Sunday 30 September 2018

picot join to the right part 2

Pin It now!

Continuing on from the previous post, not just rings, but chains too can be joined to the right in the exact same way – rotate the work on your hand so that the joining picot lies to the left of work, make a normal picot join and continue.
So instead of repeating it all over again, I will switch to images showing how to join with a down loop instead of up loop. This is for directional tatting (frontside/backside), and creates a complete ds visually.

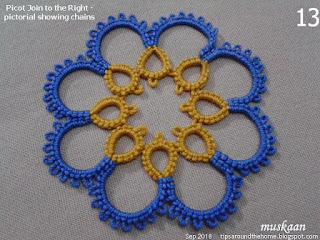
A simple enclosed space medallion was created to illustrate. Mustard colour thread in shuttle is joined to blue ball thread.
Pattern :
Ring  : 6 ± 3 – 3 – 6. reverse work
Chain: 3 (± 2)x9, - 3. rw.
Join ring to previous ring, and chain to previous chain.
         The last ring and chain will be joined on both sides. 

Picot Join to the Right - Part 2
(joining last chain to first using the down loop)

In a rosette such as the ones in Blossoms motif, rings face outward and hence a picot join to the right is needed. However, even when rings face inwards as in this medallion, the same join is required when linking back! So, in this medallion, we are using the join twice – once for rings (follow as in Part1) and then for chains.
1. The last chain is worked to the point where it needs to be linked to the first chain. 
This chain, with it’s joining picot is on the right side.

2. Start rotating the work in counterclockwise direction …

3. till we have the ball thread positioned under the picot 

4. and pull up a loop through that picot, passing shuttle through it as in any normal picot join. This can be followed by a 2nd half stitch or a complete ds.

For frontside/backside tatting, with a down loop or down join, I am restarting from image #2 - 
5. After rotating, position the ball thread above the joining picot 

 6. and pull a loop down through it, passing the shuttle through this down loop.

 7. and start closing the loop

 8. The loop is now tensioned and snug – the 2 chains are successfully linked! 
Notice both threads are above the work.

NOTE : If we want both threads to be under/at back of the work, then before starting the linkage, place both ball and shuttle under, leaving only a short segment of the ball thread over the picot, through which we can pull a loop down.   

9. Work the 2nd half stitch (along with the join, it counts as 1ds) and 2 more ds. 
This completes the last chain.


Quite a while back another relative beginner asked me where and how I tied off the 2 tails. This is how I do it (not all steps are pictured here) -
10. Needle the core thread and pierce through the base of the previous ring. (Imagine where the core thread would’ve been if it wasn’t the end).

11. The ball thread is passed through the tip/cap of the stitch on the adjacent chain. 
(again imagine or see how the threads lie in the previous segments when they are continuous).

12. I make a single overhand tie at the back, and …

13. whip stitch the core thread through the ring and the ball thread through the chain.
Leave off following the middle path mantra.
Tug and then snip off excess tail ends.


So, joining to a picot on the right of current work can be as easy as that – all a matter of perspective, and nothing to fear. And we have seen it in use in enclosed space medallions where rings faced outwards (previous rosette), and also for inward-facing rings and chains (the above medallion).

I’d like to talk a wee bit more about this join – a common threads kind of overview through various project pics.

to be continued (final part)
Related Posts
Joins in Shuttle Tatting

Friday 28 September 2018

picot join to the right part1

Pin It now!

Several weeks back an expert told me that the last to first join is not a beginner technique. I can see why, since there is a tendency for the joining picot to twist when linking to it. We are familiar with different names for this technique - twisted picot join, folded join, avoiding folded join, joining in a circle, rosette join, etc. (scroll down to I.1.b here) and excellent tutorials in various formats show us multiple ways of going about it.

But whichever method one employs it boils down to just 2 facts :
  • the joining picot is on the right side of the current ring or chain being worked; and
  • the join is ultimately a picot join.
Hence we can employ a generic term, Picot Join to the Right, irrespective of which particular movements a tatter uses to achieve it.
I understand and have tried the folded & twisted picot joins, but continue to avoid them. I get a sense of security & comfort in working it as a normal picot join. 
All I have to do is move the last picot to the left of the current tatting! 
And I consider this easy enough for any beginner to grasp and accomplish. Scroll down if this interests you …

The flowers (rosettes) in Blossoms motifs all require this join. Hence Part 1 shows how to do that last join, continue to completion, and also how I finish off the ends.

Picot Join to the Right - Part 1
( joining last ring to first in a rosette )
Only one step – rotate work to bring joining picot from right to left side!

One-shuttle pattern.
Each ring is (7–5–5–7), joined to previous ring. 7 rings total. 
Ring7 is linked to both Ring6 & Ring1, closing the medallion or circle.

 1. This is the common Picot Join where the joining picot is on the left side of the working element  (Ring7). We pull up a loop of ‘ball’ thread, pass shuttle through it, tension and snug, and continue with the second half stitch or a new double stitch.
Note
In fs/bs tatting, we pull a loop down on the frontside and then make the second half stitch.

 2. Here we have reached the point where the last ring (wip) needs to be linked to the first ring.

3. Rotate work on your hand. We do NOT have to take it off our fingers, simply rotate counterclockwise.
Notice how the picot is now on our left! Looks familiar, doesn't it?!

 4. Pull up a loop of ‘ball’ thread, just as in a picot join (as seen in #1).

5. Adjust the tension. Make sure that the core thread slides freely.
Notice how the threads are all on the front of (or above) the motif.
Note : 
If we need the threads to be at the back of the work, use this simple trick by Linda Davies

 6. Continue tatting to finish the last segment of this ring.

7. Close the ring. Picot Join to the Right has successfully completed the rosette!

Permit me to continue, to show how I end the motif. Notice there is a tiny loop (like a vsp) at the base of the first ring. I had tatted over the starting tail, but did not pull it tight. I left this tiny space for a reason...(I showed it here in more detail along with a pdf). 

8. Snip off the shuttle and thread the new tail.

 9. Insert needle through that space or loop.

10. Tug strongly at the old tail to close that gap. This also traps the new tail within.
(I sometimes use my teeth for a strong grip & pull) 

11. Bring the needle back through the space between the 2 rings 
and whip stitch through the back arcs of the last ring.

12. After whip stitching for a few stitches, tug tight and snip both tails close.

As with all techniques, what I have shown here is a viable alternative, but optional.  
We all have our favourites, and this works well for me.
I used a down loop, hence the joins all look like a complete double stitch.

This pictorial was already photographed when I received a ‘distress’ email last week, asking for help on how to proceed with the last chain after it has been joined to the first chain. I will share it in the next post since this is already pretty long.
.... Part 2 in next post 

Tuesday 25 September 2018

Usha's motifs

Pin It now!
PLEASE NOTE : The sequence of posts has altered when I was updating my posts yesterday, causing my newest post in the Cluny tatting series - hitch the loom - to mover 2 posts down, in case you were wondering or missed it. Blame it on Blooper's (err Blogger's) whimsies.

  
For the last few days I’ve been tatting up a mini-storm of Blossoms Motifs while working on the numerous pictorial presentations. A quick break was in order when Usha’s Split Ring triangle motif turned up.
The near-perfect circular rings attracted me in the first place. And circles that formed an equilateral triangle. It is certainly impressive to successfully convert such a shape into actual tatting.
Large rings - whether normal, split, or scmr - often close into a circle rather than teardrop.


In Lizbeth size 40, the sides measure 1½”.
Having mistakenly made a picot at the corner of the first ring, I repeated it for the other 2 corner rings.
In the pattern all rings are split rings. However, one can start the motif with a normal ring, and add new thread for the 2nd ring and onwards.
I ended with a normal ring, sewing in the tails. But one Can hide tails in the last split ring without sewing.
Future Idea : It would be interesting to see this motif repeated as a magic pathway to form a larger lace fabric! And notice how one can form a diamond by removing 2 and adding 1 ring ?!

Many many months back, I had also attempted Usha's Fringed Petals motif but worked only the first 3 rounds. What I liked about this is how the clever designing of 3rd round lifts the rings of the previous round, ending in a raised and curved textural effect! Notice how they are ‘normal’ in the 2nd round (above pic), but suddenly acquire that 3D look when the next round is worked (pic below)?

However, the working was fiddly and I was not quite happy working through it. I would definitely like to see more of that curving effect, though !! 
My apologies for not completing the motif - I intended to, but never got around to it. I might some day when I find where it's run off to ;-D
This motif also uses long picots with CWJ (lp_cwj), notes for which I shared here and again in the beaded version here.

An enjoyable break, thanks Usha :-))) Now back to some more pictorials - I'm on a roll and want to make the most of it while I can (but can I beat my own record of 15 posts in Sept 2017?!). I hope you will be tolerant through it all :-D

Monday 24 September 2018

colouring the Cluny

Pin It now!
The current Cluny tatting series has covered how to wind the loom and weave tallies where the loom and weaving threads are either the same colour or different colours. For many more tips, ideas, and possibilities, refer to my earlier series and posts.

We now come to the original purpose of this series – multicolour Cluny leaves or tallies – a glimpse of which you saw here last year.

As usual, let’s go progressively… 2-coloured Cluny tatting. For 2 colours to show on a tally, we will actually need 3 threads – 1 for the loom which is hidden, and 2 for the stripes that are visible.
Adding more threads allows us opportunity to play with colours for the next Cluny leaf or element(s) in a pattern.

I chose to work on a cardboard loom, weaving with a tapestry needle especially when using multiple colours. The process itself is simple, but some management of threads is required as we increase colours (threads). If we choose a flat surface to place our loom while weaving, and lay the unwanted thread on the side, it avoids tangling and weaving can be done comfortably.

To repeat – this same method works on a box loom ; and in any pattern a split ring can be substituted with a regular tally/petal/leaf, and a normal ring with a hanging Cluny leaf.

  • How to add new thread (knotless method)
  • How to hide tail of new thread
  • How to avoid the colour blip from loom thread
  
Two-Colour Cluny Tatting
(3 threads and 2-coloured striped Cluny leaf)


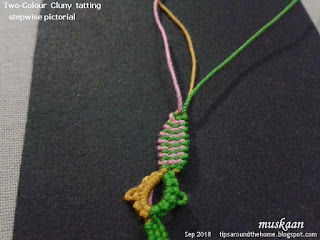
Loom/Warp thread - mustard ;
Weaving threads – Colour 1 on the right – green; Colour 2 on the left – pink
Sequence of weaving : green, pink. Colours alternate after each wrap/weave, giving a striped appearance.

You can try different visual effects: from regular stripes to broader bands to random, and from broad to hanging Cluny leaves.


1. The previous element (split ring) already has 2 colours – mustard and green. 
We will add a 3rd thread (pink) while weaving the tally.
Wind the loom as usual, with 3 Warps.
Bring green to the right (Under, Over) and leave pink on the left side.

2. Make 1 pass to the left with green (Under, Over, Under),
place pink over the green ….
(as mentioned in previous post, you can choose your own style of weaving)

 3. … and make the return pass to the right (Over, Under, Over), trapping the pink within. 
Leave a pink tail to be hidden later. 

 4. Snug and tamp down the weaves before proceeding.
Notice the new thread is captured within on the left side.

5. With pink thread, move to the right (Under, Over, Under) …
Scroll to end for 2 ways to hide this new tail. 

 6. … and back to the left (Over, Under, Over)

7. Pick up green and move to left (Under, Over, Under), and return to the right.

8. Similarly, make another weave with pink moving to the right and back to left.

9. Continue, alternating the colours as desired, and shaping the tally as you go.
This tally has 15 wraps and threads are back in their original position.

10. Pass both needles through the top loop, back to front.

 11. Both threads are through the top loop. This will hide the loom thread colour.

12. Top loop pulled off the loom and start closing the tally.

13. Top and bottom loops of the loom are closed.

14. One 2-Colour tally made.

To hide tail of new thread :
Needle the tail and weave it through the back of the tally. 
If we weave under the green thread, then the tail will not be visible at all. 
Snip off excess.

See also tip #12 for hiding tails here and Dagmar’s video here. : In pic #5 above, fold the tail behind to align with Warp1. Then, weave as normal, incorporating/encapsulating this tail within. After a few wraps, the excess tail can be snipped off. 


Next in this series is a 3-coloured broad Cluny leaf (4 Warps), and hopefully a practice pattern for these 2-coloured tallies.

The only 2- or 3-coloured Cluny tatting I have come across is by the talented and prolific Dagmar Pezzuto. In both cases, she has worked hanging Cluny petals or leaves. The principle remains the same. You can find all her Cluny patterns through Georgia’s site here.


… to be continued

Cluny Tatting Basics

Pin It now!
Last year, Georgia asked me to do coloured Cluny Tatting on a box loom starting with the basics. I used a card loom (for ease of photographing) which is exactly the same as using a box loom, except for the hollow depth of the latter. This space is created on a card loom when the Warps are pulled tight and the card curves slightly. Or by inserting a pencil or cardboard wedge to raise the loom threads (see Fig1). 
Fig1 - Card Loom with raised Warps
Secondly, while a flat card loom has notches/slits, the 3D box loom has knobs around which the thread is wound (see Fig2 - it is Tamie's pic from the Online Tatting Class) .
Fig2 - Box Loom (pic borrowed from Tamie)
All pics were ready in December 2017. But it has taken over 9 months of gestation to see the light of blog! And now when the time came, it seemed better to start with the very very basic steps which I hadn’t done previously, and then progress to colours. This can act as a refresher as well as to showcase my little tips/tweaks for ease of comparison and reference. I am not happy with the picture quality in my 2015 Cluny Tatting series. Hence this post will contain new pics, though some of the steps may have been covered then.
Due to this change, I will shift the overview and notes to next post where we start with 2 colour threads.


Cluny Tatting - the Basics 
This covers winding the loom and making a single coloured tally

Winding the Loom

A cardstock loom has been used throughout. 
The same principle applies to any kind of loom, including one’s hand.

Yellow shuttle is used to wind the loom (Warps) and red shuttle will be used for weaving. Both shuttles have same colour thread.
There are slits cut into the card loom where thread is inserted. In box loom, the winding is around the knobs. 
I started CTM, and made a ring : 3-3-3-3 before winding the loom.

 
1. Insert thread through A and out through B
2. Insert thread through C and out through D

 
3. Insert thread through E and perform ‘one small step’ from behind 
(this small step is not possible on a hand loom)
4. Pass shuttle through the back loop of A & B. 
This step ensures that closing of the tally can be done on the loom itself.  

 
5. Bring the thread from E out through F …
6. … and in through G (which is the same slit as C). 
This is optional, but I find it keep the loom thread taut at all times 
and the loom shuttle out of the way.

To raise the Warps, a folded card wedge (or pencil) is inserted at the top.

7. This side view shows the raised Warps clearly.
The loom is all set and we are now ready to start weaving our first tally.


Weaving the Tally
basic Cluny Tatting – with same thread (colour) in both shuttles.
2 threads ; 1 colour

 1. Since the previous element is on the left, 
we need to bring the weaving shuttle to the right to begin. 
Hold the ring in a pinch and pass shuttle Under and Over.
NOTE: Instead of simply passing the shuttle across, sometimes a half stitch (flipped or unflipped) is made to secure the base. I have not done it, because at times the stitch knots up for me.

2. Shuttle is in position now, and ready to start weaving.
(though not shown here, keep the ring & Warps in a pinch, as seen in Fig5 below)

 3. Move to the left – pass shuttle Under-Over-Under. 


4. 1 pass made


 5. Move to right - pass shuttle Over-Under-Over.


6. 2nd pass made 
These 2 passes form 1 wrap or weave.
Nudge the thread towards the base to keep all passes close together.

 7. Continue weaving and shaping the tally.
One tally made with 6 wraps (12 passes).


We can now begin to close the tally. Keep tally in a pinch to avoid distortion.

 8. Discard the wedge. Remove thread from slits A & B. 
This is the first loop that needs to be closed by pulling B-C from the lower end. 
Notice how that one small step (Fig4 in Winding the loom) 
has kept all other threads in place on the loom.


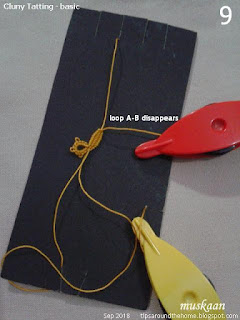
9. The A-B loop disappears.
Now we need to close the lower loop. 

10. Remove thread from E and start pulling upwards. As the lower loop (C-D) becomes smaller, remove it from the loom and close completely.
In this case the loop is twisting. Inserting a crochet hook through it weighs it down, 
allowing for a smooth knot-free closure.


11. All loops closed. 1 tally or Cluny leaf or petal made.

In the next post in this series, we begin working with a 2nd colour. All updates will be listed in the My Tutorials page. For lots more tips, resources, and potential, check out my 2015 Cluny Tatting series.

…to be continued