Friday 31 December 2021

a future perhaps

Pin It now!
 

My last post for this year, with a potential doily design! 

Imagine if my hubby felt it looked like our tatted doilies, then something good is rubbing off on him, LOL. He was scrolling for some notebooks/sketchbooks and immediately bought this for me. There is a vinyl dustcover and blank pages of good thickness. We all know what the sketches will be of ....

Wishing all my readers, followers, friends and visitors a very creative year ahead....

and stay connected...let's continue our journey together

Tuesday 28 December 2021

cupping hearts

Pin It now!

Over a year back, I struggled with cupping in this doily pattern and expert tatters offered several solutions and valuable advice. But I left it on the sidelines and only took it up again a week or so back. This is pattern #37 from Eleonore Endrucks-Leichtenstern’s German book ‘Die Schiffchen-Spitszen’,1920.

After tweaking some of the stitch counts in outer chains, it finally lays flat.... 
....but above is the fallout of my several attempts, without including all the retro-tatting and indecision that went on.
This was the crucial round (Round 4) which I just Had to get right and others would fall into place more easily. While weighing the numerous options, I hit upon my own solution which I bet you won't be able to identify! 
The above combo shows Endrucks' original model with my modified one. Can you guess the difference? 
HINT: It lies within the square/diamond motif.

Now I have tons to share about that motif, some of which is already written about/hinted at here - https://tipsaroundthehome.blogspot.com/2020/11/arranging-motifs.html
I had started to diagram the motifs to show the different paths, but this last week I haven't been able to allot time or focus to anything other than some actual tatting for an hour or 2 daily. So the pattern itself will also take time to be presented. My apologies for this inordinate delay, that will spill into 2022.

So what do you think? does the modified model look okay? I tried to keep the tweaks minimal, without disturbing the original shape as far as possible.

The doily is worked in Anchor pearl cotton, size 8 and measures just under 10.5 cms across from the extreme tips. Perle cotton is flexible to work with. But would the tweaks hold up in mercerised cotton? Only one way to find out - tat one more doily in size 40. 

But look what I discovered ... 3 possible heart patterns!  I Spy Hearts, as Anita would say! Here's what she wrote when I showed these to her - “Each heart design can be an individual heart, a row of hearts made into an edging, implemented into a design, etc. So much fun.”

Heart #1 - after round 5 ;

Heart #2 - after round 6 ; and,

Heart #3 - after round 8. the final round. I figured out a way to work it in one pass through a rough sketch.
Something to look forward to for the 2022 heart season in February ;-D


All links and details, including all modernised patterns can be found in the Endrucks 1920 Project document here -

Friday 24 December 2021

block your tree

Pin It now!

Guess what! Ninetta played Santa and shared a cute edging pattern as gift. One more inspired fallout from the 100 year patterns of Frau Endrucks.

Christmassy Edging or Bordino Natalizio by Ninetta Caruso – click to download the pattern pdf – https://drive.google.com/file/d/1kvgQKW6lXclzK8wIspwm6busbrI0e7Mu/view

When Ninetta first shared her prototype motif – yes, she couldn’t contain her excitement – I thought she was going to turn it into a star or snowflake! I guess it can still be done.

Pattern/notes for both single and 2-colour versions is included in the pdf. Anna Tedesco helped in it's translation to Italian, too.
There are several ways in which we can choose where to place which colour, in the 2-colour model. 5 such methods are listed in the Lock Join Plus series, and links are given for individual pictorials here - https://drive.google.com/file/d/17zsM3JaLO7r0ajg8VOnv5IcJ-kLNqEiU/view

Recently when she sent the longer version, my imagination went haywire! My first impression was that of a bird. (I roughly sketched some elements to highlight the shape over the tatted models...)
Is it a peacock? Is it a pigeon? Perhaps it is a Christmas rooster to take to mass (Misa del Gallo)? Or should it have been a turkey for Thanksgiving?

The tree itself can easily be adapted into a bell, too! Or perhaps a turban or an elf's hat?
Hubby got into the visual game and agreed with the bird analogies. But he loved the sense of movement in this white version. He felt there was some creepy crawly moving surreptitiously but couldn’t make up his mind whether it was a a snail, caterpillar or snake.

So, what do You see?

Mind you, though inspired by Endrucks’ Ninetta did not actually refer to any single pattern or motif when designing this! It was only when she sent the draft and asked me, that I told her about the similarity in pattern #17 block. The ‘blocks’ in this book have such a wide range of shapes, visual effects, as well as some difference in actual tatting, leading to infinite possibilities. Never-ending ideas! I have collated many examples – both original and also some variations by our volunteers, and will showcase them in future. Quite an eye-opener.

Hope you enjoy tatting this clever and cute edging (or any of the ideas thereof) and when you share on social media, remember to use the hashtag #Endrucks1920Project, so that your version comes up in a search.

You can find all of Endrucks' patterns (& derivations) in modern style here -
https://docs.google.com/document/d/17LEVftXweztBIOWh4sL4BB7bX65ssoOsOn4oXIgCepY/view

Many many thanks to Ninetta for this wonderful gift!

Thursday 23 December 2021

rose in my heart

Pin It now!
tatted by Jeanie 
https://tipsaroundthehome.blogspot.com/2019/12/hidden-treasures.html

 I woke up to devastating news this morning. Who knew that the angels I posted yesterday would see my own friend joining them. 

Jeanie was a very special friend. So many tatters have touched my life in various degrees during the last 8 years, but she was 1 of only 5 tatting cyber friends after whom even my hubby asked periodically. 

She approached me around 5 or 6 years back with some questions and it was always such a pleasure to discuss and debate tatting with her. She wouldn't rest till she understood the concept or principle, and never shied from questioning, learning, improving, perfecting. Boundless curiosity and positivity. The true hallmark of a good teacher.

A septuagenarian with a dream, a mission and despite whatever snags life threw at her, she never flinched and carried on relentlessly. I feel honored that she included me in her dream to publish a tatting manual-dictionary. She had worked on her book for 7 years when she emailed a digital copy for review and course-correction, if any. Oh, we had some spectacular discussions with mutual benefits. 

Graceful through all her ordeals during recent years, which set back her book and limited our conversations (she always came first, though), she still worked on it daily as much as she could. Tenacious and persistent, yet with a strong streak of perfectionism. She wanted her book to include the latest in tatting knowledge, and reflect her best possible ability, to fill in the lacuna in our tatting world where terms and definitions are often confusing or missing.

Self-effacing! She never bragged about her accomplishments. Whatever glimpses I got of positions she held or chaired or tutored, were when my search for something else threw up a reference to her.  Despite all her  experience and expertise, she was graciously willing to concede if/when she was 'wrong' and change accordingly. 

The last I heard from her was a short update about herself, knowing that I would worry if the silence latest too long. Even in the most dire times, I never detected any note of complaint - she was always like a warrior on the field. And a week back I found something to extend one of our discussions, and was thrilled to email it to her. I doubt now whether she got a chance to read it.

There is so much my heavy heart, with moist eyes, can continue to write about her. I will miss this sweet, strong lady tremendously. A true angel on earth who taught me many life lessons, my husband joins me in sending heartfelt condolences to her bereaved family and friends. 

May she continue to tat with the angels.

Wednesday 22 December 2021

tiny angel with big message

Pin It now!

 Recently Margaret shared a memory of her cute mini tatted angels (https://margaretsdesignercards.blogspot.com/2015/12/decembers-pinterest-challenge-choir-of.html) and it reminded me of the ones Anita Barry had shared last year (https://tipsaroundthehome.blogspot.com/2020/02/happy-birthday-georgia.html). 

Huh. turns out neither of us remembered to upload the pattern for the white ones, after Anita taught them at the Palmetto Tat Days 2020. Got the wheels in motion and no better time than the present to present these tiny dancing angels.

Itsy-Bitsy Angels pattern (click to download)
https://drive.google.com/file/d/1jWQGGWH5E5hMKZGG_cWkbEQ26o1Q0Lad/view

As you can see, this can be worked as a single angel or a row of angels. A rings-only design, the pattern uses a single shuttle, working the wings as folded SSSRs to work continuously. However these can be worked as split rings if one wishes to tat with 2 shuttles. 

The flexibility of this edging adapts to any shape we desire - a round or oval garland, a straight edging, a square or any other polygon! It can make a cute frame.

And, Laura Angel pattern
https://drive.google.com/file/d/12NJtxEWk6jyl_H0i2upSi_CNWZfWpaR9/view?usp=sharing

Hope you enjoy these quick tiny tats that carry a big message within them (read it in the pdf).
So get out those shuttles with leftover threads from all the snowflakes you tatted, and quickly belt out these little angels!

Many many thanks to Anita for sharing her patterns. 

Sunday 12 December 2021

inward picot with marker

Pin It now! Often a picot is required on the core thread. But when the core thread is pulled to snug stitches, the 'picot' would disappear! In order to hold this picot in place till we need it for joining, a temporary marker or holder is inserted in a loop of the core thread. Most common is the paper clip, but coil-less safety pin, scrap thread, stitch marker, etc, are also employed.

TIP: Always remember that the thickness of the marker/holder will affect the size of the picot formed. Hence choose a marker carefully.

This is a common enough picot and you must have your own method down pat. But if I am not careful mine turn out to be fiddly to handle (with marker getting in the way) and untidy or twisty. Yet this method gives the best visual result. So here's what I do to keep the inward picot tiny and neat ---

Inward Facing Picot in normal tatting –

1. Pull a longish loop of the core thread. Make the first DS. Then insert marker.
https://tipsaroundthehome.blogspot.com/2016/07/double-duty-due-to-delegated-dusting.html
2. Continue to tat at least 2 to 4 stitches, before snugging the stitches and closing the loop.

Advantages –
  1. Avoids any gapsosis in the knotting/chain thread, keeping the stitch before and after the picot close together.
  2. The picot on the core thread remains tiny or the required size.
  3. No twisting of chain/element.
  4. The marker does not get in the way of working.
2 motifs/repeats have been worked above....
...and when it is time to join, remove the paperclip and join through that tiny loop, taking care to not let it slide and hide! A crochet hook is handy.

Inward-facing picots in direct tatting
 – 

For direct tatted chains, where reverse (unflipped) stitches are worked, Ninetta demonstrates how she twists the marker to hold the picot in place. https://youtu.be/d02yb-cKSLI 
This twist makes it easier to hold the picot and work unhindered.

TIP: It is important to realise that this twist adds some length to the picot. Hence choose a marker that is finer than the required picot size.
        Alternate solution: Once all stitches are completed in that chain, untwist the marker and pull the core thread taut. This will bring the picot to desired size.

We can actually use this twist for the normally tatted chain, too, instead of leaving the loop long as photographed above. And when it is time to snug, untwist and remove slack from the core thread.


There are many other ways to make such inward, downward, starter, or drop picots (https://ninettacaruso.blogspot.com/2017/10/fun-or-fan-in-direct-tatting.html). Since the most common is using a paperclip the above tips are limited to markers. 
This post is in response to a recently raised query. 

Tuesday 30 November 2021

peel the beet

Pin It now!

One of the staples in my fridge is raw beetroot pickle. Ages back my friend had shared this simple recipe but the tip on how to peel raw beetroot was my Mom's. Mom had such a curious nature and never stopped learning and experimenting.

Scrub and clean raw beetroots in water. Dunk them fully in clean water and refrigerate overnight. I often leave it for longer, depending on my mood or if I get busy. The thickness of skin might also affect the time, so try it out...
Notice that hardly any colour has seeped out.

Next day, cut off the tapering portion (not on the leaf side) and with a simple knife start peeling the skin back like a banana! No need for a peeler, etc. I actually enjoy it ;-D

Well the next step is grating the beet. Make a solution of cider vinegar, sugar (I use either brown sugar or boora), pinch of salt, pepper. Mix in the grated beet, put in an air-tight jar, and refrigerate. It can be eaten immediately, but certainly the next day onwards.

I hate cooked beet. So this recipe is something that appeals to me and is a quick replacement for a proper salad. A healthy side adding tangy sweetness. It goes well with so many cuisines!

How do you prepare and eat your beets?

Monday 29 November 2021

the foster child

Pin It now!

Reworked patterns from Frau Eleonore Endrucks-Leichtenstern’s ‘Die Schiffchen-Spitszen’, 1920, for Endrucks 1920 Project.

Don’t these look like folk dancers with frilly skirts and knocking elbows! Now add a head to each to complete the ladies…. A single motif, with a bit of addition, could become an angel or Crinoline lady.

Endrucks' pattern #7 pdf (click to download): https://drive.google.com/file/d/1UDNg-1W6LJ3pyrn_Umz5f33BF01_92-E/view

This little pattern has interested many tatters and each ‘foster family’ loved and groomed it to their best ability. But each home wanted something even better for the foster child that they could not provide, hence the child travelled, leaving behind a virtual trail of trials and learning, until the final adoption.

adopting, not foisting, the foster child...
House #1 (Ayşe Özgür): An enthusiastic & immediate start but life halted for 10-11 months.
        Starts with chain and work moves form right to left. Good use of 3 colours.
House #2 (Douglas Hill): Enthusiastic choice in the 2nd volunteer list, and mutual collaboration, # 2 conceded that #3 (adaptation & tatting) was better.
        Starts with chain, with inward picots for bilateral symmetry, and work moves from right to left.
House #3 (Julie Santos Villegas): An immediate & willing response but later needed help which #4 provided, but health forced another shift.
        Starts with a ring and work moves from left to right..
House #4 (muskaan): Formally adopted and continued to maturity.
        Starts with a ring and work moves from left to right. With options shared.


TWoT (This Way or Tat?) and Diagram Notes :
original model
Considering Frau Endrucks did not like decorative picots, all her edgings have a line of free picots along the top side (as seen in her tatted model pics) ostensibly to sew down the lace along that side while the other dangled.
original diagram
However her diagrams are ‘upside-down’ and this line of picots lies along the bottom.

But there is a 3rd aspect. Her diagrams are read from left to right. Most of the patterns start with a chain, and when we actually tat a chain normally (not direct tatting) and continue, the working progresses from right to left (as in Houses 1 & 2).
I find myself doing mental & physical callisthenics in order to sync her diagram with the work in my hand. I like to know where/how my very first element faces, and where the threads emerge to continue – this orients me correctly till the very end. This is especially true for her patterns which involve frequent changes in direction.

Hence there are 2 solutions I have employed –
original diagram flipped
1. Try to start the pattern with a ring. It has obvious advantages, including CTM and hiding tails. It is how I presented this pattern, shifting the start from a chain to a side ring. (Julie had first started her adaptation sampler with the central ring and diagrammed it accordingly, moving from right to left). Now the work progresses from left to right as in the diagram. 
2. Draw a working diagram where we follow the pattern exactly as Endrucks has written starting with a chain, but the diagram shows this first element on the right instead of left. And the diagram then moves leftward (as in the flipped diagram above). No need for any brain callisthenics – simply lay the work against the diagram and you are facing the ‘right’ way.

One more common feature of several patterns is that the central ring at the base (from which chains radiate) is tatted at the end of the motif. The only reason I can think of is to make it easy for a designer to estimate how large the ring should be and avoid multiple prototypes. Anyways, several of our pdfs show this ring as per the original. I have always shifted it towards the start of the motif joining chains to it, rather than joining the ring to chains.

TIP:  Potential Pitfall : Joining to the wrong picot!
 
This is one area where I frequently made a mistake and had to retrace my steps! This final one I noticed too late but fixed it by carefully snipping the joined picot (and glued the cut ends), and sewed the correct picot in place. 
This is the 1st motif I tatted in early October to understand and explain the pattern to House#3. By November, I had to tat one more (no pic) to refresh my short memory and then went on to the sampler below ...
Each motif, especially with decorative picots, has the shape of a petal. 
Gather up a row of motifs to create a 3D flower! Alter the length and width 
and you get more layers and visual variety!
Of the 4 motifs in the sampler, the first 2 follow the pattern, each colour giving a clear idea of which shuttle forms the core thread, in other words, which shuttle is in the hand.

In the 3rd & 4th motifs, I added decorative picots along the top edge of the rings, and Catherine Wheel Joins in some chains for a smoother look. Remember to count the CWJ as 1 stitch (as in 4th); notice how smooth and symmetrical the inner negative space is? I also played with colour placement, using Reverse Join, Twist Work, etc. (see Lock Join Plus for more options).

This is one more idea I had – tat the entire motif with bilateral symmetry. The best part? No need for paper clips and inward picots - no BBT (block below tatting)! Notice the central ring is worked as a split ring and the innermost left chain is tatted first. 
But some tweaking is required especially on the right side ... when I get my bearings back ;-P

Before signing out, let me quote my partner Ninetta -
I would say one more time that this project taught us a lot also in terms of collaboration. The n.7 changed family but each time "we" added a new piece in the puzzle, that is always an improvement, for both understanding the pattern and learning how to present the modernized version.

Remember, you can find all of Endrucks' patterns (& derivations) in English here - 

Wednesday 24 November 2021

willing non-volunteer

Pin It now!

Sounds crazy oxymoronic? Read on …

We have just thanked our very first volunteer, Mariantonietta here https://ninettacaruso.blogspot.com/2021/11/willing-volunteer.html and now we take equal pleasure in thanking Julie, our last ‘voluntary non-volunteer’.
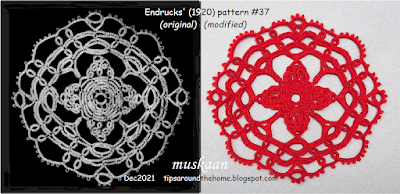
In Nov 2020 volunteers had chosen pattern(s) from Endrucks’ book to tat and present in modern forma,. Over time 3 of our volunteers had to step back for personal reasons and mid-2021 we opened up their selections for pickings. They were pounced upon and selection was closed.  

Direct link to pdf (updated version) - https://drive.google.com/file/d/1SmqcWxtPAlvveValWZmTlq-tHucSa6wr/view

It just so happened that Julie Santos Villegas was in neither of these volunteer lists. Yet, she could not contain her enthusiasm and almost overnight she tatted pattern n.7 and shared her sampler which was slightly modified from the original. When asked if she would like to present her work in a proper pdf with pattern, she readily and whole-heartedly agreed, roping in her son to diagram it too!

Does ‘willing non-volunteer’ makes sense now? Turned out Julie was the last person to make it to the community project since all patterns were finally chosen at the time. Few changes occurred subsequently but the story will continue in respective posts. Mind you, we still have to introduce and thank many more contributors since we are not following any chronological order. And new ones are cropping up in our FB Group, too!

Throughout our collaboration and engagement, Julie has been enthusiastic, responsive and receptive in equal measure -  a true team player. It has been a pleasure to get to know her. Her son, Robbie, has been instrumental in drawing the diagram(s).

Julie had started her first sampler from the lower central ring (starred in above pic) instead of with a chain as in the original and we uploaded the pdf in July. Since then she altered the start to the side ring and also tatted a 2-colour sampler and included a written pattern so that more tatters could benefit. Robbie had to alter the diagram. They make a good mother-son team and we thank them both! 

She graciously shared her tatting journey …..

“I learned tatting in high school. I remember having a good teacher who constantly reminded me of my thread tension. I enjoyed the craft so much that I tatted a green edging for a blouse collar. It was just rings and bare thread. College and adult life followed and tatting was completely forgotten until I retired in 2008. Thinking of what to do next to occupy my retirement, I looked back to what I enjoyed most doing when I was younger. Thankfully the Internet was already dominating our lives. I googled “tatting” and the rest is history. Through you tube I learned from generous tatting masters how to make chains, cluny, split rings, onion rings and many more. There is a lot more to learn but I am not complaining. I think tatting and I will grow old together.”

Her last sentence is quite philosophical and a good way to ‘grow’…

Ninetta joins me in thanking Julie for her willing contribution, team spirit and enthusiasm.

**********************

Endrucks 1920 Project is a community project, we welcome every one of you to join in and enjoy the modern-style pdfs that have been uploaded! Please let us know where we can find your renditions and derivative tatting!

We created the hashtag #Endrucks1920Project, so please use it for your pics to show up in a search.

*** NEW! *** We have a Facebook Group (please read the group’s description and rules before asking to join) – “Endrucks 1920 Project”: https://www.facebook.com/groups/1235560633606162   

We all enjoy sharing and experimenting and the group is waiting for you!  All info and links (original and modern) are in the Endrucks 1920 Project Document, here: https://docs.google.com/document/d/17LEVftXweztBIOWh4sL4BB7bX65ssoOsOn4oXIgCepY/view

Remember there are many more modernised patterns, derived and extracted patterns/ideas, already listed in the project document, with more still to come! So, do visit and scroll through.

*********************
With love and gratitude,
muskaan & Ninetta

Saturday 20 November 2021

from one to many

Pin It now!

...in evolutionary steps

Reworked patterns from Frau Eleonore Endrucks-Leichtenstern’s ‘Die Schiffchen-Spitszen’, 1920, for Endrucks 1920 Project.

Pattern #1 from this antique book has progressed in evolutionary steps … I found myself picking it up every alternate year starting with 2015! There are written and typed notes, hand sketches and Inkscape diagrams, tweaked pathways and orientations, umpteen photographs and WIP/UFO adaptations – all witness to the slow and sporadic progress (the folders in my compy total over 135MB in size! Most of it is now fossilized).... Till this final stage resulting in stepwise pictorial and pdf.

Pattern #1 edging with modified pathway 
download Happy Hands pdf (straight and circular edgings and sunflower with modified pathway for symmetry) : 
 https://drive.google.com/file/d/1IRlJ7bnx-c27PYtgXymx_ps-KL2pen_m/view

I called this Happy Hands edging because that’s what came through – 2 happy hands raised above the head – is it a yahoo, a prayer, or a pirouette? With our tatting tension, the original edging tends to curve. The connecting chain is doubled to straighten it out.

 
Happy Hands Coaster was tatted in 2015 (the center was added this year) and I used double and triple picots to fill in spaces and add some frills. Disappointed with my picots. I used Endrucks' original pathway where all long chains face the same way.

Happy Hands Sunflower is what evolved from that coaster and makes me happy- 


Happy Hands Heart is a single motif extracted and adapted into a heart shape. 
    Needle tatting tips were shared by Pam Hemenway - 
    Happy Hands Shamrock is 3 hearts tatted continuously by Diana Howe! 
    Pattern - https://tipsaroundthehome.blogspot.com/2021/03/lucky-hands.html

Evolution is a slow process, but this heart branched out into several offshoots in rapid succession.
His Kid (Sue B) used it as a mermaid flukehttp://hiskid66.blogspot.com/2021/03/inspired-by-muskaan.html and joined 2 for a lovely butterflyhttp://hiskid66.blogspot.com/2021/03/inspired-by-muskaan-2.html

And if we add a 2nd colour and beads into the mix, the possibilities of visual effects increase manifold.

 
The stepwise pictorial which shows a few colour options can be accessed here  - https://tipsaroundthehome.blogspot.com/2021/03/balancing-act.html 

Happy Hands Beaded Necklace or choker wannabe (tatted in 2019). Increase the length of the 'hands' - graduated motifs - and we have a beautiful broader version. Or tat a single motif for earrings or brooch! I have handwritten notes and a single motif prototype for the beaded necklace, but the final version will take a while.

My fascination with this book is not that the patterns are beautiful – far from it. Her contemporaries published elegant patterns. Frau Endrucks’ elegance lies in her clever construction and the many possibilities that each pattern provides as you will see when you scroll through the modernised versions.  

I am reminded of this oft-quoted couplet by Majrooh Sultanpuri -
        maiñ akelā hī chalā thā jānib-e-manzil magar
        log saath aate ga.e aur kārvāñ bantā gayā

Literal translation - I started towards my destination all alone but
                                Others kept joining me and we became a caravan (group).

It was my solo mission to convert every pattern from the 1920 book into modern style. Then Ninetta joined me and gradually we evolved into a community, each tatting 1 or more patterns. Now one year later we have gone one step further and created a Facebook Group – Endrucks 1920 Project. (https://www.facebook.com/groups/1235560633606162) dedicated solely to this book (original/modern) and pattern offshoots and showcasing all past and future models!  

For the present, despite being a publicly visible group, the membership is strictly limited to tatters who have already tatted an Endrucks’ pattern in any form. Send us (Ninetta and I are admin) a pic of your work and we will gladly send an invitation.

Our objective is to be a focused group rather than a general tatting group. But a lot of interactive discussion, etc.is in the works!

All links are listed in our Endrucks 1920 Project document here - https://docs.google.com/document/d/17LEVftXweztBIOWh4sL4BB7bX65ssoOsOn4oXIgCepY/view

Reiko Akamatsu tatted the modern version in the above collage. This is actually her 3rd cover tat, one in 2020 and then a prototype for our Project presentation  (https://ninettacaruso.blogspot.com/2021/08/love-for-lace-music-and-nature-driven.html). She is holding a solo exhibition in Hyogo, Japan of her tatted lace and quilting, with focus on Mike Lyon's Lagniappe and our very own Endrucks 1920 Project! She even shared a virtual tour of the exhibition in out FB group! She has tatted so many models from the book and contributed a lot to our group. UPDATE: Nov 21, 2021 Reiko has uploaded the virtual tour in her feed ... check out this link -  https://www.facebook.com/100001649732912/videos/222462399961645/

.....aur kārvāñ bantā gayā

Saturday 6 November 2021

fooled by the tool

Pin It now!
It is always such a thrill to see my pattern crop up and even more so when it comes in such wonderful versions with impeccable tatting. So which tool did these talented artists use to tat?

I have chosen a very small selection of the many that are gladdening my heart and eyes; these are presented here in chronological order. They are all needle-tatted from my patterns that were presented for the shuttle.

needle-tatted by Gloria Nelson, June 2019

Gloria Nelson's modification of the Paisley Snowflake with graduated picots has brought more character to the flake, and the design and variegate fell in sync! But can you tell it is needle-tatted?

New tatters often ask which tool is better or easier - needle or shuttle. Valid question but no easy or straightforward answers. There are tatters who spent their life using one tool and muscular ailment forced them to change to the other because their love for the craft overpowered their discomfort. On the other hand a tatter may stick with the first tool s/he learned on, for their entire life without any curiousity to try another. Then there are those who deliberately learn tatting with the other tool (&/or hand as Eliz Davis did) in order to become more proficient at teaching and diversify their knowledge.

Ninetta Caruso said it best - hand is the tool

We could take this quite literally, too! Teri Dusenbury used finger tatting a lot. Hey, where's that tool now? And for the truly determined one hand will get the task done as Marilee Rockeley has demonstrated.

needle-tatted by Amarilys Cwb, Sept 2021 
Amarilys Cwb made some mistakes in this first attempt (not that I had noticed any) and worked it a 2nd time below with minor adjustment to picot size on chains.  
needle-tatted by Amarilys Cwb, Sept 2021

Second attempt of the Silver Linings Snowflake by this tatter from Brazil who can work with both needle and shuttle.

For some reason, probably starting with it being a late entrant, the needle has been looked down on as the stepsister in tatting. To date some purists consider only shuttle as the legitimate tool for tatting. 

Why? Look at the numerous patterns Nicola Gooday Bowersox has shared with us for free. I could never identify from only seeing her model that it was needle tatted! Could you tell? 

needle-tatted by Amarilys Cwb, Oct 2021
What about this gorgeous rendition of the Floating Beads earrings?! I had to ask Amarilys whether it was done with a needle or shuttle! Those cute beads really transform my simple pattern with 'boring' pearl beads, into something fun and enticing.

Elena Kozinenko is proficient with all tools be it shuttle, needle, or a cro-tatting hook. Even a netting needle! And unless she points out, one would never guess whether she used a needle or shuttle. I asked her which tool is her favourite and this is what she says - 
'I have absolutely no choice. It all depends on the idea that needs to be implemented and even on the mood!'
Oh, to have that kind of flexibility! She has such a range of patterns and frequently uploads videos that demonstrate a technique using each of the 3 tools - https://fairylace.kozinenko.com/three-types-of-tatting/

needle-tatted by Lella Loops, Nov 2021
Lella Loops is yet another needle-tatter who has such finesse with her needle! Besides this recent Frost Flower Snowflake, she has tatted a few more of my patterns earlier and wowed me every time!


Returning to Gloria Nelson, she needs no introduction! She frequently shares her expertise with her Facebook group for needle tatters. If we follow and apply her tips, the usual 'visual identifiers' of needle tatting will disappear! 
But here are a few of her must-read articles, shared in her Sparkling Light Creation Studio page https://m.facebook.com/story.php?story_fbid=1774052256037040&id=724059564369653
  • Needle and Shuttle – What’s the Difference?
  • Can a needle tatter follow shuttle videos and tutorials
  • Patterns - Can a Needle make shuttle patterns
So any tool in the right (or left!) hands, combined with the passion to lace, is ultimately what matters. And the journey's enjoyment for accompaniment...


As an aside .... I have wondered for years how needle tatters feel when shuttle tatters collectors display their collection of shuttles? There is such a Vast range to choose from, with new designs, materials, and decorations coming out frequently. Now a tatting needle can be so boring in that sense, except perhaps for the material used? 
 
At the very least, why can't the needles be colour-coded for size at the eye end? eg these tapestry and chenille needles from Pony - https://tipsaroundthehome.blogspot.com/2018/08/needle-tips.html 
Or can some kind of fortified coloured plastic needles for tatting? 
Can needle-tatters come up with ideas to share with suppliers and manufacturers to make the needles prettier and more of a collectors' item?

I'd like to thank each of the tatters mentioned in this post for all their dedicated and inspiring work. 
I want to stress that they constitute a very thin slice of the talented multitude,
all of who I cannot name or might not even know of. 


All patterns mentioned in the post are free and can be found here - https://tipsaroundthehome.blogspot.com/p/patterns-designs.html