Showing posts with label shamrock. Show all posts

Friday, 26 December 2025

full of options tatting

Pin It now!

 In our endeavour since July 2025 to update patterns in our Endrucks 1920 Project collection, some PDFs posed a dilemma. For instance whether to leave the E1 shamrock and it's butterfly offshoot in the same PDF or to separate them. A survey in our FB group voted overwhelmingly in favour of the former. We took the opportunity to include a stepwise pictorial, add some missing portions, as well as options to work certain parts through some mini-pictorials.

E1 Happy Hands Shamrock and Butterfly by Diana Howe and Muskaan : 
https://drive.google.com/file/d/1_D5xY68NyfsKMB4LDr0GUv-WYC0VCba6/view (updated pattern link)

Following are some notable features -

This Way or Tat? (TWoT Notes): This is one of those patterns where many paths and options are possible.  Diana had diagrammed both clockwise and counterclockwise pathways (my E1 Happy Hands Heart from which it was derived could also be worked either way), and my working of the shamrock followed a third. Since it is a two shuttle pattern, just follow the shuttle which is in the right position, but adjust the instructions accordingly.  

I used contrasting colours in size 10 knitting cotton for the pictorial to clearly indicate which shuttle is in use.
Dimpled Yorkie: Since the heart ring is fairly large, it is a good idea to apply the two-step closure option as in the dimpled yorkie. Notice the bare thread on the left, just before the ring starts? It is part of the false picot ....

False Picot: Since there will be two back and forth chains at the base of the heart, a false picot is needed to prevent overcrowding. And the bare threads need to be long enough to accommodate them.

False Picot v/s Mock Picot): I distinguish between a false picot and a mock picot. The former is just bare thread left before and/or after an element to simulate a picot. The latter usually uses an overhand tie, a lock stitch, or a paperclip/spacer to make the picot. False picot is a much more vintage term than a mock picot, often used interchangeably, and the construction is left to the discretion of the tatter. However one should be aware of this since it may affect which of the two shuttles you will be using to continue. Does it coincide with what the designer intended? If not, the tatter will need to adapt accordingly.

Lock Join and Under-Over Join (U-OJ) aka Alligator Join: During my early trials with the original E1 pattern, I finally settled on making a lock join through the false picot in order to keep the chain in place. This was followed by ensuring that the two threads/shuttles were on either side of the picot (one above and one under).  
However the lock join can be eliminated completely and only the U-OJ can be used if so desired. And which thread you wish to keep above and which under is entirely up to the tatter. Just make sure to adjust instructions accordingly.

The first heart motif is complete in the above image. 

Armadillo join: While in the above model we went with the original consecutive joins (picot join on top and lock join below), this can be substituted with the armadillo join as explained in my previous post. https://tipsaroundthehome.blogspot.com/2025/12/armadillo-join.html . 

Over The Top Join (OTT): This is an adaptation of the U-O join when the space is too small for a shuttle to pass under (or one forgets to position the shuttles ahead of the final chain segment in the pattern). Above image shows Ninetta working it in the 2nd or 3rd repeat.

 
Ninetta's E1 shamrock and butterfly versions! Can't thank her enough for all her enthusiastic and prompt support in so many unexpected ways!

Stem : Diana recommended the BDS or padded chain for a stem. However, any decorative chain or cord can be applied such as the lock chain in above model, a pearl tatted chain, etc. 

Never let it be said that tatting is just rings and chains and picots, LOL.

We will soon be releasing the EP Tutorials document which endeavours to list all tatting techniques, effects, and terms used in the Endrucks patterns - original, reworked, and derived. Until then you can find tutorial links in the Tatting Resources tab above (https://tipsaroundthehome.blogspot.com/p/tatting-resources.html).

Please give credit to the designer and pattern, and use the tag #Endrucks1920Project when you post your version of the pattern.

Saturday, 3 September 2022

who knew

Pin It now! Well we already know that so many variations, applications, and derivations have arisen from one single edging from the German book ‘Die Schiffchen-Spitzen’,1920, by Frau Eleonore Endrucks-Leichtenstern. The edging #1 was first taken apart to create a heart which was then put together to create a shamrock (and so many butterflies as shown in previous post
But who knew a butterfly still lurked in the folds of the shamrock leaf?! 

However, I'm getting ahead of myself. Let me first share a proper pattern pdf of the Happy Hands Shamrock by Diana Howehttps://drive.google.com/file/d/1_D5xY68NyfsKMB4LDr0GUv-WYC0VCba6/view which was first posted here- https://tipsaroundthehome.blogspot.com/2021/03/lucky-hands.html

As I worked the leaf I found myself following a slightly different path to tat the heart from those described and drawn by Diana or in the Happy Hands Heart pattern. The reason was that I followed the threads when climbing into the 1st heart; the threads formed a nice false picot.
However, this simply reinforces the fact that there are multiple paths and options and the tatter can decide.
In Anchor size 20 shamrock approximately measures 5.5 cms across and 4.5 cms high. (without stem)
And after completing the 2nd heart motif, look what emerged! A butterfly with a built-in head.
Folded the 'wings' a bit and loved the shape of the butterfly enough to tat another with a proper head....
Added beads for eyes, too. Everything, except a slightly tweaked count for the head, remains the same.
And the final tails make the antennae so no ends to hide. The head pattern diagram in included in the pdf. https://drive.google.com/file/d/1_D5xY68NyfsKMB4LDr0GUv-WYC0VCba6/view

The Happy Hands Butterfly in different stages of flight and motion :-D
In Anchor size 20, it is 6cms wide and 4.5cms tall.

Future Ideas : 
  • Add a 4th heart to the shamrock and we have a four-leaf clover. 
  • Hubby thought the inverted shamrock looked more like a capsicum or apple. Hmmmm, something to think about for the future!
  • How about decorative picots, and gems, etc. to embellish the butterfly?
☘☘☘☘☘
And great news! My complimentary copy of the IOLI Bulletin Summer 2022 (42-4) issue finally landed on my doorstep after 2 whole months of flight. This carries the 1st of a 3-series article on Endrucks 1920 Project.
☘☘☘☘☘

Find all original and adapted patterns, and a whole lot more, in our Endrucks 1920 Project document (EP doc) here - 

Many many thanks, Diana! It's been a pleasure corresponding with you ...

Saturday, 8 January 2022

here we go again

Pin It now!

 I shouldn't, but I am! Yeah, I should've been working on my numerous commitments, but these hearts were calling to me and I am taking life easy and don't want to regret my actions/inactions. Being tiny, they kind of fit into my Life Interrupted, so there! 

1 & 2 were what I shared yesterday - https://tipsaroundthehome.blogspot.com/2022/01/hearty-round-robin.html and they needed improvement. Enter trials 3 & 4 respectively.

I tried 2 things together. One was to make asymmetrical split rings (thanks, AlenAlea Rako), and the other was adding another row of chains below. I also added more joining picots for stability.

Trial #4 is the picoted version of trial #2 - gentle gradation - and I like it. 
TIP: This version can be made with shuttle and ball by using any of the Lock Join Plus options to change direction. ( https://drive.google.com/file/d/17zsM3JaLO7r0ajg8VOnv5IcJ-kLNqEiU/view )

Forgot to include this yesterday. The encircled portion is the heart I am trying to make. Notice how it is much broader here than in my free-standing ones? I tried to mimic the count for the most part in my first trials. But it is the pull from the rest of the round(s) that creates this stretched shape. Perle cotton versus mercerised cotton could also be playing a small part.

Here are the old and new versions together. Is there any improvement? I'm not so sure. And because I added a stabilizing picot for the long chains, the arch is higher than wider, changing the overall outline.
Picots are missing because I wasn't sure of the new count, but I think addition of decorative picots would certainly lift it up. 
Here the picots definitely perk things up! I even considered a Josephine Ring on the inner chain but Mickey Mouse came to mind.
Future idea - Make those 3 inner picots long and joined later to the curved chains, thus filling the negative space.
3 hearts in a Shamrock arrangement, just like Diana Howe had done with the Happy Heart from Endrucks' pattern #1 - https://tipsaroundthehome.blogspot.com/2021/03/lucky-hands.html

TWoT Notes: Interestingly, of the 4 hearts, 3 follow a different sequence/path! It helps to tat in multiples - each time you get a clearer picture, you focus on subsequent or peripheral aspects, .... and small pieces are just right to tat multiple times, LOL.  

So, dear tatters, what's your opinion and feedback? Which patterns should I share?

Saturday, 20 November 2021

from one to many

Pin It now!

...in evolutionary steps

Reworked patterns from Frau Eleonore Endrucks-Leichtenstern’s ‘Die Schiffchen-Spitzen’, 1920, for Endrucks 1920 Project.

Pattern #1 from this antique book has progressed in evolutionary steps … I found myself picking it up every alternate year starting with 2015! There are written and typed notes, hand sketches and Inkscape diagrams, tweaked pathways and orientations, umpteen photographs and WIP/UFO adaptations – all witness to the slow and sporadic progress (the folders in my compy total over 135MB in size! Most of it is now fossilized).... Till this final stage resulting in stepwise pictorial and pdf.

Pattern #1 edging with modified pathway 
download Happy Hands pdf (straight and circular edgings and sunflower with modified pathway for symmetry) : 
 https://drive.google.com/file/d/1IRlJ7bnx-c27PYtgXymx_ps-KL2pen_m/view

I called this Happy Hands edging because that’s what came through – 2 happy hands raised above the head – is it a yahoo, a prayer, or a pirouette? With our tatting tension, the original edging tends to curve. The connecting chain is doubled to straighten it out.

 
Happy Hands Coaster was tatted in 2015 (the center was added this year) and I used double and triple picots to fill in spaces and add some frills. Disappointed with my picots. I used Endrucks' original pathway where all long chains face the same way.

Happy Hands Sunflower is what evolved from that coaster and makes me happy- 


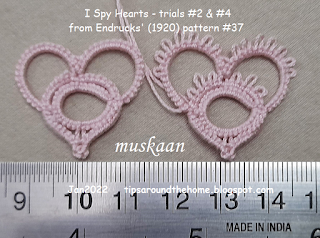
Happy Hands Heart is a single motif extracted and adapted into a heart shape. 
    Needle tatting tips were shared by Pam Hemenway - 
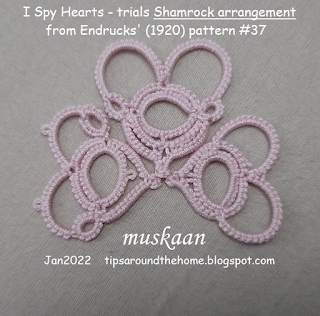
    Happy Hands Shamrock is 3 hearts tatted continuously by Diana Howe! 
    Pattern - https://tipsaroundthehome.blogspot.com/2021/03/lucky-hands.html

Evolution is a slow process, but this heart branched out into several offshoots in rapid succession.
His Kid (Sue B) used it as a mermaid flukehttp://hiskid66.blogspot.com/2021/03/inspired-by-muskaan.html and joined 2 for a lovely butterflyhttp://hiskid66.blogspot.com/2021/03/inspired-by-muskaan-2.html

And if we add a 2nd colour and beads into the mix, the possibilities of visual effects increase manifold.

 
The stepwise pictorial which shows a few colour options can be accessed here  - https://tipsaroundthehome.blogspot.com/2021/03/balancing-act.html 

Happy Hands Beaded Necklace or choker wannabe (tatted in 2019). Increase the length of the 'hands' - graduated motifs - and we have a beautiful broader version. Or tat a single motif for earrings or brooch! I have handwritten notes and a single motif prototype for the beaded necklace, but the final version will take a while.

My fascination with this book is not that the patterns are beautiful – far from it. Her contemporaries published elegant patterns. Frau Endrucks’ elegance lies in her clever construction and the many possibilities that each pattern provides as you will see when you scroll through the modernised versions.  

I am reminded of this oft-quoted couplet by Majrooh Sultanpuri -
        maiñ akelā hī chalā thā jānib-e-manzil magar
        log saath aate ga.e aur kārvāñ bantā gayā

Literal translation - I started towards my destination all alone but
                                Others kept joining me and we became a caravan (group).

It was my solo mission to convert every pattern from the 1920 book into modern style. Then Ninetta joined me and gradually we evolved into a community, each tatting 1 or more patterns. Now one year later we have gone one step further and created a Facebook Group – Endrucks 1920 Project. (https://www.facebook.com/groups/1235560633606162) dedicated solely to this book (original/modern) and pattern offshoots and showcasing all past and future models!  

For the present, despite being a publicly visible group, the membership is strictly limited to tatters who have already tatted an Endrucks’ pattern in any form. Send us (Ninetta and I are admin) a pic of your work and we will gladly send an invitation.

Our objective is to be a focused group rather than a general tatting group. But a lot of interactive discussion, etc.is in the works!

All links are listed in our Endrucks 1920 Project document here - https://docs.google.com/document/d/17LEVftXweztBIOWh4sL4BB7bX65ssoOsOn4oXIgCepY/view

Reiko Akamatsu tatted the modern version in the above collage. This is actually her 3rd cover tat, one in 2020 and then a prototype for our Project presentation  (https://ninettacaruso.blogspot.com/2021/08/love-for-lace-music-and-nature-driven.html). She is holding a solo exhibition in Hyogo, Japan of her tatted lace and quilting, with focus on Mike Lyon's Lagniappe and our very own Endrucks 1920 Project! She even shared a virtual tour of the exhibition in out FB group! She has tatted so many models from the book and contributed a lot to our group. UPDATE: Nov 21, 2021 Reiko has uploaded the virtual tour in her feed ... check out this link -  https://www.facebook.com/100001649732912/videos/222462399961645/

.....aur kārvāñ bantā gayā

Wednesday, 17 March 2021

lucky hands

Pin It now!

A tatting charm awaits us .... such a beautiful adaptation of the already adapted-from-vintage-edging heart pattern! Yes, you guessed right - the Happy Hands Heart from Endrucks' #1 pattern is now a Shamrock leaf, courtesy Diana Howe. And she shares her working with us!

Happy Hands Shamrock - adaptation by Diana Howe

UPDATE Sep 2022 - pattern pdf :
☘☘☘


In her own words -
I’ve modified your Handy Hand Heart to create shamrock. The center ring (R1) makes a handy spot to add a lapel pin to mount it on a collar. Enjoy!


She shares 2 sequences sketched neatly - clockwise and counterclockwise!
 
Must leave a small space between CH1 and Ring A – the width of a thread – to allow an alligator join (passing one shuttle over, one shuttle under heart) to cross from chain D to E.

Tail/stem: after last ch 3, join to start.

I really like a balanced double stitch to create a stem.

This one is tatted in size 40.
Notice that she has used normal chains throughout instead of the roll tatting segments in the heart pattern.
TIP : Instead of ending the stem in a knot, one can hide ends in the chain as shared here - https://tipsaroundthehome.blogspot.com/2019/12/open-treasures.html 

Above is her earlier leaf in size 20 where she used the S-chain (1double st,1 reverse st) for stem.

I really like the simplicity of her arrangement to create a perfect leaf! We are indeed lucky to have this pattern.
All tutorials can be found by clicking on the tabs above.

I requested her to write something about her tatting journey for us to get to know her better and she graciously agreed -
Diana Howe of Lake Stevens, WA, has been tatting since 1980 when she purchased a Better Homes & Garden tatting kit in Ames, Iowa in preparation for a road trip (move) west. Been creating ever since! So, while trying to design a shamrock with heart shaped leaves that start from the base, Muskaan posts the perfect heart, Handy Hand Heart. Here is her adaptation. Enjoy!

Many many thanks, Diana, for sharing your lovely adaptation and for your kind words :-) 

Please note that I have made a couple of edits to the edging pattern I shared in previous post, adding a few points I'd forgotten at the time of posting.

Friday, 22 September 2017

so far

Pin It now!
How far can I go with designing my first ‘doily’, I’d asked last time?
Here's how far I've come, so far ...


a snowflake ….
The first 3 rounds with picots and only 6 rings in the central rosette could masquerade as a snowflake, right? But the rosette needs some decorative picots I think.
The 3rd round here completely flattens out even without any blocking ! The initial ruffling is a design characteristic - I won't call it a flaw.

a possible motif ….
These 3 round medallions can probably be joined as motifs for a larger fabric.

After tweaking, ruffling was tamed, and with light blocking it stays flat.
One of the tweaks was to add some bare thread space between central rings. Unfortunately the compactness and slimmer teardrop shape of rings (as in the bronze one) got lost. Should I give it another go ?

To maintain the radiating look I nixed any thought of inward facing rings in later rounds.

Also realised that for a larger project, it is not enough to design the immediate next round. One has to think ahead to the round after that as well, in order to determine the placement of joining picots in next round. Doesn't mean I can transfer the “think ahead” to real life ;-P

and 5 (4 tatted) rounds….
I used Sketcher Guru app on my tablet to draw rounds 4 & 5, and a rough 6.
Have I ever crossed 3 rounds/rows in any of my designs ? Doubt it.
So I’ve decided to christen this ‘Aspiration’. It kind of suits the ever-widening radiating look, too – like widening my horizons, moving beyond my comfort zone, yada yada yada …
My intention is for rounds 4 & 5 to reflect rounds2 & 3. Let’s see.

Does the design resemble any snowflake or doily? I haven't copied any pattern, but who knows what's stored in the recesses of my cluttered brain! It’s such a simple pattern after all.
I used to dissuade myself from creating a simple pattern especially for a larger piece. But baby steps are important. I’m really excited about this now that it is laying flat.


Almost forgot – the tiny little leaf is Simple Shamrock earrings pattern is by Stephanie Wilson from the 52 Earrings Project (does this count, Mel ;-D). I made it in size 40 'coz she loves tiny thread (hey, I’m Not going beyond 40, Steph !). We’ve decided to sit side by side and tat ‘n’ chat, pretending we’re at the Fringe Elements ;-P Vicki’s posted another charade with simple rules … Join us ? I didn’t get to see what others had made last time, but as long as one is tatting, game on J
And this is my answer to the question in the Shamrocks pattern.  
#fringetatdays  #Tatting 

here’s to another round, ahem, of tatting !å