Showing posts with label BDS. Show all posts

Wednesday, 16 February 2022

a small gift

Pin It now!

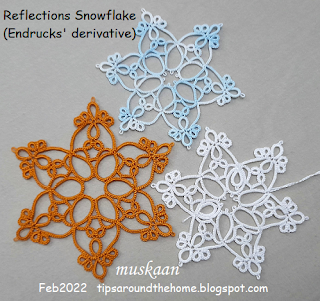
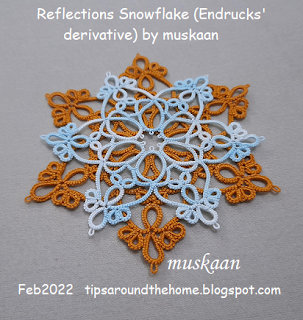
derived from Endrucks (1920) pattern #17

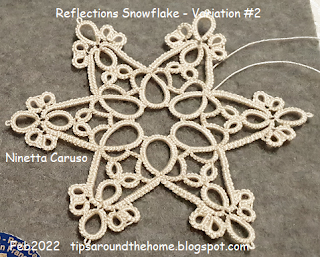
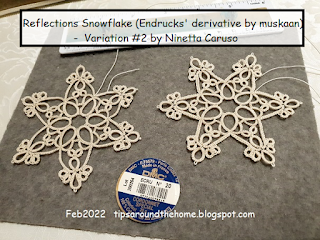
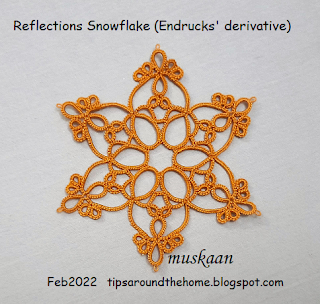
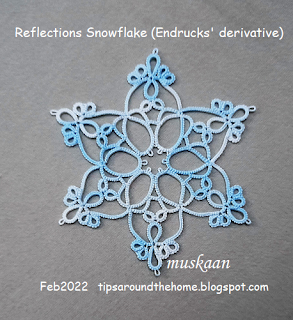
We’ve had such a wonderful group of tatters contributing to the Endrucks 1920 Project, and Ninetta and I wanted to show our appreciation in some material form. We finally decided on this snowflake. It is a direct derivative from one of Endrucks’ own patterns (#17) yet has quite a trendy modern appeal and application, and the prototype was very well received. It lacks Endrucks' denser block segments, though.

In December 2021, we gifted it to all our original volunteers who had worked on their respective patterns. Since then, many more tatters have joined our FB group and displayed their skills and shared patterns, too. This gift now goes out to all who participate and show a completed working/adaptation of any pattern from the modern pdfs or the original book.

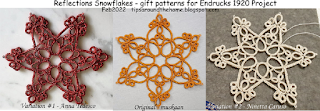
The finalization of this snowflake pattern is another reflection of joint effort. I wanted a test-tatter to try it in cordonnet cotton, but because it was to be a surprise gift, we couldn’t ask for volunteers. Ninetta finally suggested Anna Tedesco, who jumped right in with her characteristic enthusiasm and speed.
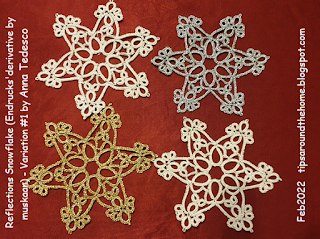
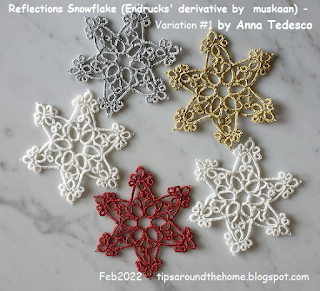
Using Sanbest 6 strands, she worked 5 complete samples, systematically sharing her feedback and even altering her style to improve on her previous samples till she was satisfied!
While the first round can be a standalone or tiled motif, with one arm of the 2nd round, it looks like an earring or pendant! She had to shorten a chain segment in the inner round, which might be due to the thickness/metallic nature of the thread or a longer inward picot.
These tips/links for inward-facing picots in both regular and direct tatting might come in handy-https://tipsaroundthehome.blogspot.com/2021/12/inward-picot-with-marker.html

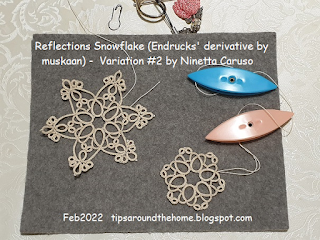
Ninetta, herself, got into the exercise, tatting 2 models, and we have a tweaked count for the inner rings and padded stitch (BDS) version for outer chains from her!
Notice the thicker chains on the arms. 
It is amazing that between the 3 of us, we had a total of 8 freshly tatted snowflakes within 5 days, including 2 variations! The power of the collective. This was in early November and the gift went out to all our original contributors in December. Now we are gifting it to anybody who completes a pattern and actively participates in our group.
As feedback poured in, I started a new model (mustard/gold in Anchor size 20) and much later I finished the earlier incomplete model in Lizbeth size 20, which is seen in the last photo here - https://tipsaroundthehome.blogspot.com/2021/10/spirited-seventeen.html

While I worked on presenting the pattern, Ninetta composed a beautiful letter of thanks. She also translated the entire pdf into Italian because the largest contingent of volunteers was from Italy (followed by the USA). Pattern is diagrammed as well as written. And the composite diagram shows all 3 versions/tweaks. I’m getting to like this style of diagram!

Not merely did I get such diligent testing, there were a few design lessons to be learned along the way! A very satisfying and happy experience.

Remember the newsletter I spoke about? Well, one tatter already completed that doily, joined our FB group and has started more patterns from the project. Yes, she, too, has received her gift.

There is one very exciting news to be shared in future about the past!

All patterns from the Endrucks collection can be accessed here (feel free to innovate and adapt) - https://docs.google.com/document/d/17LEVftXweztBIOWh4sL4BB7bX65ssoOsOn4oXIgCepY/view

Ciao for now and many many thanks to Anna and Ninetta and our Endrucks community

Wednesday, 17 March 2021

lucky hands

Pin It now!

A tatting charm awaits us .... such a beautiful adaptation of the already adapted-from-vintage-edging heart pattern! Yes, you guessed right - the Happy Hands Heart from Endrucks' #1 pattern is now a Shamrock leaf, courtesy Diana Howe. And she shares her working with us!

Happy Hands Shamrock - adaptation by Diana Howe

UPDATE Sep 2022 - pattern pdf :
☘☘☘


In her own words -
I’ve modified your Handy Hand Heart to create shamrock. The center ring (R1) makes a handy spot to add a lapel pin to mount it on a collar. Enjoy!


She shares 2 sequences sketched neatly - clockwise and counterclockwise!
 
Must leave a small space between CH1 and Ring A – the width of a thread – to allow an alligator join (passing one shuttle over, one shuttle under heart) to cross from chain D to E.

Tail/stem: after last ch 3, join to start.

I really like a balanced double stitch to create a stem.

This one is tatted in size 40.
Notice that she has used normal chains throughout instead of the roll tatting segments in the heart pattern.
TIP : Instead of ending the stem in a knot, one can hide ends in the chain as shared here - https://tipsaroundthehome.blogspot.com/2019/12/open-treasures.html 

Above is her earlier leaf in size 20 where she used the S-chain (1double st,1 reverse st) for stem.

I really like the simplicity of her arrangement to create a perfect leaf! We are indeed lucky to have this pattern.
All tutorials can be found by clicking on the tabs above.

I requested her to write something about her tatting journey for us to get to know her better and she graciously agreed -
Diana Howe of Lake Stevens, WA, has been tatting since 1980 when she purchased a Better Homes & Garden tatting kit in Ames, Iowa in preparation for a road trip (move) west. Been creating ever since! So, while trying to design a shamrock with heart shaped leaves that start from the base, Muskaan posts the perfect heart, Handy Hand Heart. Here is her adaptation. Enjoy!

Many many thanks, Diana, for sharing your lovely adaptation and for your kind words :-) 

Please note that I have made a couple of edits to the edging pattern I shared in previous post, adding a few points I'd forgotten at the time of posting.

Sunday, 30 August 2020

one is here

Pin It now!
Remember this? Well, the Summer 2020 IOLI issue has arrived and I am so excited to hold the magazine in my hand! The previous (Spring) issue is obviously lost, though editor-in-chief Prabha has generously assured me they will send in another copy. 

Hubby was so excited to see the article, co-authored by my prodding pardner, Anita Barry, that he has now urged me to reveal my real name and use/include it in future. So, meet Meenakshi Jain, popularly known in the tatting community as muskaan ;-)  Most correspondents already know my name and Georgia Seitz gave me one of the best compliments when I told her the meaning of this Sanskrit term,  'eyes shaped like a fish'. She said, I was 'meant to tat! Rings are often called oeillets and shuttle is called fish (because of it's shape) in certain languages.'

Back to the publication. It is the last article in the bulletin, and the only exclusively tatting article. But there are so many interesting articles to go through and the images have already inspired me to convert those laces into tatting patterns!

Bookmark adapted into a Mat - WIP

One of the distractions a couple of weeks back was test-tatting a bookmark pattern for Ruth Perry. I liked the central round rings made with balanced double stitches and decided to work it as a square mat instead. It is still a work in progress and can be worked in one pass - several magic pathways are possible! However, I ran out of threads and have shifted attention to completing the hanky edging.

In Anchor size 20, this is just over 7" long. The thread is probably 20 years old and considering the deceptively large amount used up in just this, it might be sufficient to complete the entire mat. Have some ideas in mind to introduce another colour...

This is a multi-purpose pattern. Work it as a single square motif or a beautiful bracelet with ribbon woven through the rings! Or with multiple rows, as a mat! 

Download Bookmark-8-2020 pattern here. She has several more patterns, including a beautiful new Celtic Knot Tatted Square, that I am resisting for now.


Monday, 3 August 2020

stormy calm

Pin It now!

Or so it seems! Blue skies one moment, and the next stormy grey clouds converge together, enclosing the sun (or is it an orange eye of the storm?). That’s how I see these 2 snowflakes!

If you remember Ruthie May and I joined forces to tat Robin Perfetti’s Challenge Snowflake. It was fun corresponding together and watching each other’s progress.


While I worked it with shuttles and monochrome Anchor size 40 thread, Ruthie selected a grey-scale palette along with orange (don't you just love that splash of orange?!), from her embroidery skeins. 6 strands, needle tatting.

My readers know that none of the several techniques used in the pattern are new to me; most already applied in my own patterns. But the pattern is just so attractive and irrestible. Also, it is good practice, good refresher! And such a clever combo, and padding the stitch makes the chains hold their shape nicely.

Ruthie : “This was my introduction to balanced doubles. I had previously seen a video demo link on the subject from Georgia Seitz. I said to myself I'm never gonna need or want to use that. Then I saw your post with the link to the snowflake challenge Balanced doubles included. To coin your phrase never say never. You never know what life will throw at you.”

Needle Tatting tutorials and resources - https://tipsaroundthehome.blogspot.com/p/tatting-resources.html

I think instead of 5mm double picot recommended for size 40, I would prefer 7mm. As it turned out, except for the first, I used 6mm.

Ruthie - “…. I was delighted that the color work added the gradient affect that I was looking for. The thread increased the size of the snowflake and gave it a puffy texture that I desired for a mug coaster." 

Alongside Robin's Floral Edging (see recent posts) where I have turned the corner. Snowflake measures 3.5" in size 40. Love it!!! 

Ruthie was successful in making the mug coaster she wanted! In 6 stranded embroidery thread, the final measurement is 5.5".

Ruthie : "It measures 3 1/2 inches across the middle not including the SCMR around the edges. 

Regret:The embroidery thread that I used was not kind to my picots. It separated and became (splitty) which is what embroidery threads do for a reason. Though, I could see myself using that effect in other projects to create an interesting feather, fur, or frilly texture.”

We never stop learning, and what better way than with/through pretty lace, with like-minded tatters.

Many thanks, Robin, for sharing your beautiful patterns ! 

Tuesday, 24 November 2015

pds – padded double stitch

Pin It now!


Padding the Double Stitch - any which way !

We’ve heard of padded tatting. We’ve also heard of/used Double Double stitch & Balanced Double Stitch to straighten out long chains. Some may even remember self-padded double stitch from an earlier time. Are all these the same or different ?
Here is my attempt (delayed by over a year, sorry) to make some sense of it all. I apologize for the length of this post ... 

Some sentences/paras are direct quotes from the original thread here. To distinguish these, I’ve used a different font in blue. Anything in italics here is my personal comment. Unless otherwise indicated, all quotes are by Judith Connors. Needle tatting quotes are by Judy Anderson.

======================================

I.  The  Terms
Existent :
s-p ds : self-padded double stitch or self-padded ring (Rhoda Auld, 1974),
BDS : Balanced double stitch (Ruth Perry, 2008), 
DDS : Double Double stitch (Jane Eborall, 2009), 

Proposed :  Padded  Double  Stitch  (pds)
pds : padded double stitch (emerged/evolved through a discussion in Craftree, 2014)

======================================

II.  Why  call  it  pds ?

  1. Historical credit. Padded double stitch is simply shortened from Rhoda’s first known use of ‘self-padding a ds’. “Her experimentations are recorded on page 84 of her book, 'Tatting: the contemporary art of knotting with a shuttle'”.  This was arrived at after some detailed discussion, investigation, & experimentation by participants in the thread "Balanced Double Stitch (?)" started by Judith.
  2. BDS & DDS are only two of the possible motions (& applications) that can create padding in a stitch, making them a subset of the pds formation. Refer to ensuing points & Table in Sec.IV 
  3. Variable/unequal wraps on the half stitches or between ds can create graduated, transitional, or unique effects on any ring or chain. (I shared some possibilities here). But then the stitch will not remain ‘Balanced’, nor only a ‘Double’. Hence a generic term like padded ds seems more appropriate.
  4. And pds, with it’s proposed Notation System captures this variability in written form, too. See examples of notation in next segment.
  5. “Padded double stitches may be applied, for effect, to known elements in tatting.” Besides large rings & long chains, they can be used in Split rings, Onion/concentric rings, Josephines, etc. as showcased in pictures below.    
  6. Standardization to reduce confusion – both with multiple terms as well as notation. pds could be considered a generic term .


======================================

III.  Notation for padded double stitch

A double stitch is made of 2 half stitches, called 1st HS/fhs & 2nd HS/shs.
Hence in order to show padding wraps, we include the half stitches in brackets, with number of wraps indicated on each.
Thus,

1. ‘Balanced’/Equal Padding :
pds(1,1) means 1 wrap on fhs & 1 wrap on shs.
So, if you’ve been reading carefully, what would pds(1,1) represent ??
Yes! pds(1,1) = BDS or DDS !!!  And by same logic, pds(0,0) = DS!
pds(2,2) = 2 wraps each on each half stitch.

2. Variable/Unequal Padding :
pds(1,3) = 1 wrap on fhs & 3 wraps on shs.
pds(4,2) = 4 wraps on fhs & 2 wraps on shs.
pds(0,2) = no wrap on fhs & 2 wraps on shs.
pds(3,0) = 3 wraps on fhs & no wrap on shs.
pds(0,1) = no wrap on fhs, 1 wrap on shs. (Half DDS by Jane Eborall, 2014)
In these 3 examples , 0 or no wrap means that half stitch is tatted like a normal half stitch, without any padding , as seen in above pic, where Chain is pds(0,5) 

3. Number of Stitches :
Just as one puts a numeral before ds to indicate how many stitches are to be tatted, one puts a numeral before ‘pds’ to indicate the number of stitches required.
3pds(1,1) = 3 padded ds with 1 wrap in each half stitch.
6pds(3,2) = 6 stitches with 3 wraps in fhs & 2 wraps in shs
5pds(0,3) = 5 pds with no wrap in fhs & 3 wraps in shs.

4. Special Elements :
Josephines are worked with only one of the half stitches - either 1st or 2nd only. This can be represented with a “–” for the missing half st.
Eg. JR 10pds(–,2) = a J Ring of 10 sts padded with 2 wraps on the shs ;
JC 6pds(3,
–) = J chain of 6 sts padded with 3 wraps on fhs.     
    

================================

IV.  Tabulated  Comparison  of  Stitches


For pdf download of table : "Padding" the Stitch Table (revised) 


======================================

V.  How to Wrap the half stitches ?

Refer to Table above. Click on names below for direct link to resource.
Resources/Tutorials referred to by :  Ruth Perry , Jane Eborall , Karen Cabrera .

This post is more about unifying the seemingly different movements applied to attain the same result. I would love for you to take up your shuttle(s) & some scrap thread & try out the 3 versions for yourself & have fun discovering the Wow moment ! And also find your own comfort movement :-) Humour me ?


And one can’t really go wrong . WHY ?
If you make a mistake in the wrap, it will do only 1 of 2 things :
either unwrap immediately so that you have no padding (it is easily visible)
OR
it will create a knotty situation (pun intended) when you try to snug it close. So in either case, one will realise one's mistake & can rectify it immediately.

My Submission : The extra wrap(s) can be made anywhere !


It does not matter Where the extra ‘wrap’ is made – on the core thread, or on the loop of the half stitch that is being formed, on the ‘leg’, or on the ‘auxiliary’ thread (chain/ball/shuttle 2 thread), or How it is made – whether before flipping or after! Once the half stitch is Flipped, &/or the threads tensioned, the result is the Same ! After flipping the half stitch, whichever it is, the wraps will coil around the core thread in the same way seen in 3rd pic from top , or pics #4 & #8 below. And tensioning or snugging, the stitch will also produce the exact same padded effect.

There are 3 ‘ways’ to wrap around a half stitch (before or after flipping)
  1. core thread (as Jane does)
  2. 'leg' loop of stitch (as Karen does)
  3. working 'cap'/upper thread of stitch loop (in pictorial below)
and it will make no difference to the end result ! The 3rd way is photographed below 

======================================

VI.  3rd Way of Padding the Double Stitch
A Quick Pictorial
… making the wrap on the top auxiliary thread part of flipped half stitch – the ‘cap’ part


Since the formation of the wrap is of no consequence, one is free to choose what one finds most comfortable & easy. In fact, I have used all 3 wrapping movements interchangeably in my Wreath Ornament ! I usually wrap around ‘cap’; but for reverse stitch or 2nd half of SR, I find it easier to wrap around the taut core thread.

======================================

VII.  Are these the same ?

1. Padded Tatting and ‘Padding’ Tatting !

'padded tatting' is a concept which would embrace a number of effects:
* using multiple core threads or a cord, as in pearl tatting (aka parallel and Maltese tatting);
* the use of wool, in needle tatting;
* using threads of two different thicknesses, the thicker one as the core;
* Rhoda Auld's and our recent padded (wrapped) double stitch --> padded chain and padded ring.
[This includes the BDS & DDS].
There are probably others, depending on the experimentation of various tatters.

Thus pds is a ‘subset’ of padded tatting where we are ‘padding’ the stitch, without use of any auxiliary thread. Can be done with both a regular double stitch (flipped) or the unflipped reverse stitch formations, and any element using them. So, while we keep saying padded DS, it could well be padded RS

2. Roll Tatting & Padded DS

The movement is similar, one is making wraps ! But in Roll tatting, one wraps around the Core thread Only, with no stitches.
In Padded DS, one is wrapping within the stitch.

======================================

VIII.  Can it be done in Needle Tatting ?

YES, and it is so much easier ! 
This technique is not limited to shuttle tatting. For needle-tatters, Judy points out how easy it is : “just circle that finger twice before putting on the needle.” So, the wraps are made on the finger !
Judy goes on to say “This needle tatter has used both padding and variable tension.. and both at the same time ... to make a reasonable script J for a monogram. Tight curves, rounder ones and straight sections…”

======================================

IX.  Final  Observations

CHARACTERISTICS :
It provides thickness, texture, interest, stiffness, bulk, highlight. 
It is very easy to do & very practical for long lengths of chains, large rings, and many decorative elements. 
It makes the stitch wider/broader, too.
 “It works well for a bracelet because the chain is not curved as a normal chain would be.” (Jane McLellan)
It is perfect for 3D &/or freeform tatting to add stiffness & effect. I have used the pds in a lot of my freeform 3D patterns, listed at end.  

RELEVANT FACTORS :
Size of thread is inversely related. Fewer wraps possible with thicker thread, because it is unwieldy to tension.

But quantity of thread used is directly proportional to the number of wraps.
Soft silky threads make better wraps.
Tension plays a role in the final visual effect of each stitch as well as the overall appearance.
For noticeable visible difference in effect when making unequal/variable wraps in half stitches of same DS – the difference in wraps should be more than One.

LIMITATIONS :
As the number of wraps increase, the thread may start to twist. Suspend shuttle to normalize.
For same reason, padding a Josephine ring or chain, may become slightly more difficult.
TIP (Judith Connors)  “… the adage 'Less is more' is advised, as over-padding could alter the integrity of the known elements.
Some tatters never use this type of double stitch, preferring to tension the double stitches less so that the chains do not curve much at all. [When I tension less in some sections of inverted tatting, I can produce chains which are straight.]”

I invite your inputs, opinion, feedback, & suggestions .

Thanks to All Designers & Participants 
who have contributed so much to tatting & it's evolution

Related Posts : My experiments and trials
My patterns using pds : Wreath , Rustic Leaf , Poppy , 

********************************************

  
2 of my projects & 2 tutorials had been nominated, of which this one won. 
I think it is very much in keeping with my 2 passions - TATeaching :-)))

A BIG Thanks to all you wonderful voters for such a lovely gift :-)

and a very special Thanks to Ninetta for sharing your creative originality, 
to Fiona for altering my perspective, 
& Kersti for her wonderful forum  ...

((( HUGS )))

CONGRATULATIONS to all nominees & winners – your work is always an inspiration

********************************************

okay, okay, I'm going ..... ;-)
Monday, 5 May 2014

Tatting : Experimenting with a Stitch

Pin It now!
Self-Padded Double Stitch

Is it an s-p ds ?
Is it a DDS ?
Is it a BDS ?
Is it a dds ?

No, I’m not high, but I Was all confused as many of us are when we encounter new &  multiple tatting terms, try to look for tutorials/definitions/explanations & find out (if we are lucky) that they All apply to the Same Technique !!!
This is the message Judith Connors tried to put across when she recently started an InTatters thread about the history & multiplicity of the Balanced Double Stitch.
UPDATE : InTatters has shifted to Craftree & click here for the new link to thread. 

Before proceeding further, let me give the full forms & sources of the above abbreviations :
s-p ds : self-padded double stitch by Rhoda Auld in her book 'Tatting: the contemporary art of knotting with a shuttle' (1974)
DDS : double double stitch or padded double stitch by Jane Eborall  (2009)
BDS : Balanced double stitch by Ruth Perry   (2008)
All 3 terms refer to the Same technique.
Okay, dds is the odd one out here. Jane Eborall uses it to refer to the Daisy double stitch.
(click on links for the respective tutorials)

During the discussion, there were many queries, explanations, suggestions, etc. This brought on some experimentation too. Here is my exploration into this stitch domain.
I first learned it from Ruth Perry & hence called it BDS. I loved the effect of this ‘basic’ stitch & had already used this stitch in my designs. A BDS/s-p chain does not curl as much as a normal ds chain would. It has more texture, bulk, & stiffness.

But then Judy, in the same thread, spoke about varying the number of half stitches!!! That was exciting stuff to try out. But this also created a problem about how to notate the count. Judith’s historical knowledge came to the rescue again. Rhoda Auld used the term "wrap" to indicate the number of times thread is wrapped around the core for padding !

UPDATE : Judith Connors added a summary at the end of the discussion thread here (post#74)

·                       'Padding' tatting has been done for over a century. The earliest practices were padded pearl tatting, and the use of uneven thicknesses of threads. These padded the core thread, mostly.
·                       Rhoda L. Auld experimented with wrapping the double stitch itself, and in 1974 published her 'self-padded double stitch' and 'self-padded ring'. This could be applied to equal and unequal numbers of wraps, on either half-stitch.
·                       In 2008 Ruth Perry applied one extra wrap to each half-stitch, calling this a 'balanced double stitch'. It is only one of the possibilities of self-padding double stitches.
·                       This thread has investigated Rhoda Auld's approach to equal and unequal numbers of wraps, and chosen to call the result the 'padded double stitch' - pds(1,3), 1 and 3 indicating the number of wraps on the half-stitches, or pds(2,2).
·                       Padded double stitches may be applied, for effect, to known elements in tatting. However, the adage 'Less is more' is advised, as over-padding could alter the integrity of the known elements. “

Accordingly, I am updating the notations in this post & using 'pds' instead of 's-pds'.


Here are my trials, with pictures , stitch counts, & comments/observations …I have used size 20 thread.

Self-padded Chains


# 1 : In this 1st picture, all stitches are 5 in number & Both 1st & 2nd halves of a ds, whether padded or not, are the same.
  • As is clearly visible, while count remains same, length & width of each subsequent segment increases with each increase of wrap !
  • I found it easier to do the 2nd half stitch wraps than the 1st half.
  • This time I managed both 4 wraps And 5 wraps too. Altho’ neatness is lacking.
  • When I loosened the 5-wrap ds, it seems to have had a better effect than when the tension was tighter.
  • Unknotting/unraveling a pds becomes a tad cumbersome as wrap count goes up.


# 2 : In this trial, all 1st half stitches are normal FHS of a ds (i.e., no padding); padding is applied Only to the 2nd half stitches. Hence “Variable” pds. Each segment is 7 stitches.
  • If stitches are snugged a little loosely, then a subtle ric-rac effect is visible. However, it is a very delicate balance between ‘loose’ & ‘tight’. If too tight, then individuality is lost ; if too loose, then the chain tends to twirl & flop a bit.


# 3 : Josephine Chains & Ring made using pds (2nd half stitches) . My love of Josephines got the better of me & curiosity made me try out how the Josephines would turn out with padded stitches !
I used only 2 wraps & the 2nd half st (SHS) since I find it quicker & easier to handle than the FHS of pds.
  • In the 1st segment of J. chain, the stitches were tatted ‘normally’ tension-wise (i.e. a bit tight) & snugged close together too.
  • In the 2nd segment, I deliberately loosened the stitch, thus getting a broader wave !
  • Josephine Ring made with 2-wrap SHS is almost twice the size of a normal J. Ring as can be seen in the pic.


I added a 4th picture showing 5 wraps of the 2nd half stitch, just before closing it.


The texture is superb. And these padded chains can be used by designers in various ways to enhance their tatting project. 

TIP : As the wrap count increases, the stitches acquire a beaded effect in the variable s-p trial.  Especially, I think, if one makes the FHS tight & the s-p SHS a little loose. Then one could get a ‘spiral’ or wavy cap.


This was just a 'dry-run' to see effects of this stitch. And I tried this only on chains. These stitches can be used to make rings, too (self-padded rings as Rhoda called them).
It will be even more exciting to Apply this stitch in newer & different ways !

TIP : Try this stitch with finer threads, including silk & floss. It will be interesting to see the results !

Would love to get your feedback, inputs, & criticism, as well as view any trials/projects made with this stitch.
I will update if any further information , etc. comes my way.

Thanks for reading through, if you have ;-))

UPDATE :

I should’ve mentioned that these chains, due to the increased thickness & texture, can be used in bracelets, cords, bookmarks, free-form tatting, & all sorts of other applications, including edgings, etc. ! 
It is up to the designers  ! 


Here’s another possibility – a beaded chain/cord with no beads !!!


In 1st half segment of cord (towards the left) I have alternated 1ds with 1pds(5). { 5 within brackets represents 5 wraps} I kept the ds 'tight' & the pds 'normal' in tension. In reality, it looks & feels pretty nice - like tiny beads !
It would work so wonderfully in various applications.

In 2nd (right) half of the cord, I used Only pds(5), separated by a SLT {SLT - shoe lace trick}. I used 2 different colors in the 2 shuttles & switched them with the SLT, so that one can see white 'beads' alternating with blue ones.
Not very nicely done ;
the SLTs seem to make the cord flip around a bit - it does not stay even. Or maybe I was SLT-ing wrongly..
Altho' both threads are from the same brand, same size (20), same purchase, the white appears thicker & stiffer as compared to the variegated blue !!! Hence the difference in the sts even tho' both were made with the exact same number of wraps.
This segment needs to be tried again for clearer results & inferences.

So, here is my contribution - a beaded cord with no beads (but bds ! )