Showing posts with label S-chain. Show all posts

Wednesday, 17 March 2021

lucky hands

Pin It now!

A tatting charm awaits us .... such a beautiful adaptation of the already adapted-from-vintage-edging heart pattern! Yes, you guessed right - the Happy Hands Heart from Endrucks' #1 pattern is now a Shamrock leaf, courtesy Diana Howe. And she shares her working with us!

Happy Hands Shamrock - adaptation by Diana Howe

UPDATE Sep 2022 - pattern pdf :
☘☘☘


In her own words -
I’ve modified your Handy Hand Heart to create shamrock. The center ring (R1) makes a handy spot to add a lapel pin to mount it on a collar. Enjoy!


She shares 2 sequences sketched neatly - clockwise and counterclockwise!
 
Must leave a small space between CH1 and Ring A – the width of a thread – to allow an alligator join (passing one shuttle over, one shuttle under heart) to cross from chain D to E.

Tail/stem: after last ch 3, join to start.

I really like a balanced double stitch to create a stem.

This one is tatted in size 40.
Notice that she has used normal chains throughout instead of the roll tatting segments in the heart pattern.
TIP : Instead of ending the stem in a knot, one can hide ends in the chain as shared here - https://tipsaroundthehome.blogspot.com/2019/12/open-treasures.html 

Above is her earlier leaf in size 20 where she used the S-chain (1double st,1 reverse st) for stem.

I really like the simplicity of her arrangement to create a perfect leaf! We are indeed lucky to have this pattern.
All tutorials can be found by clicking on the tabs above.

I requested her to write something about her tatting journey for us to get to know her better and she graciously agreed -
Diana Howe of Lake Stevens, WA, has been tatting since 1980 when she purchased a Better Homes & Garden tatting kit in Ames, Iowa in preparation for a road trip (move) west. Been creating ever since! So, while trying to design a shamrock with heart shaped leaves that start from the base, Muskaan posts the perfect heart, Handy Hand Heart. Here is her adaptation. Enjoy!

Many many thanks, Diana, for sharing your lovely adaptation and for your kind words :-) 

Please note that I have made a couple of edits to the edging pattern I shared in previous post, adding a few points I'd forgotten at the time of posting.

Saturday, 16 May 2020

tracking both sides

Pin It now!
So, Life got majorly in the way! You indulged me, but ALL my plans to utilise my time on blogging and ticking off my check-list, while keeping my personal correspondence staggered, got way-laid. Where did this entire week go?! I literally lost track of everything beyond the very personal.

But life's train runs on 2 tracks - there are 2 sides to everything. So there was some good mixed in and everything is back on track, fresh ‘n’ fine.

And look what I discovered on the other side of the picoted S-Chain


Isn't it pretty? In my previous cords, this intricate weave did not reveal itself so clearly. Obviously, there needs to be greater contrast in colour or tone between threads. It may also be lost in finer threads.
The above cord uses Anchor size 20.
We can now choose which side we want to show up front and which to hide!


Saturday, 4 April 2020

picoted S Chain cords

Pin It now!

Ever since I shared the S-chain cords using scrap threads, there has been a renewed interest in this beautiful effect. Last week Madhur asked for help with the picoted S-Chain I had used in a bookmark tail here. 
I took pics and prepared a quick pdf to send to her. I’m sharing some background notes here along with detailed steps and large pics, if you are interested.

S-CHAIN WITH PICOTS or faux Pearl tatting!
- PICTORIAL -

NOTES :
  1. Sabina Carden-Madden first wrote about the S-Chain, along with instructions and comparison. 
  2. 1 double stitch is followed by 1 reverse stitch or lark’s head knot. In other words, 1 flipped stitch is followed by 1 unflipped stitch/hitch, and repeated to desired length.
  3. If picots are added before every stitch, the cord looks like Pearl Tatting, without the hassle of 3 threads or even 2 shuttles.
  4. It can be tatted with single shuttle and a ball, but the effect is best seen when there is a contrast between colours.
  5. For initial practice, use a thick thread and 2 colours.
  6. For even picots, a picot gauge can be used. Scroll down to page 3, III-A – Direct Tatting, to see how a gauge is used in direct tatting or reverse stitch.  


Above pics show vertically and horizontally measured picots in 2nd side of split ring which uses reverse stitch.


Double Stitch v/s Reverse Stitch :
1 double stitch is made of 1st half-stitch (under-over) followed by 2nd half-stitch (over-under).     1 ds = fhs, shs
1 reverse stitch is made of unflipped 2nd half stitch (over-under) followed by unflipped 1st half stitch (under-over).     1 rs = ushs, ufhs
UPDATE - 1 reverse stitch is made of 1st hitch (over-under) followed by 2nd hitch (under-over). 1 rs = 1st h, 2nd h


Pictorial shows coloured thread in shuttle, and a ball of cream thread.
Tie threads or start with a ring in order to get a good grip.

The 1st image shows a ring (with tails hidden within) followed by (1ds,1rs)x4 already worked.
1.  
Start chain with picot followed by 1 double stitch. 


2.
The next stitch is a reverse stitch or unflipped stitch (as in 2nd side of split ring).
Bring shuttle over-under to make an unflipped half stitch.
Do NOT snug tight. Leave picot space at the beginning. See next pic for a better idea.

3.
Notice the bare threads after previous ds? This will later become the picot.
Make next unflipped half stitch (under-over) to complete 1 rs.

4.
Now snug the stitch.
The space converts into a picot at the beginning of this reverse stitch.
Also notice that the reverse stitch faces downwards as opposed to the double stitch.

IMPORTANT : Snug properly only after you are satisfied with picot length because each stitch locks the work in place. See above on how to use a picot gauge.

5.
Leave picot space and make another ds.

6.
Repeat the 2 stitches (p,1ds, p,1rs) for desired length.


See bookmark tail made using a doubled-up cord. It is also linked into a mock ring that resembles a Maltese Ring! 

Hope to see this cord being used in patterns - it can easily be substituted for regular chains, mock rings, etc. Vary the length of picots to create feathery effects! Let your imagination free

UPDATE : If distinctly contrasting colours in size 20 or thicker thread are used, a beautifully woven pattern emerges! Check the image in this post -  https://tipsaroundthehome.blogspot.com/2020/05/tracking-both-sides.html

Wednesday, 19 February 2020

a chained heart

Pin It now!

I fell in love with it right away. It is such a wonderfully elegant heart with a bit of freeform thrown in – just the way I like it. So it had to go to The Most Special person in my life for our very special day.

This is Renulek’s Serce Od Serca or Heart from the Heart. Such a beautiful conversion of a bobbin lace heart to a tatted lace heart. The pattern is free here.
Made with Anchor size 40, it is <7 cms high and 8½ cms wide.

I must apologise to Renulek for bungling up. Despite frequent referencing and such clear diagrams, I ended up joining the last chain on 1st round on a picot rather than at the base of ring. Realised only when I reached it after the 2nd round. Had to wing it, which is why you see a long chain and no small ring.
My eye keeps getting drawn to it ;-(

TIP Notice how the orientation of my heart is opposite to that of Renulek’s? In traditional tatting this wouldn't be a problem, but with directional (fs/bs) tatting, there is only one distinct front side.
TWoT (This Way or Tat?) Notes - The reason lies in the very first ring. I followed the pattern, and tatted the ring frontside, starting with 8ds. Realising it was going to face the other way, I peered closely at her photos. Huh, her rings were backside, and chains frontside - knotty naughty ;-D. This same orientation was used in diagrams, hence the confusion.
However, if you want the heart to face like her’s, in frontside/backside tatting, 
start the ring by reversing the order of half stitches (shs then fhs), 
OR,
start the ring as 5-5-3-8.

It seemed a bit forlorn all alone on the card. These S-chains made with scrap threads, saved the day. There’s more tatted lace and stuff inside, but that’s our secret ;-P

Meanwhile I’ve been hooked on the S-chains, clearing out my scrap lengths. I have a few ideas to cook them in SOUP* when I have a good stock ;-P (This is how the S-chains look with picots)


Many many thanks, Renata,  hubby loved it !


Friday, 23 March 2018

squares from knotty creations

Pin It now!
updated post with revised images

As promised, here are 5 free patterns from Vrinda. She created 6 patterns one of  which was called Checkers. However, even though she came up with it independently, since it is a common split ring square, the pattern is not shared here.
All Vrinda’s patterns have also been uploaded to Cathy’s facebook page.

At the very beginning, Vrinda had graciously given me permission to share them on my blog. Unfortunately it has taken time. In deference to individual preferences, I have notated the pattern in photos alongside the written pattern.
 
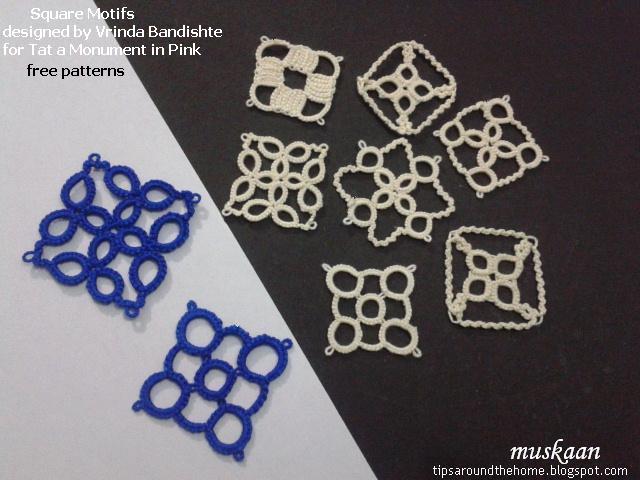
Squares from Knotty Creations !
3cms square motifs designed by Vrinda Bandishte
for Tat a Brussels Monument in Pink

I started in size 20 blue then switched to size 40 cream. I will show you why in the next post.
I like the way different techniques have been used to create interesting squares.

NOTES:
A few general notes before I begin with the actual patterns.

  1. Vrinda’s pink squares, designed for Tat a Brussels’ Monument in Pink measure 3cmsx3cms when worked in Anchor size 20. As I’ve often pointed out, Anchor 20 is thicker than Lizbeth 20. Hence, stitches will need to tweaked depending on the brand you are using. 
  1. slip ds” in her notation refers to reverse stitch (rs) or lark’s head knot or unflipped stitches as used in the 2nd side of a split ring or in encapsulation. 
  1. Zigzag chain” here refers to Sabina Carden-Madden’s S-chain. It is made of alternating flipped and unflipped stitches. i.e., 1 double stitch and 1 reverse stitch. Vrinda counts each stitch separately, not as a pair. Thus chain of 5 means (1ds,1rs,1ds,1rs,1ds). And she always starts with a normal double stitch.
  1. Some medallions use a central picot in first ring, to which later rings are attached. Ensure that this central picot is long enough to hold additional rings. 
  1. In 2-shuttle tatting, when in doubt, use the shuttle that is closest in position to start the next element. 
  1. I have tried to make minimal changes to the written pattern, except for consistency or bringing it in line with common notations. Sequence and some details are notated on my tatted models. My models are worked in Anchor size 40 in cream. Vrinda’s original models are in pink. 
  1. Some of the squares need to be blocked. 
  1. Leigh Martin has prepared pdfs for these squares, along with her notes. These can be accessed from Craftree.  

Abbreviations :
CTM    continuous thread method.
ds       double stitch
rs       reverse stitch (unflipped stitch in reverse order as in a split ring)
– or p  picot
vsp     very small picot
R        ring
--       long picot
+        join
rw      reverse work
SR      split ring
sh       shuttle
SS      switch shuttle
FR      floating ring


1. URCHIN
The enclosed space in this medallion is formed by clusters of block tatting. 

Techniques used : 
block tatting , starting chain with a picot
Worked all from the front in clockwise direction.

Load the shuttle with the required thread. Keep the ball attached.
Insert a paperclip to hold picot before starting chain.

Start Block One with chain of 6ds, vsp, chain of 6rs. Join to the start of the previous chain.
Repeat twice to form a block of 6 chains, with a vsp at start of each chain.

** Chain of 6ds, p, 6ds. Pull snug.
Block Two : 
Chain of 6ds, join to base of last chain of previous block. Continue the chains to form block two. **
Repeat from ** to **, twice.
Chain of 6ds, p, 6ds.
Attach to the start of the first block.

Hide the ends and neaten.


2. WIGGLES
A zigzag chain outlines the square shape of this central picot medallion

Techniques used : 
central picot, zigzag or S-chain, picot join to the right (folded join)
Worked in counterclockwise direction.


see notes for zigzag chain
revised direction

One shuttle and ball of thread, CTM.

R1: 5 – 5 -– 5 – 5. rw
S-chain : 5 -- 15 -- 5 rw
**R2 : 5 + 5 + 5 – 5. rw
S-chain : 5 + (last p of previous chain) 15 -- 5 rw**
Repeat from ** to ** 2 more times, joining the last ring and last chain to the first ring and chain respectively.

Finish by tying the chain ends to the base of first R. Hide ends and trim excess thread ends.

TIP : Make the pioct on chains long to give a better finish and sharper corners (see the bottom right model in lead photo)


3. BUBBLES
A central ring medallion worked in one pass from the front in counterclockwise direction

Techniques used : 
2-shuttles, mock picot, split ring

NOTE : This motif turned out smaller than 3cms. Hence I added 2 stitches in each segment of each element. Following is the altered stitch count.

Load two shuttles, CTM. Start with sh1
revised direction & stitchcount

Central R1 : 7 – 7 – 7 – 7. close. Leave mock picot space.
SR2 : 7 vsp 10 – 10 / 7.
**Chain (sh2): 7. SS
SR3 : 10 – 10 / 7 + 7. **
Repeat from ** to ** 3 times.
Chain (sh2): 7. Join to first picot of SR2.

Hide ends and neaten.

TIP : One can make the central ring and climb out with a mock picot and split ring; or one can throw the central ring off the first SR (from the 2nd side).

I think this motif would look lovely in 2 colours, especially when tessellated to create interesting patterns.


4. CLOVERS     
A central picot medallion made with inward facing clovers. 

Techniques used : 
2-shuttles, split ring, zigzag or S-chain
  
Load two shuttles, CTM. Start with shuttle 1.

R1 : 10 vsp 10.
R2 : 8 –- 8.
SR3: 10 / 10. rw
Zigzag chain : 1ds, 1rs, 1ds, picot, 1ds, 1rs, 1ds. rw.
**SR4: 10 / 10
R5 : 8 + 8.
SR6: 10 / 10. rw
Zigzag chain : 1ds, 1rs, 1ds, picot, 1ds, 1rs, 1ds. rw. **

Repeat from ** to ** 3 times. Join to the vsp of the first R. Hide ends and neaten.

TIP : I did rw (reverse work) before and after the zigzag chain so that the picot faces outwards easily and the shuttles also remain in the right position.


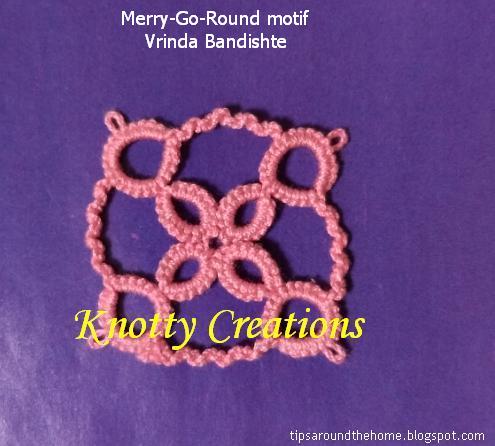
5. MERRY-GO-ROUND
A central picot medallion made with inward facing thrown rings.  
        
Techniques used : 
2-shuttles, split ring, thrown ring (from 2nd side of SR), zigzag or S-chain

UPDATE Mar 23 : revised direction
NOTE: There is a floating ring (FR) thrown off the 2nd side of each split ring. Start the split ring and when we come to that point, switch to shuttle2, make the ring, switch back to shuttle1 and continue to finish the original split ring.
The first floating ring also has a long central picot top which later FRs will be attached.

Load 2 shuttles, CTM. Start with shuttle1.

SR1 : 6 – 6 / 6 SS, FR: 8 –- 8, SS, 6. close.
**Zigzag chain: 9
SR2 : 6 – 6 / 6 SS, FR: 8 + 8, SS, 6. close **
Repeat from ** to ** 3 times,
Zigzag chain: 9
Join to the base of first R. 

Hide ends and neaten.


There was a mistake when I first tatted this motif. 
I made 15 stitch zigzag chains instead of 9 stitches. 
And the merry-go-round spun away !!!
If we add a picot in the center of each chain, we get another square motif !


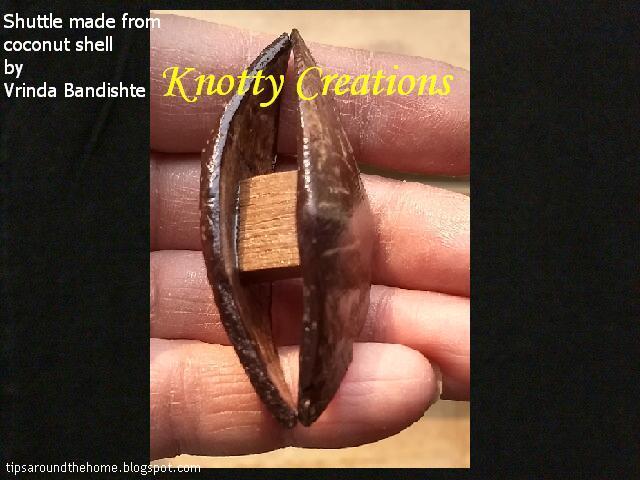
Before I leave, another glimpse of her multiple talents - a handmade and handcrafted shuttle. 
Can you guess the material?
Tatting Shuttle made from a Coconut shell !!!

Many many thanks to Vrinda for sharing her lovely patterns

hope you have tons of fun tatting up squares :-)


Tuesday, 19 April 2016

locked in place

Pin It now!

One can never have enough bookmarks ! And I have been itching to tat one for quite a while. Hence what started out as a practice braid out of curiousity, got extended into a bookmark for my latest book.

Rings and Curves Variation
Braid to Bookmark
Original braid : 'Rings and Curves' by Elaine P. Gan
Variation : Judith Connors, on Craftree


This variation of the braid pattern was shared by Judith on Craftree as part of her description of & practice for Elaine’s Reverse Join (“The handy reverse join”). I have used the RJ frequently since the Wiosna doily & prefer it to the SLT (shoelace trick/overhand knot).
So here is my practice piece of the braid which I later decided to extend to a full bookmark.

Having used leftover green thread, it soon ran out. So I used Ninetta’s ‘elementary’ technique to add the chain thread and it felt a bit like deja vu. Loved the ease with which the thread was added & no ends to sew!

It was interesting to do directional tatting (RODS) in this braid - the changes were made in blocks of elements, just as in the Spinning Wheel mat 
With the main body length completed, I had to think of a tail. A lock chain would be too narrow for this braid. The tail needed some width to be proportionate to the width of the main body. Picots on both sides !

UPDATE: Pictorial for the Picoted S-Chain -https://tipsaroundthehome.blogspot.com/2020/04/picoted-s-chain-cords.html  . S-chains are a variant of the zigzag chains.

For the few who actually read through my posts, do you recognize this? I tried it with metal here.
Yes, it is not a pearl tatted braid, but a S-Chain with picots. And the S-chain is a simple extension of a lock chain with complete stitches. Refer samplers # 10-12 here for comparison. I love how the stitches are diagonal to each other !

The tail still felt too narrow; so I decided to go for 2 tails & snipped off after desired length. And as always, the NanoMoment you snip, there comes this Big brainwave sweeping in all kinds of regrets !  Why have 2 separate tails ? Why not have them interlaced ?! I could’ve simply turned back ….
Oh well, damage was done. Reconnected threads to base & started 2nd tail, intertwining it with the first. Here, I used Martha’s ball thread join (explained in her Butterick Butterfly Bookmark pattern) to mask the links & keep the picots seemingly intact.
Look carefully & you will notice a green join on the lower left overlap & a pick one in the upper overlap.

Threads used : Anchor Mercer size 20 Art 4054. (pink – 052; green – 0241)
Measurements : Main body – 5½” x 1¼”  ; Tail – 4 “ x ½”
Techniques I used : 2 shuttles, RODS/directional tatting, reverse join, S-chain, ball & thread join, adding new ball thread in a chain

Without planning it, this bookmark has 2 adaptations/variations of the lock join – the reverse join & the ball thread join. The latter is already covered in Part II of the Joins series, & the former will come later.

My Observations/thoughts on Reverse Join :

  • RJ eliminates the visual dip caused by a lock join, and another dip when using SLT (I am not a fan of SLTs). Due to the encapsulated thread, no dip is produced.                     
  • There will remain a colour blip which can be incorporated as a design element.
  • RJ is much easier to undo than a traditional LJ, because of the encapsulated thread.
  • In the bookmark, I deliberately used a down loop throughout to make the RJ. And since I was tatting fs/bs, some of these turned up as up loops. It doesn't change the spot of colour, but it Does change how the colour bar appears ! 

I enjoyed tatting this braid to bookmark - although only rings & chains, it needed one's attention. Another page in my learning turned :-)

Many thanks to all the wonderful tatters named in this post - 
you enhance my learning at every step !

Related Posts : Shuttle 2 to the rescue