Tuesday 22 September 2020

3rd times a charm

Pin It now!

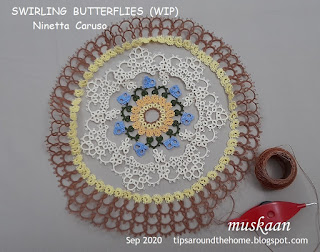
 continuing Ninetta Caruso's Swirling Butterflies doily - rounds 6 to 9 ... 

All my previous posts on this work in progress with notes - https://tipsaroundthehome.blogspot.com/search?q=swirling+butterflies

Round 6 : 15.5 cms in Anchor size 40, worked counterclockwise with one shuttle only.
Techniques - spiral ring, decorative picots, treble stitch (tds), lock join (substituted with a DYJ variation)
This round consists only of spiral rings with long decorative picots and a single tds. I asked Ninetta about that single tds -- it is a clever visual effect to maintain same height!
This light yellow colour was a compromise colour although Ninetta approved early on, and later even my hubby liked it a lot, despite my continuing doubts midways

My first choice was this dark green in order to frame the large floral design. Unfortunately the thread turned out to be very difficult to work spiral rings! Notice the ugly bare thread and distorted rings in the inset above?! Not to mention eyesight difficulty in tatting with a dark colour

TIP : Quality of thread is very important to work spiral rings. The stitches should slide smoothly so that the ring closes easily without any tug on thread between rings.

The yellow was a charm - worked like a breeze! Especially since I did not use any picot gauge.

TIP : There are 13 long picots and a 14th vsp for the last treble stitch. I made All 14 picots long. 

TIP : In order to avoid counting back all the picots, this coiless safety pin marked the picot (7th) on which a lock join needs to be made to coil the ring.

During my failed green trial, in order to increase stability (and for peace of mind), I altered the lock join to a variation of the Dora Young Join (DYJ) and decided to continue with it in the yellow version.

Dora Young Join (DYJ) variation - Start with making a lock join, but instead of pulling shuttle thread to tension it, tug at the loop thread that is at the back of work (like we do for the DYJ and CWJ) to remove slack, In next step, pass shuttle again through the open loop, front to back, and tension.  
I'll have to try it with thicker thread to see how it looks up close. 

This round is quite floppy with rings tending to dance and twirl since there are 7 unattached rings in between. I had to be real careful to keep them facing correctly when attaching 8th ring to previous round.

Rounds 7, 8, 9 : 17.5cms, 19.5cms, 21.5cms in Anchor size 40 worked counterclockwise. 2 shuttles, ctm.
Techniques - fs/bs tatting, split chain, split ring (all 3 optional).

These 3 rounds are worked continuously, climbing out with a split chain and into the next round with a split ring. With only 2 SRs, I decided to work with 1 shuttle and ball.
All 3 rounds are identical!

Ninetta warned us that rounds 7 & 8 ruffle but settle after round 9. The waves after round 7 already seem to be flattening as round 8 gets underway. 

Ruffling has decreased even more along the portion where round 9 portion has been made.
I blocked (rolling pin) only after completing all 3 rounds.

Voila! Flattened! 3rd time was such a charm!
Working 3 identical rounds consecutively could've been boring, but it was truly Fascinating watching the taming of the ruffles!
Got me wondering if there was any other way to keep it flat and avoid ruffling. Here are my thoughts on the Design Options -
1. start with shorter chains and increase the number of stitches (1 or 2 ds per outer round) ; 
2. include stabilising picot after 2 & 1 ds, to link adjacent chains in rounds 7 & 8 respectively.
3. progressively increase ring size in subsequent rounds.
All options come with their visual consequences - it all depends on what the designer is going for!


The next round consists of individual 3-round motifs very similar to the center. (7x2) motifs will take some time to tat. The very last round is simple rings, chains, and thrown rings.

I had intended to keep blogging as I worked this doily on the side. But I get so engrossed and Love the tat, that all blogging is side-lined. Hopefully I'll squeeze in a few posts this time.

Wednesday 16 September 2020

3 and 1 and 2

Pin It now!
No, no, this time I have the sequence right!
These are the number of shuttles or threads used in rounds 3 to 5 of Ninetta Caruso's Swirling Butterflies Doily.
And it also showcases a mixed timeline in evolution of tatting techniques...
Rnd3 - treble tatting in butterflies - a very modern stitch, along with encapsulation/padded tatting ; 
Rnd4 - bare thread tatting with rings only - from the very beginning of the artform ; 
Rnd5 - chains and split rings - evolved between the 2 time zones above.


Round 4 : 11cms in Anchor size 40, worked clockwise with one shuttle
Techniques - one shuttle rings only, bare thread, lock join bridging, directional tatting

Remember my incorrectly tatted round that I snipped last time? It is the one on the left. On the right is the correct version.
 
One ring strategically placed, makes all the difference in the height and shape of the arch! 
The incorrect one measured 10cms across.
The bare thread is 2ds long, but I did not use any picot gauge.

The main feature of interest in this round is the bunch of 5 rings that look like leaflets.

The leaflets are again a look back in time to 1850! The leaflets are worked in the same way as Mlle Riego's Bunch of Grapes , using bare thread and lock join to emerge at a distance to start the next ring. 

TIP : Since the leaflet is worked from the backside, if we use a loop pulled down to make the lock joins, the bare thread remains at the back of doily. 
TIP : Also, it is better to err on the side of a slightly longer bare thread. If it is too short, it distorts the ring, as happened a few times.

TWoT Notes - Directional Tatting in Round 4
Following the pattern, if one starts with the outer large ring frontside, the inner small rings and leaflet will be worked backside and the leaflet will swirl as in the left image below.
 
However, if one works the small rings and leaflet frontside, then the latter will tilt in the opposite direction (pic on right).

UPDATE: As I worked more rounds, I realised that the bare threads at the base of the leaflet motif can be avoided all together! In my working, the bare thread makes the leaflets 'loose' and floppy, and they shift while blocking instead of lying flat.

TIP : In order to climb out to Round5, I left a long tail and began with the 3rd inner ring. This tail was used to work the split ring to climb out. 


Round 5 : 13.5 cms, worked counterclockwise with 2 shuttles, starting with false CTM.
Techniques : split rings, directional tatting
The long tail acts as the 2nd shuttle thread. One can add a fully loaded 2nd shuttle at an element of one's choice later. I climbed out at the outer ring as seen in pic above instead of where the pattern instructed. Personal choice, nothing more.

 
The side of the septagon measures 6cms in size 40.

Such a lovely large flower shape! In order to highlight this floral effect, I chose cream. This forms the complete colour palette for this doily.
Against a black background (my tablet cover).

I am thoroughly enjoying this doily, though it is progressing a bit slower than I would've liked. And these 2 rounds gave me lessons in design and designing from a master of the craft!

Sunday 13 September 2020

7 plus 6 is 13

Pin It now!
7 outer rings and 6 inner rings make 13 rings. This is followed by ring#15 of the leaflet. So how did I miss Ring#14?! Ah, yes, I definitely need to go back to kindergarten to learn counting! Last time it was for simple addition.

the crane is hungry!

On top right is my trial tatting in order to establish the length of bare thread in size 40 thread. I was happy and did the entire round 4, climbing out with a split ring. It was only on the last element of Round 5, that the bulb in my eyes and head went off!

Peered into the diagram and found that there are 8 outer rings and 6 inner rings in the arch above each butterfly, equaling 14. Followed by ring 15 which starts the leaf/frond. Sigh.

The hungry crane went to work, snipping it all off.

Off to restart the round. Will show how it all looks next time. Luckily, the round tats up pretty quickly and is so lacy!

Enjoy, while I return to my dunce corner, shuttle and abacus in hand :-)))

Tuesday 8 September 2020

4 plus 1 is 5

Pin It now!

This is the start to Ninetta Caruso's Swirling Butterflies doily which I am privileged to test tat. If you remember, she had posted these 3 rounds as a tat-along in which I participated here.
See all her related posts here.

This time I am working in Anchor size 40.
Round1 - 2.5cms worked clockwise with shuttle and ball;
Round2 - 4.5cms worked from right to left (counterclockwise) with single shuttle.
Techniques - spiral rings, treble tatting

2nd round is worked first, but joined into a circle only after the 1st round is completed. It is such fun to tame the linear spiral rings braid into a circle!

Round3 is worked with 3 threads due to this colour placement. However she also gives the option to work it with 2 threads. This is where my confusion arose. Her diagram says 4ds chain before and after the butterfly, but her 2-thread pictorial showed 5ds chains. Hmmm, turns out in the former there is 1ds made on either end, with the blue thread, thus equaling 5ds! Back to kindergarten....

All my notes are in the above link.
The butterflies are worked from the back. The chains have 2 core threads, and is easier to work as encapsulation or direct tatting (reverse/unflipped stitches)  moving counterclockwise.

With butterflies, it measures 7.5cms and without butterflies this would be 6cms across.
Techniques - treble tatting, encapsulation, treble join (layered)

Now to continue with the next rounds.


All my projects are on hold as I focus on this doily. But I have decided on the colour scheme Ruth Perry's bookmark adaptation as a mat. I might have to discard the length already made in case there is too much difference in the thickness of threads.

A gorgeous hanky edging from Kathleen Minniti is also in queue!


Friday 4 September 2020

two clever

Pin It now!
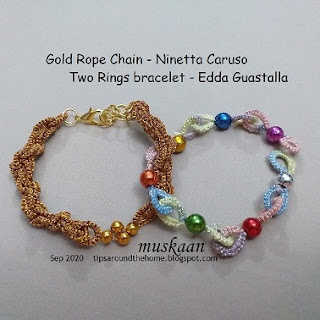
Too clever by half! Definitely not. They are truly two very clever tatters, teachers, designers and keep inspiring us with their creativity - Ninetta Caruso and Edda Guastalla!

Ninetta Caruso's Gold Rope Chain - my Rose Gold version

For my interlocking split ring and rope chain pictorials, I had used thick thread. Further, in order to avoid a bare thread spanning the side of each ring, I left the bare thread space shorter than required. Both factors created a gentle spiral, not the rope chain effect in Ninetta's original. I Had to satisfy my scientific curiosity, hence a quick tat with metallic thread.

TIP : The length of bare threads between successive rings determines the amount of twist; and the visible effect can range from a gentle wave to a tight woven rope.

Stringing beads on 3 strands of Anchor metallic embroidery thread that kept splitting was taking too much time. Hence no seed beads.
Much happier with the twisted effect, though could've been better. These are certainly addictive and I stopped only when the shuttles ran out. My fear about the thread were unfounded - the rings closed easily - and only 1 or 2 strands could have worked smoothly as well.

Edda Guastalla's Two Rings (Interlocking) Bracelet/Chain (catenella 2 anelli)
I was very impressed with Edda Guastalla's easy interlocking rings! Such fun, too, besides being practical....
  • no need to string beads, except the one (or more between the twin rings).
  • can use up leftover thread lengths to empty shuttles
  • no need to hide tail ends
  • only one shuttle required
  • easy travel or 'handbag' tatting project
  • several variations possible - colour, size, symmetry, etc. 
  • TIP : eg. One can create a diamond shape instead of simple straight chain. Start with twin rings, then make 2 sets of twin rings within the same (these could have an asymmetric stitch count to move the edges further apart), and a 4th set within both 2nd & 3rd sets to bring them together again.
Red Rose metallic thread size 20. Used up several leftovers that were at least up to 25" long.

TIP
: These twin rings can be used effectively as connectors! Remember these curled ring connectors (CRCs) which are essentially the same twin rings curled around motifs to link them? Instead of curling the rings, one can simply insert thread to make the twin rings.

Two lovely addictive interlocking rings! Vastly different in execution and skills, yet brilliant in conception and creativity. Many many thank to both ladies.


The rope chain reminded me of the double helix structure (closer to the quaternary structure) which led me to these books ...

A team that revolutionised the scientific and medical world comprised James Watson and Francis Crick when they unraveled the DNA structure based on Maurice Wilkins' results. Of the 3, the former 2 are more commonly credited.


Francis Crick. Discoverer of the Genetic Code by Matt Ridley
This paperback is a 2008 Harper Perennial edition of the original 2006. It is a rare insight into the life, work and thoughts of Crick. An engaging read, as are most of Ridley's books.

A Passion for DNA. Genes, Genome, and Society by James D Watson
2000, Oxford University Press. This paperback, with high quality paper, is a collection of Watson's lectures, essays, commentaries on diverse topics and the wider impact and implications of the discovery. 
Having already read Craig Venter's autobiography, it was interesting to compare notes from both perspectives. 

I found Watson was the more conventional and conservative one compared to Crick, though I admired the latter's principles and highly intelligent mind.

Rummaging for all these books brings bittersweet memories - the happy hours spent reading and discussing (hubby & I love Genetics!), but the sadness that I cannot now recall all details. A poor memory that needs huge refreshers ;-D

Wednesday 2 September 2020

influential intrusion

Pin It now!
It all started when Grace Tan saw the intruding picot and brought out her long-stalled pattern. She thought it could be used in her serpentine pattern and simplify the working instructions. And I was one of the first few she roped in to test tat Endless Hearts Braid with Corner.
Grace adapted her heart patterns into an undulating length of lace - a clever symmetry - and a larger heart for the corners. The frequent directional changes take a bit of getting used to, but soon one can set a rhythm. It still needs some concentration, especially if one resorts to fs/bs tatting as I did, in two colours, trying to keep the blips at the back. I had to draw my own diagram for reference initially.
 
Inward facing  picots - She substituted the Intruding Picot (ip) with Ninetta's Face Inward Picot (FIP), although the ip worked for me (above pics) in the 3rd and 4th corners. FIP was my first time and it was not easy to tease out the leg in perle cotton. I followed instructions for the braid, using FIP in first 2 corners.
Encapsulating Picot Join (EPJ) - I got to try out this new blipless join that can link several elements together at a later time. As the term suggests, it is a picot join that encapsulates or traps another element or picot. More elements can be linked to the same point later as well.
Sometimes I got the EPJ looking almost invisible from the front, at other times a thread bulge was visible. I played with many tweaks, such as up and down loops, etc, but need more study in thicker thread to figure out how best to avoid that thread to make it consistently indistinguishable.
Layered Picot Join - My 'easier' alternate to EPJ -
1. Make a longer picot on the ring such that it can span the chain(s) that it intends to encapsulate.

 
2. Keep this picot at back of work and make a normal picot join through Both picots simultaneously. 
3. This is how it looks from the back. 
Note - these pics were taken when I was working backside. 

 
4. This is how it appears from the front - the join is invisible here.
5. This is how the hook will be inserted through both picots when working frontside.
And a 4th element can be joined to that same picot through the back. I love how clean the chains look - the join is invisible.
Drawback - the rings tend to lie slightly below the chains, but with sufficiently long picot, it can be avoided. Mainly, there is a colour bar at the back (clearly visible in #3).
Turn Chain (tc) - Of course there are several other ways to work this, as outlined in Grace's post. Overall, I limited myself to very few tweaks and substitutions, trying to largely stay true to the pattern. I have used many ways to turn a chain, but stayed with her version of turn chain which was to simply rotate the stitches in such a way as to reposition them, like this Twist Work (TwW).
There are also several applications to this versatile pattern! -
Add a drop crystal and beads for a beautiful V-shaped necklace or collar; or a square collar to sew on!
Without the corners, it is easily a braid, bracelet, bookmark, ring, choker, etc. 

In Anchor Pearl cotton size 8, the braid is 1" broad ; 2 hearts = 1.5" long. The entire frame is 3" on the inner edge and just over 5" at the outer edge.
All in all, a good learning experience with tons of ways to work it.

Romancing With Life - an autobiography by Dev Anand -
This all-hearts pattern seemed a fitting frame for this true karma yogi's life, work, and joie de vivre perspective. Ageless, who died at 88 with his boots on and with more energy and curiosity than his juniors by generations.

Dev Anand needs no introduction to Hindi film buffs and Indians in general (isn't that top left pic just great?! - the 3 great contemporary heroes). But my international friends, can you identify who he is with in the top right pic?! This hardbound book is a feel-good read for the most part, dwelling mostly on his various loves - be it nature, mountains, films/film-making, women, beauty, etc. There are more areas and depth one would have liked to read about, but it is understandable how the entire focus was on romancing.