Showing posts with label tatting tips. Show all posts

Thursday, 18 June 2026

EP Tutorials

Pin It now!

Ninetta Caruso, my partner in crime! Ninetta is my PIC in the Endrucks 1920 Project and we have a great collaboration going. Add to the vibrant Project is something she and I have been working on since August of 2025 - a tutorial resource catering to the Endrucksian collection. but of course, it is relevant for any tatting project.

Eleonore Endrucks used very limited techniques to create unique patterns in her 1920 book, Die Schiffchen-Spitzen. Yet the derivatives and even some reworkings of her originals have applied a wide range of techniques and effects. Our members cover an entire spectrum of skill levels. Hence some required help at various stages. We tried to provide that help. Over time, these tips and techniques started growing and remained scattered. (We had used the #eptutorial hashtag, yet found that only some selective posts came up). Hence we needed to bring them all under one roof so that future tatters could find the tutorial alongside the pattern easily. To that end we worked on the EP Tutorials document and lo and behold, it started to grow and grow!

This is a quick collage showing some step in a pictorial or some application in a model, etc. 

As our technique list grew, we tried to incorporate what Frau Endrucks herself advocated through her advice and preface and balance it with what we do today. 

EP Tutorials :  https://docs.google.com/document/d/17Xh32ZlW5MmVTlidA8RzwwY7j-l4i_9YYv5N236R5RE/view    (click link to open/download)

Some features of this document include -  

  • Endrucks' tips
  • short introduction or descriptions
  • pictorials (as PDFs)
  • video links
  • blog links (We have tried to keep it an in-house affair limiting the links to either Ninetta's or to my blog and resources created by us.)
  • diagrams (as PDFs)
  • pattern links where the technique was used or effect applied; these can act as practice patterns. All patterns are from our Endrucksian collection.

The document is divided into sections and each sub-listing is arranged alphabetically for ease.
We start with a general section comparing vintage or traditional tatting with contemporary tatting.
This is followed with 
  1. starting and finishing
  2. changing direction
  3. 3D or dimensional tatting
  4. picots
  5. joins
  6. classic formations
  7. techniques
  8. continuous tatting
  9. needle tatting
  10. working with beads and jewellery findings or notions
Some presentations are still works in progress; we had delayed the release of this document long enough and didn't want to wait any more. So these PDFs will be done over time and the document updated accordingly.

We hadn't realised ourselves how much diversification had entered into the Project! And I am sure we must've missed a few! Do let us know if you come across something we've missed or something you want.

On the top right of this blog page you will find important links relating to the Endrucks Project. I also added a new page (tab on top panel) titled 'Endrucks' to give a birds-eye view of the Project and all relevant links. It is still under construction. 

Saturday, 17 August 2024

bingo, found it

Pin It now!

 My tatting-related activities are so scattered. And I feel quite scatter-brained. Wonder which came first, hmmm. Over the past several months I have been tatting samplers for the Glossary. Since it is progressing in sporadic bursts, I tend to either forget I've tatted it or misplace it. The pile-up does not help at all, neither does the various steps involved in saving and processing if not done sequentially and soon.

However I had a lucky breakthrough! Finally found the sneaky little Double Pearl chain sampler, whew. Incidentally, the PICOT Bingo game has one box for this technique, which is why I am sharing it here. 

My initial objective was to tat a short sample. However, the rhythm became quite addictive and I enjoyably continued till one of the threads ran out. What was meant as a short chain turned into a necklace.

Pearl Tatting is the double-sided technique with picots and stitches facing both sides. We are more familiar with the Single Pearl, worked with 3 threads instead of 2 for chains and it's counterpart the Maltese Ring worked with 2 threads instead of one. Pearl is the vintage term for picots. There are a few tutorials listed under Chains 🠆 Pearl Tatting, here. Mlle Riego wrote a book dedicated to this technique in 1867! 
Double Pearl tatting/chain, consequently, is an extended single pearl using extra auxiliary threads - a total of 5 threads for chains which tend to be straight.  

Double Pearl tatting requires 5 shuttles (or at least 3 or 4 shuttles + 2 or 1 ball, respectively) and encapsulation. Numerous permutations and combinations are possible, but I stuck to the basics.
You can change
  • the number of colours and their relative position,
  • the number and size of picots,
  • the addition of decorative elements thrown off the chain,
  • the thickness of threads,
  • the stitches used (double and reverse stitches) and thence the number of shuttles used,
  • embellishment with beads, etc., and so on.
● We can even have decorative chains instead of the long bare thread picots! For instance, dot picot string, bullion knots, JRs, Josephine knots, scallops, etc. 
On the left part in above image, you can see the thrown Josephine rings instead of the small picots.
TIP: If you wish to add such elements on each segment, ensure you have 5 shuttles.

I deliberately used 4 different colours. But imagine the confusion one can create if working with the same colour throughout! Even experienced tatters might find it difficult to identify how it was done, LOL.

I then continued as before, enjoying the rhythm. Josephine rings tend to break that working rhythm.
Threads used - Anchor mercerized cotton size 20 (equivalent to Lizbeth size 10) in 5 colours 
TIP: Only 4 colours are visible. The core thread can be of same thickness or thicker than the outer threads for a stiff cord. The core thread can also be made visible by simply bringing it forward, or by using Repositioning methods such as SLT, etc.
Picot gauge - 2 cms
TIP: It was easier to hold the gauge horizontally while measuring.

Starting the chain was tricky. I knotted the 5 threads together, but leaving the right length of bare thread took some trials.
Also, initially I made mistakes in maintaining a consistent overlap between threads. However, once I understood where the thread of last segment should be held while tatting the new segment, it became smooth sailing and addictive. 
TIP: Immediately after tatting a segment, I would place the shuttle to my left at the front of the work. Thus, when its turn came again, the picot overlapped from the front.

Directional or FS/BS tatting was maintained throughout. I didn't block the finished piece, except for shaping with fingers since I wanted to keep the gracefulness of the sinusoidal arches intact. 
I could've added more picots, including graduated picots, in each segment; or embellished with beads. However this was a relaxing, enjoyable tat, and I wasn't in a very adventurous frame of mind.

Since the core thread is of same thickness, it was easy to curve the straight chain. And it had become long enough to become a necklace instead of a bracelet, LOL.
TIP : Another way to ensure curvature is to shorten the picots on one side. 

I do wish I had added a few highlights such as beads and findings to finish off the 'necklace' properly. And one can use metallic threads for stiffness. Otherwise one might need to stiffen the piece for the picots to hold their shape when worn as a necklace or bracelet. So, I hope Natalie forgives me the lethargy.

Submitting this for two blocks in the PICOT Bingo
Double Pearl Chain, and 
Tat a Necklace.

And 💥Bingo💥! I have completed my first horizontal strikethrough! The middle row consisting of Tat a Necklace; Add Beads; Free Space; Graduated Picots; Catherine Wheel Join.

Wednesday, 31 January 2024

helix tatting pictorials

Pin It now!

Caps in, counterclockwise spiral

I was testing a pattern for Richard Embrey and I needed to understand clearly (through action) how to achieve a particular effect. While I had dealt with the concept here - https://tipsaroundthehome.blogspot.com/2023/12/about-helix-tatting-and-more.html, I needed more clarity on the actual tatting since four visual effects are possible. 

positioning for last stitch for Caps out effect

It bothered me not being able to identify the path clearly. Just one final stitch in the first row makes the difference! I needed this study.

Secondly there was a stimulating discussion that this technique is macrame and not tatting. If the very basis of tatting is the flipped/transferred lark's head knot (called double stitch), then helix tatting is definitely tatting since chain segments with double stitches are made. And besides the tubular I-cord, numerous shapes can be created, and rings and chains can be thrown off at any point.

Helix tatting basic trial

Thirdly, I couldn't find any really close-up pics of the steps/process. This led me to a quick, very basic pictorial using thick knitting cotton and only 4 threads. However, on it's own, this might've led to some confusion or disinterest. And like most of my work, I delved further, resulting in this presentation pdf.

Helix Tatting Pictorials and Effects (and Tips)https://drive.google.com/file/d/13dPVQGsmAQU6OS4FrP3YCFgXokdiJVvs/view

HT Caps out, clockwise spiral 
The second pictorial uses 8 shuttles, but instead of starting CTM, I simply tied a loose knot. The fun part of this is that the tails can be hidden later within the hollow.
If one runs out of thread, it is easy enough to add new thread leaving the tail in the hollow!

And simply inserting a skewer stick and rotating the tatting helps the stitches to arrange themselves neatly!

These are the 4 effects together. The left pair is Caps out and the right pair is Caps in. The difference is visible in the texture, width, and direction of the spiral.

I haven't decided what to do with these samplers, hence the tails are left unhidden. Besides the 3D candle I mentioned here, I have a few other ideas in my head. Let's see if they get translated into thread. 

So that's it for now. Hope you give it a try if just for a lark! 
I have another pictorial lined up to share, again arising out of my errors and dissatisfaction.

Wednesday, 16 September 2020

3 and 1 and 2

Pin It now!
No, no, this time I have the sequence right!
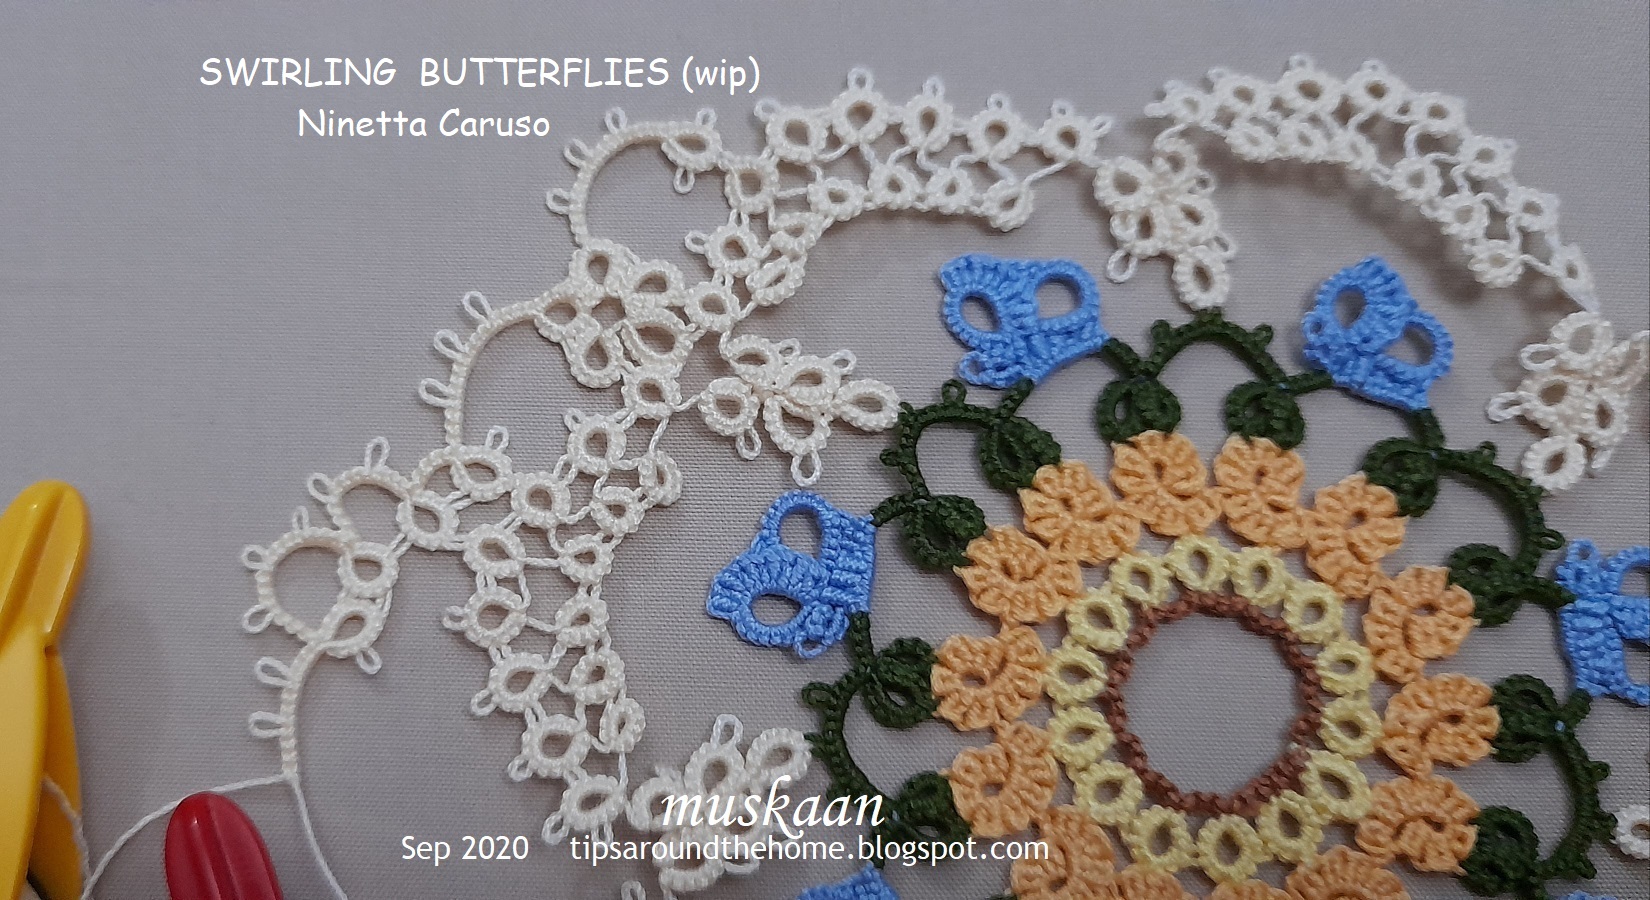
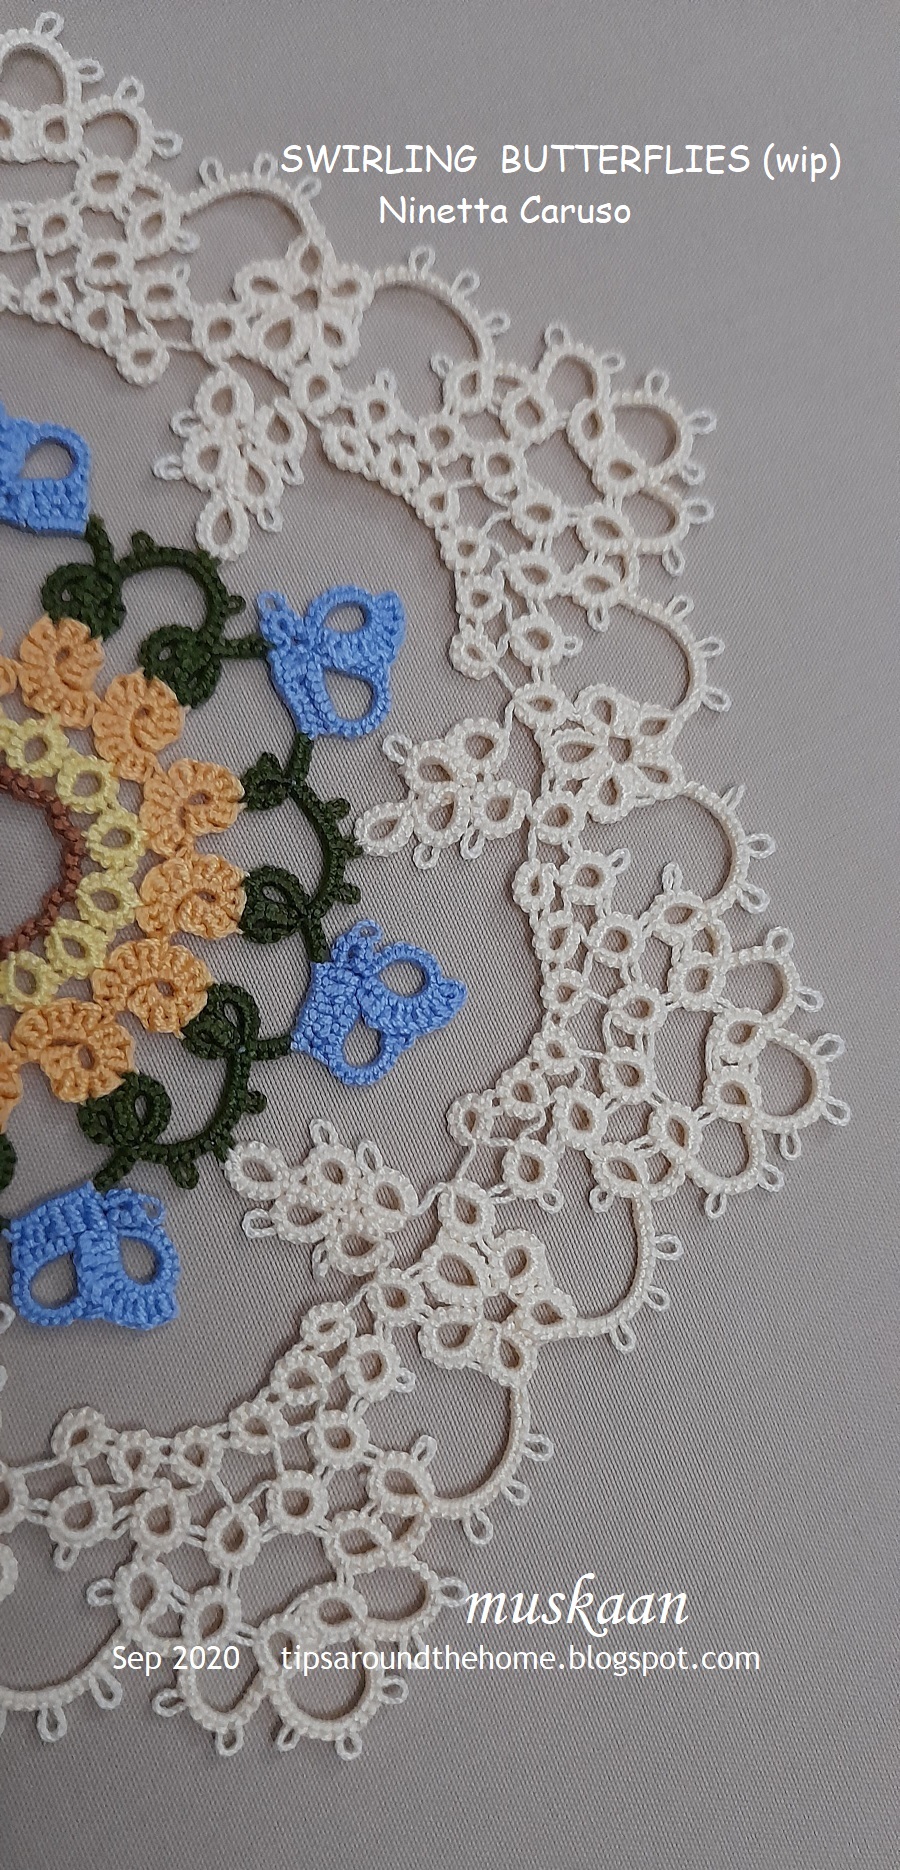
These are the number of shuttles or threads used in rounds 3 to 5 of Ninetta Caruso's Swirling Butterflies Doily.
And it also showcases a mixed timeline in evolution of tatting techniques...
Rnd3 - treble tatting in butterflies - a very modern stitch, along with encapsulation/padded tatting ; 
Rnd4 - bare thread tatting with rings only - from the very beginning of the artform ; 
Rnd5 - chains and split rings - evolved between the 2 time zones above.


Round 4 : 11cms in Anchor size 40, worked clockwise with one shuttle
Techniques - one shuttle rings only, bare thread, lock join bridging, directional tatting

Remember my incorrectly tatted round that I snipped last time? It is the one on the left. On the right is the correct version.
 
One ring strategically placed, makes all the difference in the height and shape of the arch! 
The incorrect one measured 10cms across.
The bare thread is 2ds long, but I did not use any picot gauge.

The main feature of interest in this round is the bunch of 5 rings that look like leaflets.

The leaflets are again a look back in time to 1850! The leaflets are worked in the same way as Mlle Riego's Bunch of Grapes , using bare thread and lock join to emerge at a distance to start the next ring. 

TIP : Since the leaflet is worked from the backside, if we use a loop pulled down to make the lock joins, the bare thread remains at the back of doily. 
TIP : Also, it is better to err on the side of a slightly longer bare thread. If it is too short, it distorts the ring, as happened a few times.

TWoT Notes - Directional Tatting in Round 4
Following the pattern, if one starts with the outer large ring frontside, the inner small rings and leaflet will be worked backside and the leaflet will swirl as in the left image below.
 
However, if one works the small rings and leaflet frontside, then the latter will tilt in the opposite direction (pic on right).

UPDATE: As I worked more rounds, I realised that the bare threads at the base of the leaflet motif can be avoided all together! In my working, the bare thread makes the leaflets 'loose' and floppy, and they shift while blocking instead of lying flat.

TIP : In order to climb out to Round5, I left a long tail and began with the 3rd inner ring. This tail was used to work the split ring to climb out. 


Round 5 : 13.5 cms, worked counterclockwise with 2 shuttles, starting with false CTM.
Techniques : split rings, directional tatting
The long tail acts as the 2nd shuttle thread. One can add a fully loaded 2nd shuttle at an element of one's choice later. I climbed out at the outer ring as seen in pic above instead of where the pattern instructed. Personal choice, nothing more.

 
The side of the septagon measures 6cms in size 40.

Such a lovely large flower shape! In order to highlight this floral effect, I chose cream. This forms the complete colour palette for this doily.
Against a black background (my tablet cover).

I am thoroughly enjoying this doily, though it is progressing a bit slower than I would've liked. And these 2 rounds gave me lessons in design and designing from a master of the craft!

Tuesday, 10 July 2018

black blindness no more !

Pin It now!
How often have we ranted and raved;
avoiding black like the plague ?!
Well, avoid no more! Follow this tip to tat with thread of any colour and any thickness.

(click title to download pdf)

Tatting with black thread often means having to rely on motor /muscle memory. It is so difficult to see or distinguish each stitch! And heaven forbid if we lose count!
Well, fear no more.
Here's a simple way of counting stitches in black or dark coloured threads and even very fine thread. So tat on without a care; throw away that magnifier.

this is only an image. click here to d/l pdf
[ It was extremely difficult to take pics of the top view, despite seeking help. Only 6 of the tons made it through. Hence the diagrammatic illustration. ]

Turn the tatting towards you so that it is vertical and you now see the stitches from the TOP. It helps to view it against a contrasting background.
The line of stitches now looks like a serrated edge or a wave.
Slide/spread open the stitches along the core thread - separating them out a bit.
Each individual crest & trough of the ‘wave’ is now individually visible. Even in size 50 black (or thinner threads).
Count either the crests or the troughs to determine the number of stitches.

In traditional tatting, count the number of troughs.
1 trough = 1 double stitch.

In backside tatting where the sequence of half stitches is reversed (rods),
1 crest = 1 double stitch

Once you are satisfied with the number, push back the stitches and continue. 

Here's the same in thick thread - 
 There are 5 ds on either side of the picot on this chain...
Spread out the stitches and view from top. 
One can clearly see 5 troughs on either side of picot.


Simple? Try it and do tell. 
I have not come across any such tip. If you have, please share.

Sunday, 29 March 2015

and options

Pin It now!
Renulek’s  Wiosna  Doily 2015
Rounds 8 & 9 


Last year I was amazed at how the same doily pattern, Renulek’s Spring Doily 2014 (my version here), took on a character of it’s own, changing appearance with the colour choices, placement choices, etc. that each tatter made.
But tatters don’t just have the option of colours, threads, & thread sizes. We can also make choices with regard to which/what technique to apply to each round, to best suit our requirements & our comfort ! Many paths to the same destination :-)

I have just started on Round 9 & would’ve ideally posted only after completion. However, since this is a tat-along, & there seems to be some interest in my earlier tips, I decided to upload my thoughts so that they may be of timely help, if required …. as it is I started late & am lagging behind ;-P

UPDATE (March 10, 2017) : For a simpler working of Round 9 see pictorial here with options for different colour placement,  too.

This is what worked for me for Round 9 of the Wiosna

I have used single colour for entire round. Hence both shuttles are loaded CTM.
For those using 2 colours, you may switch colours using the SLT wherever necessary. Carollyn has posted some excellent how-to pics for 2-coloured Round 9,here.


Firstly, some pointers :
  • Work this round counter/anticlockwise ! While all previous rounds were done/could be done in clockwise direction, this one Has to be tatted in opposite direction.
  • It requires Directional Tatting. Hence a knowledge of Reverse Stitch (also called 2nd half of Split ring method, lark’s head knot,  unflipped stitches/hitches, encapsulation, etc.) is required.
  • All tatting is done on the Front Side Only. Do Not Reverse Work at all !!! I learned this from tatting Teri’s Dandelion Chain Link Bookmark here.
  • If one is not too experienced with this type of tatting, it is best to use single colour, so that any small mistake will not be easily apparent.
  • I always find it less complicated to use 2 different types of shuttles since it is easy to keep track of which is Sh#1 & Sh#2. Or else, mark them.
  • Lock Joins are made with the shuttle closest to the joining point.


The Process (Directional Tatting)

To Begin :
*** With Sh1,
Ring : start with the central ring normally (ds) . Close ring. Switch shuttles.
       With Sh2,
Ch1 : Reverse Stitch.  LJ with Sh1, to ring picot.
Ch2 : Reverse Stitch.  LJ with Sh1, to ring picot.
Ch3 : Reverse Stitch.  LJ with Sh1, to base of ring.
Ch4 : Normal ds , join to picot on round 8, continue ds chain.
Switch Shuttles. *** 
Repeat from *** to *** till end (72 total motifs/repeats)

The first ‘motif’ is complete. For all subsequent repeats, the 1st side chain will be joined to the adjacent previous side chain in this manner : LJ with Sh2, to chain picot UPDATE : As pointed out by Ninetta in the comments below, instead of a LJ here, one could easily use the Split Ring or Lark's Head Knot Join. That would not only bring about neatness, but keep the core thread in play. Thanks Ninetta :-)

Continue in similar fashion for rest of the round.

To Summarize :
Work Only the Ring with Shuttle #1, and the Lock Joins to ring from the 3 chains going around it.
All the rest will be tatted using Shuttle #2 – the 3 chains around the ring, the chain joining to previous round, and the Lock Join when connecting to chain picot on previous repeat.


I am thoroughly enjoying this round – both for it’s beauty , the colour I’ve chosen , And for the option of using yet another technique learned earlier. The only minor irritant is that one has to unwrap the chain thread from one’s pinkie to make those LJs ;-P

Abbreviations used :
CTM – continuous thread method
SLT – shoe lace trick
Sh – shuttle
ds – double stitch
Ch – chain
LJ – lock join

Just a couple of lines regarding Round 8 :
It is a simple round, which can be done with single shuttle & ball, although I went with 2 shuttles.
I added a tiny picot at base of each chain (after 1st ds & before last ds) , joining adjacent chains for better anchorage & stability, just as I did in the previous round 7,here.
I’m not too happy with the long chains – there is some ruffling – but  am hoping that Round 9 will flatten it out.

And to repeat, there is no Single correct way of tackling round 9. One should choose what one is comfortable with. This can, however, also be a challenge to learn new techniques & applications.

UPDATE :
Well this post Is about  Options!
Optional  Process (Traditional tatting) :
Bernice mentioned in the comments below, that she was also working counterclockwise but was reversing work. This morning, as I continued my directional tatting, it suddenly hit me that this is Essentially the Same ! All I was doing was tatting from the front with no RW, while Bernice was tatting ‘normally’ ie., with normal ds & hence had to use RW.
I had to confirm it of course ;-P Yes, it worked great (the last 2 repeats in the pic). Looking closely, I think, in fact, these turned out better looking than the previous ones !


Note : 
Ring is made on the front side of the doily. Hence when work is reversed, we are on the backside, & you might need to make a Down Join to avoid colour blip if working with 2 colours.

Also, use SLTs when required if working with 2 colours. Carollyn has demonstrated this.

So, when one looks from the front side, one is tatting Counterclockwise, but with normal ds. 
In fact, if using a single colour, then one can even work with 1 shuttle & ball through the entire round, by doing just 1 SLT before each ring.

The ring is like a Thrown Ring - a ring on the long chain! 

Another option -- if working with 2 shuttles & single colour,  every alternate repeat will be made by the next shuttle.  If you started with Sh 1, next repeat will be with Sh2, then 3rd repeat with Sh1 and so on.  No SLT required. 

The Process
Make Ring . RW . (you can see the solitary ring in the pic on top right)
Work Ch1 & join to previous repeat (ch picot) using a Down Join.. LJ to Ring. DNRW.
Ch2 . LJ to Ring. DNRW.
Ch3. LJ to base of Ring . RW .
Long Ch . Join to previous round. ……


Please feel free to share how you are tatting/have tatted this round. Ideas multiply when we share :-)
happy tatting :-) 

Related Posts : Wiosna Rounds 1-5


Tuesday, 6 January 2015

Quick TIPS II : CTM

Pin It now!

Continuous Thread Method of Loading Shuttles

Think you have it all figured out . Then comes the knock . Hey that particular figuring out doesn't work every time or in every situation or without changes ! So back to tweaking - probably the favourite byword of us tatters …. Should we be called The Tweaking Tatters ;-P

I shared a tip here, on how to wind the 2nd shuttle CTM (continuous thread method) using any calibrated holder/winder. The 1st shuttle was fully loaded & only 2nd shuttle needed to be loaded, for which we used the holder/winder of known circumference.
But what if Both shuttles require a measured amount of thread, neither of which is fully loaded ?
Case in point : Jane's TIAS 2015  
Many of us are getting ready for the TIAS, and some might be facing a similar problem. If so, the following might be of some help to you ..... Read on :-)

Winding shuttles CTM when

neither shuttle needs to be full, 
or,
when precise lengths need to be loaded on each shuttle

Converted yards to inches, and then calculated the number of winds required on my 'winder' (my spectacle case, where 1 wind equals 6.6 in) for each shuttle (Sh).
I needed 25 winds for Sh1 & 17 winds for Sh 2.

On the winder, I started winding thread from the ball for Sh2 first (indicated with solid white circle & Arrow #1). 17 winds.
When done, Without changing anything, I continued winding for Sh1, But at a slight distance away (Arrow #2). 25 winds. (Arrow #3).
Then snip off thread from ball (shown by solid red oval).
Now start winding Sh1 from this cut end till all (25) wounds are loaded onto the bobbin. (Arrow #4).


The remaining 17 wounds are for Sh2. Take the starting thread end (the solid white circle end in pic) & start winding Sh2, till all remaining thread is loaded.

You will notice, when you start winding Sh2, that the thread end is Beneath the 17 rounds, unlike for Sh1. Hence, when winding, there is a tendency to play footsie / entangle with Sh1 thread.  To avoid this, turn the winder as seen in pic, so that Sh1 is 'out of the way' And winding can continue in original clockwise direction. I found it even easier when I moved Sh1 also to the other side (left hand side in pic).


Both shuttles now have the required lengths of thread, wound CTM !
The best part, to me, is that I did not have to measure the lengths Beforehand ! All I needed was to count the number of winds and then load ....

And I am ready for Jan 7th 2015 . Bring it on :-) 

Disclaimer : I may have a couple more winds than strictly necessary - better safe than sorry ;-)


How have You loaded your shuttles CTM for the TIAS  :-)
How did You do it ?


Related Post : Winding Thread, CTM