Showing posts with label treble tatting. Show all posts

Saturday, 21 March 2026

Dedicating my 1000th

Pin It now!

For this 1000th post I kept musing on the choice of subject. And I finally decided to dedicate it to some of my favourite people who have shaped and inspired my tatting journey. This is a symbolic gesture to ALL the tatting teachers, designers, innovators, experimenters, explorers who have shared their own learnings and experiences. 

Three Geniuses and a brand new stitch in tatting!

Two years back I stumbled upon two drawings that gave Ninetta Caurso's treble tatting stitch a basis in tatting history! 

A drawing on page 31 in Anne Dyer's 1994 book, To Boldly Go Where No Shuttle Has Gone Before, showing the decorative chain picots. 

A drawing on page 85 in Rhoda Auld's 1974 book, Tatting: the contemporary art of knotting with a shuttle showing her twisting the thread (this twisted picot is something I had pointed out in my pictorial) and passing the shuttle through it. Her tatted model is what we now call the vapour stitch.

Well, our very talented Ninetta engineered the two movements to create her treble tatting stitch (tds) all on her own! At the time she did not posses either of the books and till I pointed it out to her, she had not noticed! Basically, the chain picot became the 1st half of the tds while the vapour stitch became the 2nd half of the tds! 

💧One of the reasons for the delay in posting this was ambiguity about whether I could share the diagram pic from the book with due credit. Anita suggested I ask Tamie Montgomery, who now runs The Online Tatting Class and is very mindful of such issues. She was very receptive and we discussed it. Although she said it was okay to use the accredited pics (like Georgia had done) since it was a 'technique', I still wasn't comfortable, till I hit upon the idea of showing it in thread as above. 

💧💧💧

Auld is gold bead effects!

Last year I found some new beading effects by Rhoda Auld in the same book and took the liberty to give them each a name based on words used by her.

Framed Bead - The diagram on page 107 has been in circulation through Georgia Seitz's classes for several years now. Georgia pitched it as a way to add a bead in the center of a ring and I used it in this butterfly


However, Rhoda showed it as a way to add a free bead on a long picot with bare thread framing the bead on both sides when slack is removed. Makes for some good possibilities.

Piggyback Beads - Now this was fun to discover! On pages 99-100 Rhoda shows how to place two free beads one over the other using simple movements. I tweaked it a bit to make it easier to tat.
Instead of loading the bead on the core thread where she has to move the chain stitches, I loaded it on the knotting thread (teal in above sample) and the rest of the process remains the same. On an earlier page, Rhoda makes the teal picot longer and ties up both picots till required for joining. Hence there are many options depending on the pattern.
My sample is a bit wonky, but you get the picture, right?
💧💧💧

Generosity knows no bounds!

💧I can't thank Anita Barry enough for gifting me so many vital books on my list. Without these I wouldn't have been able to review and edit Net Best's, Six T's of Shuttle Tatting, not with any satisfaction or confidence. These have helped me to confirm, correct, or refine terms for her glossary, and even understand and discover so many gems, some of which I took the liberty of adding to the glossary.

💧Judith Connors has been taking an active interest in the glossary, too, either as an answer to my question, as a reaction to my blog post, or reaching out on her own privately. You can imagine what a treasure trove of knowledge she is and how lucky we are to benefit from her skills. 

Judith sent me a copy of her 2000 book, Creative Tatting with beads, shuttle, and needle. It has some of my all-time favourite patterns besides numerous interesting effects and applications. While I read the book, tatting models will be later in the year. 

💧Late last year I received a wonderful digital book by Carin Jansen, Riego ReTatted (2023).  She needed some advice on selling the book through the USA, not being sure of its reception. With permission, I sought Anita's advice and we both gave our respective take urging Carin to put it on the market. Eventually she decided against it for personal reasons, though she has shared her Dutch version within her group. It is such a labour of love and we hope she will change her mind in future. Carin has chosen patterns from each of Mlle Eleonore Riego's books (1850-1886) and shared detailed steps and modernised versions/tips in a pleasant format alongside diagrams and written patterns. 

💧💧💧

I'd like to think that my blog has stayed true to its name to the extent that almost 95% of my posts have a tip of some kind. Unfortunately I couldn't stay true to the url since this blog soon turned into a tatting blog ... not that I'm complaining, LOL. 

Hope you continue to follow my blog and read my posts. 💞

You will find tutorial links to terms in this post here - https://tipsaroundthehome.blogspot.com/p/tatting-resources.html and you can use the search box on the right panel to look for past posts on the tags used here and much more.

💧💧💧

Many many thanks to all the wonderful tatters mentioned here and also to those not mentioned who have influenced, inspired, and improved my tatting journey and maintained my eagerness to blog.

Tuesday, 26 December 2023

lighting up

Pin It now!


The 2nd candle motif is complete, with pattern. As mentioned here (https://tipsaroundthehome.blogspot.com/2023/12/the-power-of-15.html) I used treble tatting stitch chains alternating with regular double stitch chains to block tat this textured candle. 

While I wasn't successful in obtaining the intended spiral effect, I have since found a solution and even tried out a very quick trial. I believe it should work. No pics yet.

E15 Candle Motif version 2 pattern pdf - https://drive.google.com/file/d/1r3SXvBp6bTwrHxU0Y6veyl2M5lnqA1uv/view

The flame is slightly different from version 1, both derived and adapted from a motif of pattern #15 from Endrucks' ‘Die Schiffchen-Spitzen’,1920.

The flame is tatted separately first. When we start the candle body, the first ring is joined to the final ring of the flame in onion ring style/join.

And the base or candle stand is also different. 

I'm not at all happy with my tatting, especially the stand. I need a change of glasses to see more clearly! And working under a magnifier limits the fun. Hmmm, come to think of it, I could easily have re-tatted the stand from scratch! Perhaps I will.

If you tat it, please do share your improved versions! May these candles brighten up the new year as well. Happy tatting! 

Sunday, 28 May 2023

my DAL tadaaaa

Pin It now!

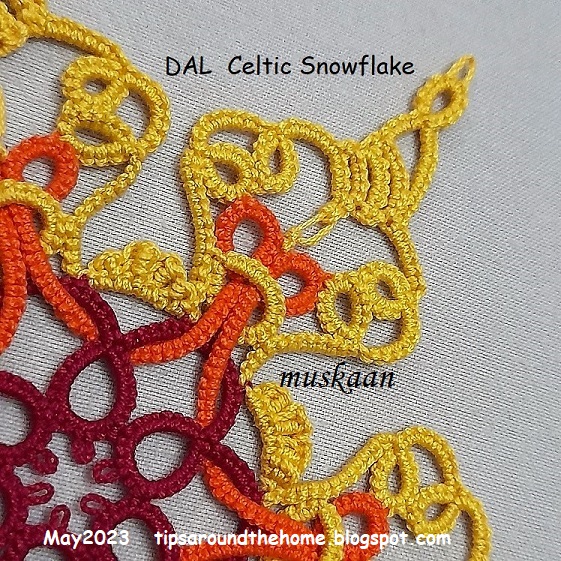
 And the reveal!!!! My version of the 3rd Round design-along for the DAL Celtic Snowflake. This is where I first posted the game - https://tipsaroundthehome.blogspot.com/2023/05/lets-design-round-3.html. My next two posts showed my own dilemma, course correction and solution trial (thanks to Anna Bonelli!). 


Several techniques, effects, stitches, and their modification have been used to achieve this result. 

I am very happy with the end result. I challenged myself and am quite satisfied.

Tatted in Red Rose size 20 threads (equivalent to Lizbeth size 10), the final size is 14cms.
Motif 1 = 4cms ; Motif 2 = 7cms.

I did away with the Josephine rings. For the tip I used a decorative picot; for the treble arches I used graduated treble tat stitches.

This is how it looks in toto. I would've loved to try Sam's visualization of the flake in blues and greens. Hopefully I will do another one in finer threads using the water effect.

To anchor the are thread in the center, after doing a lock join, I made a tied stitch (as in encapsulation) at the very base and then again at the tip. The bare thread is deliberately left uneven to give an open, free-style look.

This is the same, but from the back. After all Celtic interlacing creates a different overlap on the two sides.

Again from the back.


We now have a total of, I think, 15 models submitted or WIP, with 6 patterns (I have to write out mine to make it 7) and 2 more patterns promised. I have started compiling them in a Google Doc but it takes time to get it all done properly since time needs to be squeezed in, LOL.

Please mention the name of the designer and the pattern whenever you post.

Tuesday, 23 May 2023

solution

Pin It now!

 Remember my problem and the mood to give up on my own 3rd round design? Well turns out there were two possible solutions! Anna Bonelli suggested something in Italian which, though lost (on me) in translation actually threw up the first solution to my mind! After making the join I could leave some bare core thread, work and interlace the large ring, then go back and cover the bare thread with 'tied' stitches using the 2nd shuttle!

Anna then tatted a sampler to show what she meant, and that is the solution I adopted. Notice the ring is now horizontal instead of vertical, and I made it smaller too.
Meanwhile I had this idea to use block tatting at the tip. It caught my imagination and between these two elements I allowed my shuttles to do the work, starting with treble tatting arches.
 
I like how the block appears like a flame. 
In several places I hadn't made any picots. Used a finer crochet hook to clear enough space for a join.
To offset any denseness, I did the bare thread thing in the center. I could use dot picot strings, but wouldn't it be overkill?
Just like the Josephine Ring at the tip of the 'flame' is an overkill, right? Although I cannot decide on the JR above the treble tatting arch.
I was going to include decorative picots, but I like the clean lines here.

So what is your verdict? 
I am open to suggestions since I haven't yet started tatting. Oh and this time I'll be using a muted shade of yellow.

So far the design-along has roped in 12 tatters: 1 diagram only; 5 models only (1 WIP); 5 models with patterns; and 1 late starter. I will collect them all in a Google Doc with shareable link so feel free to join the game whenever you can .... 
My journey so far -
Many many thanks to Anna Bonelli for her wonderful solution that got me going!

Wednesday, 12 October 2022

treble stitches

Pin It now!

This post is a response to a request by Tatting with Sherri who wanted a visual comparison of treble tatting with crocheted treble, etc. It started when a confused tatter posted a pic in a group asking whether the arched chains between rings were made of tatting (treble stitch) or crochet, especially since the image was a bit blurred. Unfortunately I cannot share that pic here. Verdict was divided between crochet and treble tatting, with most tilting towards crochet.


Just a reminder that the treble tat stitch (tds) was first invented by Ninetta Caruso in June 2018, to resemble the crochet stitch, and evolved into an all-encompassing 3rd stitch in tatting! https://ninettacaruso.blogspot.com/

The picots on the left chain should've been longer for the effect to be seen clearly. You might remember 
Wally Sosa's Maga Hibiscus https://www.needles-n-shuttles.com/free-patterns where the long picots were anchored with a round of crochet. 
Crochet and Tatting have been used together occasionally. Wally also has a Heart pattern with a crocheted heart in the center, surrounded by tatting.

This is pure crochet where a chain was worked first and then part of the 2nd round is made with trebles (double crochet) and partly with half trebles (half double crochet).
NOTE: This crochet can be done over a tatted chain (eg. the blue chain on the right in the next pic) instead of a crochet chain 
As pointed out above, #3 can be worked over a tatted chain.
Cro-tatting is another option. eg. in the above sampler rings are tatted over the cro-tat hook (needle-tatting fashion) and the chains would be crocheted using the same tool. Then one has an option to cover those chains either with treble tatting or treble crocheting.  

On the right side are close-ups of each option.

In the image that started the discussion, the 'chains' were arched. Above is one example of how arched treble tatting looks like. Pattern - https://tipsaroundthehome.blogspot.com/2020/05/double-trouble-motif.html
This is another pattern with graduated treble tatting, but a more gradual arc compared to the pointedness of the previous motif. https://tipsaroundthehome.blogspot.com/2020/05/peacock-in-snow.html
A close-up. 

Friday, 22 May 2020

peacock in the snow

Pin It now!

Whoever heard of a tropical bird prancing and showing off it’s plumage in snow? A bird that dances in the rain! It can only happen in lace where creativity knows no geographical bounds.
Yet, I stuck with cool colours for a seamless transition.

2 flakes stacked, creating a lovely effect and design!

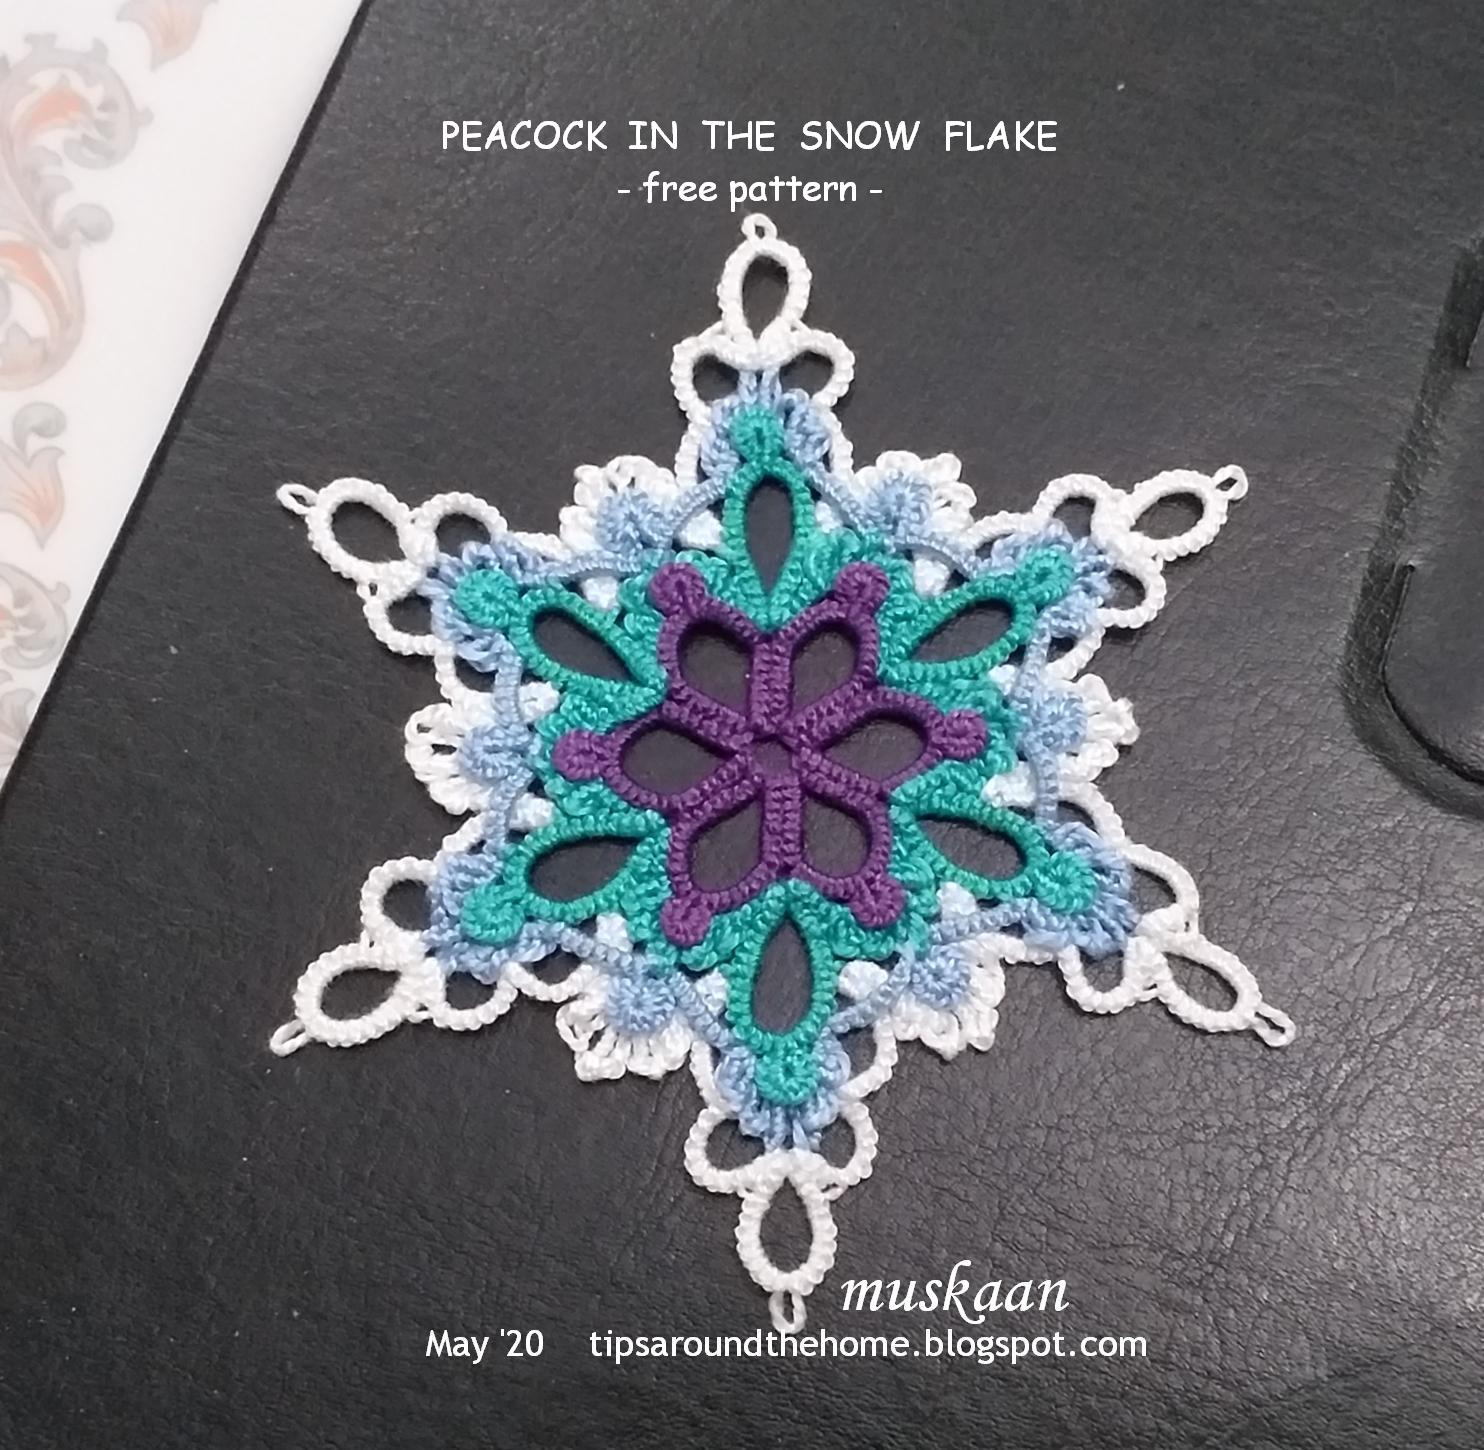
Peacock in the Snow flake
Pattern is finally ready and converted to pdf which includes details, along with a close-up pic. Contact me in case of any problem. Hope you enjoy this layered flake. 

The story in pics ....
Round 1
Round 2
Round 3
2 together as motifs for a larger fabric.
Round 4
It measures 10 cms in Anchor Pearl cotton, size 8 (similar to Lizbeth size 20)
An extreme close-up to show details.

2 together as motifs for a larger fabric. Each side is 5 cms.

Hope you enjoy it as much as I did creating and playing with it!

Download pdf here


Saturday, 2 May 2020

double trouble motif

Pin It now!
So, here’s what I did with the treble arches (from previous post) to showcase their gracefulness! And despite the title of this post, I found it very relaxing and enjoyable ;-D Perhaps you would like to give it a go as a practice piece?

I started with the same first round rosette as in the snowflake since I wanted to check on something. It can be made smaller, of course, and the next rounds adjusted accordingly.

Treble  Arches  Flower  Motif pattern
muskaan © May 2020
Abbreviations : ctm = continuous thread method ; SCMR = self-closing mock ring ; 
rw = reverse work ; tds = treble tat stitch

NOTATION for Graduated or Variable Treble Tat Stitch (tds)  :
The original tds is made by pulling 2 loops consecutively for 1st part, and 3 rolls/wraps in 2nd part. In order to create a relatively smooth gradient, both halves of the tds have been tweaked. A notation that can convey this clearly was needed. I find the following notation (similar to the pds) easiest to indicate the range of variability.
Following the above logic, a normal tds would be notated as tds(2,3) where 2 loops are pulled and 3 wraps/rolls are made. However, tds is retained in instructions. 

The following tds variations have been used in this pattern :
tds(1,2) = 1 loop pulled, 2 wraps/rolls made.
tds(3,4) = 3 loops pulled, 4 wraps/rolls made.
tds(4,5) = 4 loops pulled, 5 wraps/rolls made.
tds(5,7) = 5 loops pulled, 7 wraps/rolls made.

A single tds is tatted each time, hence, no number is indicated on the left in this pattern.

All rounds are tatted using a single shuttle and ball, without cutting the thread between them (ctm). Shuttles require only short lengths.

Round 1 : Red ball and shuttle, ctm
SCMR: 4 ± 4 ± 8 – 8 – 4 – 4. close. rw
Chain: 1
Repeat this 5 more times, joining to previous ring and last ring to first ring.
I direct-tatted the chain using reverse stitch. See details here.

Round 2 : yellow ball and shuttle, ctm
Note: Each arch starts and ends with 2 double stitches.
Attach thread to 2nd picot on Round1.
Chain: 2, tds(1,2), tds, tds(3,4), tds(4,5), tds(5,7), tds(4,5), tds(3,4), tds, tds(1,2), 2, lock join. Repeat 5 more times.
One can stop after this round.

Round 3 : mustard yellow ball and shuttle, ctm
Attach thread to free picot on Round1, from the back.
Repeat Round 2 all around.

Possible variations
  • Overlap the arches of 3rd round with previous round.
  • Add more rounds/layers.
  • Instead of blocking flat, keep the petals raised in 3D effect – in the right colours one could make a water lily or lotus surrounded by leaves!
  • Add beads and findings to convert into earrings or pendant.
Measurements when worked in Anchor size 20 - 
Round 1: <4cms (with picot)
Round 2: >5cms. (3 cms as a hexagon side)
Round 3: 5½ cms (3½ cms as a hexagon side)

So what do you think? Are the instructions and notations clear? If you can suggest an alternate or better notation, please do share. 

happy tatting :-)