Showing posts with label Wally Sosa. Show all posts

Thursday, 12 December 2024

fulgent and folly

Pin It now!

This month Ninetta has hosted the Bead Me Endrucks game in the Endrucks 1920 Project FB group. Simple and single rule - to choose any pattern from the original or derivatives and bling it with beads. Here's my fulgent attempt...

I extracted a motif from Endrucks' pattern #10 and worked it into a complete circle. Since I haven't decided what to use it for - so many possibilities - it's a medallion for now.

I used Wally Sosa's version (page 4) in the reworked pattern presentation by Ninetta Caruso here - https://drive.google.com/file/d/1YFBYqbgssthqDKYi8YkTX-fvAPmIYbm-/view. After taking the length of bugle bead into account, I doubled the stitch count in the rings. Since the bugle bead covers the chain length, there are only 2ds on the ringside and 1ds, p, 1ds, bead, 1ds, p, 1ds on the inner side. See TIP below.

Materials - This is a pic after I gathered all the supplies needed. I chose to go with a ball and shuttle instead of 2 shuttles. Red Heart metallic thread size 40; yellow seed beads size 16/0; red beads size 5/0; twist bugle beads #4. And beading needles and crochet hook #11. I selected beads from my stash, though I do need to buy more in different sizes.

As per my visualisation, I pre-strung the bugles on ball thread and the red and yellow beads on the shuttle. However, the shuttle beads didn't work out the way I had hoped. Hence all the beads were removed and re-strung differently. One yellow bead between a pair of bugles on the ball thread and alternating 1 red and 2 yellow beads on the shuttle.

This is how I ended up doing the effect I had in mind. On the ring, a long picot holding 14 yellows...
I loaded the beads using sewing thread and size 28 tapestry needle as seen in the background. 

Followed by 1ds, red, 1ds, join to the beaded picot, continue. This centered all the beads beautifully.

Can't say how much of the brilliance and shine the camera caught, but in real it is quite the shining medallion!

Folly - not one but many! If you look closely, most are easy to spot.

  • I should've used pure metallic thread instead of this single metallic strand twisted around perle cotton, size 40. Tons of trouble with the metallic strand breaking while closing the large ring even after I started working the stitches loose. Had to start afresh many times! Took the shortcut but tying a slip knot and tatting over both tails. The number of rings you see in the final medallion are only half the rings I tatted, LOL. 
  • Once I forgot to work the twin ring and had to cut off two repeats. 
  • Not making a lock stitch at the end of the bugle bead to avoid the core thread from being pulled too tight. Did it for the last few beads. 
TIP: If the bugle bead is not on the core thread, it may be a good idea to add an unflipped stitch at the end before continuing, so as to lock in the core thread and bead.

  • Noticed the difference in bugle bead size in one arm only in the pics, LOL, though I kept wondering why it wouldn't stay even. And not to mention the space between two rings where the thread got pulled while closing the ring and I didn't notice in time. Dr Downplay at work here, though lessons learned for future.

It measures a wee bit over 7cms across. 

Mr Meticulous is not happy at all, but Dr Downplay rules the day. What's your verdict?

Many thanks to Ninetta and Wally for their work on the main pattern and thanks for organising the game, Nin!

Saturday, 9 March 2024

exciting firsts

Pin It now!

 Editing the book, 'The Six T's of Shuttle Tatting' is creating opportunities to try out exciting techniques and effects, long in my to-try list. And learning a Lot in the process. The author, Net Best, had created one glossary for her book, and another more comprehensive glossary for her group and possibly for later digitization. We decided to combine both to make the glossary as updated as possible, which was her main goal. This also means we have to add missing sampler images. I have reached out to several of my tatting friends to contribute some specific pics (with due credit), and so far everybody has graciously given permission. 

While I won't be sharing all pics, here are a few - I love the way these turned out!  

1. BROOMSTICK PICOT - 

I followed Karen Cabrera's Lesson #104 - https://youtu.be/yp5W6ZrDF9I

And since the long adjoining picots need to be joined to create the effect, I allowed my shuttles to create this little motif - like a flame within a flame. 
Is it interesting enough for the pattern to be shared?
Although I'm sure there are tons of tatters who will simply count the stitches and tat it up, and we all know who will get the credit ... yes, Pinterest, LOL. 
I used really thick thread (probably a size 3) so that the effect shows up in thumbnail pics.


2. DANCING PICOTS -
I followed Karen Cabrera's Lesson #107 - https://www.youtube.com/watch?v=DX7Ig978Xg4
This is a variation of the Daisy Picot and requires 2 shuttles.
I encapsulated the 2nd shuttle thread within the first half-stitch at the start and the last half-stitch at the end. (Judith Connors' tip).
While I tatted over the shuttle 1 tail at the start, I didn't do it for the Sh2 thread, although it can be done.
NOTE: All picots here (bare threads) can be both decorative and functional (for joining).


3. INTERWOVEN  SPLIT  RING  BRAID / CORD -
This 2-shuttle variation is attributed to Wally Sosa, and I referred to Jane McLellan's Choker patternhttps://janemactats.blogspot.com/2012/04/choker-pattern.html  [In the right panel on her blog page, you can find the pdf links for the lovely beaded versions of choker as well as a necklace].
All split rings are 8/8. This time I used Anchor size 20.
It comprises a red foundation cord tatted to desired length. Then the teal cord is worked, weaving the red cord alternately over and under through the open ring before it is closed. 
It is such a lovely piece! However, I have no idea how to use it. It is a bit short for a friendship bracelet coz I ran out of thread and don't wish to add more. 
Any ideas how I could use it?


I hope you enjoyed seeing and reading this, and will try to use these techniques in future tatting. And adding beads for even more variations. I certainly hope to incorporate my new learnings some day. For the present, I am busy tatting more samplers and working on the book, to the exclusion of all else. If I don't concentrate on it it will never get done. Our target is to finish it before year end.

And there are more to share ....

Wednesday, 12 October 2022

treble stitches

Pin It now!

This post is a response to a request by Tatting with Sherri who wanted a visual comparison of treble tatting with crocheted treble, etc. It started when a confused tatter posted a pic in a group asking whether the arched chains between rings were made of tatting (treble stitch) or crochet, especially since the image was a bit blurred. Unfortunately I cannot share that pic here. Verdict was divided between crochet and treble tatting, with most tilting towards crochet.


Just a reminder that the treble tat stitch (tds) was first invented by Ninetta Caruso in June 2018, to resemble the crochet stitch, and evolved into an all-encompassing 3rd stitch in tatting! https://ninettacaruso.blogspot.com/

The picots on the left chain should've been longer for the effect to be seen clearly. You might remember 
Wally Sosa's Maga Hibiscus https://www.needles-n-shuttles.com/free-patterns where the long picots were anchored with a round of crochet. 
Crochet and Tatting have been used together occasionally. Wally also has a Heart pattern with a crocheted heart in the center, surrounded by tatting.

This is pure crochet where a chain was worked first and then part of the 2nd round is made with trebles (double crochet) and partly with half trebles (half double crochet).
NOTE: This crochet can be done over a tatted chain (eg. the blue chain on the right in the next pic) instead of a crochet chain 
As pointed out above, #3 can be worked over a tatted chain.
Cro-tatting is another option. eg. in the above sampler rings are tatted over the cro-tat hook (needle-tatting fashion) and the chains would be crocheted using the same tool. Then one has an option to cover those chains either with treble tatting or treble crocheting.  

On the right side are close-ups of each option.

In the image that started the discussion, the 'chains' were arched. Above is one example of how arched treble tatting looks like. Pattern - https://tipsaroundthehome.blogspot.com/2020/05/double-trouble-motif.html
This is another pattern with graduated treble tatting, but a more gradual arc compared to the pointedness of the previous motif. https://tipsaroundthehome.blogspot.com/2020/05/peacock-in-snow.html
A close-up. 

Sunday, 17 April 2022

Deaconess Butterfly 1916

Pin It now!

Back in 2019, I had tremendous fun tatting the Deaconess Butterfly (from 1916) using beads to pretty it up. Recently Cross-eyed Tatter left a comment asking for help. (https://tipsaroundthehome.blogspot.com/2019/10/beady-eyed.html). 

After reading up my notes as well as the rewritten pattern by Carolyn Groves (in 2002) to refresh my memory, and being in a diagramming mode, I decided it would be better to share a diagram than simply notate the model. So here it is ---


And here is the pdf link (click to download) - https://drive.google.com/file/d/1gDRWAwqyN7f6kdsu9yybtQj9-l_QpsFn/view

For the above beaded version refer to my detailed notes here - https://tipsaroundthehome.blogspot.com/2019/10/beady-eyed.html

It took me a while to do the diagram to my satisfaction since parts of the pattern can be a bit confusing especially if one is a visual tatter. 
Pay close attention to the sequence. 
TIP: There are multiple joins between the head and body, and body and tail. Hence make sure the picot is sufficiently accommodative. 

Cross-eyed Tatter already figured it out and was tatting it based on her last comment. For what it's worth, I hope this diagram helps tatters in future. I will also send it to The Online Tatting Class, since that's where I first tatted it as homework. 

UPDATE: Thanks to some good sleuthing by Gloria Nelson and Wally Sosa, the original source of the pattern is as follows: 'Butterfly Motif' by The Deaconess in 'Practical Tatting Book No.1', 1916. (Reprinted in the book, 'Tatting- A Potpourri of Patterns' by Handy Hands). The pdf and image above have been updated with this info.

That's it for now. Butterflies never go out of season! So, let's enjoy 🦋🦋🦋
And if you find a mistake, please holler!

Monday, 24 August 2020

hybrid tatting

Pin It now!

my musings.....

This is somewhat of a personal deliberation, contemplation - musings if you may. I haven't done a thorough exploration. So jump in with your comments, input, counter, reference, etc.

We know that any tool we use for tatting lace has it's advantages and limitations. Ingenious tatters have found ways to use the strengths of each tool Together!

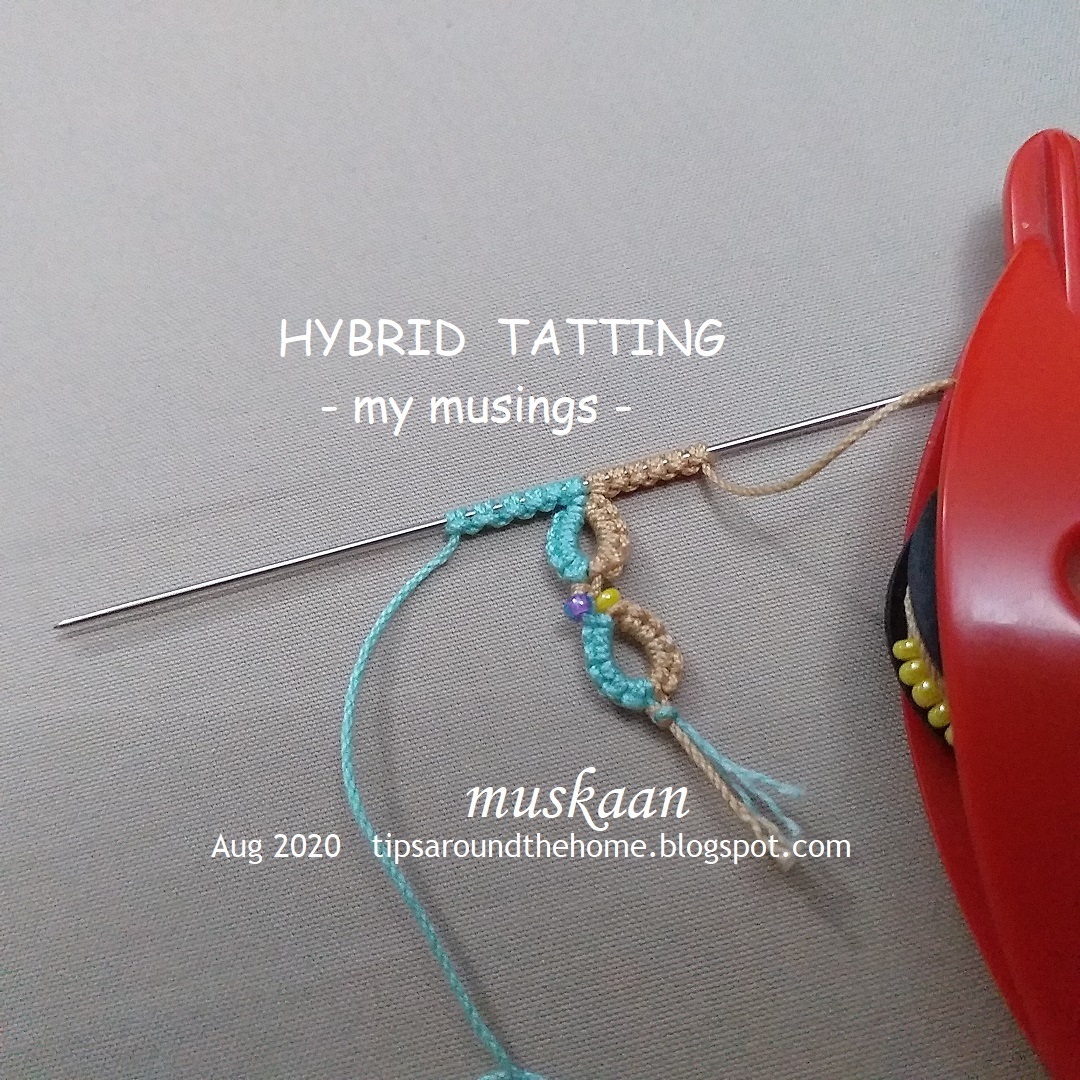
Hybrid Tatting is a tatting method that uses both needle and shuttle to work an element. It started with using them together in a split ring as seen in the image above. The term was coined by Wally Esther Sosa, for this method by Rosario Ruiz Moreno. They taught it at Palmetto Tat Days in 2017. Wally narrated the genesis -

I first came across this term and clever adaptation last year when Sharon Fawns blogged about it here

Recently, someone shared a video on facebook, that clearly showed how to do the split ring in hybrid tatting. It was dated 2015! It is by ChariFriv and can be accessed through this link - https://www.facebook.com/charifriv/videos/1602794246605932. Another example of how tatters independently came up with the same technique, method, or effect!

UPDATE (Nov 2022) - Wally tells me that ChariFriv is Rosario Ruiz Moreno

Anyway, this got me thinking. 

Should the term hybrid tatting be limited to the use of 2 tools for the same element or can it include the use in separate elements or rows within the same lace? 

A pattern that comes to mind is Frivolé's Rose and Crown motif. It has interlocking rings as the central round and several shuttle tatters use a needle to tat only this round.

And what about the SSSR (single shuttle split ring) where we use shuttle to tat 1st side and finger to tat the other?! 2 tools in same element.

Going further back in time, when the chain as we know it, had not been invented in tatting. Tatters left bare thread between rings or ring clusters. 

 
This bare thread was later covered in several different ways. Elgiva Nicholls calls this the 'False Chain' where the bare thread was covered in numerous ways using a tapestry, netting, or sewing needle (Tatting Technique and History, 1962). I am selecting only 2 where the stitch clearly imitates the half stitch(s) as we see in today's tatted lace.

Larks Head Knot (LHK) - 
  
The bare thread being covered by mock ds or LHK. The unflipped over-under movement for half-stitch is underway (left pic). The unflipped under-over half-stitch being made (right pic).


3 mock chains completed with picots.

Buttonhole Stitch - 


Those with a preference for embroidery might have used the buttonhole stitch to cover the bare thread.
Turn work (or work back to the start) and cover the bare thread with buttonhole stitches. These resemble a repetition of half-stitches as in a Josephine chain.

These are merely a small window into the use of 2 tools specifically for tatting the same element, separate elements or rows in the very same tatted lace. I deliberately omitted several other ways we use a crochet hook, a needle, or a cro-tatting tool, focusing only on how a false/mock stitch can be made with 2 tools such that once the lace is completed, the difference in tools is not apparent or discernible.

So, what are your thoughts? Where, and how would you use 2 tools to ease your tatting; and which 2 or more tools?

Sunday, 5 July 2020

welcome intrusions

Pin It now!
It has been amazing - the interest and the exploration that has already moved far and wide ... almost overnight! I cannot thank my tatting mates enough for their enthusiasm and for embracing the potential of Intruding Picot (ip)!


In chronological order -
Wally Sosa - This multi-talented and creative lady had also discovered this picot, calling it 'Evil', and dismissing it! Above is a nice comparison between, and combo of, normal and intruding picots.

Wally Sosa - Introducing the Rolled intruding picot! She combined her rolled picot with the ip to create such an interesting effect. And there's more - she has already tatted a beautiful motif/pendant using these and will be sharing a tutorial soon. Can't wait ....

Ruthie May - She interrupted her doily to try out her first intruding picots (thankfully she didn't close the ring - who wants to open a ring?!) and she has created this lovely pearl tatting/Maltese ring effect! It is something that had not occurred to me.

Ninetta Caruso - Can't keep her away from metallic threads and beads ;-D
Such a wonderful Beaded ip - as seen from front and back! Think of the scope for play....

Anita Barry - Independently, she came up with the Pearl tatting effect.
In the trefoil, one can see the dimpled effect in the side rings, and she has pulled up the ip in the middle ring! Creates a matted/woven effect.

Anita Barry - sent in this exploratory trial piece as well. The messy one on the right makes me think of snipping the ip and ruffling them!

This is my Filled Ring trial using ip. Didn't come out right, but I can put it down as proof of concept at this stage. Had thought of twisting them, but that was too fiddly. However, it can be quite easy if done on a chain.
I want to try it with SCMR. I also want to try it with folded rings and chains. Could we weave them as well or am I getting way ahead of my skills, head in clouds?
Lots of homework ;-D

UPDATE : Jane McLellan created a lovely bookmark using interlaced rings and intruding picots! Check it out - https://janemactats.blogspot.com/2020/07/muskaan-bookmark.html

Present Summary -
So, what a spread, with many more ideas to try out besides a downward facing picot - Rolled, Pearled & Maltese (using a single thread is now possible!), Filled, Beaded, Dimpled, Ruffled (inside!), Mock rings, Onion rings, bead in center of ring and other functions ..... this is just the start of the Intrusion!
UPDATE : I have used it successfully with dot picots, dot picot strings, double picot, twisted picot, and even a half-closed ring with twisted picot as it's base!


And speaking of welcome intrusions, a few more prettified butterflies flew in after 2 years! Did they get lost in migration - I hope not. Care to send in more Make Me Pretty Butterflies?
Corinne worked her cute version for an event by Association Francaise de Frivolite.

 Krystyna Mura posted her version - I couldn't even recognise it - so great is the transformation!

Madhur Dadlani was inspired by Corinne's version and posted this cool freshness!


Keep Intruding, dear tatters. No 'stings' attached :-))) 

Saturday, 12 May 2018

not The One but

Pin It now!
…. oh so many pretties from the friendly tatting neighbourhood.

That one butterfly we were hoping would emerge from the pot, did not. But several tatters accepted my invitation to make a butterfly pretty. I received some pics while others have blogged. I’m so excited to display their talents and uniqueness!!!

The different colours, beads, techniques, effects - 
I am quite overwhelmed with the beautification process and creativeness.
Read on for more versions (click on respective name for the blog link to their post)

In chronological order of flying in….

We frequently exchange pics of our work or chat about our current project. When I showed Anita Barry my DIP (design-in-progress) pic of cream butterflies, she was inspired to tat a single butterfly before I even shared the pattern. She used dot picot antennae and her own stitch count (which she even diagrammed and sent me).
I like how the span of the top wings spreads wider & the little extra chain in center creates a kind of torso. Overall a much better shape than mine.

Denise Wessman sent in 3 almost as soon as the pattern was posted! Well, she is Mme Butterfly/Papillon – flitting enthusiastically from one project to another inspiring everyone around her! Wish I could keep pace with her activities.
Don’t the 3 beads look cute; and what a pleasant colourway.


It came as a pleasant surprise when Wally Sosa shared her version during the online class. Excellent placement of beads especially inside the wings – something I would like to imitate. Forgot to ask, but this looks like needle tatting? 
UPDATE : Wally pointed out that it is shuttle-tatted in size 10 thread using #6 beads.

Ninetta Caruso blogged her ethereal version here. Such lovely colours and she also added a very realistic looking venetian picot body making it 3D! The downward facing picots are an excellent touch. You must read the specifics on her blog, along with her other butterflies. 

Right on the tail of Nin’s butterfly, flew in Usha Shah’s interpretation with her trademark dot picots. Converting the chains into dot picot strings added a nice texture. Peachy!!!

Pretty soon I was viewing Jane McLellan’s sunshine version and graduated picots! And she rightly interpreted the double entendre of my post title - make me pretty please. Very happy – she always comes through for me.

And I can’t thank Lavi Damian-Boja enough. She struggled with the pattern, threw away many attempts, yet persevered. I'm so glad she did. A lovely blue beaded butterfly took wing! Read her post for a tip on how not to throw away a mistake.

A reminder - For a list of techniques, inspiration, and tutorials/resources, please check out Eliz Davis' incredible compilation - An Element-al Approach to Tatting Techniques.

UPDATE : Marja has prettied her butterfly with tons of picots, including downward picots.

For my prettified versions, click here.
More new versions have flown in (2020) here!


My heartiest thanks to all who have participated and shared their versions. 
I hope more tatters join in the fun and show us their prettifications, 
whichever way it is read -

make me, pretty please !
Or
make me pretty, please !