Showing posts with label Lavi. Show all posts

Monday, 21 May 2018

stabbing at tidbits

Pin It now!
A few small pieces, mistakes and all ….


Started with Lavi’s new Wheat Circle earrings. I miscalculated and made only 9 rings. 
Although I liked the small circle I wasn't happy with the teardrop suspension.
With my new bead-stabbing, I was enthusiastic to have another go. 
This time will all 12 rings and the teardrop pierced with a jump ring, 
then suspended on a double chain of beads. 
I also increased the number of seed beads on the bare thread. 
Much better but wish I’d stuck with the earlier shade of green thread.
Both worked in Anchor size 20

In between the two, I worked this long overdue Sunflower in Maltese Tatting by Jane McLellan. I need occasional refreshers for some of these techniques and this is such a pleasant project. But I had beads left – hmmm! Not that it shows much.
While blocking I deliberately went with angular petals and noticed one was way smaller 
– hey, that’s to give it a ‘natural’ look ;-P
Yellow is Anchor size 20 and black is size 40.

Lastly, as I mentioned in my earlier post, I wanted to see how Usha’s Charming Frills looked with beads. Had another stab at it. 
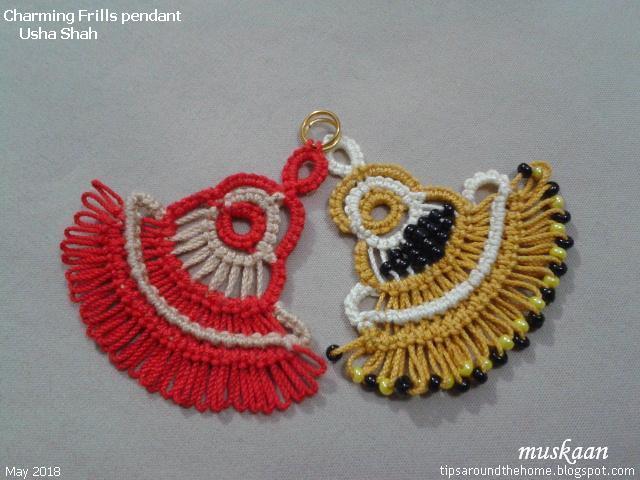
Oh and another reason was that in the last fringe row, I had made 2 CWJs in one picot (since it was not clearly specified at the time – the pdf has been updated now). I thought that was the reason my pendant was broader, with the stitches all neatly lined up.
As it turns out, the last row is a chain with alternate CWJ and double stitch, with long picots between each obviously.
The black beads in the center are in a diamond formation. For this I reduced one long picot 
(only 7 instead of 8 and following with multiples of 7 in subsequent rows).
Too late I noticed the threads were tied off at the wrong point (gap seen on left side)! 
I had worked the first pendant from the prototype while the pattern was still being polished for presentation. So I’m happy to have made it again as per the final.
Worked in Anchor size 20.


many thanks to Lavi, Jane, & Usha for sharing their lovely patterns

happily tatting always – beads and mistakes and all  ;-P

Saturday, 12 May 2018

not The One but

Pin It now!
…. oh so many pretties from the friendly tatting neighbourhood.

That one butterfly we were hoping would emerge from the pot, did not. But several tatters accepted my invitation to make a butterfly pretty. I received some pics while others have blogged. I’m so excited to display their talents and uniqueness!!!

The different colours, beads, techniques, effects - 
I am quite overwhelmed with the beautification process and creativeness.
Read on for more versions (click on respective name for the blog link to their post)

In chronological order of flying in….

We frequently exchange pics of our work or chat about our current project. When I showed Anita Barry my DIP (design-in-progress) pic of cream butterflies, she was inspired to tat a single butterfly before I even shared the pattern. She used dot picot antennae and her own stitch count (which she even diagrammed and sent me).
I like how the span of the top wings spreads wider & the little extra chain in center creates a kind of torso. Overall a much better shape than mine.

Denise Wessman sent in 3 almost as soon as the pattern was posted! Well, she is Mme Butterfly/Papillon – flitting enthusiastically from one project to another inspiring everyone around her! Wish I could keep pace with her activities.
Don’t the 3 beads look cute; and what a pleasant colourway.


It came as a pleasant surprise when Wally Sosa shared her version during the online class. Excellent placement of beads especially inside the wings – something I would like to imitate. Forgot to ask, but this looks like needle tatting? 
UPDATE : Wally pointed out that it is shuttle-tatted in size 10 thread using #6 beads.

Ninetta Caruso blogged her ethereal version here. Such lovely colours and she also added a very realistic looking venetian picot body making it 3D! The downward facing picots are an excellent touch. You must read the specifics on her blog, along with her other butterflies. 

Right on the tail of Nin’s butterfly, flew in Usha Shah’s interpretation with her trademark dot picots. Converting the chains into dot picot strings added a nice texture. Peachy!!!

Pretty soon I was viewing Jane McLellan’s sunshine version and graduated picots! And she rightly interpreted the double entendre of my post title - make me pretty please. Very happy – she always comes through for me.

And I can’t thank Lavi Damian-Boja enough. She struggled with the pattern, threw away many attempts, yet persevered. I'm so glad she did. A lovely blue beaded butterfly took wing! Read her post for a tip on how not to throw away a mistake.

A reminder - For a list of techniques, inspiration, and tutorials/resources, please check out Eliz Davis' incredible compilation - An Element-al Approach to Tatting Techniques.

UPDATE : Marja has prettied her butterfly with tons of picots, including downward picots.

For my prettified versions, click here.
More new versions have flown in (2020) here!


My heartiest thanks to all who have participated and shared their versions. 
I hope more tatters join in the fun and show us their prettifications, 
whichever way it is read -

make me, pretty please !
Or
make me pretty, please !

Tuesday, 6 March 2018

Snowdrops

Pin It now!
Lavi has come up with an artistic visualization of the snowdrop flower, ensconcing it in heart-shaped foliage!!!
I already had size 40 white on my shuttles, so got to work right away.

Snowdrops
Lavi Damian-Boja (Dandelion Lace) 


It is one of those patterns where multiple pathways are available.
Just like in Coretta's Rose with so many alternate ways of working (not to mention all-chains starting with a mock ring).
Going by her comment, the pattern is still in a bit of development stage. She has 2 versions on her blog.  
I decided to work the white flower first, using a single shuttle. At the end of the 3rd ring, I lock joined to the 1st ring through a tiny space left before tatting over the tail.
This ensured I had an attachment point for the calyx later.

Loaded 2 shuttles CTM, with green. Changing the sequence a bit, I started with bottom ring, and up the inner chain. Then the next ring (calyx), attaching the flower, and down the outer chain.
One can simply move across the base ring using the under-over or alligator join to work the 2nd half. However, since the ring is so tiny, I did a lock join, then moved shuttles to other side.
With my tight tatting tension I ended up with 90 to 100 half stitches in the Josephine chain!

This would look great as a pendant in metallic thread! It will give it the strength to hold shape as well.
Other ways to stiffen this piece :
- diluted PVA or fabric starch
- padded tatting (adding additional core thread)
- padding the stitch (pds).
Perhaps some beads in one of the arcs would work, too?

I tremendously enjoyed working this little motif. It has the elegance of Nicola's Kiss Curl heart, yet with more 'story' within it.

And to give an idea of the size of the 3D carnation in an earlier post -

.

Many many thanks for sharing the pattern, Lavi.


hope you give it a whirl, too J