Showing posts with label jhumka earrings. Show all posts

Monday, 21 May 2018

stabbing at tidbits

Pin It now!
A few small pieces, mistakes and all ….


Started with Lavi’s new Wheat Circle earrings. I miscalculated and made only 9 rings. 
Although I liked the small circle I wasn't happy with the teardrop suspension.
With my new bead-stabbing, I was enthusiastic to have another go. 
This time will all 12 rings and the teardrop pierced with a jump ring, 
then suspended on a double chain of beads. 
I also increased the number of seed beads on the bare thread. 
Much better but wish I’d stuck with the earlier shade of green thread.
Both worked in Anchor size 20

In between the two, I worked this long overdue Sunflower in Maltese Tatting by Jane McLellan. I need occasional refreshers for some of these techniques and this is such a pleasant project. But I had beads left – hmmm! Not that it shows much.
While blocking I deliberately went with angular petals and noticed one was way smaller 
– hey, that’s to give it a ‘natural’ look ;-P
Yellow is Anchor size 20 and black is size 40.

Lastly, as I mentioned in my earlier post, I wanted to see how Usha’s Charming Frills looked with beads. Had another stab at it. 
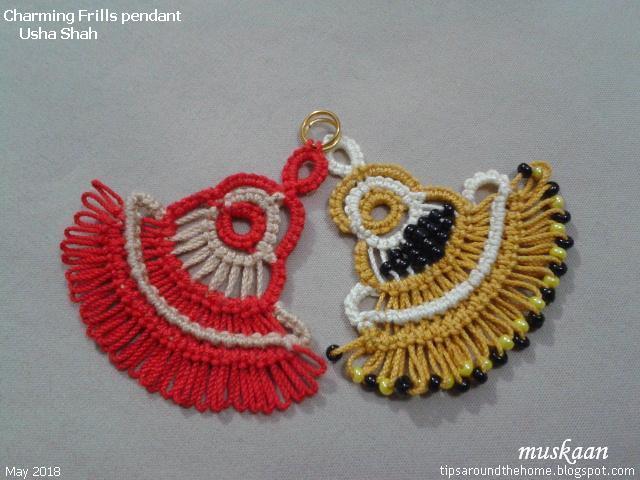
Oh and another reason was that in the last fringe row, I had made 2 CWJs in one picot (since it was not clearly specified at the time – the pdf has been updated now). I thought that was the reason my pendant was broader, with the stitches all neatly lined up.
As it turns out, the last row is a chain with alternate CWJ and double stitch, with long picots between each obviously.
The black beads in the center are in a diamond formation. For this I reduced one long picot 
(only 7 instead of 8 and following with multiples of 7 in subsequent rows).
Too late I noticed the threads were tied off at the wrong point (gap seen on left side)! 
I had worked the first pendant from the prototype while the pattern was still being polished for presentation. So I’m happy to have made it again as per the final.
Worked in Anchor size 20.


many thanks to Lavi, Jane, & Usha for sharing their lovely patterns

happily tatting always – beads and mistakes and all  ;-P

Saturday, 5 May 2018

frill thrill ?

Pin It now!
Writing a pattern is no easy task. One also has to think ahead to the problems that a tatter might face when following the instructions. And I find the task gets further complicated when one is trying to help out with someone else’s presentation. This is one such.

Usha created an interesting pattern and asked for my help with the draft she had prepared. We each have our strengths and her strength lies in creating new and varied effects, letting her shuttles do all the talking. It’s been barely a year since she first started blogging and sharing her numerous patterns! She is a quick learner and I’m sure there will soon be a time when she will be presenting her patterns without any outside assistance.

Anyways, so I finally ended up tatting a sample myself to garner confidence in the process and presentation. When one is given a task, one has to do it as conscientiously and accurately as possible – that’s my motto.

Charming Frills

The final height of this pendant is 4cms with size 20 Anchor 
which is a much thicker thread than Lizbeth 20. 
Shuttle1 has red & shuttle2 has beige

Works as a pendant or earring or perhaps a brooch with the appropriate findings. 
A bit of tweaking and it will look like a mini doll or angel! 

I inserted pearl studs through the top ring as in my Star Anise studs. 
These look like flat jhumka earrings!

Minor differences you might notice between Usha's and this are because I tested the prototype pattern and/or my own meanderings (and a few extra stitches to factor in tension). I’ll point them out as we go along. This is not a beginner level pattern which, for me, was an added charm.

my test tatting notes
Firstly, this is a great piece to practice the Catherine wheel join! Once this pendant is finished, I doubt anyone could forget the cwj in a hurry.
Of course, the cwj can be substituted with a lock join, JSS (join to smooth side), etc. But cwj gives the neatest double stitch and smoothest chain.

Second, the long measured picots create such a lovely effect – from airy to dense as we move from one tier to the next. Not to mention the frill/fringe where a seed bead in each would look nice. I might try it someday.
TIP : I found that holding the long picots on the picot gauge helped in the overall tatting.

The thrown ring for attaching finding – I shifted this to round 3 instead of round 2, lock joining to a picot below. No mock picot, cwj, or alligator join required. But I forgot to switch colours.

There are 2 split chains. After the SCh at the end of rnd3, I didn’t have to do any SLT (I didn’t use any SLT in the entire working). Merely ensure that the SH2 thread remains behind and SH1(red) in front. I used Dora Young’s knotless method for the SCh here and the shuttles automatically came into position for next round.

About halfway through round 4 I thought there would be cupping. Hence, I untatted it and added 2 more stitches to the side chain. Turns out it wasn’t necessary after all.
The joins here are simple picot joins since the chain is turned inwards.

Originally, the side chain stitches faced inwards too, which is how I made them. But SCh posed a problem! I finally figured it out – not the neatest, but a learning experience!
Inward-facing Split Chain –

  1. pull up a loop from below, holding it between the SCh and long picot ; pass shuttle through the loop below ;
  2. tug at the held loop to ‘pop’ and snug the 1st half stitch ;
  3. pull up another loop and pass shuttle through it to make 2nd half stitch ;
  4. snug tight – 1 double stitch made. 
Now this last row/frill or fringe is very interesting, though quite fiddly. 
Holding the long picots on the gauge helped again.
The joins here are made from the back loop/bar of the long picots. 
Reminded me of crocheting/knitting through the back loop.
This creates a raised texture in front and a woven effect from the back. 
Now that is cool! 


UPDATE : check out my Beaded adaptation here.

Many many thanks to Usha for sharing her lovely pattern.
I came away learning something new again.
Hope you enjoy it too 

Monday, 21 March 2016

A new CKP voyage

Pin It now!

When the class material for March 14 was posted, I grabbed hold of the opportunity to try my first CKPs. No, this is not Vulcan for ‘Live Long and Prosper’, although I do wish the same for all you wonderful readers :-)
Welcome aboard …


Patricia Lyn Cobb
* click for pattern; pdf from class material link

Threads : When trying out something new, I prefer size 20 thread.
Anchor Mercer . Art 4504. Copper/Burnt Sienna – 0896 ; Dark Yellow – 0289
Metallic wire/thread in copper & silver.
Measurements :
Inner Circle : ¾”  ;  Outer Circle : < 1½” ;  1¾” with CKP
Techniques I used :
Celtic Knotted Picots (CKP), Split Rings, picot gauge for CKP, Catherine Wheel Joins, S-Chain, S-Chain with picots.     
One can climb out from inner circle with a SR or a double core SSSR, but this time I followed the simple route of cut & tie.
I love the use of CKP – a lacy way to cover negative space, and join 3 elements together !
When not adjusted/opened, the outer CKPs produce a single-picot angled effect which can be used creatively in an ensuing round !
TIP : While making the CKPs, in order to hold each loop in place, I had cut out little card stock picot gauges that I left inserted till joining was required (forgot to take pics).
Since the CKPs needed to be blocked, in order to keep them open, I inserted spacer pins. These weighed down the medallion & made a Lovely carousel. Photograph does not do justice to the fun transformation. 
TIP : One can add beads to the CKPs or chains of beads all around to weigh down the medallion; add findings above & Voila, one has a jhumka earring ! Or use as decorative tree ornament.  
The outer CKPs definitely called for blocking before I could proceed further. And this time, a rolling pin would not work, since each loop had to be opened & pinned individually !
I didn’t have a bangle of required diameter & was too lazy to look for a substitute. Instead I tied 2 metallic wire threads, joined them to one CKP loop & tatted an S-chain of 10 stitches, 1ds in next CKP loop, 1picot, 1ds in next loop of same CKP. Continue. 
To finish off, I continued with an S-chain with picots between spaced-out stitches. This can hopefully be used as a tree ornament.
TIP : The stitch count was arrived at by marking the distance between CKPs on a paper & drawing a straight line between them since I wanted a hexagon.
After 3 sides were tatted, I panicked, thinking that the hexagon sides were too tight. So 2 sides on the left have 12 stitches in the S-chain, hence the curvature.
What I don’t like is that the weaving overlap of outer CKP loops is not clearly visible. Maybe another stitch would help separate the loops ?
Before using the S chain with picots, I did a quick trial with the metallic wires. The first part (on left) has closely snugged stitches, while the latter half has stitches pulled apart by the distance of each picot.
This gives a mock Pearl Tatting effect, using only 2 threads.
I really enjoyed tatting this little medallion - worked in just one sitting - & converting it into a hexagon. Love the Celtic Knotted Picots – both for their effect and their multi-utility. They are a bit fiddly, though, & I may be wary of using them with size 40 thread. But who knows what lies beyond the horizon, in the vast galaxy !

Thanks to Patricia for her lovely pattern and don’t miss her delightful allegorical tutorial of the Catherine Wheel Join here.