Showing posts with label single shuttle. Show all posts

Sunday, 21 June 2026

multiple celebrations

Pin It now!

Yesterday I wrote about two celebrations of which one is actually a week away. Turns out we have a full house today. International Yoga Day, Father's Day, World Music Day, and our very own International Lace Day all came together on this June Solstice! 

These are my tatted motifs for the day - two from our Endrucks Project and the other a better version of my recent unhappy trial.

My name badge from the ILD FB page. 
Letter E from E41 derived by Manju Talekar.
This letter was tatted a few days back when I was doing the presentation for this pattern to ensure that the correct shuttle and instructions were presented.

And if I rotate the E by 90 degrees, we get M!!! A wee bit of tweaking for it to look better is all that's needed.

Letter E cursive from E32 derived by Paola Bevilacqua.
This one I tatted today! However instead of captured picots I used beads. I wanted something festive.
TIP: Although it called for 2 shuttles, I used a shuttle and ball with beads pre-strung on both! Using SCMR (mock rings) and reverse join as well as any relevant reposition method, I managed to avoid the 2nd shuttle!

Earrings with Interlaced Onion Rings designed by Lauretta Tondelli.
This time her onion rings comprised of true rings and not chains as in the unhappy trial post. I like this Much better!!! Of course since the 2nd and 3rd rings were large, I left a core thread loop (2 in case of the 3rd ring) midways so that the ring could be closed in 2 (or 3) phases. Pretty happy with the result, though I do see the need for improvement.
Also, I had to un-tat and re-tat with 2 less double stitch in each segment of the inner chain to get the proportions right.
The two Es together. Both pattern links are in my previous post. I wonder if I can tat all 6 versions during our celebratory week?
All motifs tatted in Anchor or Red Rose size 20.

So, how did you celebrate the day? 

Friday, 15 August 2025

independence day tatting

Pin It now!

 Well, I managed to finish it, almost. Chain for the necklace remains to be attached, but this will give a fair idea of how the Lotus Motif Necklace looks. 

My necklace with the Indian flag colours for #HarGharTiranga2025 using tatted motifs of our national flower - the lotus. Proud to celebrate our 79th Independence Day today.

Two motifs layered to give a lotus with more petals and layers. On top is the motif from my previous post (Anchor Pearl cotton size 8) while the larger one behind is with a thread I'd remembered buying and thinking it fit for ANKARS.

Kankri thread (in cones) that I'd bought back in April and boy, was it smooth sailing! No issues with either tatting or closing the large rings. It was super fun to tat. This is an artificial silk thread. However, the difference in the motif sizes is quite visible.

I made no changes to the orange petals - pattern shared here - https://tipsaroundthehome.blogspot.com/2025/08/lotus-tatting.html
However I did tweak the green rings as follows -  (from right to left, clockwise) 
ringF: 12 - 4 - 9. 
ringG: {lies above F}  9 +(F) 6 - 6 - 9.
ringH: {lies behind G} 9 +(G) 4 - 12. 

Another visual comparison of size. The larger motifs measure about 4.5cms across and 4cms high.

Another arrangement of the three motifs.
 
And joined into a necklace or a bracelet if you prefer. At present the length is 7.5 inches - just right for a bracelet.
I tatted a pair of white rings (Anchor Pearl cotton size 8) attached to adjacent motifs with a blue bead in the center. So all colours in my flag are included!
TIP: The center pairs are (8+8) while the end pairs are (6+6) with a bicone crystal between them. 
Instead of tatting over the first ring tail, I slipped it through the bead after closing the ring, and then tatted over it in the 2nd ring. And the 2nd ring tail was again slipped through the bead to the other side and sewed in. This way I have 3 threads through the bead, making it quite stable.

Its difficult to capture the effect and colours here unless I take time out to try out different backgrounds and brightness .... Hubby approves, so you have his word that it looks quite spectacular.
I haven't even blocked or processed the motifs.

The motifs tat up so quickly (when the thread is right, LOL) that I'd love to make a little scenery with them.


Friday, 18 April 2025

hospital tatting

Pin It now!

 Its been over 10 years that I took any tatting along with me. This time I felt like taking my shuttles along to my doctor's appointment. In our minds it was supposed to be a routine visit after 6 months and since everything was stable, we thought the regimen would just continue. We spend anywhere between 3 to 5 hours there, mostly just sitting around. 

A question that has constantly plagued me .... Which came first - patient or patience?!

So anyways, turns out we started a new line of treatment (basically injections at stated intervals) in order to get rid of the oral steroids. I only have a 50/50 chance but any little decrease is better. So off we tromped to the hospital again the next day which required a few hours of hospitalisation for observational purposes, and along came my shuttles again. Following are the motifs I tatted as a patient patient. All in Anchor size 20.


I gave away a couple of butterflies. One lady noticed the hook on my shuttle and asked whether this is how crochet hooks are made nowadays! I explained to her that it was a shuttle used to make tatted lace. She bemoaned the fact that nobody wants to wear or use handmade stuff any longer.


I kept each motif different. Couldn't bring myself to repeat the same counts, LOL.
All tatted with single shuttle or one thread aka single tatting.
These are all very generic patterns hence feel free to copy-tat ;-P

These came home with me. I have decided that it is better to glue them on cards or bookmarks and then gift randomly. Easier than explaining what one can do with the motifs, how to wash and block, etc. So, whenever I'm in the mood, I'll be gluing them to card stock and adding a bit of background. 

And while I had no side-effects from the injected biologicals, I did come home with viral flu which later shifted to my stomach and I lost about 10 days doing hardly anything due to the fever. Back on track now and tatting up samplers, etc., writing an article, creating PDFs, and catching up with blogs.

Friday, 19 April 2024

bracelet query

Pin It now!

Early this month I was approached by a lady, Beata S, to help with a bracelet pattern. She showed me a pic and I immediately thought of a single shuttle pattern. However, the rings were so clearly overlapping, that it created some confusion and I veered towards interlaced split rings. That I was seeing the image on a small screen didn't help either. I can't show that pic for obvious reasons,

I asked my PIC Ninetta for confirmation and she quickly came back with a couple of WIP pics and it was such a relief. 

This bracelet is almost as basic as they come, quick to tat up, and a great way to embellish or use as a lanyard, jewellery piece, etc. It has dimension, texture, and strength. 
The following pics are a very quick stepwise pictorial using thick thread and large pearl beads. The size of ring will depend on the size of the bead - let the ring be just a tad larger.

1. String beads onto to shuttle thread and tat a ring.
Slip the bead towards the ring just tatted.
    Each ring is 12 ds ; 4mm pearl beads ; size 3 thread.
 
2. Leaving just enough bare thread to span the distance between previous ring and bead, tat the next ring.

3. Pass a crochet hook through the top of the previous ring and pull up the new ring through it,  centering the bead in the previous ring.
4. Continue these steps for the desired length.
Many variations are possible, obviously, including more than one bead in the center, seed beads around the ring, etc. 
Check out Ninetta's numerous Russian-inspired versions here - https://ninettacaruso.blogspot.com/2019/08/russian-inspired-bracelets.html

5. This is how it looks from the back. Notice the bare thread between rings. It can be avoided by using seed beads to cover the bare thread, thus making the braid reversible with kind of a dual look.

I really wish I could have made a better version - intended but not executed. Perhaps in future. At present I am working in fits and starts.

As soon as I was satisfied, I typed out instructions to Beata, and told her I would send the pics in a bit. I had barely uploaded the pics when I received her beautiful version! She was not only quick, but so neat! 

It is always satisfying to answer a query and be of help. And we learn in the process, too. I have often had to delve deeper into a technique to answer a question, thus improving my own understanding. 

UPDATE: (19th April 2024) Beata Saifer just sent me this new image of her bracelet and graciously permitted me to share it here ---
Thank you, Beata! It's been nice corresponding and chatting with you!

UPDATE (May 2024): Corina Meyfeldt used a different method (Collar Rings) to achieve the same result. https://cmhandmade.blogspot.com/2014/07/hello-jaden.html

UPDATE (July 2024): Mad Jar Tatting had uploaded a video demonstrating how to tat this braid. While the outcome is the same, she tats a line of alternating rings and beads to desired length. Then she starts weaving the rings. https://www.youtube.com/watch?v=rIrGNrkWHJE - Ring with Beads in size 20

Sunday, 31 March 2024

happy ITD 2024

Pin It now!

 A day early, but we love our tatting year round, don't we?! So, keep your tatting tools and materials ready, choose your pattern, friends, and location, and have a blast with chocolate, tea, and chatting!!!

This is such a quick and fun medallion from Rebecca Jones' 'The Complete Book of Tatting', Fig. 123.
Tatted in Lizbeth size 20, with half-closed rings (HCR) instead of chains or bare thread to bridge the distance. A single-shuttle pattern obviously.

TIP: Notice how the top and top right cords appear more pointed than the rest? It shows how you can change the curve by changing how far you close the ring! The middle ring in both is closed more than halfway as seen in the shorter bare thread space. I'm tempted to tat another with a sharper pentagon shape, LOL.

I did use a folded picot gauge for the HCRs , but messed up with some of the rings. Of course the sure shot method would've been to use beads.

🌹🌹🌹🌹🌹

After a hiatus of three months, we begin our new game of the month for this year tomorrow, in the Endrucks FB group! Let me know if  you wish to join even if you aren't on FB. This is our pre-announcement:

A game of decoration where you will get a chance to
  • Refresh your skills
  • Learn something new
  • Apply your new learning
  • Do a bit of designing
  • And all while beautifying a little model!
It all depends on how far you wish to take it! But let us warn you that this can be quite addictive!

🌹🌹🌹🌹🌹

🌹🌹🌹🌹🌹 Once again, a very happy International Tatting Day to all 🌹🌹🌹🌹🌹

Sunday, 7 August 2022

mirroring

Pin It now!

 Only 8 more days to go and my heart is beating fast ....

My messy heart after 6 days 💗

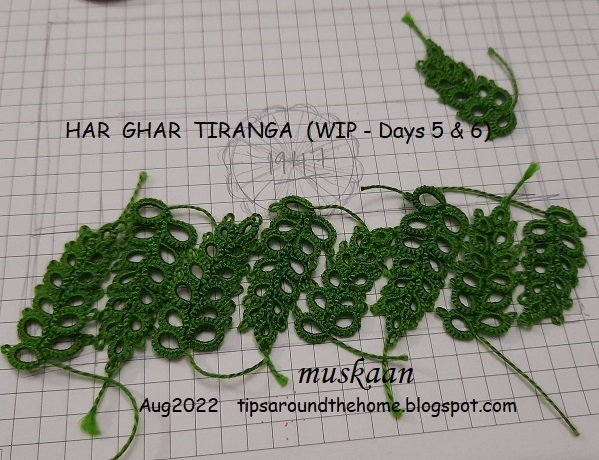
This is how I intend to place the leaves. In the background is the sketch for reference. The center is an outline of the coin. And there's one extra leaf but who knows it might come in handy once I start gluing.

Some of the initial leaves are shorter 'coz I added 2 extra leaflets along the way.
I have a shuttle filled with scrap lengths. Once glued, the empty spaces will be filled with the required number of leaflets.
This is the Laurel Leaf pattern (on page 7 of this pdf - https://drive.google.com/file/d/0B5MqI5ByadI4cjRaV3h3Qjgyajg/view?resourcekey=0-OQ9HULLWS0raSHIL0dR4Tg) In case it does not open, send the automated request.

TWoT Notes: Notice how the 4 leaves on left side face left while the 5 on the right side are bent towards the right? I followed the exercise set out in the pdf. Instead of starting the first ring frontside, simply start it backside (RODS or reverse order of double stitch ie., 2nd half st, then 1st half st.) and continue with the pattern working fs/bs tatting throughout. The leaf will curve in opposite direction.
No need to work out the mirror-image in the pattern!!!

Tonight I will try out the white pattern before working it for real. I've diagrammed it, but need to confirm stitch count, size, etc. 

Saturday, 6 August 2022

day 4 and more

Pin It now!

 This is my progress on Day 4 or rather the 4th night! ... 

Days 1 to 3 - https://tipsaroundthehome.blogspot.com/2022/08/flagging-off-new-project.html

GREEN - This is the colour of prosperity and what better than leaves to convey that symbolism!

I chose my Laurel Leaf pattern 
(pdf .. pattern on page 7 - https://drive.google.com/file/d/0B5MqI5ByadI4cjRaV3h3Qjgyajg/view?resourcekey=0-OQ9HULLWS0raSHIL0dR4Tg - in case it does not open, send the automated request).

The only tweaks made - shorten the bare thread space between rings for a compact effect; and increase the length with 2 additional rings at the  base.
When I finish the leaves, I will show how I intend to arrange them.

Speaking of leaves, here are the leaves from my balcony garden (in no particular order) - we now have 10 pots with no room for any more if we wish to sit and bask in the winter sun, LOL.

Our green chilli plant is finally flowering and there are tons of buds waiting to peep out.

Our new guava plant bought 1 week back. It is a Bonsai from Kolkata and had 2 fruit but the smaller one fell of yesterday. 
An asparagus fern in a smaller ceramic pot.

Have to look up what this ornamental plant is called. And does it bear tiny red flowers? This is the 2nd small ceramic pot. The rest of the 8 pots are 12 inch diameter.

Doesn't this plant need less sunlight to maintain the mottled effect? Again need to research it.

Our Ficus is flourishing, too, and we pruned it a few days back.

These are the fresh new leaves of the Curry leaf plant.

Ajwain (oregano) 

This is the first time our Tulsi (Holy Basil) plant has prospered so much and we had bought this almost a year  back. I used to prune, but then the new leaves would become smaller and smaller. 
The reason is a tip we saw in a gardening show on TV - Nip off the inflorescence as soon as it appears or as soon as you can. Hubby has been diligently doing it and the plant is such a pleasure to watch.
Of course, I do use the leaves in my tea.

Last but not least a portion of our lemon tree. The 2nd oldest lemon ripened and fell off, too, yum! These 2 are the next in line, though it might be well nigh 4-5 months before they ripen.

So this is a stroll through our potted plants in our balcony. Hope you enjoyed it as much as I enjoy it every morning.


Wednesday, 22 December 2021

tiny angel with big message

Pin It now!

 Recently Margaret shared a memory of her cute mini tatted angels (https://margaretsdesignercards.blogspot.com/2015/12/decembers-pinterest-challenge-choir-of.html) and it reminded me of the ones Anita Barry had shared last year (https://tipsaroundthehome.blogspot.com/2020/02/happy-birthday-georgia.html). 

Huh. turns out neither of us remembered to upload the pattern for the white ones, after Anita taught them at the Palmetto Tat Days 2020. Got the wheels in motion and no better time than the present to present these tiny dancing angels.

Itsy-Bitsy Angels pattern (click to download)
https://drive.google.com/file/d/1jWQGGWH5E5hMKZGG_cWkbEQ26o1Q0Lad/view

As you can see, this can be worked as a single angel or a row of angels. A rings-only design, the pattern uses a single shuttle, working the wings as folded SSSRs to work continuously. However these can be worked as split rings if one wishes to tat with 2 shuttles. 

The flexibility of this edging adapts to any shape we desire - a round or oval garland, a straight edging, a square or any other polygon! It can make a cute frame.

And, Laura Angel pattern- 
https://drive.google.com/file/d/12NJtxEWk6jyl_H0i2upSi_CNWZfWpaR9/view?usp=sharing

Hope you enjoy these quick tiny tats that carry a big message within them (read it in the pdf).
So get out those shuttles with leftover threads from all the snowflakes you tatted, and quickly belt out these little angels!

Many many thanks to Anita for sharing her patterns.