Showing posts with label PTG. Show all posts

Wednesday, 22 December 2021

tiny angel with big message

Pin It now!

 Recently Margaret shared a memory of her cute mini tatted angels (https://margaretsdesignercards.blogspot.com/2015/12/decembers-pinterest-challenge-choir-of.html) and it reminded me of the ones Anita Barry had shared last year (https://tipsaroundthehome.blogspot.com/2020/02/happy-birthday-georgia.html). 

Huh. turns out neither of us remembered to upload the pattern for the white ones, after Anita taught them at the Palmetto Tat Days 2020. Got the wheels in motion and no better time than the present to present these tiny dancing angels.

Itsy-Bitsy Angels pattern (click to download)
https://drive.google.com/file/d/1jWQGGWH5E5hMKZGG_cWkbEQ26o1Q0Lad/view

As you can see, this can be worked as a single angel or a row of angels. A rings-only design, the pattern uses a single shuttle, working the wings as folded SSSRs to work continuously. However these can be worked as split rings if one wishes to tat with 2 shuttles. 

The flexibility of this edging adapts to any shape we desire - a round or oval garland, a straight edging, a square or any other polygon! It can make a cute frame.

And, Laura Angel pattern
https://drive.google.com/file/d/12NJtxEWk6jyl_H0i2upSi_CNWZfWpaR9/view?usp=sharing

Hope you enjoy these quick tiny tats that carry a big message within them (read it in the pdf).
So get out those shuttles with leftover threads from all the snowflakes you tatted, and quickly belt out these little angels!

Many many thanks to Anita for sharing her patterns. 

Monday, 15 April 2019

joys of dancing

Pin It now!
We are enjoying the sights, sounds and antics of a variety of birds; including their dance of courtship or under the sprinkler or in a puddle! The kingfisher (with a few sparrows) has returned after a gap and sits on a tree in clear view!
joys of dancing with friends !
When we had first moved here over 20 years back, there used to be a couple of peacocks strutting around! They soon disappeared, never to return.

Anita Barry has been strutting my Dancing Peacocks & it's my turn to dance now :-D
She converted the medallion into a beautiful pendant and also worked out her stitch count for the earrings for a size 8mm bead. The green chain has padded double stitch!

This is another pic of her very first try immediately after I uploaded the pattern ('18) – love the vibrant colours & frayed picots!!!
While adding her count, I took the opportunity to draw some stepwise diagrams of the floating beads method, as relevant here, as well as generic. With her valuable and in-depth feedback, the notes on page 2 are more streamlined now.

I will delete the old one and substitute it in my patterns page above

At Camp Wanna Tat they have a “Pattern Binder” available for workshop attendees to look through and review. This April my peacocks have been mailed to attendees.
And the same pattern will now be taught at Palmettos Tat Days in September this year! Here's a link to the inspiring class pictures

My patterns have made it to the Tat Days goodie bags two years in a row ('16 & '17), thanks to Georgia Seitz's initiative.  
Speaking of, she will be teaching Noorjahan's Rubies - necklace and earrings - at the Shuttlebirds event in May! She is using metallic thread, though I haven't seen it yet. I hope to do the same someday.


I have fair reason to dance despite this hot Indian summer, right ?!


All these patterns have floating beads methods! I was hoping to create more diagrams for the method and it’s variations, but doubt if it’ll get done by the end of this month. There Has been progress, though.


My heartiest thanks to Georgia and Anita for letting me dance :-))))

An update to my previous post - 2 new pics have been added - one of mimosa knot leaves, and another prototype of a rose bud. Do check them out. 


Related posts

Wednesday, 27 September 2017

eternal circles and arches

Pin It now!
free tatting patterns

Renata and Justyna take turns coordinating craft series - posting project and tutorial links ranging from tatting, decoupage, sewing, crochet,  etc. They’ve already done many such series, and this time it’s back to “I Love Tatting” by Justyna. Every month there is a new sub-topic – plenty of time to learn new techniques or brush up on old ones. And people join in by posting their project and link during that month. It’s a great way to showcase the immense creativity and skills and be inspired by each other. Check out the details here.

This month (the first in “kocham frywolitkę”) the topic is Circles and Arches. Well, these are universal and ubiquitous ! I chose this simple necklace set with prominent arches and rings....

Noorjahan’s Rubies – a parure

Georgia is continually throwing challenges my way ;-P And I Love it. Makes me crawl out of my comfort zone. This time it was a necklace for Palmettos goody bag. I wanted a set with earrings, too, and at the last moment a ring was thrown in as a bonus pattern. 

This project took me over a month to present. The tatting is very quick, I assure you. But the designing, diagramming, writing, ooooof (am I That inefficient?) - the countless hours ! So I hope at least a few tatters will be willing to give it a go, if only to cheer me on ;-P
The one great thing that came off it all – a new beading method (Floating Beads).

Stephaine Wilson graciously and willingly accepted to test-tat the earring pattern. Her detailed notes, feedback, and input helped tremendously !
I ran out of the large teardrops, and had to snip them off my trial pieces. The earring on the left has longer chain arches. Wanted to show this version as well, though we rejected it (DH had a say in many of the decisions - he was thrilled and quite enamored by the whole tatted jewelry scenario!)

Do you recognize this necklace pattern? Yes, it’s the vintage edging (#7 from Needleart) converted into a necklace. Barely any changes were required!
All the other pieces are based off it to make a set – a parure (a term Georgia introduced me to!).

When it came to naming the piece, Georgia suggested something ethnic. I immediately recalled wanting to design a ruby pendant after reading “The Feast of Roses” by Indu Sundaresan. There is not much literature on this 16th century empress, but the author has brought her to life. Nothing to it but Noorjahan’s Rubies !

My intention was to use this single large oval bead in the center of the necklace, making the centre large, with more tatted chains around. But it looked too dull there, hence tatsmithed around a ring ! It can also be wrapped around a pin for brooch.
And my first time with wire bending ! The ring was a long wire with a loop at one end. I put the straight end through this loop, and then bent it into a similar loop. The ring can now fit any finger. 
The ring and earrings patterns are shared and explained in this Bellaonline article.

The bracelet was tatted while the Tat Days conference was on, hence not a part of the goody bag. This piece has 2 extra 'flowers' - I didn't realise that the tatting would stretch once it was completed and blocked. In fact it Needs to be stretched before blocking. With the extra repeats, it can be worn as a choker !

I’d like to share the design process (what’ll I do with all the pics I took, all the trials I did?!), but in a future post. There’s always a back story with many by-lanes with learning at each step.

I tried to keep beads at a minimum wanting the circles and arches in tatting to show. But I certainly would like to make this in gold thread – it would be truly Indian then. Everyone has heard of the Taj Mahal with it's elegant domes and arches. But it was Noorjahan who first had a tomb built for her father, which later inspired the Taj.

Symbolism –
Black thread - veil/shadows behind which a woman was expected to remain.
(however,  I wish I could tat it in gold -- it would really bring out the ruby reds. )
Rubies – for the ruby gifted to her by her husband when he named Mehrunissa “Light of the Universe - Noorjahan” !
Teardrops – for the blood and tears, the resistance and intrigue, yet dignity under pressure.
Filigree bead cap – reminds me of the intricately beautiful carvings & inlay work by craftsmen at the time.
Diamond spacers & Gold beads – besides prosperity, these sparkling jewels reveal Noorjahan’s brilliance and strength shining through.

Many many thanks, Georgia and Stephanie ! ((((hugs))))

Download Pattern PDFs here - 
1. Noorjahan's Rubies - EARRINGSdiagrams only pdf,
2. Noorjahan's Rubies - NECKLACE diagrams only pdf ,
3. Noorjhan's Rubies - RING/Broochdiagrams only pdf
4. Noorjahan's Rubies - a parureComplete 4-PIECE PATTERN including BRACELET, written instructions, notations and diagrams pdf.


hope you enjoy tatting a piece of this jewelry …

Sunday, 17 September 2017

ties of friendship

Pin It now!
We ‘met’ in Georgia’s online class. Anita has been a huge supporter and her emails are always so sweet and encouraging! She is so talented – many will remember her corn harvest basket and her miniature tatted baby items.  

This year she was teaching a class at Tat Days and imagine my immense surprise and pleasure when I got the same pattern in my inbox almost as soon as the event ended! The pattern will be available on the Palmetto’s CD shortly. I am so touched by her thoughtfulness and generosity and treasure her friendship.

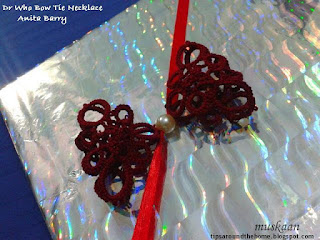
Doctor Who inspired
Red Bow Tie Tatted Necklace
Anita Barry

A 3D bow tie meant to be a necklace with jump rings and chain attached. I intended to sew it on to a hairband; instead a satin ribbon was passed through the bead to use for wrapping a gift. It's theirs to decide how to use the bow :-)

The triangular motif is repeated 4 times – 2 on either side of the bead, folded back on itself, to create this bow tie. Smart – and interesting how ‘easy’ it is to use flat motifs to create a 3D lace.

An alligator join midway through a ring was new to me - stopped me in my tracks! 
But it’s pretty simple – move the ring thread around/behind keeping the core/shuttle thread in front thus 'capturing' the picot and continue, making certain that thread still slides freely. 

Use of padding only one half of a stitch is clever (Half Double Double Stitch - HDD)! It adds stiffness to the tatting to hold shape, without making it bulky ! 
HDD is merely one form of a variable/unequal padded double stitch (pds).
According to the notation we proposed
a HDD would be pds(0,1) ie. regular first half stitch (0 or no wrap), 1 wrap on second half stitch. 
And if one wanted to make 10 such HDD, we would write it as 10pds(0,1).
pds encompasses all the various terms for padding the stitch.

Pattern called for a ½ inch bead. This pearl bead is the only one in my stash. However, one can use any sized bead, I realized only later. A smaller bead, more importantly with a smaller hole would keep the 2 sides from 'flopping'. Or perhaps I didn't snug the bead/tatting tightly enough. As a necklace, it wouldn't matter, though. 

I used size 20 Anchor although the pattern calls for a size 10 thread since I’ve come to realize that the former is pretty close to Lizbeth 10. My bow measures 2”x4” - almost similar to Anita’s. 

Since it is inspired by Dr Who, I went with maroon. Looking back, I really should’ve chosen a lighter colour to bring out the beautiful pattern. Pink, to go with the Barbie story book inside ? ;-P


Many many thanks, Anita :-)
I enjoyed tatting it tremendously & am sure the recipient will like & use it too.

Saturday, 15 October 2016

A goodie bag of free patterns

Pin It now!
at least I hope you think they are goodies, and not ho-hums. 
and plenty more patterns to come, so keep your bag open in the coming weeks for snowflakes, squares, triangles, flowers, ....
There is also a notification at end of post ...

«»«»«»«»«»«»«»«»«»«»«»«»«»«»«»«»«»

I was thrilled when Georgia asked if I would share my Bonds of Love Rakhi/Bracelet pattern for this year’s Palmetto Tat Days goodie bag. Preferably with beads. Hmmm, working with beads – a challenge but also an opportunity.  

Staring at my plain rakhi, one thing was for sure – I wanted beads inside the 2 hearts, following the curve of the long chains and filling in the space. Ninetta uses beads so beautifully, and she sent me loads of Gorgeous beaded tatting – various ways in which beads could be incorporated – pics of her own works and other resource links. She was just as excited as me and test-tatted a sampler that very night while I slept! Thanks, cara amico :-)
In the end, though, I kept it as simple as possible, adapting the rakhi to a beaded bracelet. Jane’s earrings helped me solve the problem of the braid. 

Bonds of Love” Bracelet / Rakhi
Single page pdf  ;  Longer version pdf 

The bracelet is tatted in 3 segments, joining as you go : The central medallion, and 2 heart medallions with braids on either side.
Diagrams follow the stitch colour of the tatted model, and I hope that makes it even more easy to follow along.

This single page diagram-only version was for the Tat Days goodie bag where Georgia added some lovely beads, buttons, findings, etc. Colour-coded diagram follows the stitch colour of the tatted model. 

This longer 4-page version was meant for some book/booklet that they release (I have no idea what it is, or the title, etc) and has a step-wise pictorial besides a written & diagrammed pattern.
Diagrams follow the stitch colour of the tatted model


The Design Process

A peek into the design/conversion process …. My objective was to keep the lines clean and pattern simple. It was the idea more than the execution, where one can choose any small medallions or motifs and join them together to create a bracelet, bookmark, insertion, etc.

Tacking on the beads to the old bracelet, with simple sewing thread & needle, to get a feel of what, how, … tried these 3 placements. Bead in the small rings of center would only make the rings floppy ; the one in 3rd pic looked too crowded! Settled on the last pic.
The single ring connection between the medallions was also weak and floppy and needed to be strengthened. Perhaps 2 rings would work.
Test-tatting
The 2-ring attachment worked fine and was doable.

First Version … Okay, everything worked, except for the ring in the very center. It appeared too small. At this stage, I had to string a couple of beads on the shuttle. Could I do it without Any bead on shuttle ?
TIP : Keep the long beaded picots just a tad longer than required for joining purposes, in order to maintain curvature. The beads need room to create the curve; if tightly snugged, it will become a straight line.

Second Version …Used a large pearl for the centre. Yes, it lifted up the whole ensemble, acting as a good focal point. This time, the center medallion was tatted first, and the 2 heart-braids joined on the go.  Worked much better !

Update Oct 20 : While posting, I noticed that there wasn’t a single pic with close-up of braids. Finally took one showing the braids in all 3 bracelets....
TIP for Braid : Do not close the SCMR too tightly – it will create a curvature on the way back. Leave it ‘straight’, with plenty of room to join back.

Both these versions will require some stiffening, since size 20 thread was used.

Third Version/Working …. I didn’t have any polyester thread or metallic thread (hadn’t organized my stash then ! Only later did I discover my metallic threads in silver, gold, and copper !!!), except for this pre-twisted green with metallic silver. This one stays nice and stiff.

TIP (above pic) : One way to load beads was with paper clips holding them in place. But these get in the way. So, when making the first long picot, load the number of beads required and hold with clip. Make 1 stitch and remove the clip and the beads and continue tatting. When it comes to the joining point, load the beads with a crochet hook, join and continue.
This accomplishes 2 things – one can determine the picot length for beads used, and it makes tatting smoother with no beads and clips hampering work.

Now that I have plenty of stashed metallic threads, my jewelry tatting will have some shimmer :-)
I like the fact that not a single bead needs to be pre-strung! And depending on the size of bead, one can adapt the length of the picot.
I didn’t have any clasps or toggles, hence left it with metal split rings.

Download pattern pdf : Bonds of Love diagram-only pattern

Many many thanks to Georgia, for giving me this wonderful opportunity !!!

«»«»«»«»«»«»«»«»«»«»«»«»«»«»«»«»«»


I have already shared the diagrams in the TWoT Rings Only pdf.
Here, I have added written pattern alongside the diagrams. This will go to my pattern page in the tab above.
Not to bore you further, but for a new reader ...the bouquet comprises 3 simple, rings-only patterns. These can be considered beginner patterns, I think.  
As seen in collaged pic above, Wiggly Flowers, Butterfly Liberated, and Laurel Leaf. constitute the 3 patterns that can be tatted separately or combined into a collage sewn to a fabric, or glued to a card. These are all small enough to empty shuttles and use as charms, clip ornaments, etc. etc. Check out Eliz’s adaptations of the flowers and butterfly here

Download pattern pdf Ring In The Bouquet

«»«»«»«»«»«»«»«»«»«»«»«»«»«»«»«»«»

Please Note : 
Rachael’s Hen n Chick Square Motif link did not work in the Set I pdf. Click on name for updated link. Link to video - https://www.youtube.com/watch?v=4SoGklhCqL0 
And when I checked further, the entire pdf can only be viewed, but am unable to download or open it in Window. This is the file that I edited using DocHub. I can't correct the link, hence have created a new revised link. This Way or Tat? Set I - Rings Only updated Oct 16


happy tatting always :-)