Showing posts with label giftwrap. Show all posts

Wednesday, 20 February 2019

rose is a rose

Pin It now!
rose is a rose is a rose, whatever the material used.
Time to make a rose spray after my first trial here.
Huh, turned out the coloured paper I’d bought had lots of coloured square sheets but only 3 of each colour. And each rose requires 3 sheets to make. It was either send hubby back to buy more, or simply go with the white rose. Why not? The first one did look good. And the theme seemed to be white (white saree, silver/white wrapping paper).
I found the video for DIY paper rose. It is by Dreamy Posy here. 
Also found an 'easy' rose bud video. Hmm, my fingers couldn’t turn out one as nice as in the video. Patience was hard to come by :-( 
Leaves are simple, as before, except for a spikier rim. Folded for veins.
A spray needs baby breaths! Watched this video by tsuku cafe and tried. Ugh, it was a horrendous job with glue & tissue sticking to my fingers. Not happy with the green taping either, but well, job done. (the 'well' is displaced ;-P).
Overall it looked fine. Hubby thought it was an overkill. More importantly MIL loved it and is going to use it to embellish her friend’s birthday gift in a few weeks' time ;-D
If we were geographically closer, I would’ve offered to make a better spray. I'm going to try my hand at crochet roses/flowers for next time. 

Sunday, 17 September 2017

ties of friendship

Pin It now!
We ‘met’ in Georgia’s online class. Anita has been a huge supporter and her emails are always so sweet and encouraging! She is so talented – many will remember her corn harvest basket and her miniature tatted baby items.  

This year she was teaching a class at Tat Days and imagine my immense surprise and pleasure when I got the same pattern in my inbox almost as soon as the event ended! The pattern will be available on the Palmetto’s CD shortly. I am so touched by her thoughtfulness and generosity and treasure her friendship.

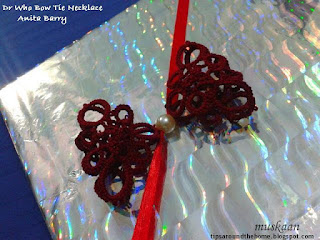
Doctor Who inspired
Red Bow Tie Tatted Necklace
Anita Barry

A 3D bow tie meant to be a necklace with jump rings and chain attached. I intended to sew it on to a hairband; instead a satin ribbon was passed through the bead to use for wrapping a gift. It's theirs to decide how to use the bow :-)

The triangular motif is repeated 4 times – 2 on either side of the bead, folded back on itself, to create this bow tie. Smart – and interesting how ‘easy’ it is to use flat motifs to create a 3D lace.

An alligator join midway through a ring was new to me - stopped me in my tracks! 
But it’s pretty simple – move the ring thread around/behind keeping the core/shuttle thread in front thus 'capturing' the picot and continue, making certain that thread still slides freely. 

Use of padding only one half of a stitch is clever (Half Double Double Stitch - HDD)! It adds stiffness to the tatting to hold shape, without making it bulky ! 
HDD is merely one form of a variable/unequal padded double stitch (pds).
According to the notation we proposed
a HDD would be pds(0,1) ie. regular first half stitch (0 or no wrap), 1 wrap on second half stitch. 
And if one wanted to make 10 such HDD, we would write it as 10pds(0,1).
pds encompasses all the various terms for padding the stitch.

Pattern called for a ½ inch bead. This pearl bead is the only one in my stash. However, one can use any sized bead, I realized only later. A smaller bead, more importantly with a smaller hole would keep the 2 sides from 'flopping'. Or perhaps I didn't snug the bead/tatting tightly enough. As a necklace, it wouldn't matter, though. 

I used size 20 Anchor although the pattern calls for a size 10 thread since I’ve come to realize that the former is pretty close to Lizbeth 10. My bow measures 2”x4” - almost similar to Anita’s. 

Since it is inspired by Dr Who, I went with maroon. Looking back, I really should’ve chosen a lighter colour to bring out the beautiful pattern. Pink, to go with the Barbie story book inside ? ;-P


Many many thanks, Anita :-)
I enjoyed tatting it tremendously & am sure the recipient will like & use it too.

Sunday, 30 April 2017

gifting SOUP

Pin It now!
using tatted motfis and scraps on gifts

Readers may remember that I use up many motifs, trial pieces, etc. to adorn fabric or paper. The acronym (not a very good one) SOUP stands for Sewing On/Using Pieces of tatting.
(click on label on right panel for my earlier “tatting SOUPs”)

Here are a few pics of my more recent ventures.
Since this is in family, and hand-gifted, I merely tape the motifs on the underside. 
The recipients enjoy taking out the pieces and re-using in their own way :-)

I like that the cover brings in some interest…

and I reduce some of my stash, making room for more !
Patterns on this gift wrapper:
Laurel leaves & Wiggly flowers from Ring in the Bouquet
Rosette Enchained – pattern to be shared
Those small fluffy flowers are made with scrap thread (size 40) using Interlocking picots (long picots on a Josephine ring). 

õùõùõùõ

Jane’s TIAS rabbit & Irene Woo’s Heart of a Butterfly have also been similarly taped & gifted some weeks back (forgot to take a pic).
I try to match up the embellishment with the gift inside or to the recipient's taste, as far as possible.

õùõùõùõ

Prior to that, this envelope has 2 of my favorites taped on ...
Super 17 Butterfly (3D in size 40) and
my tiny Hibiscus doodad

õùõùõùõ

Mission accomplished !

Where/how do you serve your tatting SOUP ?

keep tatting - SOUP is healthy :-)