Showing posts with label alligator join. Show all posts

Thursday, 26 June 2025

quick tatting

Pin It now!

 I first shared a pic of my Fan Palm motif or pendant here - https://tipsaroundthehome.blogspot.com/2025/05/bead-tatting.html . Now I have the pattern ready --- 

Fan Palm Motif/Pendant by Muskaan (March2025) pattern PDFhttps://drive.google.com/file/d/16amEUnVT7ERSySRJqbMsj0af0Xu_MFsP/view

It is a simple motif that can be worked with a ball and shuttle and the beads are not pre-strung. 

It is a prototype I made to show beads over/on a picot. These beads are slipped over the long measured picots at the time of joining. Or they can be slipped over the picot while it is being formed, and held with a paper clip or marker. I prefer the former to avoid beads and clips getting in the way of smooth tatting. 

Measuring the Picot (including using beads as a picot gauge)https://drive.google.com/file/d/1Kk6rtyIUvo5JFA5u3vE3ruU2Z7zQ9fuq/view


I deliberately chose to do a mock ring since I did not know how big I wanted it. And then made an under-over or alligator join across the start of the chain. There are several ways to make the under-over join (alligator join is only one of them). Refer to my pictorials here - https://tipsaroundthehome.blogspot.com/2018/05/mock-rings-1-under-and-over-join.html  and https://tipsaroundthehome.blogspot.com/2018/05/mock-rings-1-u-o-join-continued.html

The diagram in the PDF is simply a guide. You can choose to tat with two shuttles if you wish to empty them of leftover threads. You can even work the mock ring as a true ring and without need for an under-over join. 

For a plain, flat leaf, avoid any beads on the picots. 

I used 4mm beads, but you can choose smaller ones and adjust their number accordingly. Oh dear, I've been so flaky lately that I forgot to take a pic of this on a chain. Hmm, not too difficult to imagine, right?

This is such a quick tat, really, and easily adaptable to any thread and bead size. Or go all around for a floral motif! Hope you enjoy the pattern. 

Monday, 28 May 2018

Mock Rings 1 Under and Over Join

Pin It now!
SCMR is a mock ring, but not every mock ring is a SCMR (self-closing mock ring).
While trying to explain this to someone who used SCMR as a default term, I started to remember so many different ways a mock ring can be shaped.

Mock Rings have been around for centuries. A mock ring is essentially a chain that is joined back on itself to create the impression of a ring. The difference lies only in the way the chain is closed.
In order to avoid overload I will break up the presentation into segments. This post covers mock rings made using the Under and Over Join.

Mock Rings 1: Under and Over Join


Once the tatted chain was invented, it was a simple step to convert it into a mock ring using an Under and Over Join - with or without a picot. Under and Over Join is a type of ‘across’ join, allowing us to move threads to the other side across an existing element.

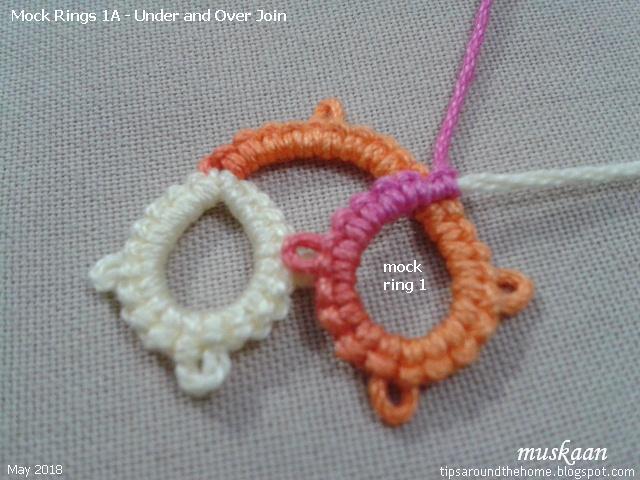
A single shuttle filled with cream thread and a ball with variegated colour are used for clear distinction in this pictorial.
There are 5 stitches between every picot; each ring is 5-5-5-5 & chain 5-5.

1-A. Under and Over Join: Without joining picot; Unattached rings

After a normal ring (cream), RW and 5-5 chain (above pic), we start working on a long chain (5-5-5-5) that will form the mock ring. 
 

Place shuttle thread above and ball thread under the chain. Continue tatting the chain normally, enduring that the first half stitch after the crossover is nicely snug.
A mock ring is made, with the chain (running scroll) moving across from above.

Note: Because of RW, the mock rings face the same side as the first normal ring.
We know this popularly as Alligator or Capture Join.


Let’s see what happens if we switch thread positions (ball above and shuttle under). 
It is difficult to control the shuttle enough to get a continuous chain above. 
But it can be useful in directional (fs/bs) tatting when working from the back side.

This method is useful when the elements (in this case mock rings) are free/unlinked and the threads can be positioned on either side.
But if the ring is attached to previous element, here’s how the join can be made.


1-B. Under and Over Join: Without joining picot; Attached rings

After linking the chain to previous ring, both threads are in front of/above the chain.
Pull a loop of ball thread down from under the chain, pass shuttle through loop, and snug tightly. Continue tatting chain.

In this case, after linking the chain, both threads are below/under the chain.
Pull a loop of ball thread up, pass shuttle through it, and snug tightly. Continue tatting chain.

This pulled loop is very handy when crossing over any previous element as in faux Celtic tatting. I used it in Teri Dusenbury’s Flurry snowflake. The pattern instructed slipping the long ball thread through the spaces and tatting the chain (as in #1A or alligator join). It was cumbersome and prone to tangling. Pulling a loop through the joining point is a quicker, more efficient method.
I made this in 2015, but am unhappy with my work.

This is a view from the back.

Without a joining picot at the start, there is greater flexibility in shaping the mock ring, but one also has to be extra careful to see that the ‘join’ is snug and secure. Adding a small picot at the start of the chain ensures accuracy and stability. I will show this in next post, along with some observations.


…. to be continued
Till then, enjoy tatting all over :-)))
See also -
https://tipsaroundthehome.blogspot.com/2018/05/mock-rings-1-u-o-join-continued.html
https://tipsaroundthehome.blogspot.com/2018/06/mock-rings-2-lock-join.html
https://tipsaroundthehome.blogspot.com/2018/06/mock-rings-2-lj-mock-onion-rings.html

Tuesday, 23 January 2018

floating with tatting

Pin It now!
updated Jan 24, 2018 with schematic for earring

Pozdrawiam ciepło (I greet warmly).

This month’s task for “I Love Tatting” is titled Goose Circle – isn’t that cute! Justyna listed some tutorials and examples of bead(s) within rings and also alternate forms of beading. I’ve already used the bead in SR and in SCMR in a few of my own patterns & other projects. Since “floating beads” was also a listed option, I chose to float along :-).  

Peacock earrings and Charmed Cross pendant
I used the floating bead (FB) method to add both teardrops in the Charmed Cross pendant – yes, this is the final version. I’ve added more crystal beads and the horizontal arms don’t look like stumps any more. But more on that when I share the pattern.

There are 2 versions of the Peacock earrings. 
These are derived from this dancing peacock medallion.

Worked with 2 shuttles, 2 colours.
Anchor embroidery threads are used : 3 strands of each colour woven with 1 strand of silver.

The bead in the center and the teardrops were added when required, using floating beads method. Seed beads are pre-strung for the overlying string.
For outermost round, one can use seed beads instead of picots, but I didn’t have any in suitable size/colour.

In version 2, I tried a little heart shape in the green, and a slightly tipped point in the blue. 
For outermost round, one can use seed beads instead of picots, 
but I didn’t have any in suitable size/colour.

After working the outermost blue chain to required length, 
I used a shoelace trick (SLT) to lock it in place. This also created the sharper tip.


These earrings are free-style and I didn’t follow any strict stitch count. But I will share the sequence :


  1. Start with topmost ring, attaching the findings.
  2. Add large bead (red crystal or gold) using floating beads method (or pre-strung).
  3. Work innermost ring in blue around the bead, with picot small midways.
  4. Bring forth the seed beads and create a layer around blue ring. Lock join to base of ring.
  5. Switch shuttles and work green chain. Join to blue ring. In version 1, add a small picot for linking next round; in version 2, make chain longer and lock join to blue ring.
  6. Over and under or Alligator join across base of rings, switch shuttles, and work the outermost round in blue with decorative picots. In version 1, join to green ring then add FB teardrop midways. In version 2, make chain longer, SLT, add FB teardrop, continue around.
  7. Tie and cut; hide ends.

Beads give us the opportunity to add more colours without having to use extra shuttles!

One can pre-string the teardrop (or sew it on later) instead of floating bead method. But I like how the FB makes the bead dangle a little further from the stitches. Also, since I use Pony shuttles that are too small to load large beads, this is a convenient alternate.

I hope you take the time to check out what the other talented participants have created. 

to the love of tatting, with beads

Sunday, 31 December 2017

the old with the new

Pin It now!
As we shed the old year for the new, memories of the old stay with us.
Here’s something old with something new to symbolise this transition on the eve of 2018. 
And since I love tatting, it seemed apt …

The old comes from many of the discarded bits from recent projects or experiments, 
used to make the bouquet.

The new is all Josephine Chains or Spiral Tatting - to complete the bouquet with stems 
and leaves as well as outline the card topper.
The 'leaves' are mock rings held in place with an under-over or alligator join.

The post and examples seem to indicate only spiral/Josephine chains not rings, 
so that’s what I went with.

Except for a random few rings or the set of 3 which used a thick thread, all the rest is in size 40.

Do you recognise some of the floral medallions? 
The pink are from Doily #10
most others are from later trials of my Aspiration doily center
the small 3D (layered onion rings) marigolds were made to empty the shuttles. 

 
The dark blue trim of Josephine chain is in size 20, made in one pass.
TIP : In order to turn the corner, I left a picot, and switched from 1st half stitch for vertical sides to 2nd half stitch for horizontal sides. It creates a fairly distinct corner.

for some beautiful applications and tatting !


Here’s wishing all my readers
A very happy, peaceful, healthy and creative 2018
With lots of tatting thrown in !
And looking forward to even more interaction ...

Sunday, 17 September 2017

ties of friendship

Pin It now!
We ‘met’ in Georgia’s online class. Anita has been a huge supporter and her emails are always so sweet and encouraging! She is so talented – many will remember her corn harvest basket and her miniature tatted baby items.  

This year she was teaching a class at Tat Days and imagine my immense surprise and pleasure when I got the same pattern in my inbox almost as soon as the event ended! The pattern will be available on the Palmetto’s CD shortly. I am so touched by her thoughtfulness and generosity and treasure her friendship.

Doctor Who inspired
Red Bow Tie Tatted Necklace
Anita Barry

A 3D bow tie meant to be a necklace with jump rings and chain attached. I intended to sew it on to a hairband; instead a satin ribbon was passed through the bead to use for wrapping a gift. It's theirs to decide how to use the bow :-)

The triangular motif is repeated 4 times – 2 on either side of the bead, folded back on itself, to create this bow tie. Smart – and interesting how ‘easy’ it is to use flat motifs to create a 3D lace.

An alligator join midway through a ring was new to me - stopped me in my tracks! 
But it’s pretty simple – move the ring thread around/behind keeping the core/shuttle thread in front thus 'capturing' the picot and continue, making certain that thread still slides freely. 

Use of padding only one half of a stitch is clever (Half Double Double Stitch - HDD)! It adds stiffness to the tatting to hold shape, without making it bulky ! 
HDD is merely one form of a variable/unequal padded double stitch (pds).
According to the notation we proposed
a HDD would be pds(0,1) ie. regular first half stitch (0 or no wrap), 1 wrap on second half stitch. 
And if one wanted to make 10 such HDD, we would write it as 10pds(0,1).
pds encompasses all the various terms for padding the stitch.

Pattern called for a ½ inch bead. This pearl bead is the only one in my stash. However, one can use any sized bead, I realized only later. A smaller bead, more importantly with a smaller hole would keep the 2 sides from 'flopping'. Or perhaps I didn't snug the bead/tatting tightly enough. As a necklace, it wouldn't matter, though. 

I used size 20 Anchor although the pattern calls for a size 10 thread since I’ve come to realize that the former is pretty close to Lizbeth 10. My bow measures 2”x4” - almost similar to Anita’s. 

Since it is inspired by Dr Who, I went with maroon. Looking back, I really should’ve chosen a lighter colour to bring out the beautiful pattern. Pink, to go with the Barbie story book inside ? ;-P


Many many thanks, Anita :-)
I enjoyed tatting it tremendously & am sure the recipient will like & use it too.