Showing posts with label handmade cards. Show all posts

Thursday, 21 March 2024

counts

Pin It now!
A bit of mixed media card for my March 2024 Small Decorations entry. My heartfelt thanks to splocik for graciously accepting the earring I made in February and I hope this card meets the requirements of the game. 

This is where it all started with a counting error I frequently make, despite my cautious counting! Notice that one daisy has an extra petal.

Pattern for the classic daisy is from 'The Complete Book of Tatting' by Rebecca Jones  (Fig. 122 page 47, 2011). Worked in Olympus size 40 (equivalent to Lizbeth size 20).  

Elgiva Nicholls calls this medallion a Classic Daisy formation, made with a single thread/shuttle, in 2 rounds. Olympus size 40). 

The more modern style  (coloured motif) is worked in one go, using two shuttles to throw rings off a mock center. I used the exact same pattern for the petals, but added 2 ds in the SCMR between each petal. 

Which version do you like? The Classic or the Modern?


A few more pics of the card ---


Actually when I opened my box of watercolours, I found most of the jars empty! Hubby quickly ordered a box online and while I waited for the delivery (about 15 minutes), I doodled this with the watery remains. And was too impatient to wait for the leaf to dry, hence the smudging.

Probably the last time I painted was 15 or 20 years back! 


I painted the leaves, then glued the daisies. The little orange florets are from my 2022 flag project (link below). After trying out a few arrangements, I painted the brown twigs and glued the florets. Added a few more twigs, leaves, .... and finally the diamonds. Can't even remember when or where I bought those highlights!
TIP: I deliberately glued the orange flowers on the frontside, coz the backside is more dimensional- the picots curve up a bit.
You can easily see how amateurish my painting is! Nevertheless, it felt good to hold and reacquaint myself with my brushes. This was a very hasty project - probably a half hour from start to finish. Hopefully it has opened the gates to some more doodling in the future. 

Check out the Feb gallery here - https://splocik2.blogspot.com/2024/03/male-dekoracje-galeria-lutowa.html


Related Posts
https://tipsaroundthehome.blogspot.com/2017/10/meddling-with-medallions.html
https://tipsaroundthehome.blogspot.com/2022/08/har-ghar-tiranga.html   https://tipsaroundthehome.blogspot.com/2025/01/last-and-first.html

Saturday, 24 June 2023

simple samplers

Pin It now!

 Like I said in my previous post, I'm trying to do a bit of everything so as to make progress on each simultaneously instead of letting one project get left behind totally. Following are samplers I did for Interlocking Picots. When one needs an extreme close-up of a model, the warts show up, LOL. So, try and try again! And use them as a SOUP idea.

I've done these before and even compared similar picot styles at least twice. See list of related post links below. Yet the interlocking this time didn't seem as obvious as before. 
Interlocking picots are picots made after every half-stitch in a Josephine ring and they should be within a certain length range for the interlocking to show up clearly.. 
Watch Karen Cabrera's video - https://www.youtube.com/watch?v=V7XbtXhpN-4
and my Measuring the Picot -

Anchor size 20 threads were used. I intend to glue them on a card, adding in some greens and perhaps a ribbon. They cannot be sewn down neatly because the lovely ornamental picots are easily pulled out of shape! These are certainly handle-with-care picots, for show only ;-D

Wednesday, 16 June 2021

using silk thread

Pin It now!

Melanie wished for some details on how to put silk threads to use, and this post is a short compilation of my projects showcasing some of the ways I've used them along with my thoughts/tips. But first step over to see the silk project she's working on here.

1. Embroidery on paper - 

So my very first project with silk thread, for which I specifically bought a spool, was for embroidery on greeting cards in 1986-87. These are some of the many I and my sis made together. Except for the towers on the left which used 2 strands, the rest all use only one thread.

2. Hand embroidery (single thread) - 

These next 3 are hand-embroidered on handkerchiefs, using only one thread. 
I tried to use the thread for a picot edge but unless the tension is very precise, the silk thread tends to break. I finally settled on coloured sewing thread for the edges.
I've posted details about this here. The sheen and colour choices are amazing! However, ironing needs to be done by placing a damp fabric over the embroidery. Otherwise the threads may singe and fray.
Another hanky where I used single silk thread. These are all old well-used hankies, hence the fraying is visible. For really long-lasting embroidery, I recommend Anchor embroidery thread/floss.
TIP: One tip when using silk for hand embroidery - Use short lengths. Long threads tend to unravel or knot. More importantly, the thread frays due to friction with the needle eye. My solution is to keep moving the needle along the thread so that it does not cut through the thread at one point. It works really well, as in the next project ... 

3. Hand embroidery (multiple threads) -
Here I used 3 strands of silk (1 from each spool - yes, I bought several in the same colour, LOL). Working with multiple strands of silk is not an easy task since unlike embroidery thread, these are smooth and do not adhere together. But where there's a will, there's a way!

This is also the go-to thread for another form of hand embroidery - Phulkari, a traditional style with geometric designs that fills up the entire fabric from the front! The Punjabis use brilliant colours to fill up the spaces. I am not much into symmetrical patterns, hence have never tried this stitch/pattern.

4. Machine embroidery -
Above is my sole venture into machine embroidery. I deliberately went freeform with the neck coz I could not manage to 'stay within the lines' - my design choice, haha. It is for my MIL's nightie way back.
It took a lot of manoeuvring to get the tension right and avoid breaking thread midways. I managed successfully for the most part, but not always.
This is nothing compared to what my Mom could do, including using a horizontal needle to couch over. It was mesmerising to watch how she moved the hoop on the machine with one hand, while turning the hand wheel with the other, phew!

5. Tatting - 
Finally, tatting with silk. Above is my first venture with single silk thread tatting back in 2014. The sheen is not very clear here. I simply let my shuttles take the lead, belting out a freeform braid. As you can see, it has rings, chains, split rings, onion rings, floating rings.
I found it surprisingly easy to tat, except for the eye strain. Thread moves smoothly and surely, rings close neatly. There wasn't a single break throughout! And see how dainty it is.
TIP: Before closing the ring, if you post the other shuttle through the open ring, it creates an overlapping and enclosed effect!!!!
See how the threads seem to emerge from within the topmost ring? It happened when I posted the other shuttle through the ring before closing it. And the chain seems to emerge through the ring!
The flaws in tatting are purely my lack of skill at the time.

6. Tassels - 
Then of course, the common use for silk threads, as advertised when selling, is for tassels, as in the above bookmark. Long tassel earrings are a rage at present.

Silk thread brands in my stash - 
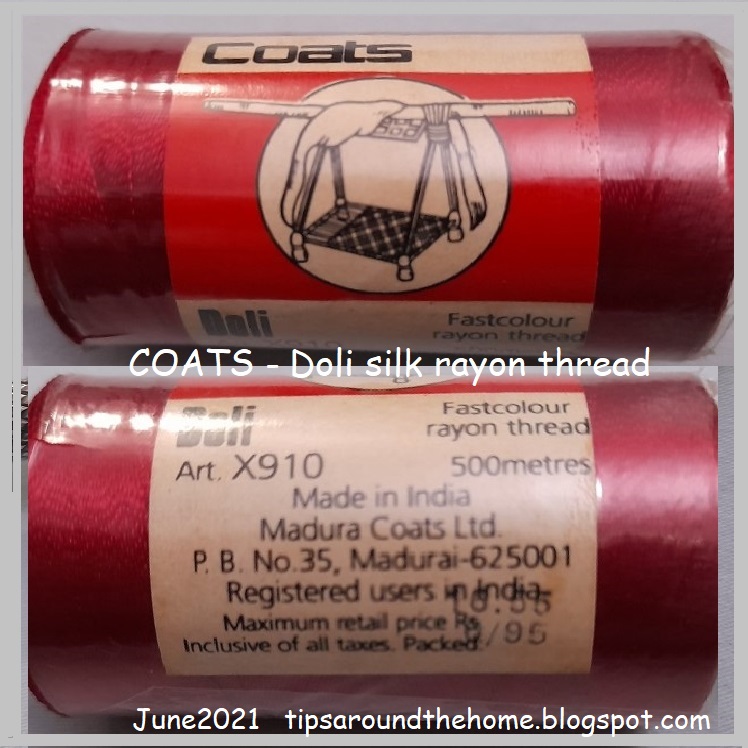
I was asked about the colour fastness & brands of these silk threads. Above are the 3 brands where the tags/sleeves are still intact. Below are each with clearer details ....
I like this Coats' Doli brand the best. The spool itself is tightly wound, as is the thread. I prefer this for machine embroidery.
Besto is another I have several spools of. Both the thread and the spool are not as tightly wound as Coats. But colours are gorgeous - lots of pastel shades.
Codak is from my MIL's leftover stash. I have 3 or 4 colours in this brand, which appears similar to Besto, except that the spool is smaller. No thread details on the sleeve, except for colour fastness.

I have a few twisted strands of silk thread as well, but forgot to take a pic. Maybe I'll add a pic tomorrow. So do check in tomorrow ....
UPDATE - Here's my complete silk thread stash -
The 5 wooden spools are vintage pure silk threads (at least 60-70 years old) as I'd mentioned in my earlier post. 
On the left are some skeins of Opella brand silk threads. Some have been used, others are still intact after decades! The tag says 'Fast to Bleach' (does that mean it is bleach-proof?), and it has the shade number as well, unlike the other spools.

UPDATE - This is what Kathleen Minniti says in her comment below - NO CHEMICAL BLEACH EVER ON SILK! It will literally dissolve silk to nothing. The label may be referring to fading from sunlight; laying garments out in the sun to "bleach" has been a time-honored method of lightening cotton and linen fabrics.

On the cards below Opella, are leftover lengths from projects.
And under that is my new metallic thread stash that I will show you once I've tatted with it!

Wednesday, 19 February 2020

a chained heart

Pin It now!

I fell in love with it right away. It is such a wonderfully elegant heart with a bit of freeform thrown in – just the way I like it. So it had to go to The Most Special person in my life for our very special day.

This is Renulek’s Serce Od Serca or Heart from the Heart. Such a beautiful conversion of a bobbin lace heart to a tatted lace heart. The pattern is free here.
Made with Anchor size 40, it is <7 cms high and 8½ cms wide.

I must apologise to Renulek for bungling up. Despite frequent referencing and such clear diagrams, I ended up joining the last chain on 1st round on a picot rather than at the base of ring. Realised only when I reached it after the 2nd round. Had to wing it, which is why you see a long chain and no small ring.
My eye keeps getting drawn to it ;-(

TIP : Notice how the orientation of my heart is opposite to that of Renulek’s? In traditional tatting this wouldn't be a problem, but with directional (fs/bs) tatting, there is only one distinct front side.
TWoT (This Way or Tat?) Notes - The reason lies in the very first ring. I followed the pattern, and tatted the ring frontside, starting with 8ds. Realising it was going to face the other way, I peered closely at her photos. Huh, her rings were backside, and chains frontside - knotty naughty ;-D. This same orientation was used in diagrams, hence the confusion.
However, if you want the heart to face like her’s, in frontside/backside tatting, 
start the ring by reversing the order of half stitches (shs then fhs), 
OR,
start the ring as 5-5-3-8.

It seemed a bit forlorn all alone on the card. These S-chains made with scrap threads, saved the day. There’s more tatted lace and stuff inside, but that’s our secret ;-P

Meanwhile I’ve been hooked on the S-chains, clearing out my scrap lengths. I have a few ideas to cook them in SOUP* when I have a good stock ;-P (This is how the S-chains look with picots)


Many many thanks, Renata,  hubby loved it !


Sunday, 13 October 2019

lay it on, baby

Pin It now!
SOUP card and tatted rope pattern

Playing around. See, I don’t need friends to distract me; I do well enough myself !

Looking for ways to use up your little bits and pieces of tatted lace, medallions, learning or trial pieces, mistakes, etc.? Another SOUP* (Sewing On/Using Pieces)tatting card. This time I placed little pieces over the larger medallion. Haven’t glued them down yet, merely playing at a good composition….
This is where it all started – made the lower motif for a tutorial and then used up the leftover thread for the upper ring. 
In time for Diwali and other festivities – an idea in time saves a dime ;-P

ËÌËÌËÌËÌË

Now that Ninetta has tested it, I want to put the pattern out, since I want to get back to other projects. She has also tried another variation/modification of this SR method (I will update with the link later), as well as a whole range of other techniques and will be blogging about it over the next few weeks at least. Keep an eye out – this is just the start!

Tatted Rope Bangle/bracelet/kadaa 
generic pattern 


The pattern can be adapted to suit your choice of thread and beads. I am merely giving the main process – adapt as you will. You can increase the number of colours, or decrease; change their placement to create new designs, …. And the length can determine which piece of jewellery it can become.  Play!

If you wish to practice without beads First,  try this tree trunk pattern here. 

MATERIALS :
Size 20 crochet cotton.
2 shuttles.
Picot gauge (I used 7mm but 6mm is sufficient)
Crochet hook (I used #12 to load bead on long picot)
Bicone crystals in 4 colours – 2mm.

With 18x4=72 crystals, this prototype is 4 inches long and about 1cm wide.

Choose one colour beads, and load half in one shuttle, the remaining half in the other shuttle. Wind shuttles ctm (continuous thread).
The remaining 54 beads will be later inserted Over the long picot,  at the time of joining, in the colour sequence desired.
NOTE : Length of long picot and number of stitches between these is determined by the size of your beads and the amount of thread you want visible.

- : measured or long picot (6 or 7 mm in this case)
B+ : load bead on long picot of previous (lower) ring, and join upper ring. I count the join as 1st half stitch, followed by 2nd half stitch.
SR : split ring  ; R : ring
SS : switch shuttle

Sh1 : R : 2 - 2 - 2 - 2. Close. SS and move bead from Sh2 to base of ring.
Start next SR with Sh2 keeping bead OUT of loop.
**Sh2 : SR : 1 - 1 B+ 1 - 1 B+ 1 - 1 B+ 1 / mock picot 1. Post Sh1. Close.
Leave some bare thread before working the 2nd side of SR (as in a mock picot, equal to the height of the bead).
SS and move bead from Sh1 and start next ring with Sh1 following same process **

Repeat ** to ** for desired rows, switching shuttles and moving bead from that shuttle to the base.

TIP : It becomes easier to work the split ring if, after the 1st double stitch, we work the 2nd side of SR (which is only 1 stitch) and then continue back with the rest of the first side. (Thank you, Ninetta)

TIP: Post shuttle : If the shuttle that is used for 2nd side of SR is passed through the ring before closing, the bare thread from mock picot is not visible, ie., keep the shuttle INSIDE the loop. It may cause a bit of twist in the ring, but is of no consequence. 

TIP : If you wish to join back to starting ring, seamlessly/invisibly,  tat the 1st ring as follows : 1(-1)×7. The 'free' picots can later be used to load bead and join to last ring.

Insert required findings/clasps for jewellery. Or simply tat one last ring and curl it around the first ring to complete the circle.


It gets easier and easier as one gets into the rhythm. So if a bead-challenged person (ahem, I) can do it, you surely can! Give it a try ….

Tuesday, 25 December 2018

season greetings

Pin It now!
Compliments of the season
The coloured snowflake is for my friends down under who cannot celebrate a white Christmas ;-D

And since this post is already a tad late, why not include b-Elated wishes for Hanukkah !

I’m hoping Santa’s gift bag contains lots of joy, happiness, health, long life, 
and 
a whole host of tatting/craft supplies to spread around …

These card toppers were made in another lifetime, in another millennium. My sister & I made twin cards, often using different background and thread colour combos. Most of them got sent out over the years. But the joyous memory of making these still lingers.


These are patterns from a book lent to me by a friend while we were studying for our BEd – really wish I had the name of the book. Sis and I spent an entire holiday stitching these. These are so much easier and handier than the actual string art that uses nails and wires. And so much more practical to gift, share, send. 

Thursday, 31 May 2018

I love floating

Pin It now!
The task was split chains and floating chains. I chose floating chains - 
also known as dead end chain, curlicue, or single shuttle split chain (SSSCh).

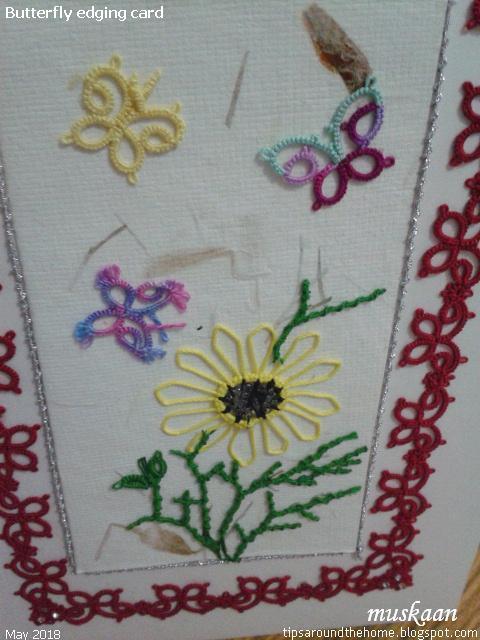
This black butterfly with curlicue antennae and the 3 with venetian picots (a variation of floating chains) was my earlier submission for the task. However I have a feeling that it was not appreciated by the ladies there. In any case I needed to complete the card topper.

I had gifted the earlier card to my SIL. MIL liked it very much, so this butterfly edging card is for her. For the card topper I used handmade paper with herbs embedded in it. I glued some folded paper underneath to raise the level slightly.

 
Rummaging through my many little scrap pieces, I tried to choose and arrange them into some collage (taking many pics to remember the arrangements) but finally settled on a fairly simple arrangement. I absolutely loved how Jane's Maltese Sunflower looked here, so that stayed obviously. And these were the only 3 butterflies that seemed proportionate.

Time to work on the foliage.... A helper thread worked wonders to wrap around the hand and hold the core thread taut while encapsulating. 
I mentioned this in my tutorial especially for fine thread, but didn't show it on the fingers.

All chains are spiral or Josephine chains. I like the texture and dimension they create without taking up too much space. In Anchor size 40, they are about 4cms tall maximum. 

While working on the foliage my Lizbeth specialty packs (size 20) arrived and I made one more butterfly using floating chain tipped with a Josephine ring for each antenna. 
Unfortunately it was too large for this scenery at 2-2/5×2 cms (2½cms high with antennae). 

 
The tatting SOUP has been arranged then glued! 
I deliberately followed the slant of the herbs in the handmade paper - it is what inspired this nature collage. But it still needs some balance and sparkle.

3 Swarovski crystals glued inside corner florets. 
Unfortunately, my stash was lacking in anything smaller for the rest of the florets. 

Added another little foliage on top of flower. 
And to echo the crystals, I tatted and glued a Josephine chain cord using metallic embroidery thread all around the topper. 
The core is size 40 crochet cotton for easier handling.

TIP: When making long JChs, I like to wind the chain thread on a shuttle too. 
It is convenient to dangle the shuttles and maintain the twist within both threads.


There seems to be something missing along the outermost edge or periphery - too plain. 
Any ideas to bring it all together? Another silver chain all around? 
Or 3 crystals in each corner? A mirror in each corner?

Check out what the others have made here.
With the exception of the sunflower, the entire card topper collage is worked with one shuttle and ball. A 2nd shuttle was used only in case of 2nd colour or for convenience. There is no dearth of techniques and effects that can be created with a shuttle - including the many variations of SSSCh or floating chain!

under appropriate headings. 

hope you have a great day with lots of creative tatting floating in !