Showing posts with label interlocking picots. Show all posts

Saturday, 24 June 2023

simple samplers

Pin It now!

 Like I said in my previous post, I'm trying to do a bit of everything so as to make progress on each simultaneously instead of letting one project get left behind totally. Following are samplers I did for Interlocking Picots. When one needs an extreme close-up of a model, the warts show up, LOL. So, try and try again! And use them as a SOUP idea.

I've done these before and even compared similar picot styles at least twice. See list of related post links below. Yet the interlocking this time didn't seem as obvious as before. 
Interlocking picots are picots made after every half-stitch in a Josephine ring and they should be within a certain length range for the interlocking to show up clearly.. 
Watch Karen Cabrera's video - https://www.youtube.com/watch?v=V7XbtXhpN-4
and my Measuring the Picot -

Anchor size 20 threads were used. I intend to glue them on a card, adding in some greens and perhaps a ribbon. They cannot be sewn down neatly because the lovely ornamental picots are easily pulled out of shape! These are certainly handle-with-care picots, for show only ;-D

Tuesday, 28 July 2020

picoted Josephines

Pin It now!
Oh, my poor head – it is filled up with so much tatting-related stuff that my memory bank is full! No RAM, no way to access my over-full storage capacity, despite frequent rebooting, sigh! Turns out I already used the tufted rings in the Icy Rivulet Snowflakes last year - https://tipsaroundthehome.blogspot.com/2019/11/frozen-or-flowing.html. Barbara Slodka had first shared the video link (can't find the exact thread, but earlier than this - https://m.facebook.com/groups/752452334871921?view=permalink&id=2521882034595600 ; and the recent discussion - https://m.facebook.com/groups/752452334871921?view=permalink&id=3082763385174126&_rdr )

I seem to be going round in circles. Like I mentioned in the previous post (https://tipsaroundthehome.blogspot.com/2020/07/applying-techniques-rakhi.html), some question either in facebook or privately, set me on the path to compare various picot formations in Josephine Rings (JR) or Josephine Knots (JK) back in Oct-Nov 2019. 
But let’s move logically ….

Picots in Josephine Rings
A study of 4 methods
For each style in this study -  

1. Regular or Interlocking Picots
( https://youtu.be/V7XbtXhpN-4 )
Picots made normally (with or without a gauge) after every half-stitch.
       JR: 1ds, (p, 1hs)x14, p, 1ds.
Notice how the picots split apart as they get longer. The long picots are termed Interlocking Picots.

2. Mrs Mee Picots
( http://www.youtube.com/watch?v=qNW4CyGWzQA )
Picots made normally (with or without gauge) after every 2 half-stitches. 
  Make the picot followed by a half-stitch, and repeat the half-stitch (pic below).
      JR: 1ds, (p, 2hs)x14, p, 1ds.
This results in a larger ring, but with more stable but ‘independent’ picots and a larger center space. There is a tendency for the picots to twist decoratively if they are longer than 10mm.

3. Tuft Picots 
This requires a picot gauge through the 'leg' or loop of each half-stitch. The gauge may be placed above core thread (Nadezhda's method) or below the core thread (Ninetta's method). The beauty lies around the periphery where picots seem to be interlaced.
What Actually happens, is that the stitch itself becomes a picot! The gauge 'pushes up' the belt or horizontal bar of each stitch to lie on the outside instead of at the base of a picot as normally happens. 
The above rings have 20 picots of 5mm in size 8 perle cotton. 

Nadezhda Malysheva method - gauge above core thread
( https://youtu.be/HFCimyOpoXI March 2018)
Hold the gauge above core thread as usual. But look closely – the gauge is ‘inserted’ through the open ‘leg’ or loop of the stitch rather than the main arch of hs as in #1 and #2.
      JR: 1ds, (p, 1hs)x14, p, 1ds.
Notice the outer edge of the picots – they appear interlaced or interwoven, creating a neat trim around the periphery. It almost appears as if the stitches are made loosely - which they are, in a sense. But the 10mm picots split apart as in #1.

Ninetta Caruso method - gauge below core thread
( https://youtu.be/1uTtSE8ZUJY  Aug 2017)
Hold the gauge Below the core thread, but inserted through the ‘leg’ or loop of the stitch instead of the arch. 
      JR: 1ds, (p, 1hs)x14, p, 1ds.       
When the ring is closed, both Nadezhda’s and Ninetta’s rings turn out to be The Same! However, since the former does not have a name, and it was Ninetta who created it before, I think it is proper to term them both Tuft Picots. The rings can be called Tufted Rings.

My Observations and Thoughts -
  • Of the 4 methods, only Mrs Mee’s picots can be used for joining – they remain stable due to the extra hs between picots; the other 3 are merely decorative. They form a broader JR and a larger number of picots is more visually pleasing.
  • I find that using perle cotton creates a better tufted ring as seen in the rakhi I posted earlier.
  • As seen, 5mm picots give the best result. As the picots increase in length, they tend to split apart and twist. It makes sense, because the belt/bar of the stitch no longer has any support and slides back!
  • It is important to factor in the thread size to get the desired result.
  • It will be interesting to see the effect with graduated picots! And beads.

Tuesday, 22 August 2017

gauging the lie of the land

Pin It now!
(Common Threads III)

When making a picot in tatting, there are mainly 2 factors involved.
Which 2 factors ? – the half stitch(s) on either side of a picot and the position of picot gauge !
An interplay of just these factors can change the look and effect of the picot, as well as it’s functionality.
Comparing 3 types of picots here - interlocking, Mrs. Mee, & tuft - got me thinking about picot gauges. Gauge position was very interesting.

It started as a deconstruction of the 2 factors in various picot types we know of, but that is a Huge study and I’ve only just bit a small morsel at present and will require more time and concentration than I can manage at present. But keep an eye out …
For the present, I’m sharing only the various positions of gauges (that I know of. I welcome more input).

Picot Gauge in relation to Core thread
& where the stitch faces

Vertical v/s Horizontal
These are the standard options that we are all aware of.
I’ve used a 8mm gauge vertically and a ½in gauge horizontally.

Notice (in traditional tatting) -
In normal rings and chains the gauge lies above the core thread, whether it is held vertically or horizontally.
Vertical position -  picot has the hand (for ring) or ball (for chain) thread wrapped around both sides and we get the same size of picot as the width of gauge. Stitch is formed at the base of the gauge since gauge is at right angles to the core thread.
Horizontal position – the hand/ball thread lies across the entire width of gauge and the resulting picot is half the length of the gauge. Stitch is formed at the side of the gauge since gauge is parallel to the core thread.

Common practice is to RW – reverse work after a ring to tat the chain. But what if we don’t RW, and work the chain directly using unflipped stitches?
Carollyn pointed out an interesting aspect with beautiful pics here.
(in direct tatting)
If chains are tatted directly using reverse stitch ie. unflipped stitches in reverse order, then the gauge is held below the core thread, vertically or horizontally.
It holds true for reverse rings and 2nd side of split ring as well .

This establishes that where the stitch faces while tatting decides where the gauge is held!


Picot Gauge in relation to Core thread & the Half stitch

Now let’s bring in one more factor – the half stitch where the picot is to be made.
In all the following pictures, I have used the 8mm gauge vertically.

Picot is simply a length of bare thread between 2 half stitches.
Let’s tackle the fhs - first half stitch first.
After 4 stitches, we want to make a picot followed by a fhs. Above pic shows fhs being formed. Let’s call the left part the arch which will be compressed into a picot, and the right part is the loop of the half stitch.

Gauge is held above core thread, under the arch.
Inset pics show the completion of the process to form 1 picot.

Gauge is held above core thread, through the loop.

Gauge is held below core thread, through the loop.

Similarly for shs – second half stitch.

Gauge is held above core thread, under the arch.

Gauge is held above core thread, through the loop.

Gauge is held below core thread, through the loop.

Can you identify the gauge positions for regular picots, interlocking picots, Mrs Mee picots, and the tuft picots that were described in this post ?


If this seems confusing, pick up some scrap threads and give it a quick try to discover the joy of versatility! And like I said, this is only a tiny glimpse into the beautiful world of picots.


Happiness lies at the Core of Tatting !
Stay happy stay tatting always :-)

Sunday, 13 August 2017

a huff a puff and a tuft !!!

Pin It now!
Comparing Picots.

Did you miss me ? Yes ? I missed me, too !!!
When one’s head is in yo-yo mode, bobbing up and down – sometimes light sometimes heavy – one becomes mindful of being mindless! No ‘shuttle’ can transport you across and all one can do is play some mindless jigsaws on the tablet or read sappy stories.
So yes I missed me, my tatting, and most of all I missed You !!! Shutting out the net only meant I have much more to catch up on now (I read an occasional post, but couldn’t leave a comment). I apologise for these theatrics, and hope you will patiently wait as I plough through your emails and blogs in the coming days.

On a couple of good days I did manage to adapt a pattern into jewellery (first trials only) but that’s a secret for now. And I also figured out, on my own, a way to add beads exactly where I wanted them! Unbelievable.
Meanwhile, what’s a post without pics …


So Ninetta finally shared her Tuft Picots along with an excellent video demo & application ! I had the immense privilege of being the first to try them out – it was a quick tat where I tried to use them in chains and also compare them with interlocking picots (in size 40 tinted red sampler below). Served as a good study then.
But in her post she has also mentioned Mrs Mee’s Picots which I hadn’t tried before. So the new sampler in blue is a comparative study of 3 types of picots …. 


Comparative Study of Picots -
Interlocking Picots, Mrs Mee Picots, Tuft  Picots

Some basic characteristics are outlined below, along with direct link to tutorial :
Although samplers are rings, all these picots can be made on chains.
Size of thread doesn’t seem to matter. I’ve tatted them in size 40 & 20, and Ninetta in size 10.

All rings start with 4ds, p, 1ds followed by 8 picots using a 7mm vertical picot gauge, and end with 1ds, p, 4ds.
fhs – first half stitch ; shs – second half stitch ; ds - double stitch


·         Are long picots on a spiral or Josephine segment.
·         Here I made them between fhs.
·         Picot gauge is held above core thread.
·         The picots have a tendency to radiate & spread out, seen more clearly here  where the entire ring has picots.  
·         They, however, overlap or interlock with each other. Hence these are merely ornamental and cannot easily be used for joining later – there is a tendency for the cluster to distort if tugged.


Mrs Mee Picots (Rings 2 & 3)
·         Here the stitches are complete ds. Longer picots tend to twist. 
·         Picot gauge is held above core thread.
·         In ring 2, the picot is made while forming the shs ie. tat fhs normally, and form the shs around the gauge.
·         In ring 3, the picot is formed with fhs.
·         Notice the -
a)     change in direction of twist (see below)
b)     the stitch at base of picots. Ring 3 gives a complete stitch effect.
·         There is an even greater tendency to radiate outwards and each picot is separate. Hence joining new elements is easy, without any distortion.

Tuft Picots (Rings 4 to 7)
·         These picots are also made on a spiral or Josephine segment, similar to interlocking picots.
·         But the most important difference, and the unique feature of tuft process is that -
Picot gauge is held below the core thread.
·         Ring 4 uses shs between picots  ;  Ring 5 uses fhs
·         Notice –
a)     the interlocking/overlapping of picots
b)     their tendency to clump together – a neat outer line is visible (especially if picots are shorter).
c)     the illusion of ring being smaller than in previous ones
·         Not good for joining as tugging causes distortion.

These separate pair of rings above with only tufts are 6ds, 12 picots using ¼inch gauge, 6ds. But these 12 picots are a combination of tufts in 4 & 5. viz, …
·         Ring 6 has a combination – first 6 picots use shs, followed by 6 picots with fhs.
·      Ring 7 – order is reversed – 6fhs picots followed by 6shs picots. And I deliberately left some extra space when switching, giving it a crested effect.

Besides the joining/not-joining issue, these picots do consume lots of thread. More importantly, blocking them would probably pose some colourful situations - haven't attempted it yet ;-P 
Amazingly, I found Mrs Mee picots the most difficult to tat because every alternate half stitch has a picot and I had to retro-tat many times due to forgetfulness/errors.
For tuft picot, it is fun to 'lift them up' to the edge of the ring/chain - sometimes they simply want to 'lie low' ;-p

It would be interesting to see how these picots look if used all around a ring !
In general, though,
·         regular picots 'stand straight';
·         interlocking picots tend to radiate but overlap;
·         Mrs Mee picots radiate even more but remain single & perhaps with a twist;
·         while tuft picots tend to converge. 
And Floral or Ruffled Picots give us a picots facing inwards and outwards ! These have 2 same half stitches between each picot,  alternately.

For more on Tuft Picots and their possible application, please read the very talented and innovative Ninetta’s complete post. 
And many many thanks for always coming up with something new & fun,
and sharing with us lesser mortals :-))))

UPDATE (Aug 23, 2017) : check out images for all the different positions of picot gauge ...

UPDATE (July 2020) : See effect of these picots in Josephine Rings - 
do it with a huff, a puff and numerous tufts !!!!
happy tufting :-)


Some more interesting picot effects/techniques :

Monday, 15 August 2016

picking on picots

Pin It now!

I’ve sensed this for a long time & this medallion confirms it. Anchor Crochet Cotton that is made in India by Madura Coats is thicker than the size 20s & 40s (of any brand) that I see you tatters using. In fact, it is thicker now than the old thread I have ! Makes it very difficult to follow a pattern with long picots.

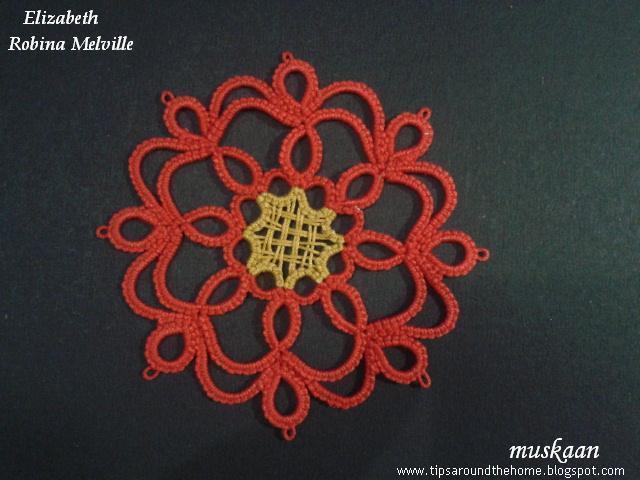
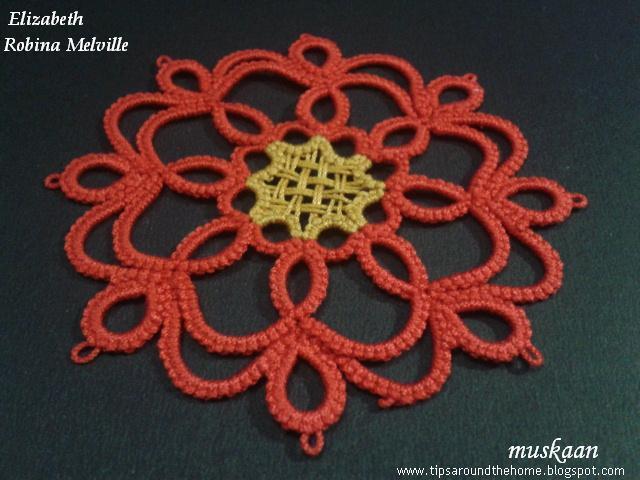
(aka Woven Center Flower)
Robina Melville
first published in Ring of Tatters Newsletter #72, Spring 2016
This is such an elegant pattern !

Materials : Anchor Cotton size 20, Art. 4054. Golden yellow – 0307 ; red – 046
2 shuttles ; picot gauge : 2.5cm & 3 cms
Techniques I used : long picots, woven picots, split rings, thrown rings, lock join, SSSR to climb out.

Round 1 : 1⅛”
My first attempt failed, as I had sensed, due to difference in thread brand :-( The last ring didn’t even have any space to fit in (top right in pic) !
Increased the picot sizes & the 2nd attempt worked.
TIP : I used a threaded tapestry needle to easily weave the picots, otherwise it was a bit fiddly in the cramped centre.

Climbing Out
For my own recollection, there many ways 2 colours can be used in 1st round & still climb out to next round without tying & cutting both threads.
1. Climb out with a SSSR in red, while hiding the yellow tail in first half of the SSSR.
I had to do this, because I didn’t think ahead & I wasn’t sure what colour(s) I wanted for next round.
2. Wind 3 shuttles : Sh1 with yellow; and 2 shuttles wound CTM with red. Thus while climbing out, we hide the yellow within a split ring. This is what I could’ve done.
3. Double Core SSSR to hide the yellow within & keep the SSSR red. This, in fact, gives us the option to continue with both colours for next rounds, yet keeping the ring a single colour – either red or yellow. I had tried this for the first time here, with a slight adaptation.

Round 2 : 2¼”
Round 3 : 3” 
I absolutely Love this medallion & enjoyed tatting it. Hey, even my long chains behaved !

Although, I did make a mistake – a picot in one of the outer chains – an expected outcome of trying to watch the Olympics & tat. Noticed too late, so folded the picot behind & glued it. Will sew it in later.

Flashback to May 2014

My very first attempt at woven picots was when I saw these lovely earrings by Lilas Lace. I was going through a phase of learning different picots & effects - the net kept throwing up such gorgeous tatting ! 
So these earrings both inspired & intrigued me & using her basic idea, I attempted to tat it.
The stitchcount is my own & I included 2 colours & Josephine Rings. Didn't have findings/hooks... This can work as a pendant, too.
This is the 'before' pic. More practice with picot gauge was needed then, but blocking the piece now has helped a bit. 

and this one is for Michelle !
Remember this, Michelle ? A while back I had tried to duplicate the look of that tatted model in pinterest that you shared. Tried a few things in size 40, but don’t know where I’ve misplaced them. Will turn up some day. 
Before posting, I usually do another round of online research for resources. And guess what - Karen already Has a video of these !!! They are called Interlocking Picots (why do the tutorials turn up After I've gone through the grime ?! I need better perception & recognition).
Had some thread left on the shuttles after the medallion, and quickly tatted another for this post before I forget again. 

Many thanks to Robina & Georgia, 
to Lilas, & to Karen
happy tatting :-)


Related Posts : Snow Doily