Friday 23 July 2021

superimposed excitement

Pin It now!

 I couldn't wait to share what I've been tatting with all my wonderful readers (thank you all for your kind thoughts 💝). Although my pace was slow, I finished this square edged frame today and am excited for you to see it, too.

Recognise the motifs from my recent posts - the block tatting question and the extracted earrings

I chose the easy path following Frau Endrucks' practicality and working the blocks on either side 'normally' with no mind to directional symmetry.

Here you can see the adaptation to turn a 90° corner, which inspired those earrings. Removing a few elements and joining at the base, brought the 2 enr together.

Continuing Row 1 working with 2 shuttles, CTM. There are a couple of inward picots that I used a paper clip to hold till joining.

Row 1 complete. I like how this looks! Each side is a single repeat; by adding more repeats along opposite sides it can become a rectangle or a larger square.
In Anchor size 40 (shade 00352), this row is 3½ broad and 13 cms length of side.

After continuing to the next round (all tatted in one pass, and both rounds move clockwise), this is how the final frame/edging looks. I think the inner edge makes an elegant statement, too.
The side now measures 17 cms at the extremities.

Don't these look like 2 different squares superimposed and well-synced? Eyes seem to be drawn first to one square and then to the other. 
The only change I made to this round was adding a few decorative picots, including above a lock join.

Laid over this truffle box which is my current project box with all essentials inside. It makes a nice tatted frame ...

UPDATE: the pattern is included in the main pdf here - (click for pattern)  https://drive.google.com/file/d/1sStHg5IQmuwizC7QcKRaX951CvVoURbn/view

If you visit the Endrucks 1920 Project doc here, you will see the talented Reiko Akamatsu has already made another square adaptation from this same edging. She has introduced more changes and it will be an interesting study to compare these 2 versions.

One very interesting feature of this pattern (and most of Frau Endrucks' patterns) is that the entire pattern is worked with 3ds or 6ds between picots or between joins. The only exception is the 1ds she uses to rise to next level of each block. 

I will share this pattern in due course and hope you like it enough to give it a try. 
In fact I have 2 more narrower edgings in mind but tatting might have to wait. But I am willing to share a diagram if anybody wishes to give it a go. 


Friday 16 July 2021

scattered

Pin It now!

Scattered - that's how I am feeling .... be it my thoughts, health, life, routine, tatting, diagramming, .....all seem scattered and as soon as I try to hold on to one, it scurries away! My routine of years, some even decades, has been disrupted and I feel disoriented, and at times, overwhelmed.

So, I've decided to take a break from blogging for probably a fortnight or so. I wouldn't have said anything, except that some well-meaning friends and followers become concerned. I am not sure how things will play out; whether I will continue to read/comment/interact online. One thing's for certain, I will try to answer my emails ASAP.

That reminds me, Blogger's email service/subscription (through FeedBurner) hasn't stopped! Now that's wonderful news and I hope they continue it. 

Thanks for being a part of my life, dear readers, and please there's no need to leave a comment. I'll see you back fresh and refreshed in a few days and cause you grief with all my blogging.... ah, good times 😁😃

💓💖💓   
muskaan   

Monday 12 July 2021

every day is lace day

Pin It now!

This is the first time I have posted a pattern elsewhere and not in my blog first. But it was crazy busy this weekend and I was simply too knackered to write out a proper post and share my notes, despite having uploaded a few pics yesterday morning. 

So, without much ado, here's the Lace Day earring/pendant pattern - click to download diagram-only pdf. Eventually I will write out the pattern and add it to this, including a pic of the beaded model. 

It all started when I thought of making a corner for Frau Endrucks'  pattern #17 by extracting one of the lovely motifs from it. Here you see it attached to the 2 sides in order to estimate that it would work. After snipping it off and turning it around, it looked lovely as a possible earring motif!

 
Found out it was International Lace Day on the 11th of July and I registered with a Facebook group and decided to quickly tat and create the pattern to share. The above 2-coloured model is worked in Lizbeth size 20.
TIP : Pattern starts with a chain. In order to avoid too many tail ends at the beginning and also to position the autumn leaves colour for the top ring, I used False CTM! Pull out enough length of thread from the shuttle (Sh2 in this case), work the first chain, and add the 2nd colour in that ring which I worked as a SCMR in order to avoid knots.
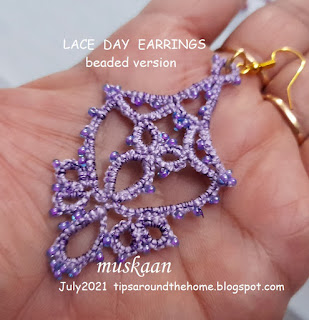
Getting ready to start a beaded model on ILD. I used Anchor pearl cotton size 8 along with metallic thread in a darker shade. Size 16/0 beads and earring hook, along with 2 shuttles wound ctm.

work in progress ...
TIP : If one adds bead(s) at the start of the first chain, there is no need for a paperclip to hold the picot. There is sufficient space to make a join later! I started with 3 beads at that corner (seen at the bottom center in above pic).

NOTE: In order to add beads, I made the short chain 4ds instead of 3ds. This is how it now-  (2ds, 3 beads on picot, 2ds, lock join).
Here it is all finished. Unfortunately the metallic thread and beads do not sparkle in the pics. However, if you are on Facebook, check out Anita Barry, Krystyna Mura and Ninetta Caruso's beautiful beaded models. Anita and Krystyna's models can be seen in my FB page and hopefully Ninetta will blog hers. 
This measures 3.5 x 6 cms

In another event organised in the Italian group for the same event, there was a spiral tatted/Josephine chain for eye glasses. I took the opportunity to simply add a short beaded length to make this a necklace.
This pendant measures 2.5 x 6 cms.

Download Lace Day Earrings pattern pdf here.


This is my ILD 2021 badge. There were almost 4,500 participants worldwide and many tatters, too! I'll be looking forward to it next year and hoping you will also join lace makers in our passion for lacing!
Please accept my belated wishes for a Happy Lace Day.... for lacers, everyday is a lace day 💖

Friday 9 July 2021

a pernickety question

Pin It now!

 When I focused on bilateral symmetry in this pattern, I forgot about the blocks (see 3rd pic below). Thus, while most rings on left and right halves face the same way, the chains in the left and right blocks are incongruous -- instead of being mirror images, they all face the same direction.

Block Tatting is made up of rows/tiers of chains. These rows/tiers can be worked one above the other, or one below the other.

1. Block tiers moving up ie. tatted ABOVE the previous, are simple to make, joining below with a lock join to the picot(s) on previous chain. Like the blocks in pic #1 below -

The block on the right is tatted the same way starting from the shortest chain on top, and moving 'above' to the next row/tier (though it looks upside down).
Now compare the left and right blocks with respect to 2 variables - the colour of each chain/block, and where the chains face. Not symmetrical, right?!

2. When the next tier is tatted BELOW the previous one, it means we need a picot on the core thread to which the new chain level can join. We need down/downward/inward facing/intruding picots! Of the many methods, holding the picot space with a paper clip is most common. This is how the right block was tatted ....

In above model, the left block is tatted 'normally' with chains stacked above. But for a mirror image, the block on the right is tatted with the next chain worked Below the previous one, with a regular picot join instead of lock join. The penultimate chain (beige) in the right block held 4 paper clips till each join was made! (sorry about the shoddy tatting)
Again, compare the 2 blocks in terms of colour placement and chain direction.
Mirror images!!! 
This is the way Pina Pinto has worked her sampler for the Endrucks Project - I will be sharing the pattern when it is diagrammed.

In the above model, all the blocks (in cream and in purple) face towards the right. (The cream rings along the 'belt' are not mirror images since I did not think ahead). Since the row moves from left to right, it is easier to tat in this manner.
Frau Endrucks tats all her blocks with the next chain above the previous one, although she states clearly in her tips that it is not necessary to have picots. Simply move the stitches a bit, clearing space to make the join.

Now here's my pernickety question - Would you be Mr Meticulous with perfect mirroring of blocks despite the invasion & interference of all those paper clips or would you rather be Dr Downplay, just going with the flow without bothering overly much about the left and right sides?
 
Which factors would influence your choice -  whether working with 1 or 2 colours; mood; time constraints; competition submission; etc. 

Please enlighten and entertain ....


And hopefully you will join the global lace community on International Lace Day (July 11th) ....choose your form of lace-making and celebrate the day. I have already registered (free, but only a few hours left, so hurry) with this ILD group on Facebook and intend to tat a new earring/pendant - the motif can actually be repeated to create a lovely edging! I am hoping it will work .... let's see. Off to load my shuttles. Maybe I can upload a diagram on or before 11th, in case you wish to tat and experiment with the same pattern? Stay tuned .....

Monday 5 July 2021

continuous paths

Pin It now!

There are some lovely doilies in Endrucks' book, all worked in one pass. What I find, though, is that unlike her straight lace patterns, the circular doilies tend to either ruffle or cup, and some tweaking of count is required. I think it is a matter of individual tatting tension?

Another thing I've noticed is that perle cotton (as in the one above) is more forgiving than mercerised cotton which makes sense due to the difference in their twist. The tight twist of mercerised cotton thread tends to keep the lace stiffer and less flexible. 
Despite all the colours in the mandala, false CTM gave me a sense of continuous tatting. However, for the Endrucks 1920 Project, I needed to tat a model that could be more easily shared in modern style which is why I chose this pistachio green in Anchor size 20. It is tatted in one pass using mock picots, split chains, and split rings to climb out. 
Above I have traced the 'modern' path of climbing out of rounds (in blue). For this to work smoothly, I had to work a couple of rounds counterclockwise. The orange path shows how Frau Endrucks moved to the next round - simply add another chain(s) till you reach the point where you can climb out! 
UPDATE: I  have coined the term 'SHADOW CHAIN' for this extra chain(s) used to climb out to the next round, row, or motif, thus enabling continuous tatting.
No need to learn any techniques, and the direction of each round remains unchanged. But as seen above, it does add extra chains along the path....something which 21st century tatters may not like. Although in fine threads, it may pass inspection, and clearly speed up tatting.

UPDATE: Pattern for this doily is uploaded, showing both methods of climbing out - https://drive.google.com/file/d/1vG2g0JCVsy8cy2DfGKHEhxleq_7Rveba/view

 
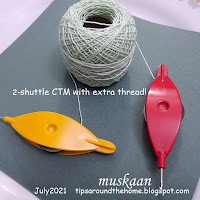
Since the first few rounds can be worked off a shuttle and ball, I used my earlier tip about extending the thread between 2 shuttles. All the extra thread in left pic was wound on to the ball temporarily, till it got used up and the 2nd shuttle was needed.
Of course, one can simply keep shuttle 1 and ball thread continuous and tat till the 2nd shuttle is needed. At that point, pull out the length required, cut from ball, and wind up shuttle2.

There was a lot of ruffling in the green model, despite adding a few stitches to a later round. So I started another in tinted Anchor size 20, with modified stitch count. Worked beautifully and lay flat. The 3rd round does ruffle till the 4th round is added, but this is a structural problem.
Ran out of thread after 5 rounds, hence added a bold violet shade to add a spot of colour. I kinda like it - what do you think?
I am busy with pattern #17, hence this pattern pdf will have to wait a bit. However, for those who'd like to try it right away, you can find the written instructions and tips by Georgia here.

This is Pattern #28 from Schiffchen-Spitzen 1920 by Eleonore Endrucks-Leichtenstern. You can find all the links in the Endrucks 1920 Project doc here along with all other patterns in modern format. We are hoping to have all of Endrucks' patterns in modern format by this November - a year from when we started. 

Friday 2 July 2021

luscious lychees

Pin It now!

 The male of the human species can be quite the baby when it comes to eating berries or peeling fruits! They much rather not eat such fruit. At least the specimens around me show these symptoms, sigh. So as a good housewife I have to find ways to keep my sanity .... errrrr, keep fruits fresh for longer and also to serve them with least amount of effort to both genders.

So here's how I store and peel lychees.....thankfully, I no longer have to deseed and slice away the pulp. My specimen has been tamed a bit ;-P
After several different ways, here's the one that works foolproof for me (the batch above had been bought and stored 4 days before taking these pics and one helping already served)

1. Do not cut away the twigs and leaves... keep the lychees attached. 

2. Put the entire bundle in a cotton bag and wrap nicely. 

TIP : I use old cotton pillows, folded and sewn along the sides to give me an open bag with double cloth layers. These are ideal to store select fruits and veggies. My MIL handed me her spare new cotton pillow covers for use, like the one photographed ;-D 

3. Place inside any air-tight container, be it a zip lock pouch or lidded container, and refrigerate.
The berries stay fresh easily for 10 or more days! 

Now comes the serving and eating part where the male specimen cannot be bothered! 
4. Break the berries from their stems, rinse, and soak in clean water for a couple of minutes. With your bare fingers, simply tug the stub and start peeling. Voila, the hard dry skin has softened and peels off smoothly. 
Gone are the days when I used to struggle to peel the skin in small bits and pieces.

Notice the new batch of pre-soaked almonds in the bottle?

Lychees served with cherries and soaked almonds. The condensation is still visible on the cherries! That's how quick this entire exercise was.

Other berries such as cherries and Indian blackberries (jamun), strawberries, too, are best stored in similar fashion. Line a container with paper towel5/napkins or cotton cloth, place the cherries, cover with another sheet of paper napkin, then close lid and refrigerate. They stay fresh for days.