Showing posts with label extending thread in ctm. Show all posts

Monday, 5 July 2021

continuous paths

Pin It now!

There are some lovely doilies in Endrucks' book, all worked in one pass. What I find, though, is that unlike her straight lace patterns, the circular doilies tend to either ruffle or cup, and some tweaking of count is required. I think it is a matter of individual tatting tension?

Another thing I've noticed is that perle cotton (as in the one above) is more forgiving than mercerised cotton which makes sense due to the difference in their twist. The tight twist of mercerised cotton thread tends to keep the lace stiffer and less flexible. 
Despite all the colours in the mandala, false CTM gave me a sense of continuous tatting. However, for the Endrucks 1920 Project, I needed to tat a model that could be more easily shared in modern style which is why I chose this pistachio green in Anchor size 20. It is tatted in one pass using mock picots, split chains, and split rings to climb out. 
Above I have traced the 'modern' path of climbing out of rounds (in blue). For this to work smoothly, I had to work a couple of rounds counterclockwise. The orange path shows how Frau Endrucks moved to the next round - simply add another chain(s) till you reach the point where you can climb out! 
UPDATE: I  have coined the term 'SHADOW CHAIN' for this extra chain(s) used to climb out to the next round, row, or motif, thus enabling continuous tatting.
No need to learn any techniques, and the direction of each round remains unchanged. But as seen above, it does add extra chains along the path....something which 21st century tatters may not like. Although in fine threads, it may pass inspection, and clearly speed up tatting.

UPDATE: Pattern for this doily is uploaded, showing both methods of climbing out - https://drive.google.com/file/d/1vG2g0JCVsy8cy2DfGKHEhxleq_7Rveba/view

 
Since the first few rounds can be worked off a shuttle and ball, I used my earlier tip about extending the thread between 2 shuttles. All the extra thread in left pic was wound on to the ball temporarily, till it got used up and the 2nd shuttle was needed.
Of course, one can simply keep shuttle 1 and ball thread continuous and tat till the 2nd shuttle is needed. At that point, pull out the length required, cut from ball, and wind up shuttle2.

There was a lot of ruffling in the green model, despite adding a few stitches to a later round. So I started another in tinted Anchor size 20, with modified stitch count. Worked beautifully and lay flat. The 3rd round does ruffle till the 4th round is added, but this is a structural problem.
Ran out of thread after 5 rounds, hence added a bold violet shade to add a spot of colour. I kinda like it - what do you think?
I am busy with pattern #17, hence this pattern pdf will have to wait a bit. However, for those who'd like to try it right away, you can find the written instructions and tips by Georgia here.

This is Pattern #28 from Schiffchen-Spitzen 1920 by Eleonore Endrucks-Leichtenstern. You can find all the links in the Endrucks 1920 Project doc here along with all other patterns in modern format. We are hoping to have all of Endrucks' patterns in modern format by this November - a year from when we started. 

Friday, 6 March 2020

meet me and continue

Pin It now!

Meeting with Tatting
Skip over to Anetta's blog to get to know me a bit. If you are interested, that is! 

As I mentioned earlier, Anetta has started a monthly series where readers get to meet a different designer each month. Said designer shares her/his tatting journey along with a free snowflake pattern. At the end of the year, at least 12 snowflakes will be ready compounded by the joy of tatting along with friends, and learning new techniques. It is also her endeavour to educate about copyright and giving credit even when a pattern is free.

Everybody is invited to play along. Before the end of the month, send a pic and link of your snowflake by clicking the 'blue frog' button. Anetta will further summarise all entries in a separate post the following month.
Renulek opened the year with a beautiful snowflake, followed by a couple from Anne Orr (due to unavoidable circumstances), and I was invited to share in March for which I chose the Rosette Enchained Snowflake & Ice Drop
Check out Anetta's beautiful 2-colour version. She even prepared a lovely pictorial for split chain, leading up to the pattern. 
And don't forget to visit the post again at the end of this month to check out what the talented tatters send in.
Seeing the patterns shared so far, I am tempted to tat and send in entries, too. May be I’ll catch up later in the year.

{{{
Continuing with the topic of continuous tatting ….

Mock Picot to climb out and Changing chain curve
In my previous post, I spoke about Sheetal’s question on facebook, which led to 2 methods of climbing out with a mock picot when there is a bead at the base (down bead or bead on core thread). {If the beads are on the picot (up beads) and we need to climb out with a mock picot, then I described it for the Sitka Rose}.
Sheetal uploaded a pic of her 2nd round – a flower motif {! The petals are very similar to the rosette enchained ones where the chain changes it’s curve. But her brilliant stroke was adding beads on picots to the concave segment! Thus the beads face inside. Love it!!! If you are a member of the Just Tatting facebook group, you can read and see the entire post.

{{{
…and about continuous threads...

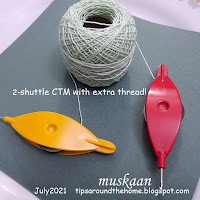
Extending thread in CTM or CTM with Extra Shuttle 2 thread!
A post without a pic is like a faceless body! So here’s a little trick to extend the length of shuttle 2 thread when winding continuously. 
Pony shuttle bobbins are fairly small. For the Split Ring Heart I didn’t want to have to reload later. 
So, after cutting and winding the Sh2 bobbin fully, I wound the remaining length of Sh2 thread on a spool between the 2 shuttles (red is Sh1 & yellow is Sh2). Look closely and you can see which thread goes where.
I started with the inner clover, working it as mock rings, thus saving on Sh1 thread.

{{{