A
question was posed in a facebook group and my first answer was incorrect. Got my
shuttle, thread and beads out, and gave it a few whirls. Wahoo, got it! (I'm getting good with bead solutions ;-P) Later, Lee Buchanan posted another option.
Climbing
Out with a Mock Picot …
with
a bead at the base!
What’s special or new about climbing out with a mock picot, you ask? Well, this time there was a bead at the base of the ring and a long picot over it. Looking back it seems, huh, what’s the big deal. Try it with a normal ring, and you’ll discover the issue.
This may have been done before but I’d like to keep a record on hand for future. Sharing both methods here.
For
this pictorial, only 1 shuttle is used, with a long thread left attached (ctm).
Method
1 : Mock Ring
1. String
beads on the shuttle thread and start a mock ring. I find the self-closing mock
ring (SCMR) is neatest and the closure almost ‘invisible’.
Leave
a loop and slide a bead after each double stitch (or as per pattern). I have 6
beads here.
2. After sliding last bead, do not make any more ds, pass shuttle
through loop ...
3. ...and close the mock ring.
4. Leave bare space for the mock picot and
make a lock stitch or overhand tie (SLT). Continue with pattern.
Method
2 : Reverse Ring
Lee
Buchanan got into the swing of things and offered this RR solution!
1. Start
a reverse ring (tutorial links here). A reverse ring or wrong-way tatting starts on the opposite side of a normal
ring, and has reverse or unflipped stitches. Make sure the beads are within the
loop of the ring, and slide a bead after each reverse stitch.
2. After sliding the
last bead, close the ring.
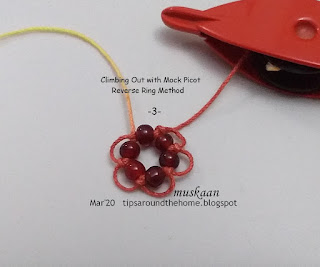
3. Threads emerge on either side of bead.
4. Make a mock
picot by securing the bare threads with a lock stitch or SLT and continue with next
element in pattern.
As
you can see, the end result is the same. Of course, getting that last
picot to look unbroken is unavoidable, Unless the next element is a split ring
in which case no lock stitch or shoe lace trick is required.
TIP : If beads are on the picot (up beads), one can climb out with a mock picot as in this beautiful Sitka Rose motif here.
TIP : If beads are on the picot (up beads), one can climb out with a mock picot as in this beautiful Sitka Rose motif here.
Thank you
Sheetal. Each time a question is asked,
there is an
opportunity for mutual learning and improvement!
Thank you Lee,
for being such an enthusiastic and adventurous tatting sport!
PLEASE NOTE: If you wish for a pdf
of any of my posts, let me know. I now have a mail app thatnallows me to convert any post into a
pdf easily.


Great to have options, well done to you both! Good idea to document the methods.
ReplyDeleteThanks, Jane 😍
DeleteExcellent pictorial as always :-) Hasn't tatting come a long way since the 70's!!
ReplyDeleteThanks, Luvlee 😍 I was a kid in the 70's, but I do love how tatting is evolving and innovating!
DeleteWhat a cute little tatting trick love this💐🦋💐
ReplyDeleteThanks, Carollyn 😍
DeleteDzięki ,przećwiczę tą metodę .
ReplyDeleteWonderful, Elzusia 😍 Hope you share your observations.
DeleteExcellent tutorial as per your style. Yes, teaching means learning, always 🥰🥰🥰
ReplyDeleteI consolidate my learning, and find myself delving deeper when posed with such questions! Thanks, Nin 😍
DeleteThanks for sharing both methods! Hugs
ReplyDelete((((Hugs, Erba)))) 😍
DeleteThank you for sharing this. Your explanations and photos are always so detailed, and I greatly appreciate your insight!
ReplyDeleteTakes a community to keep the curiosity and art alive and kicking, Diane 😍
DeleteInteresting tutorial :) Thank you :)
ReplyDeleteGlad you like it, Anetta :-)))
DeleteVery interesting!! Both look great!! :)
ReplyDeleteThanks for another lesson!
You don't need a lesson on tatting with beads, Sue! Thanks, though :-))
DeleteYou're engineers! Love it! Problems vanish with you around! Masters of techniques! And, teachers/mentors of techniques. That's an extra-special quality. You're so good!!!
ReplyDeleteNow I am truly and thoroughly blushing - full-on tomato red, Anita :-D
DeleteThe Mock picot is only needed if the following element is a chain... If Bridging into a Split Ring there is no need for a mock picot or lock stitch...
ReplyDeleteThank you, Sue, but unless one takes a very narrow definition of mock picot, what is formed in the above is still a mock/false picot since the bare threads on either side are deliberately maneuvered to resemble the rest of the picots. What is not needed is the SLT or lock stitch if followed by a split ring.
Delete