Showing posts with label Lee Buchanan. Show all posts

Wednesday, 4 March 2020

climbing out with mock picot

Pin It now!
A question was posed in a facebook group and my first answer was incorrect. Got my shuttle, thread and beads out, and gave it a few whirls. Wahoo, got it! (I'm getting good with bead solutions ;-P) Later, Lee Buchanan posted another option.

Climbing Out with a Mock Picot …
with a bead at the base!
What’s special or new about climbing out with a mock picot, you ask? Well, this time there was a bead at the base of the ring and a long picot over it. Looking back it seems, huh, what’s the big deal. Try it with a normal ring, and you’ll discover the issue.
This may have been done before but I’d like to keep a record on hand for future. Sharing both methods here.

For this pictorial, only 1 shuttle is used, with a long thread left attached (ctm).

Method 1 : Mock Ring
1. String beads on the shuttle thread and start a mock ring. I find the self-closing mock ring (SCMR) is neatest and the closure almost ‘invisible’.
Leave a loop and slide a bead after each double stitch (or as per pattern). I have 6 beads here. 
2. After sliding last bead, do not make any more ds, pass shuttle through loop ...
3. ...and close the mock ring. 
4. Leave bare space for the mock picot and make a lock stitch or overhand tie (SLT). Continue with pattern.


Method 2 : Reverse Ring
Lee Buchanan got into the swing of things and offered this RR solution!
1. Start a reverse ring (tutorial links here). A reverse ring or wrong-way tatting starts on the opposite side of a normal ring, and has reverse or unflipped stitches. Make sure the beads are within the loop of the ring, and slide a bead after each reverse stitch. 
2. After sliding the last bead, close the ring. 
3. Threads emerge on either side of bead. 
4. Make a mock picot by securing the bare threads with a lock stitch or SLT and continue with next element in pattern.

As you can see, the end result is the same. Of course, getting that last picot to look unbroken is unavoidable, Unless the next element is a split ring in which case no lock stitch or shoe lace trick is required.

TIP : If beads are on the picot (up beads), one can climb out with a mock picot as in this beautiful Sitka Rose motif here.

Thank you Sheetal. Each time a question is asked, 
there is an opportunity for mutual learning and improvement!
Thank you Lee, for being such an enthusiastic and adventurous tatting sport! 

PLEASE NOTE: If you wish for a pdf of any of my posts, let me know. I now have a mail app thatnallows me to convert any post into a pdf easily.


Saturday, 14 December 2019

Gotham Towers

Pin It now!
Snowflake #22 in Land of Laces’ 25 Snowflake Project

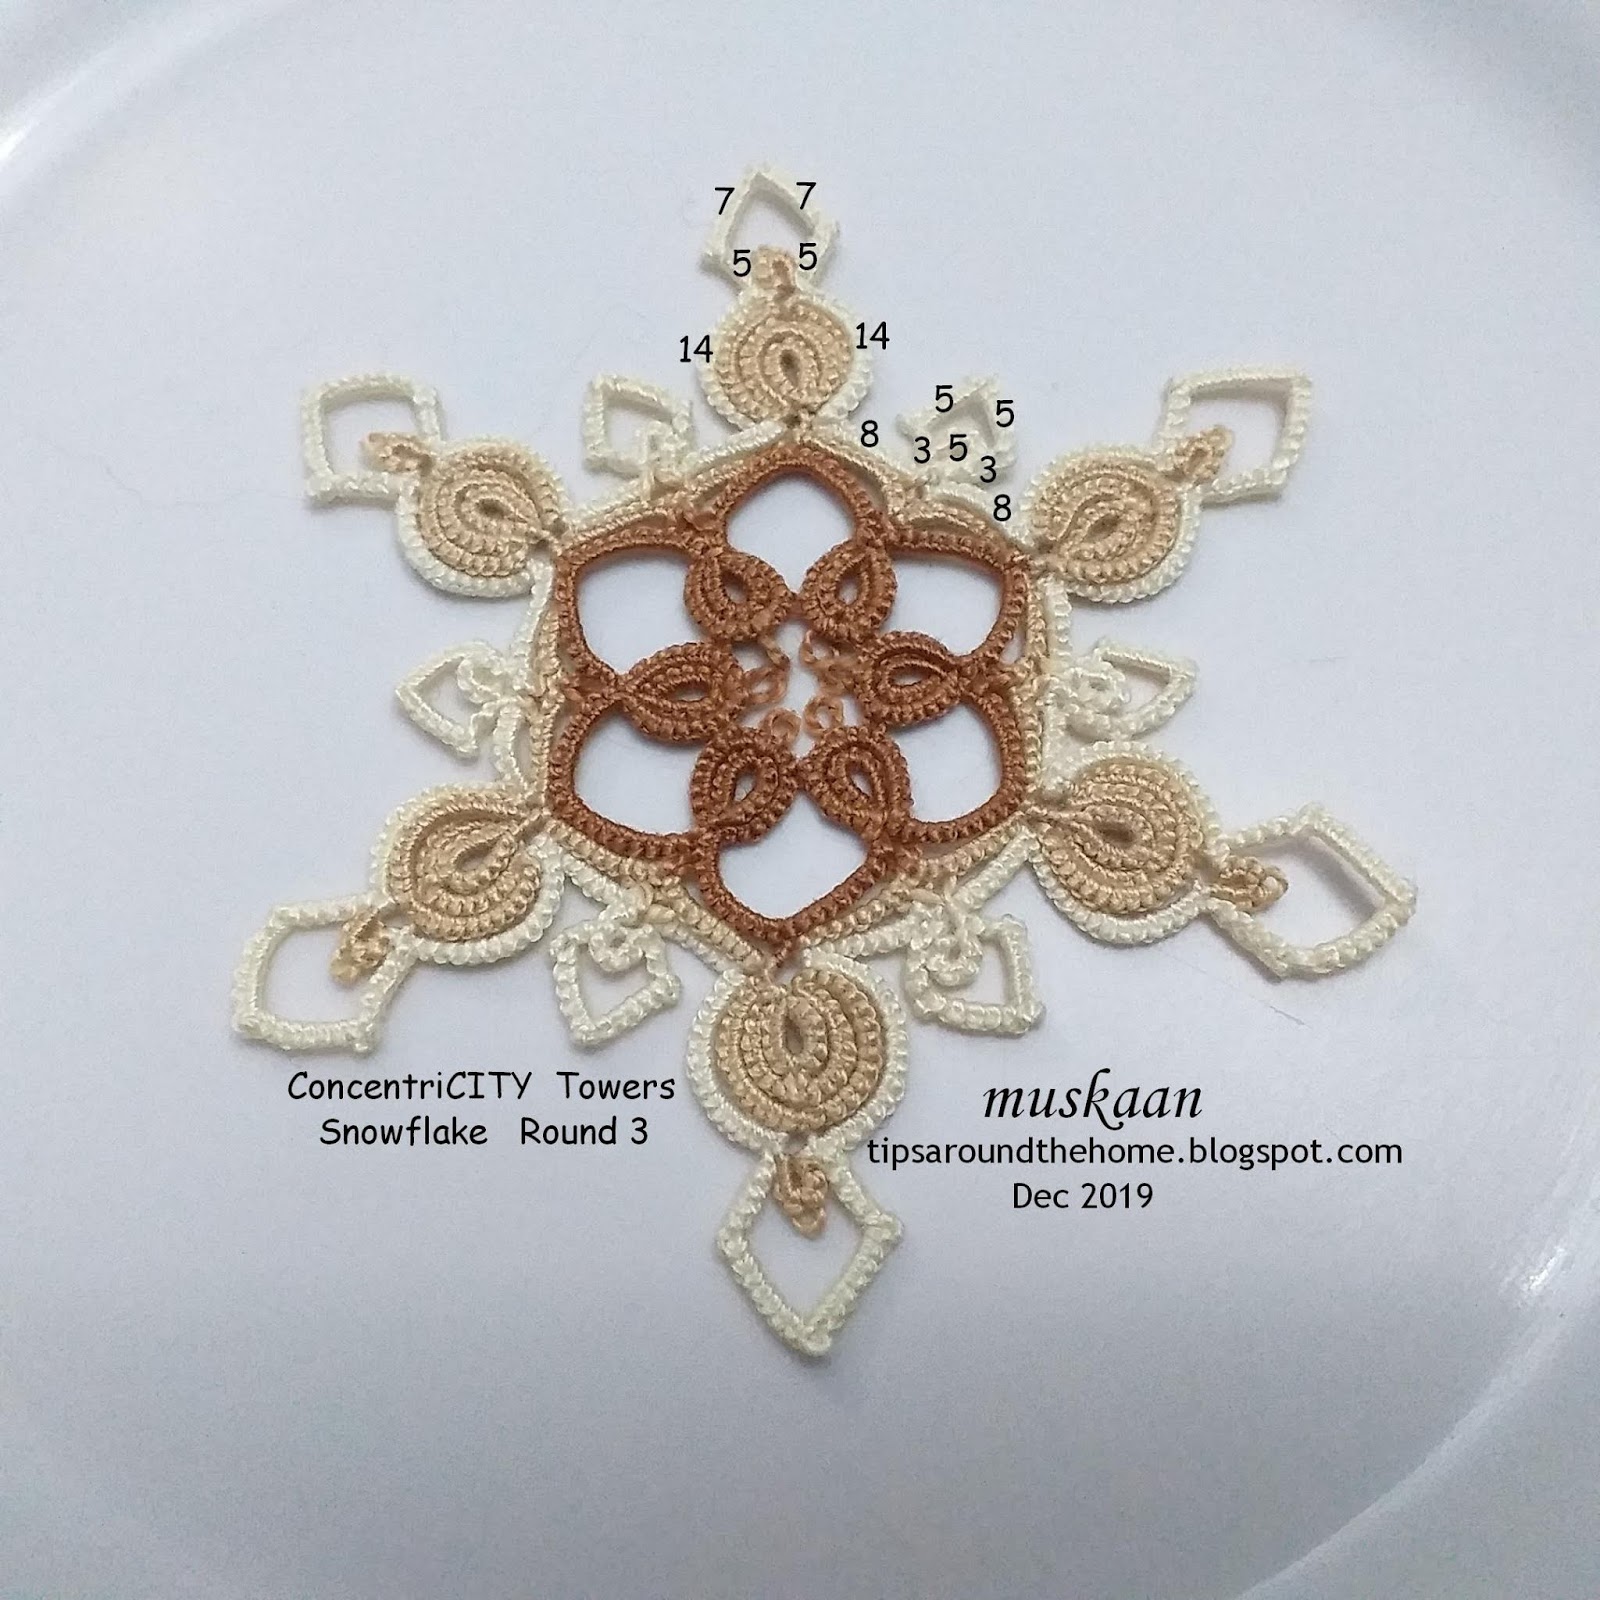
Taking in view the majority opinion in previous post, this is the 3rd round added to the snowflake. Since it has numerous possibilities (time is running out, & I am involved in helping out friends ;-P), I am counting it as #22, with 3 more to go. 

ConcentriCITY Towers snowflake
pattern
For some reason I was just not into this round – I hated my tatting, the curves in the chains were not sitting right, so many options kept invading my head, and I just slogged through somehow. I was almost on the verge of calling the 25 snowflake project over. After blocking it, though, I am fairly satisfied, and want to continue on.

Rounds 1 & 2 remain the same as shared here.
The only difference is the small ring at the tips is (3-3) instead of 5ds.

Since one tatter preferred written instructions, here is the entire written pattern. Choose your favourite method for making onion rings, pointed or angular chains, & joining 2 picots together. If required, adjust the stitch count so that the concentric rings & chains lay niched.

Abbreviation/Notation :
OR = onion ring ; -/p = picot ; + = join ; RW = reverse work ; Ch = chain ; -- = long picot ; 
SS = switch shuttle ; rs = reverse (unflipped) stitch - optional ; ^ = dot picot with Only 1 first half stitch (not 1ds) - optional ; 1SSCMR = self closing mock ring made of 1 stitch.

Round 1 : ball and shuttle, continuous thread
OR1: 6 – 6.
OR2: 7 – 3 +, p 3 – 7. RW
Ch :  2 –– 8 – 8 –– 2. RW
This forms motif#1. Repeat 5 more times, joining each new OR2 to that of previous motif, and also the last to the first.
Note : None of the chain picots is joined. They all remain free.

Round 2 : 2 shuttles, continuous thread. Refer pictorial here .
Attach thread to BOTH picots on adjacent chains of previous round. I joined them simultaneously, but you can choose your own method, keeping it consistent throughout. See Eliz Davis’ study
 
Ch : 2 –– 6 lock join
OR1: 6 – 6.
OR2: 9 + p 9.
Ch : 12 + SS mock picot R: 3 – 3. mock picot SS, 12, lock join
Ch : 6 – 2, lock join through Both picots.
This forms motif #1. Repeat 5 more times.

Round 3 - TOWERS : 2 shuttles, continuous thread.

Attach thread to the outside of any onion ring formation, and continue around the triple onion ring.
The ‘towers’ are made of curved chains where I used reverse or unflipped stitches. To avoid this, you can RW, and switch shuttle.
You can choose your favourite method to make the points. There are numerous options, including a seed bead, which I have listed at the end of the post.
To create the point at the top, I made 1ds SCMR, and the points at the side are made with 1 first half stitch dot picot. 
  
Ch : 14, lock join, 5rs, SS, ^ , SS, 7, 1SSCMR, 7, SS, ^ , RW 5, SS, lock join on other side of        OR ,
Ch : 8, lock join through Both picots,
Ring: 5.
Ch : 3rs, SS ^ , SS, 5, 1SSCMR, 5, SS, ^ , RW 3, SS, lock join on other side ring, and again          through both picots.
Ch : 8, lock join
This forms motif #1. Repeat 5 more times.
Block into shape.

NOTE : I found that when I made the ^ on the right side and continued with unflipped stitches, there was a tendency for that point to get sucked in. You may notice it on some of the spears. My solution : Make the ^. Then reverse work. Leave a loop of core thread as if you were tatting a SCMR. Work the 3 or 5 stitches, and only snug the chain. This keeps the point intact.
I really should’ve used another method to change the curves of the chain, and I did try a couple, but somehow settled for this finally. Not happy with my work.

In Anchor Pearl cotton size 8, this measures 4”. Side of hexagon is 2”.

FUTURE IDEAS
-         switch colours in onion rings, alternating the colours, as in block tatting.
-         use Victorian set for alternate onion rings.
-         change the tower curve from ‘spear’ to ‘trident’ (as in above trial pic)
-         padded double stitch (balanced ds) for sturdier spear chains
-         concentric chains for the towers (as in trial pic)
-         beads-          
-         Lee Buchanan gave me another idea to explore at leisure, to grow the tips as in real snowflakes.   
          

POINTED  CHAINS
A few options to make pointed chains : Scroll through for tutorial links (many are listed under different headings/sub-headings)   
-         Shoelace trick (SLT), switch shuttle or reverse work
-         Frivole’s one-stitch SCMR  
-         Jon Yusoff’s pointed chain 
-    Martha Ess’ folded chain (2 half-stitches) [node stitch - Elgiva Nicholls]
-         Usha Shah’s dot picot (or a half stitch dot picot as in pattern, to reduce 'bulk')
-         Ninetta Caruso’s right angle
-         Daniela Mendola’s mimosa knot