Showing posts with label tatting snowflake. Show all posts

Tuesday, 24 November 2020

spinoff fun

Pin It now!

In Jan this this I tatted 2 more spinoffs from Folded Fun square and star. 2 six-pointed versions. I'll try to add a pattern when I get around to it, but don't hold your breath! Because as I peeked into my diary where the 25 Snowflake projects were documented, I cannot find the new ones, sigh!

This is the snowflake version, not much different from the 5-pointed star. The main difference is additional stitches in the inner rings so that we now have 6 instead of 5.

This is the Stupa version - the folded rings on the outside reminded me of the 3rd century BCE Sanchi Stupa - a world famous UNESCO world heritage site - part of Buddhist holy pilgrimage.

Here they are all together (one of the stars is a prototype), positioned as a cross. I loved tatting the two 6-point versions, even during my slump phase and the colours cheered me up.

Worked in Anchor Pearl Cotton, size 8.

I have a lot of rummaging to do! Be it patterns or actual lace. I barely complete a project than jump on to another and keep forgetting along the way. Which is why I will be uploading pics of several of my designed lace, even if sharing the pattern may come much later.

Saturday, 14 December 2019

Gotham Towers

Pin It now!
Snowflake #22 in Land of Laces’ 25 Snowflake Project

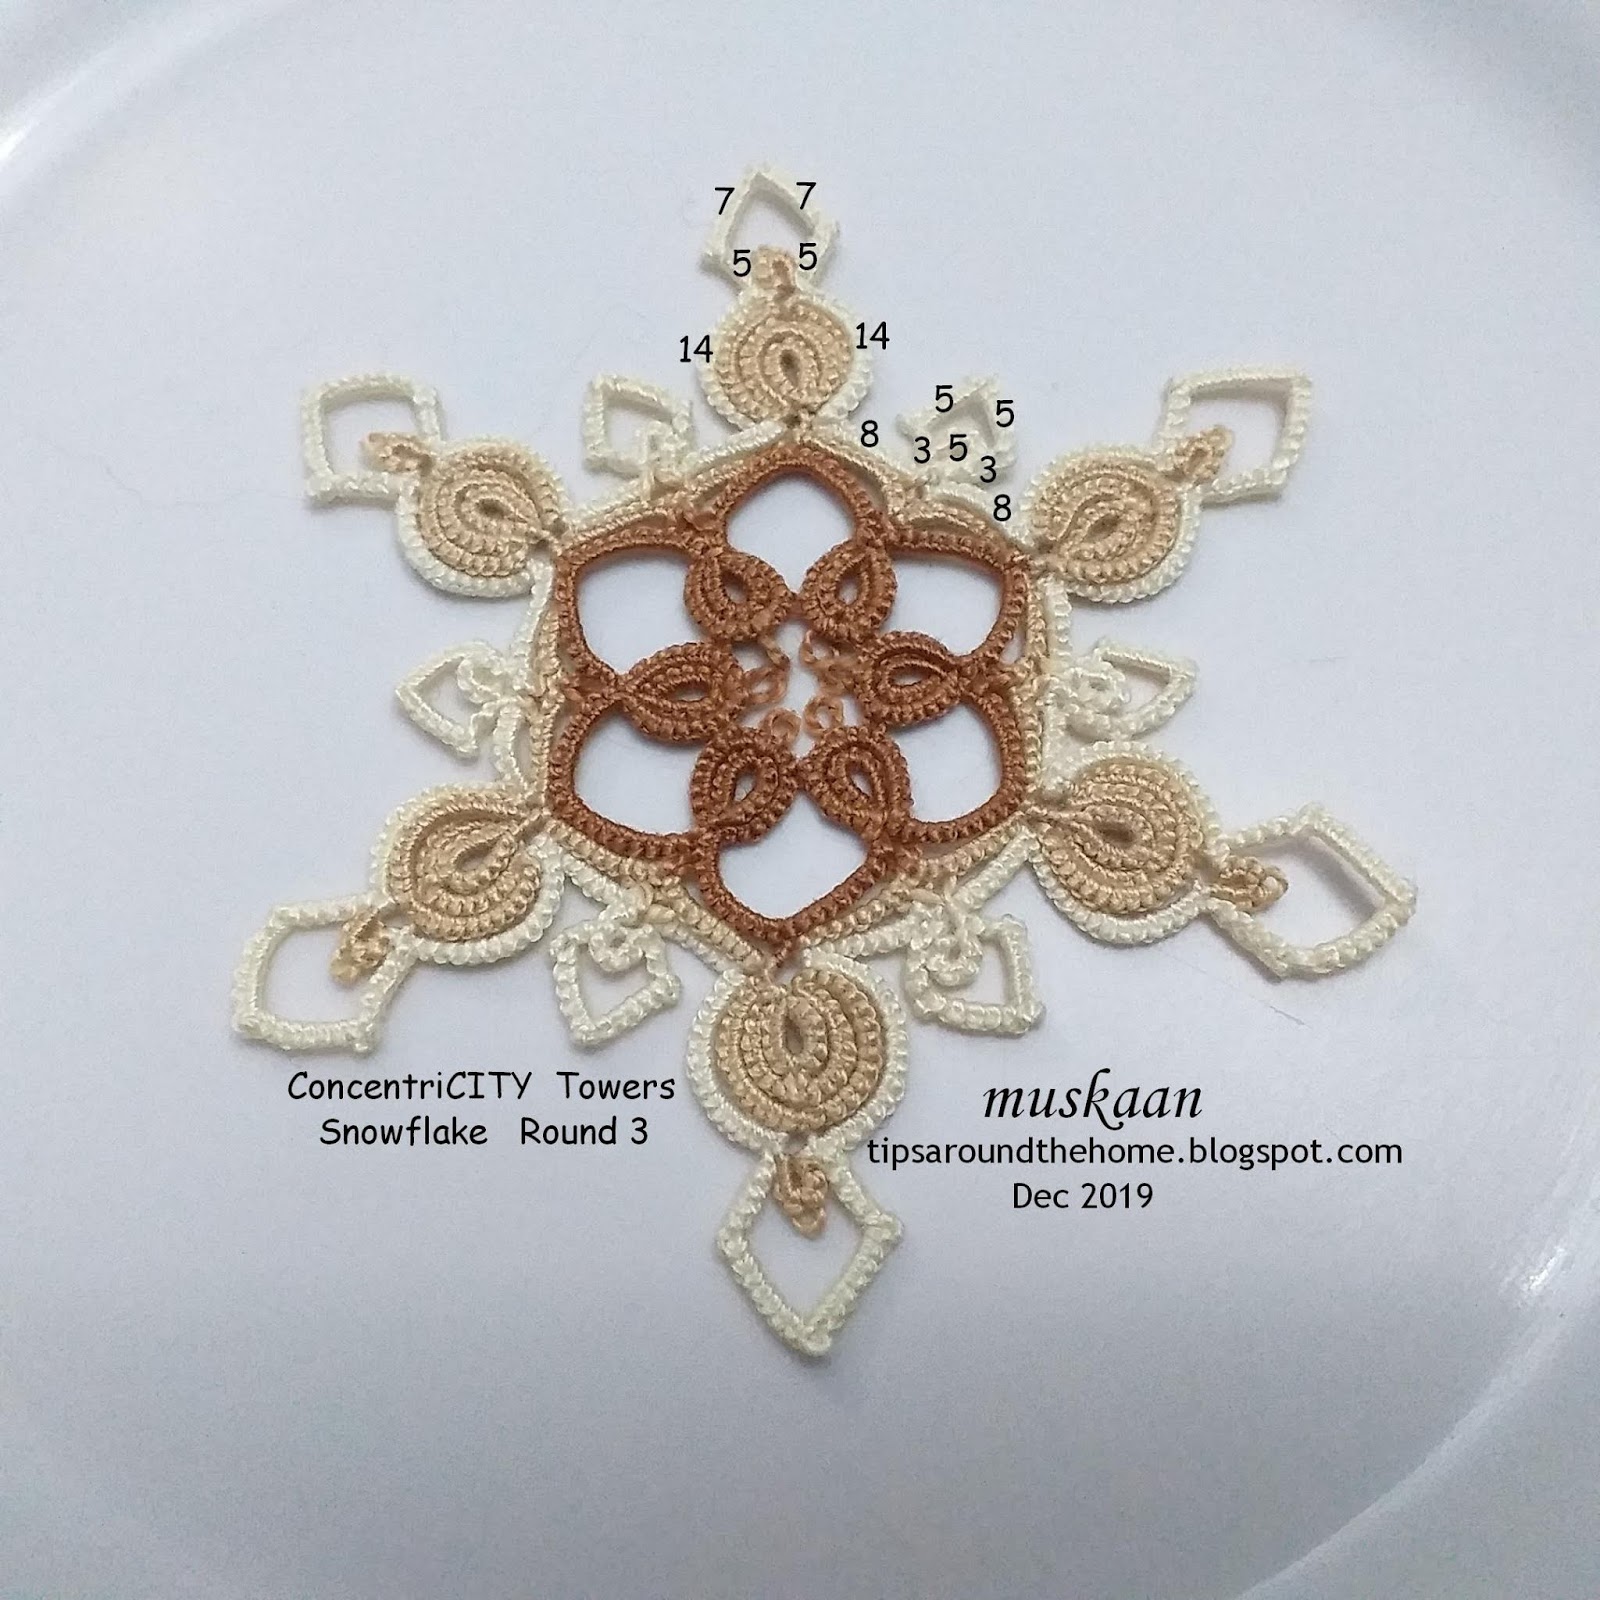
Taking in view the majority opinion in previous post, this is the 3rd round added to the snowflake. Since it has numerous possibilities (time is running out, & I am involved in helping out friends ;-P), I am counting it as #22, with 3 more to go. 

ConcentriCITY Towers snowflake
pattern
For some reason I was just not into this round – I hated my tatting, the curves in the chains were not sitting right, so many options kept invading my head, and I just slogged through somehow. I was almost on the verge of calling the 25 snowflake project over. After blocking it, though, I am fairly satisfied, and want to continue on.

Rounds 1 & 2 remain the same as shared here.
The only difference is the small ring at the tips is (3-3) instead of 5ds.

Since one tatter preferred written instructions, here is the entire written pattern. Choose your favourite method for making onion rings, pointed or angular chains, & joining 2 picots together. If required, adjust the stitch count so that the concentric rings & chains lay niched.

Abbreviation/Notation :
OR = onion ring ; -/p = picot ; + = join ; RW = reverse work ; Ch = chain ; -- = long picot ; 
SS = switch shuttle ; rs = reverse (unflipped) stitch - optional ; ^ = dot picot with Only 1 first half stitch (not 1ds) - optional ; 1SSCMR = self closing mock ring made of 1 stitch.

Round 1 : ball and shuttle, continuous thread
OR1: 6 – 6.
OR2: 7 – 3 +, p 3 – 7. RW
Ch :  2 –– 8 – 8 –– 2. RW
This forms motif#1. Repeat 5 more times, joining each new OR2 to that of previous motif, and also the last to the first.
Note : None of the chain picots is joined. They all remain free.

Round 2 : 2 shuttles, continuous thread. Refer pictorial here .
Attach thread to BOTH picots on adjacent chains of previous round. I joined them simultaneously, but you can choose your own method, keeping it consistent throughout. See Eliz Davis’ study
 
Ch : 2 –– 6 lock join
OR1: 6 – 6.
OR2: 9 + p 9.
Ch : 12 + SS mock picot R: 3 – 3. mock picot SS, 12, lock join
Ch : 6 – 2, lock join through Both picots.
This forms motif #1. Repeat 5 more times.

Round 3 - TOWERS : 2 shuttles, continuous thread.

Attach thread to the outside of any onion ring formation, and continue around the triple onion ring.
The ‘towers’ are made of curved chains where I used reverse or unflipped stitches. To avoid this, you can RW, and switch shuttle.
You can choose your favourite method to make the points. There are numerous options, including a seed bead, which I have listed at the end of the post.
To create the point at the top, I made 1ds SCMR, and the points at the side are made with 1 first half stitch dot picot. 
  
Ch : 14, lock join, 5rs, SS, ^ , SS, 7, 1SSCMR, 7, SS, ^ , RW 5, SS, lock join on other side of        OR ,
Ch : 8, lock join through Both picots,
Ring: 5.
Ch : 3rs, SS ^ , SS, 5, 1SSCMR, 5, SS, ^ , RW 3, SS, lock join on other side ring, and again          through both picots.
Ch : 8, lock join
This forms motif #1. Repeat 5 more times.
Block into shape.

NOTE : I found that when I made the ^ on the right side and continued with unflipped stitches, there was a tendency for that point to get sucked in. You may notice it on some of the spears. My solution : Make the ^. Then reverse work. Leave a loop of core thread as if you were tatting a SCMR. Work the 3 or 5 stitches, and only snug the chain. This keeps the point intact.
I really should’ve used another method to change the curves of the chain, and I did try a couple, but somehow settled for this finally. Not happy with my work.

In Anchor Pearl cotton size 8, this measures 4”. Side of hexagon is 2”.

FUTURE IDEAS
-         switch colours in onion rings, alternating the colours, as in block tatting.
-         use Victorian set for alternate onion rings.
-         change the tower curve from ‘spear’ to ‘trident’ (as in above trial pic)
-         padded double stitch (balanced ds) for sturdier spear chains
-         concentric chains for the towers (as in trial pic)
-         beads-          
-         Lee Buchanan gave me another idea to explore at leisure, to grow the tips as in real snowflakes.   
          

POINTED  CHAINS
A few options to make pointed chains : Scroll through for tutorial links (many are listed under different headings/sub-headings)   
-         Shoelace trick (SLT), switch shuttle or reverse work
-         Frivole’s one-stitch SCMR  
-         Jon Yusoff’s pointed chain 
-    Martha Ess’ folded chain (2 half-stitches) [node stitch - Elgiva Nicholls]
-         Usha Shah’s dot picot (or a half stitch dot picot as in pattern, to reduce 'bulk')
-         Ninetta Caruso’s right angle
-         Daniela Mendola’s mimosa knot


Monday, 9 December 2019

ConcentriCITY pattern

Pin It now!

Snowflake #21 in Land of Laces’ 25 Snowflake Project

This time I decided to go simple. Trouble with ‘simple’ is the constant fear that it’s already been done! Which is perhaps one of the reasons I did a 2nd round. A quick search did not throw up anything like this, and if there is, I haven’t seen or copied it.

I’ve used Kathleen Minniti’s captured adaptation of Aurora Lozada’s Onion Rings method. I find it ‘simpler’ and easier to remember, with great results. Kathleen captures the 1st/innermost ring in the first half stitch (within the loop after flipping the stitch) and proceeds with the 2nd half stitch. The rings stay snug.
In the 2nd round, where I worked the 2nd ring backside (RODS), I captured the inner ring in the 2nd half stitch (see pictorial below).

Both rounds are worked from front, clockwise....

ConcentriCITY snowflake
Small / Round 1 pattern
Worked in both Anchor Pearl (size 8, white) and Lizbeth (size 20), it is <4½ cms. As a hexagon, the side is 2cms.
Ball and shuttle, continuous thread. Start with the innermost ring (A) of onion ring. 
Choose your favourite method to make the onion rings.
I used Georgia Seitz’s Onion Ring or ball thread join.
Then work the chain. Note that the chain picots are NOT linked to each other. They remain free, and are slightly longer.

ConcentriCITY snowflake
Medium / Round 2 pattern
Worked in Anchor Pearl (size 8, white), it is 8 cms. As a hexagon, the side is 4cms.
2 shuttles, continuous thread.
Join to the 2 free picots on adjacent chains. I used a normal lock join, pulling up a loop simultaneously through both.
Check out this explorative study by Eliz Davis of how different ways of joining 2 picots together can be visually different. She tried Consecutive vs Simultaneous Joins. 

Start with the chain, going clockwise.
Lock join to the center picot. Make the 2 inner onion rings. Outer one is a chain, with a thrown ring. Join chain to middle ring, leave some picot space and make thrown ring. Leave equal space after closing ring, and continue chain. Lock join to same picot and continue chain, again making a join to the double picots simultaneously.

Repeat all around.

NOTE: I often have to tweak the stitches - adding half or full stitch in onion rings. Hence, depending on your tension, make the necessary adjustments.

PICTORIAL (with FRONTSIDE/BACKSIDE TATTING) 

The following pictorial shows how I worked one repeat, in directional or frontside/backside tatting. Red is shuttle1 & yellow is shuttle2.
1. After making the chain, make innermost ring with Sh1.

 2. Turn work and start next ring backside. Capturing the inner ring in 2nd half stitch.

 3. Close ring. Both shuttles are now in position to start chain.

 4. Make chain around the onion rings. Make onion ring join or lock join. Switch shuttle to tat a thrown ring, leaving mock picot space. Switch shuttle, and continue chain back on other side. Lock join to base. [see inset].   
 5. Make chain. Put hook through both picots of previous round to pull up a loop and make a lock join.
 6. Continue chain
 7. Make lock join and repeat from 1.
8. Snowflake complete.

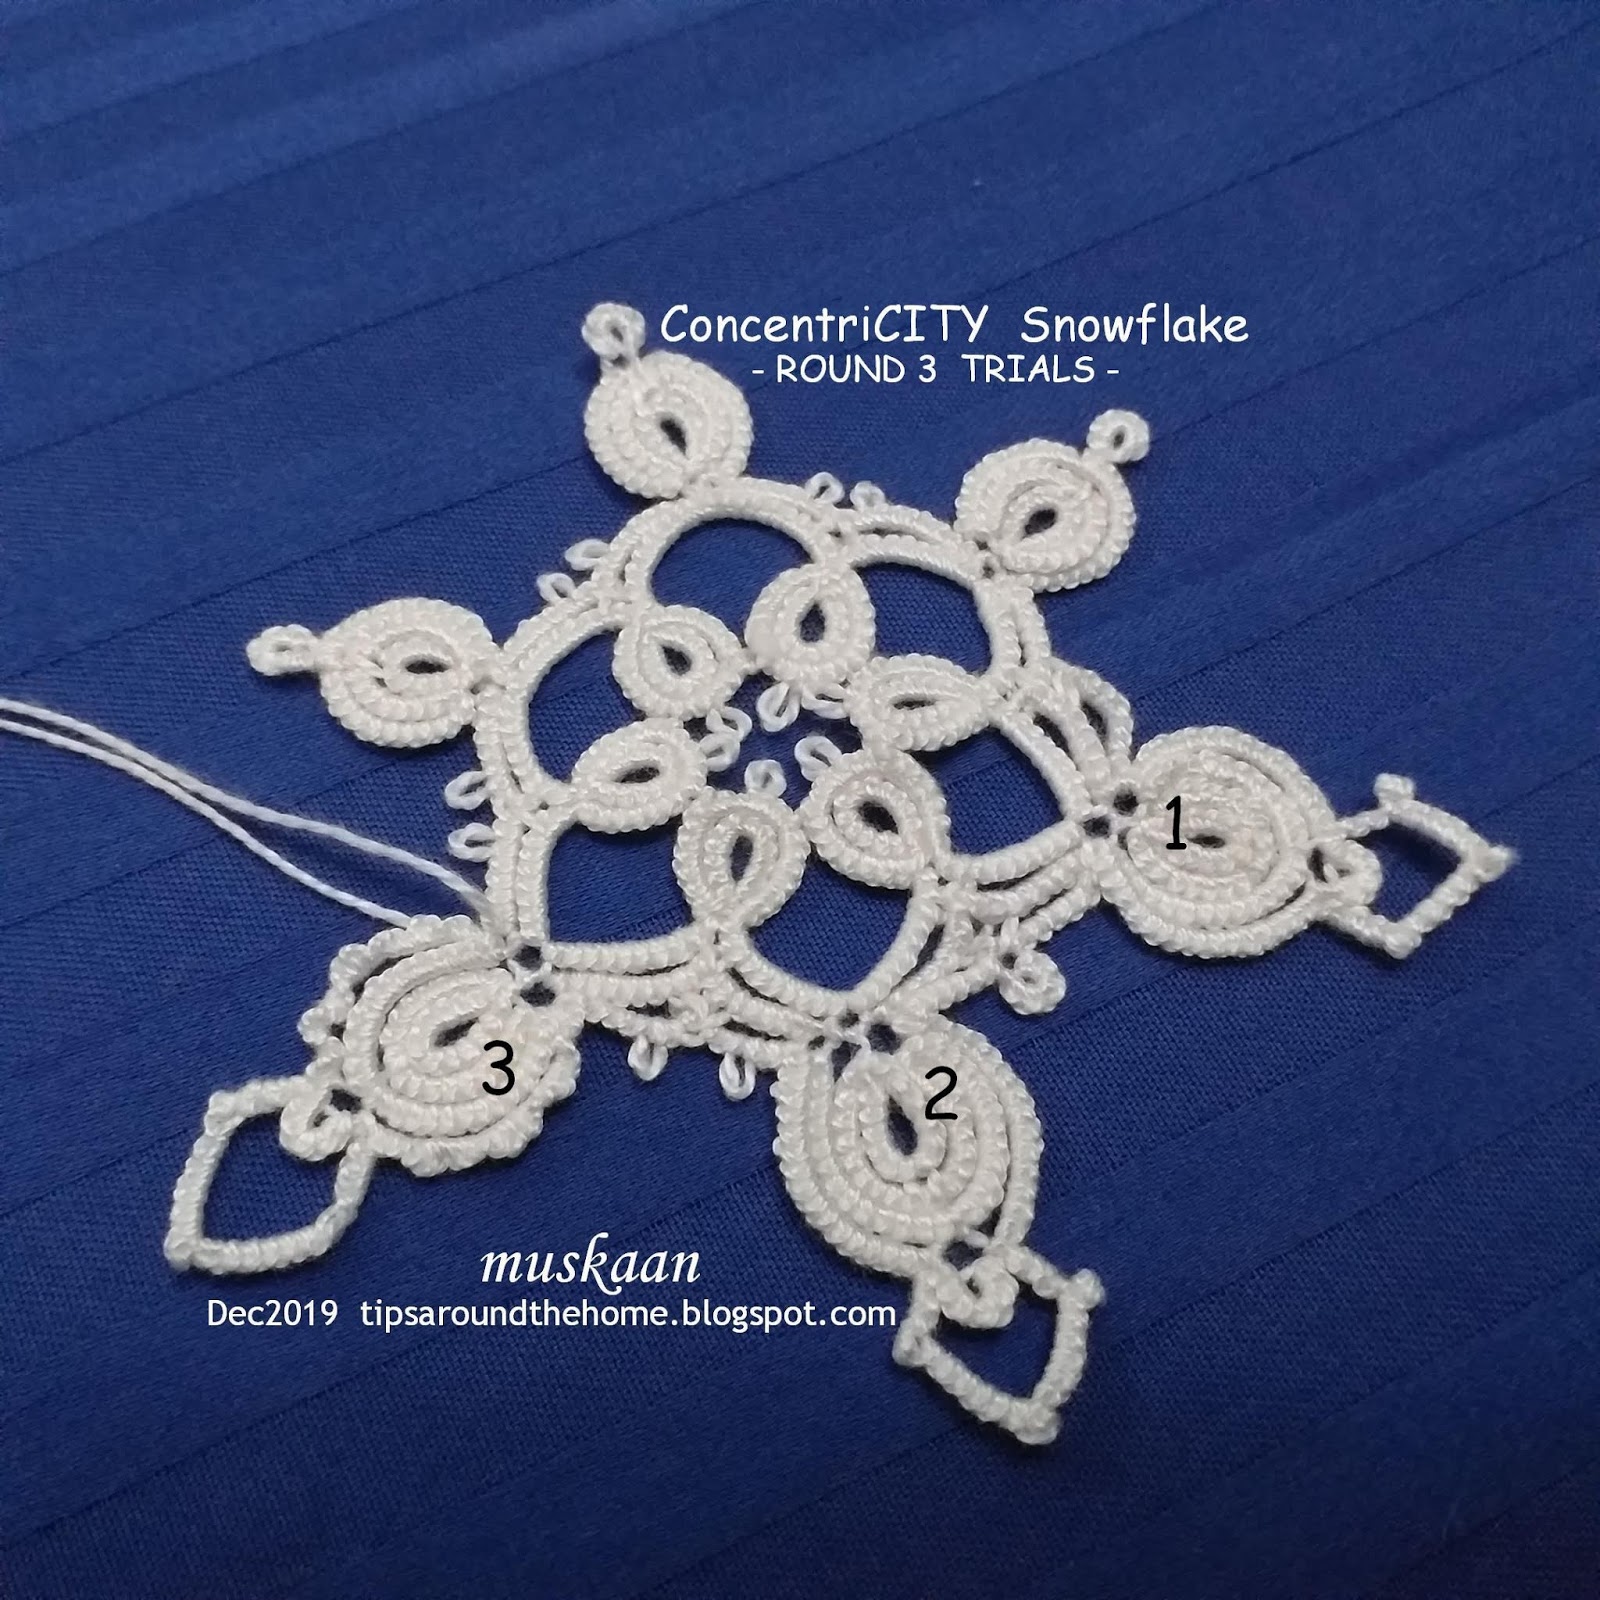
 Round 3 TRIALS
I tried a 3rd round. These are the 3 repeats with tweaks in each (from 1 to 3). I couldn’t decide whether to go through with it or not, but feedback on facebook seems to be in favour of making a 3rd round.
I have a couple of questions, though –
  • Should there be a small ring (as in 1 & 2) or 2 picots (as in 2 & 3) between chains?
  • Should the outermost onion ring round be normal (1 & 2) or Victorian Set (as in 3)?
  • Anything else?
This will require making the entire snowflake afresh to make the picots the right size and avoid stretching. Hence it will be counted as a new snowflake for the project – I have 4 more to design/tat before the 25th, so I’m taking this lifeline ;-P


Tuesday, 17 September 2019

sparkling and tinkling

Pin It now!

A week has passed since I last worked on the computer. I have posted 2 snowflake projects on facebook just so I don’t miss out since I only have 1 ‘free’ Sunday left ;-D Lots of patterns to write out…
I am taking this opportunity to post at least one pattern here – a 2D bell. When the 3D version is reworked and written out, I’ll combine both into a pdf.

The MatheMagical pattern has turned out to be quite versatile indeed – stars, tree, bells (and a possible angel, and later a coaster/doily, in future!!!). 
I first made a bell in silver metallic, without changing the original tree count (from which it is directly derived). Turned out to be a bit tubular. Then I took courage and tweaked the chain count and am so much happier with this version in gold! My tatting excitement has returned as well, lol.

MatheMagical Bell (2D) pattern

ctm - continuous thread ; - - picot ; dnrw - do not reverse work ; + - join ; rw - reverse work ; SS - switch shuttle.
Please let me know if you encounter any mistakes.

In the image below, the inset model shows sequence of working from A to P.
Black letters/numbers indicate rings while red shows chains.

2 shuttles, ctm.  1 teardrop bead on shuttle1.

Starting with shuttle1,
A Ring   : 8 – 7 – 1. dnrw
B Ring   : 1 +(A) 6 – 7. rw
C Chain : 9 – 7. rw
D Ring  : 6 +(B) 6. dnrw
E Ring  : 5 – 5. rw
F Chain : 6 – 4. rw
G Ring  : 4 +(E) 4. dnrw, SS
H Chain: 8. dnrw, SS
I Ring   : 4 – 4. rw
J Chain : 4 +(F) 6. rw
K Ring  : 5 +(I) 5. dnrw
L Ring  : 6 – 6. rw
M Chain: 7 +(C) 9. rw
N Ring  : 7 +(L) 6 – 1. dnrw
O Ring  : 1 +(N) 7 – 8. dnrw, SS
P Chain : 11 teardrop 11.
Join to starting space, tie, cut and hide ends. 
  

Snowflake Sparkle
And this is my 11th snowflake where I’ve cheated a bit (I didn’t actually tat a new model this time, but will do so this week)…. 
If you remember, it is a 2015 pattern which I improved in 2017 but the updated pattern still hasn’t been shared. This image is from 2017 and I want to tat a new model in metallic thread before I feel confident of sharing the revised pattern.

Keep the tinkling sparkle in your smile :-)))


Monday, 22 December 2014

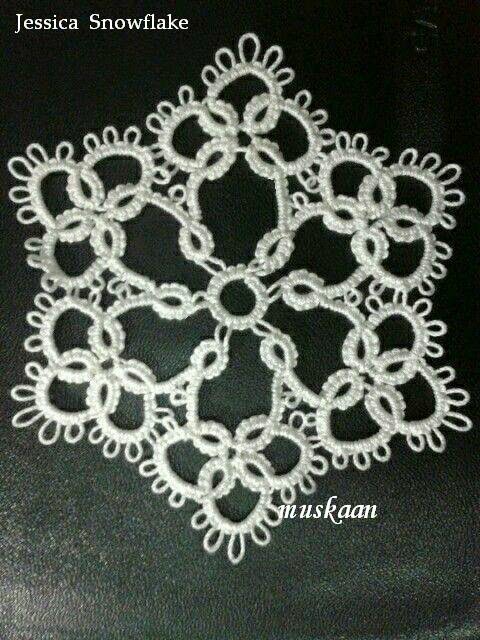
Tatting Pattern : Jessica Snowflake

Pin It now!
Talk about timing ! Now that all the tatting has been done, ornaments put up, wishes sent, ……
But I’d much rather talk about inspiration ! Inspiration not from within, but from all you awesome tatters & designers, and all your fun projects that you keep sharing. I finally dropped my crochet hook yesterday & picked up my shuttles – I just Had to, despite my resolution to tat tree ornaments, etc. only in the next season. And despite the fact that I really am enjoying my crochet afghan.

Anyways, here’s my 1st snowflake & I’m calling it Jessica Snowflake – you guessed it – after Kersti’s Jessica Bookmark. I wanted to do something quick & something I’d done before – you understand my hurry, right ? Also my post on Encircling got me thinking along the lines of compressing the circle still further to make a 6-sided snowflake from an edging. Here goes …
Oh, and this is also my final motif for the 25 Motif Challenge for 2014 ! Will be joining again, of course :-)

Jessica Snowflake           
Pattern derived from Kersti Anear’s Jessica Bookmark (click for free pattern)


I used 2 shuttles, in order to climb out of the central ring using a mock picot & Split Ring, and hence accomplishing the snowflake in one round.
This is a fairly simple pattern & can be done with shuttle & ball too. If using only single shuttle, the central ring & adjoining split ring can be done as Single Shuttle Split Rings !
Or for absolute beginners, make the central ring separately, tie, cut. Start Round 2.

I used Red Heart Size 20 in white. However, the size 20 seemed more like size 30, & it is stiffer than Anchor Mercer – ideal for snowflakes !
Size : 3’ across.

Abbreviations & symbols used :
R – ring
Ch – chain
–  – picot
––  – long picot
–––  – longest picot
mp – mock picot
SR  – split ring
+  – join
  – where next repeat is joined to previous one.

Note : Reverse work after each ring & chain, if not following frontside/backside tatting.

Central R : 3––3––3––3––3 mp (long)
** Ch : 3–3
R : 5––5
Ch : 2–22–2–2–2
R : 5+5 (join to picot of previous ring)
Ch : 2–2––2–––2––2–2
R : 5+5
Ch : 2–22–22–2
R : 5+5
Ch : 3–3
R : 5+5 (join to picot of central ring)
Repeat from ** 5 times, joining as one goes, so that one has 6 ‘sides’. Join the last repeat to the 1st one before finishing off.
Tie & cut ends & hide.

Basic stitch-count has been inked in pic below; red denotes rings & blue denotes chains.

This snowflake can also be used as a hexagonal motif, joined together for larger projects.

My thanks to Kersti,  for sharing the pattern .

I 'designed' another snowflake yesterday, but need to do it in white today. Will share pattern as soon as possible.

Motif #25 for 25 Motif Challenge

Happy Tatting :-) 

Tuesday, 28 January 2014

Tatting Patterns II : 2 Simple Motifs / Snowflakes

Pin It now!

Pentagonal & Hexagonal Motif / Snowflake Patterns & Their Applications 

Looking for simple motif / snowflake  patterns ?
Want to finish off bits & pieces of left-over yarn?
Looking for some Quick & Practical solutions ?

I am sharing 2 very simple 2-shuttle tatting patterns.
  • As single, separate entities, these are ideal for motifs, appliques, or snowflakes.
  • When linked together in a 'row' they make beautiful bookmarks, edgings, bracelets, headbands, etc.
  • Join at multiple points/tips/picots to create coasters, mats, Cheval set, table-runner, etc.
Versatile, eh ?!

Thread used: Anchor (Coats) Mercerized Cotton #20. Colors : Blue - 0131 & Black.

Pentagonal Motif / Snowflake 

<1.5' / < 4 cm across
2 shuttle pattern - Shuttle 1: blue; Shuttle 2: black.

I wonder whether this can be called my original pattern ? I "derived" it from the Hexagonal Motif pattern shown below. ;-)

Pentagonal Motif / Snowflake with inked pattern

Hexagonal Motif / Snowflake

1.5' / 4 cm wide
2 shuttle pattern. Shuttle 1 : Black ; Shuttle 2 : Blue.

Hexagonal Motif/Snowflake with inked pattern

TIP : These motifs are a great yarn stash-buster ! And one can make them bright & single or multicolored with whatever yarn is leftover in shuttles ;-)

Ideas for Projects / Applications 

  • Pendant : Single motifs can be strung to make cute little pendants for a simple necklace ! A very easy & quick gift to accessorize :-)
Motif  Pendants (Idea)

  • Choker / Bookmark / Edging : When Hexagonal motifs are joined at 2 points / picots, it creates a beautiful edging or bookmark. It would also look great as a headband, belt,  bracelet or choker! 
Hexagonal Motif Edging / Bracelet

TIP : This very bookmark or edging can make quite a spectacular picture/mirror / photo frame decoration ! Simply glue around any plain old frame to bring it to life :-)


Note : 
In the pics below, I haven't actually joined the motifs ...  merely playing around with the many possible arrangements. Depending on the project, one can join/attach motifs as one tats along. 
Or add beads & create cute accessories for self or gifting.
Even without beads, the tiny rings at each angle give a beaded effect !

  • Bookmark / Bracelet : When Motifs are joined only at one tip / picot, they create a very delicate, lacy bookmark, bracelet, headband, choker !

Hexagonal Motif Bookmark / Bracelet
Similarly, one can join the Pentagonal motifs to make bracelets !
  • Bracelet : A little starching or blocking may be required to keep the little rings in place.
Hexagonal Motifs Bracelet

  • Coaster : Attach 4 motifs for a square coaster. These can be sewn on to fabric or one can add some edging around the periphery & a little motif in the center, to fill up the spaces, if desired.

Hexagonal Motifs Coaster Sampler

  • Mat / Runner : When joined in a rectangular arrangement, the motifs can make table-runners &/or place-mats. The number of rows & columns can be decided as per requirement.

Hexagonal Motif Mat / Runner

  • Gift Wrap & Cards : Use Motifs / Snowflakes to decorate greeting cards, tags, etc. Instead of ribbons, strings of motifs can be used to tie gifts ! Practical & re-usable !
Yes, make Motifs your friend ! You never know when they might 
come in handy to decorate, adorn, create. 

Constructive Feedback is always welcome :-)