Snowflake
#22 in Land of Laces’ 25
Snowflake Project

pattern

Rounds
1 & 2 remain the same as shared here.
The
only difference is the small ring at the tips is (3-3) instead of 5ds.
Since
one tatter preferred written instructions, here is the entire written pattern.
Choose your favourite method for making onion rings, pointed or angular chains,
& joining 2 picots together. If required, adjust the stitch count so that
the concentric rings & chains lay niched.
Abbreviation/Notation :
OR = onion ring ; -/p = picot ; + = join ; RW = reverse work ; Ch = chain ; -- = long picot ;
SS = switch shuttle ; rs = reverse (unflipped) stitch - optional ; ^ = dot picot with Only 1 first half stitch (not 1ds) - optional ; 1SSCMR = self closing mock ring made of 1 stitch.
Round
1 : ball
and shuttle, continuous thread


OR1: 6 – 6.
OR2: 7 – 3 +, p 3 – 7. RW
Ch : 2 –– 8 – 8 –– 2. RW
This forms motif#1. Repeat 5 more
times, joining each new OR2 to that of previous motif, and also the last to the
first.
Note : None of the chain picots is
joined. They all remain free.
Round
2 : 2
shuttles, continuous thread. Refer pictorial here .
Attach
thread to BOTH picots on adjacent chains of previous round. I joined them
simultaneously, but you can choose your own method, keeping it consistent
throughout. See Eliz Davis’ study.

Ch : 2 –– 6 lock join
OR1: 6 – 6.
OR2: 9 + p 9.
Ch : 12 + SS mock picot R: 3 – 3.
mock picot SS, 12, lock join
Ch : 6 – 2, lock join through Both
picots.
This forms motif #1. Repeat 5 more
times.
Round
3 - TOWERS :
2 shuttles, continuous thread.
Attach
thread to the outside of any onion ring formation, and continue around the triple
onion ring.
The
‘towers’ are made of curved chains where I used reverse or unflipped stitches.
To avoid this, you can RW, and switch shuttle.
You
can choose your favourite method to make the points. There are numerous
options, including a seed bead, which I have listed at the end of the post.
To
create the point at the top, I made 1ds SCMR, and the points at the side are made with 1 first half stitch dot picot.
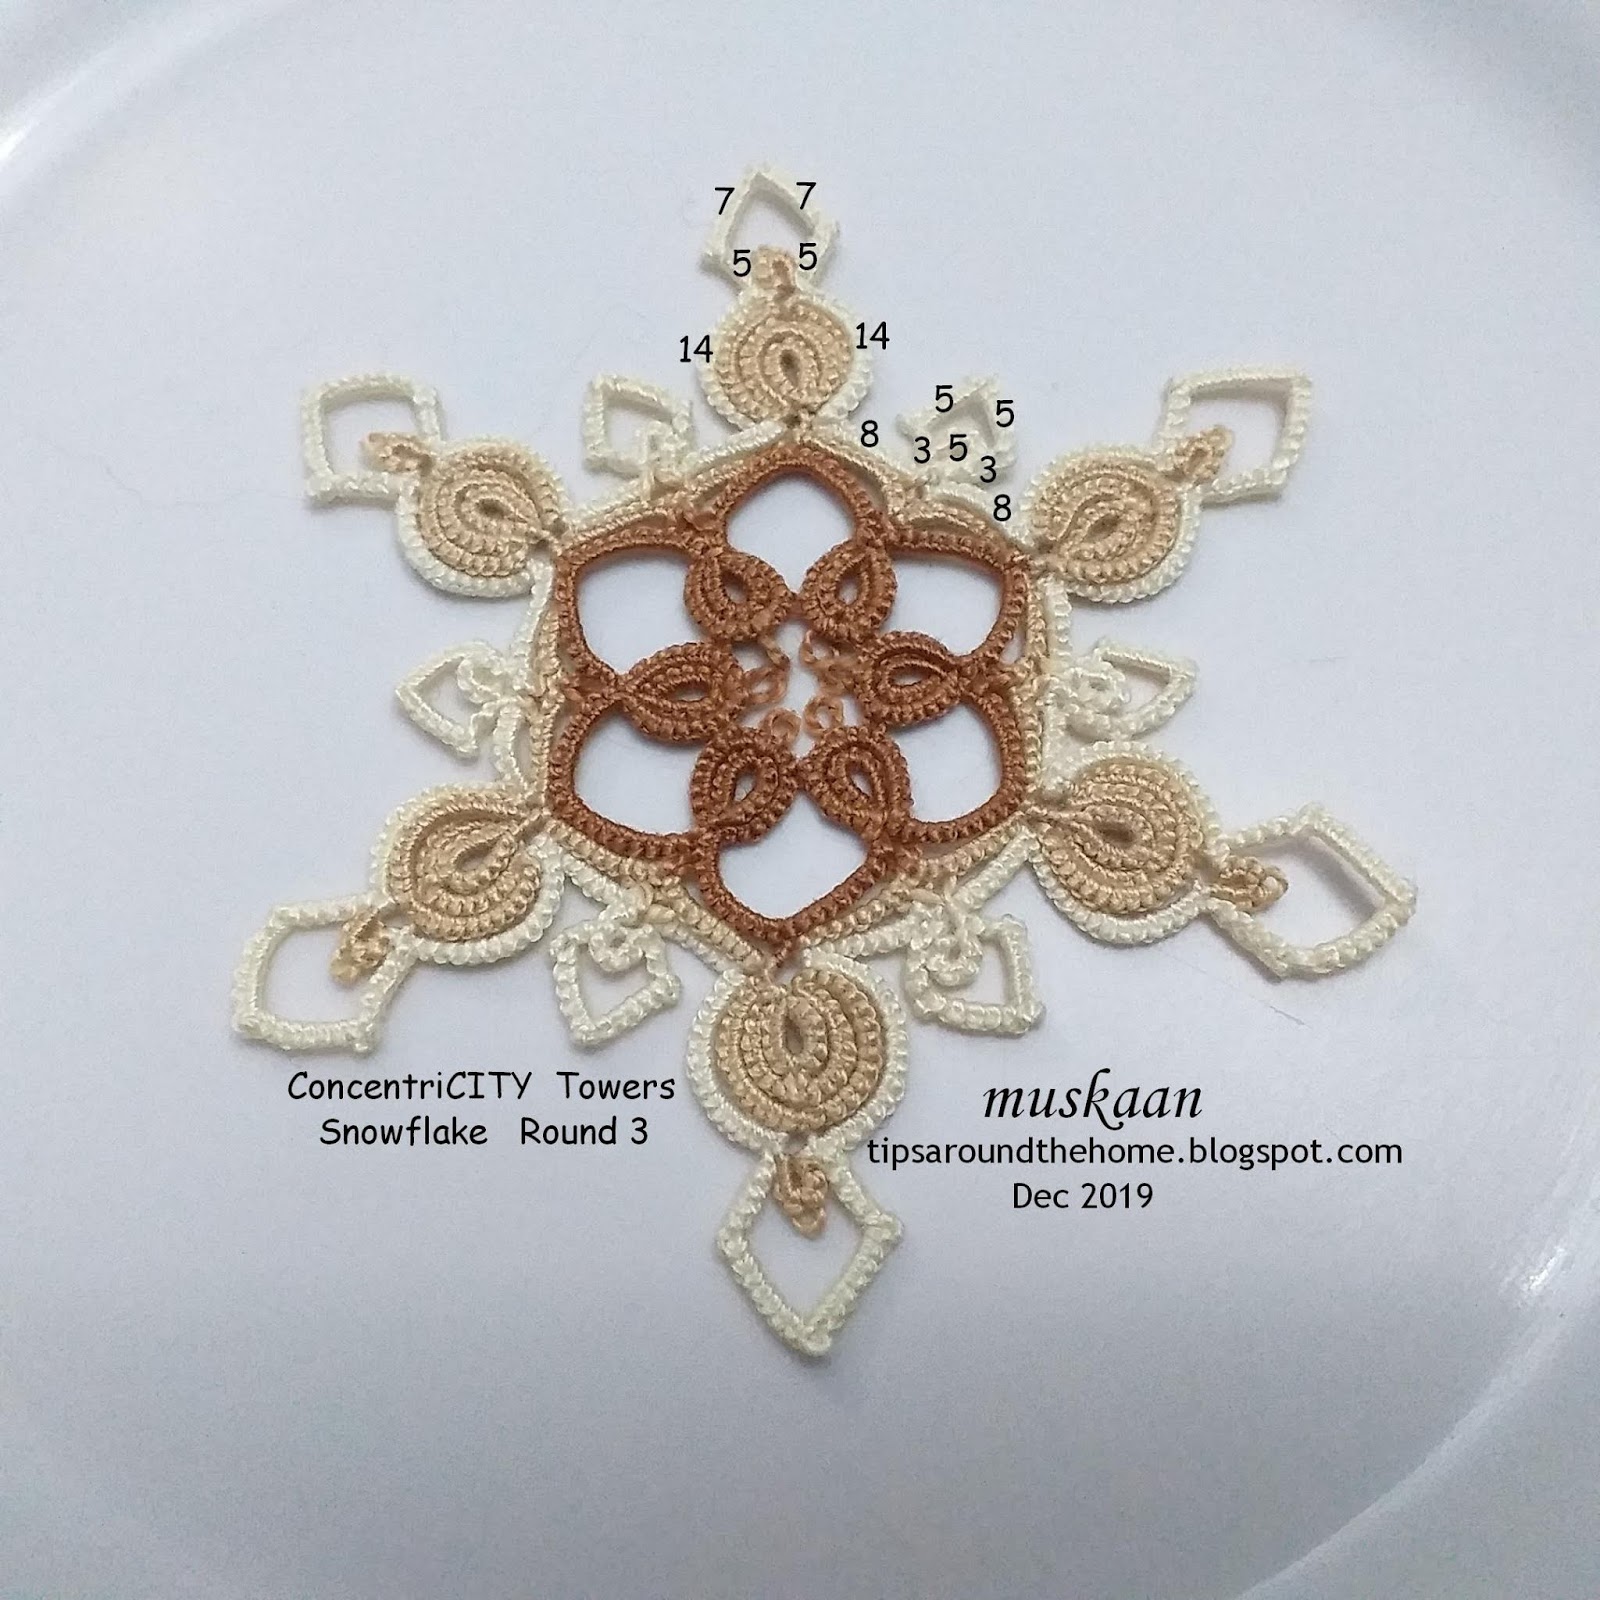
Ch : 14, lock join, 5rs, SS, ^ , SS, 7, 1SSCMR, 7, SS, ^ , RW 5, SS, lock join on other side
of OR ,
Ch : 8, lock join through Both
picots,
Ring: 5.
Ch : 3rs, SS ^ , SS, 5, 1SSCMR, 5, SS, ^ ,
RW 3, SS, lock join on other side ring, and again through both picots.
Ch : 8, lock join
This forms motif #1. Repeat 5 more
times.
Block into shape.

I
really should’ve used another method to change the curves of the chain, and I
did try a couple, but somehow settled for this finally. Not happy with my work.
In
Anchor Pearl cotton size 8, this measures 4”. Side of hexagon is 2”.
FUTURE
IDEAS

-
use Victorian set for alternate onion rings.
-
change the tower curve from ‘spear’ to ‘trident’ (as in above trial pic)
-
padded double stitch (balanced ds) for sturdier spear chains
- concentric chains for the towers (as in trial pic)
- beads-
- Lee Buchanan gave me another idea to explore at leisure, to grow the tips as in real snowflakes.
- concentric chains for the towers (as in trial pic)
- beads-
- Lee Buchanan gave me another idea to explore at leisure, to grow the tips as in real snowflakes.
POINTED CHAINS
A
few options to make pointed chains : Scroll through for tutorial links (many are listed under different headings/sub-headings)
-
Shoelace trick (SLT), switch shuttle or reverse work
-
Frivole’s one-stitch SCMR
-
Jon Yusoff’s pointed chain
- Martha Ess’ folded chain (2 half-stitches) [node stitch - Elgiva Nicholls]
-
Usha Shah’s dot picot (or a half stitch dot picot as in pattern, to reduce 'bulk')
-
Ninetta Caruso’s right angle
-
Daniela Mendola’s mimosa knot
It’s magnificent! And of course it deserves to be counted as a design in its own right. Well done.
ReplyDeleteThank you so much, Jane 😍 💕🌹
DeleteI like this 3-rounded version more than previous! You're giving your best in this 25 snowflakes project, every step in your journey is interesting, thank you for sharing patterns and lessons 🌹
ReplyDeleteIt does look complete and more like a snowflake 😄
DeleteThanks, Ninetta, it has been a journey of learning, consolidation, and confidence. 💕🌹
ÓÓ de gyönyörű!Gratulálok!
ReplyDeleteNagyon köszönöm, Vera 💕🌹😍
DeleteNagyon-nagyon szép :-) Meg fogom próbálni. Köszönöm.
ReplyDeleteNagyon köszönöm, Jolimama 😍 Looking forward to your tatting 🌹💕
DeleteIt's a fantastic design! I like the effect of the pointed chains. Thank you!
ReplyDeleteSo glad you like it, Marilee :-)))
DeleteVery interesting snowflake!
ReplyDeleteWitam i dziękuję bardzo, OlKa :-)))
DeleteNow that really is a snowflake!!!
ReplyDeleteHahaha, that is just tatted lace from someone who has not encountered real snow, Judith ;-D
DeleteYet you can appreciate the intricacies of their individual designs. :-)
DeleteThank you so much, Judith :-)))
DeleteI haven't been reading very faithfully lately so missed earlier posts on this design. The outline looks like ice crystals! I love the colors and they make me think of when the snow begins to melt and mixes with the mud. I hope you don't mind that comparison, because that often makes an ugly landscape, but it is also symbolic of your being close to the end of your challenge.
ReplyDeleteI think this is one of my favorites of all the designs you have worked.
'city' is part of it's name, Emily and I like your interpretation :-D
DeleteLet's see if I can finish the last 3 in one week!
I love this and I too have been away from blogging and facebook too! Your work is great and thank you for the pattern!
ReplyDeleteMissed you, Carollyn :-)))
DeleteA beautiful pattern. Thank you and best regards
ReplyDeleteWitam i dziękuję bardzo, Renata :-)))
DeleteBeautiful and original snowflakes :)
ReplyDeleteMany thanks, Anetta :-)))
DeleteBeautiful and balanced pattern!
ReplyDeleteSo will I see you tatting and blogging it, Marja/ :-)))
DeleteSo much here to explore! It'll have to wait until after the mad rush next week.
ReplyDeleteExploration is always fun, Mel ;-)))
DeleteBravissima Muskaan, stella molto bella particolare nella forma
ReplyDeleteGrazie, Paola 🥰
DeleteSono Paola Bevilacqua
ReplyDelete💗🌺💗
Delete