Showing posts with label pointed chain. Show all posts

Monday, 18 January 2021

a quadrille or more

Pin It now!

Yesssss, we now have more tatters joining in our dance - it's no longer a tango! More on that at end of post.

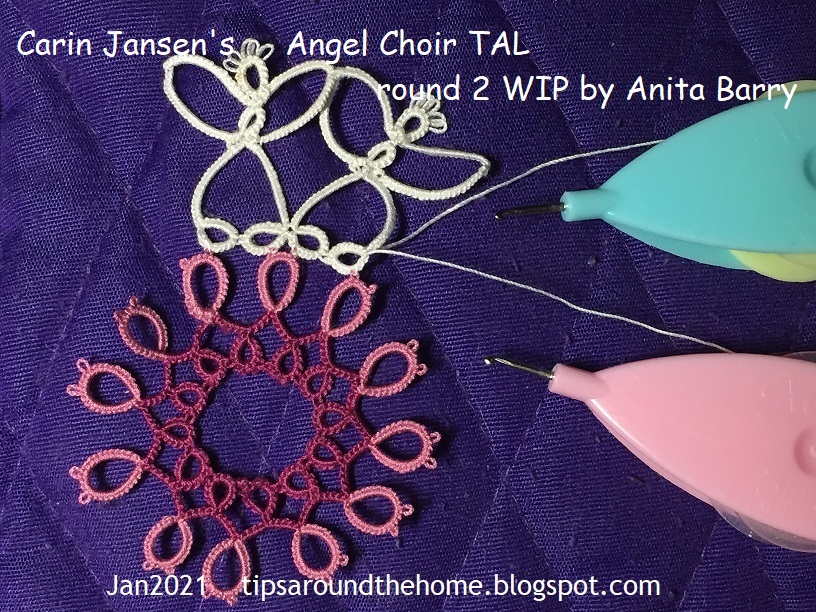
Carin Jansen's Angel Choir doily TAL – Round 2

pattern - http://handwerk-fee.blogspot.com/2020/11/engelenkoor.html

Angels are what first drew me to this pattern. And to see them merrily dancing around was an added bonus. It is a very clever and creative design and hats off to the designer, Carin!

Techniques : 2 shuttles ctm, long chains, pointed chain (one stitch SCMR), picot join to right, SCMR, lock join, very small picots.
Optional Techniques : 1 shuttle and ball ctm, frontside/backside tatting, other methods for pointed chain, mock ring, blipless join, beads.
[all tutorials can be found here with several alternatives for pointed chain, joins, etc.]

As before, we share our joint notes, tips, and ideas below. Carin has already given very detailed instructions, including alternate stitch count for metallic thread, which I will try not to repeat here.
Round 1 Noteshttps://tipsaroundthehome.blogspot.com/2021/01/two-to-tango.html

 
This is a cleverly crafted angel using simple rings and chains and reverse work between them.

The 1ds SCMR creates a nicely pointed chain for the wing tips and a picot between the 2 half stitches is perfect for joining later, without adding extra length/bulk to the tip! Whether to put a paperclip to hold the picot open depends on our personal comfort and skill.

Shuttle 2 requires more thread than shuttle1 which is used for only 3 of the 4 rings in each angel. However, one can work entire round with only one shuttle and ball if the head is worked as a mock ring. After making a lock join, continue to tat a chain and make another lock join in the same picot to simulate a ring.
Each center and head ring is secured on either side with joins to a chain, ensuring good stability. 

Joining to previous wing tip can be a bit tricky in fine thread. However joining directly without SCMR creates a curved, not pointed wing. It is easier to work this SCMR with 1st half stitch, join, 2nd half stitch.
Besides joining the wings at the tips, another join can be made further down to add stability or hold shape – about 4 or 5 ds down, using a very small picot. This will not alter the overall shape. This additional join could be more important if one does not want to tat more rounds.

Many tatters prefer to work long chains with the balanced double stitch. Make necessary stitch adjustments if you use it.
TWoT Notes:  The row can move in clockwise or counterclockwise direction as seen in both WIP versions. The reason can be found in whether one is doing traditional or fs/bs tatting; whether the first ring was worked frontside or backside.
In directional tatting (fs/bs), one should be careful while making joins to avoid colour blips on the front of work. Or one can use blipless joins.
For frontside/backside tatting, you could start this round with a backside ring so that most of the tatting is then done frontside.
There is some ruffle while working the round, but settles after simple rolling pin blocking.

The last wing joined to the first is an example of picot join to the right, though one may not realise it.
Beads on the halo would sparkle. Or perhaps graduated picots? The free flowing effect of these angels seems like they are floating through air, making each angel unique.
Notice the large sunflower shape if we do not tat the top half of each angel's body? So we have a bonus option to work a large flower coaster in the right colours! And we know how to get the petals to be pointed :-D
In Lizbeth size 80, 
single Angel motif  : < 3cms high; 2.5 cms wide wingspan; 1 cm wide at base.
After 2 rounds, this doily measures 9 cms in Lizbeth size 80.

I absolutely love this colourway and am glad I did not go with my original yellow for this round. And the little ring for body is truly special with the 1ds adding a tiny 'waist'! Every project brings in new learning in some way or other.


Now for the group dance ..... 
Several tatters on facebook showed interest in doing this tatalong with us!  I might include their versions here as I blog. eg. Cristina Reb's 1st round in Anchor size 20 -
My friend, Rose Deguara, had a tip for Round 1 (which I have now included in that post) - The last inner ring needs to be joined in the round to the first inner ring, thus calling for a picot join to the right.   
Look for #AngelChoirTAL on facebook to find posts and pics; some have joined us in the Just Tatting group.
Off to do the next round, now that I have immersed myself in this orchestration ;-D

Oh, and check out how Vera has covered her bauble/ornament even though it is not Christmas - https://veragondolatai.blogspot.com/2021/01/frivolitas-gombre.html I have updated my post with this option and my own idea!

Saturday, 14 December 2019

Gotham Towers

Pin It now!
Snowflake #22 in Land of Laces’ 25 Snowflake Project

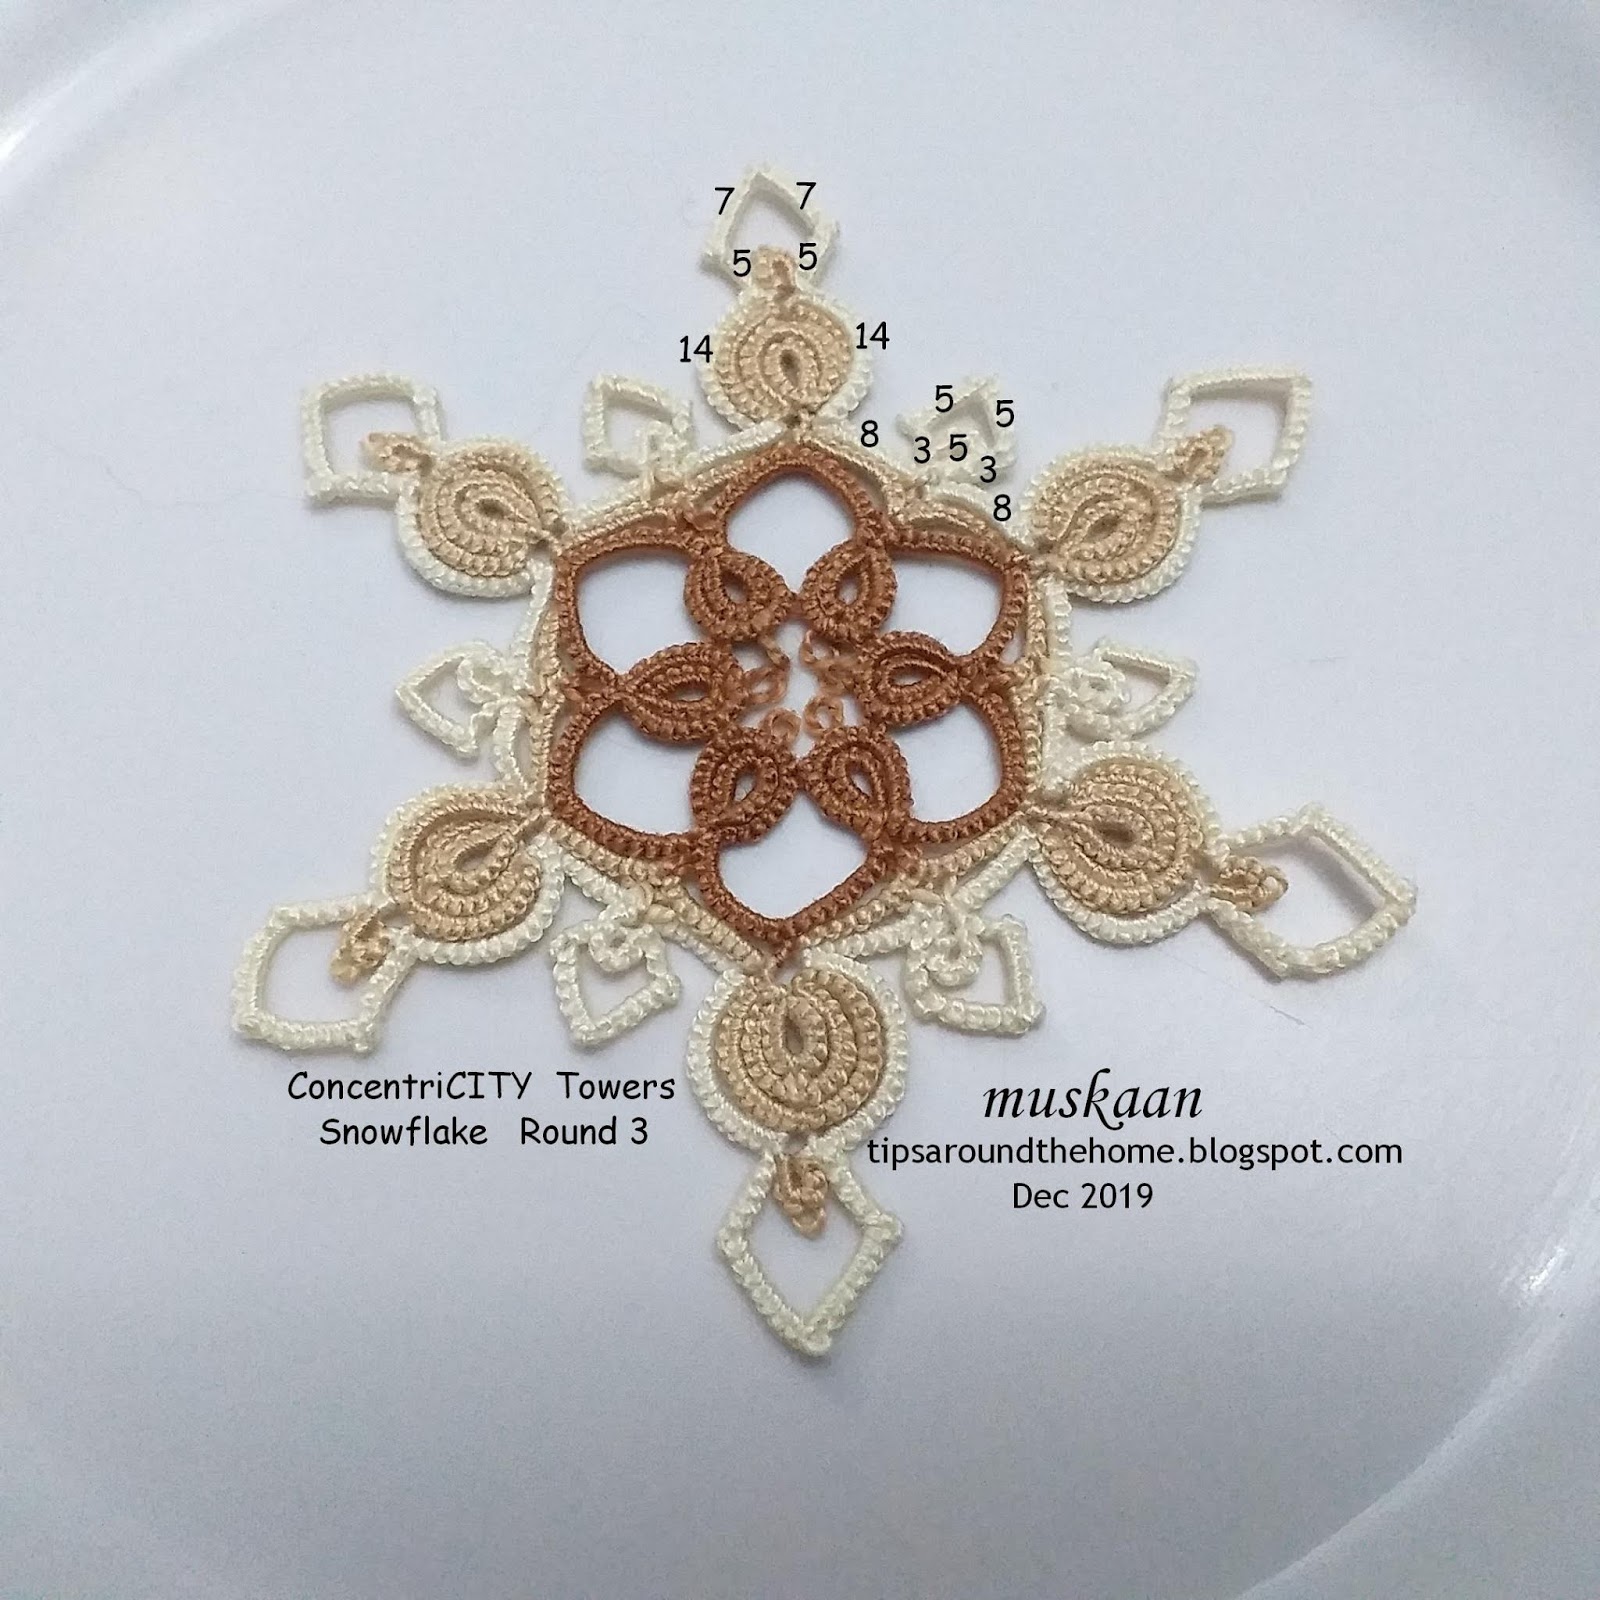
Taking in view the majority opinion in previous post, this is the 3rd round added to the snowflake. Since it has numerous possibilities (time is running out, & I am involved in helping out friends ;-P), I am counting it as #22, with 3 more to go. 

ConcentriCITY Towers snowflake
pattern
For some reason I was just not into this round – I hated my tatting, the curves in the chains were not sitting right, so many options kept invading my head, and I just slogged through somehow. I was almost on the verge of calling the 25 snowflake project over. After blocking it, though, I am fairly satisfied, and want to continue on.

Rounds 1 & 2 remain the same as shared here.
The only difference is the small ring at the tips is (3-3) instead of 5ds.

Since one tatter preferred written instructions, here is the entire written pattern. Choose your favourite method for making onion rings, pointed or angular chains, & joining 2 picots together. If required, adjust the stitch count so that the concentric rings & chains lay niched.

Abbreviation/Notation :
OR = onion ring ; -/p = picot ; + = join ; RW = reverse work ; Ch = chain ; -- = long picot ; 
SS = switch shuttle ; rs = reverse (unflipped) stitch - optional ; ^ = dot picot with Only 1 first half stitch (not 1ds) - optional ; 1SSCMR = self closing mock ring made of 1 stitch.

Round 1 : ball and shuttle, continuous thread
OR1: 6 – 6.
OR2: 7 – 3 +, p 3 – 7. RW
Ch :  2 –– 8 – 8 –– 2. RW
This forms motif#1. Repeat 5 more times, joining each new OR2 to that of previous motif, and also the last to the first.
Note : None of the chain picots is joined. They all remain free.

Round 2 : 2 shuttles, continuous thread. Refer pictorial here .
Attach thread to BOTH picots on adjacent chains of previous round. I joined them simultaneously, but you can choose your own method, keeping it consistent throughout. See Eliz Davis’ study
 
Ch : 2 –– 6 lock join
OR1: 6 – 6.
OR2: 9 + p 9.
Ch : 12 + SS mock picot R: 3 – 3. mock picot SS, 12, lock join
Ch : 6 – 2, lock join through Both picots.
This forms motif #1. Repeat 5 more times.

Round 3 - TOWERS : 2 shuttles, continuous thread.

Attach thread to the outside of any onion ring formation, and continue around the triple onion ring.
The ‘towers’ are made of curved chains where I used reverse or unflipped stitches. To avoid this, you can RW, and switch shuttle.
You can choose your favourite method to make the points. There are numerous options, including a seed bead, which I have listed at the end of the post.
To create the point at the top, I made 1ds SCMR, and the points at the side are made with 1 first half stitch dot picot. 
  
Ch : 14, lock join, 5rs, SS, ^ , SS, 7, 1SSCMR, 7, SS, ^ , RW 5, SS, lock join on other side of        OR ,
Ch : 8, lock join through Both picots,
Ring: 5.
Ch : 3rs, SS ^ , SS, 5, 1SSCMR, 5, SS, ^ , RW 3, SS, lock join on other side ring, and again          through both picots.
Ch : 8, lock join
This forms motif #1. Repeat 5 more times.
Block into shape.

NOTE : I found that when I made the ^ on the right side and continued with unflipped stitches, there was a tendency for that point to get sucked in. You may notice it on some of the spears. My solution : Make the ^. Then reverse work. Leave a loop of core thread as if you were tatting a SCMR. Work the 3 or 5 stitches, and only snug the chain. This keeps the point intact.
I really should’ve used another method to change the curves of the chain, and I did try a couple, but somehow settled for this finally. Not happy with my work.

In Anchor Pearl cotton size 8, this measures 4”. Side of hexagon is 2”.

FUTURE IDEAS
-         switch colours in onion rings, alternating the colours, as in block tatting.
-         use Victorian set for alternate onion rings.
-         change the tower curve from ‘spear’ to ‘trident’ (as in above trial pic)
-         padded double stitch (balanced ds) for sturdier spear chains
-         concentric chains for the towers (as in trial pic)
-         beads-          
-         Lee Buchanan gave me another idea to explore at leisure, to grow the tips as in real snowflakes.   
          

POINTED  CHAINS
A few options to make pointed chains : Scroll through for tutorial links (many are listed under different headings/sub-headings)   
-         Shoelace trick (SLT), switch shuttle or reverse work
-         Frivole’s one-stitch SCMR  
-         Jon Yusoff’s pointed chain 
-    Martha Ess’ folded chain (2 half-stitches) [node stitch - Elgiva Nicholls]
-         Usha Shah’s dot picot (or a half stitch dot picot as in pattern, to reduce 'bulk')
-         Ninetta Caruso’s right angle
-         Daniela Mendola’s mimosa knot


Monday, 1 April 2019

happy tatting with old and new

Pin It now!
A very happy International Tatting Day!

I’ve had a fruitful day – I’ve tatted a cross from a vintage edging, tried a new technique, gorged on black forest pastry (it has chocolate ;-P), and am now going public with this blog post. 

Georgia Seitz has a puzzle - can we work this vintage edging continuously? Hmm, I couldn’t, but I did convert it into a cross that can be tatted in one pass. And if the puzzle intrigues you, attend class today to see if our talented participants have answers. They always have tons of ideas !

The dark purple one was made first but felt too long, then 'improved' upon in the brown one. But I think the chains in the long arm should be shorter, leaner. That arm looks like it’s grown biceps !!!
In Red Rose pearl cotton (size 8) the brown cross measures 8½ cms x 6½ cms & the first one is longer at 9½ cms.
Techniques I used : 2 shuttles, directional (fs/bs) tatting, central picot, SCMR with mock picot and thrown ring, ring made with 2nd shuttle (like thrown rings), lock join.

I need your help in naming the cross. What should I call it?
It is edging #436 from Coats and Clark #138 Priscilla Edgings. And if you have any design improvement ideas, please do advise.


Now to the lovely new effect, Mimosa Knot, shared by Daniela Mendola to create pointed rings and chains. I tried them on rings only including half-closed rings.
My understanding of the Mimosa Knot on ring, based on movements in video :
  1. It starts off as a self-closing mock ring or SCMR (holding core thread loop at base) ;
  2. Make the 1st half stitch, but before snugging, pass shuttle front to back through open loop and adjust tension – this creates a twist in the thread just like in the treble tat stitch. Except that in treble, there are 3 twists, whereas here there is a single twist.
  3. Next make the 2nd half stitch, and pass shuttle back to front to twist, and snug.
  4. Close loop in 2 stages as we do for any regular SCMR. But my core thread did not slide freely after closing SCMR. I had to do this 5th step to ensure free movement & it worked every time ...
  5. Hold the mimosa knot in pinch and tug/pull the core thread such that the knot transfers and core thread becomes free.
Doesn’t this remind you of Frivolé’s one-stitch SCMR (for pointed chain) combined with Ninetta’s treble tat stitch (2nd half)? The SCMR lifts up the stitch to create a point (see 1 wrap tds here). 
Usha’s dot picot also creates a pointed effect and I remember doing a comparative study on pointed rings (perhaps privately?). Jon Yusoff also created pointed chains. Now I’ll have to add the mimosa knot to the compilation :-D

All links can be found in the tabs above (My Tutorials & Tatting Resources) or type in search box.

Can’t thank global tatters enough for sharing generously ! 

Thursday, 12 May 2016

tat-alongs and common threads

Pin It now!

A doily tat-along by Renulek


Both rounds 5 & 6 were tatted quickly. Nothing much to relate here. Cream thread in size 40.

In Round 5, with just a few repeats left, the thread in one shuttle was on the verge of running out. So I made an overhand knot (SLT – see below) & switched shuttles.
With 5 picots, it was difficult to guess where Renulek would join her next round. So I decided to cut & hide threads & start Round 6 afresh.

Round 6 : I chose to tat entire round clockwise from front, hence inner ring with RODS & chain & floating ring tatted normally. This was an extremely fun round! There is clearly only 1 joining point for the next round, so I climbed out with a split chain & split floating ring. 
Shuttles are waiting for the next round pattern to be released. 

–Ω–Ω–Ω–Ω–Ω–Ω–Ω–Ω–Ω–Ω–Ω–Ω–

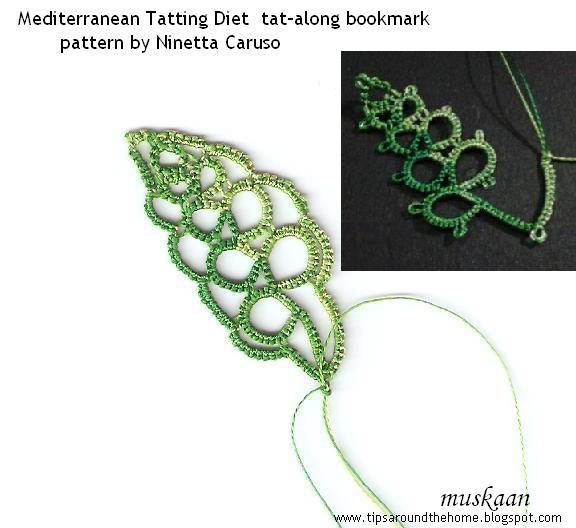
A tat-along bookmark by Ninetta Caruso

I already posted an image of the first strawberry. No beads. Can’t bring myself to have beads, howsoever small, within the pages of a book. First strawberry posted here.
For 2nd strawberry (the left one), I tweaked the outer chain round by +/- a couple of stitches, depending on how much curve I wanted. We each tat with different tension & it becomes necessary to adjust accordingly.
Both strawberries were made with decent lengths of scrap threads in size 40 & the curled ring calyx tatted with silk thread doubled up.

Made with 2 silk threads in shaded green.
What I did for Leaf #1 ...
  • Instead of using a pin/clip to hold picot, small picot & direct tatting (reverse stitch) of chain;
  • Slope & Roll join instead of Lock Join in order to avoid colour blips ;
  • Pointed chain for tip, but within the reverse stitch ! Then I switched shuttles in order to keep the shade same.
  • Instead of LJ, SS at the last ring , I used Reverse Join which automatically does that same job but in one motion.
  • Directional tatting throughout, including for split rings.
I've started the 2nd leaf as a mirror image of the 1st. Total 4 leaves are required. 
I Love  the fact that there are no ends to hide in the end !!! But I have had to make a knot to keep the silk threads from unraveling.


–Ω–Ω–Ω–Ω–Ω–Ω–Ω–Ω–Ω–Ω–Ω–Ω–
                                 
                             COMMON  THREADS 

I was going to do a couple of posts under the heading Common Threads in order to tease out underlying commonalities between seemingly different techniques or effects. Details about the topic in a separate post, but it seems appropriate to share this set here. Please note that this is based on my own comprehension & the resources at my disposal.

So, what does a shoelace knot have in common with a Celtic picot or angular chains ???

SET 1 : Overhand Tie

The underlying common factor is a regular overhand tie made on the ‘chain’/auxiliary thread (or the thread that forms the stitches). This set focuses on the similarity of construction, though it’s applicability and visual effect may be different.

1. Shoelace Trick (SLT)an overhand tie for functionality. 

It is used to switch shuttles either for colour change or if thread in one shuttle is running low. Needle tatters use it to close rings & chains.

The ‘SLT picot’ in above picture served to change colour midway through a chain, 
with a small picot added to follow the overall pattern.

2. Celtic Knotted Picot (CKP) by Sabina Carden-Madden (May 2005)
an overhand knot for decorative picots that also provide an extra joining point.

An overhand tie is made to the ‘ball’ thread for chain or to the ring thread before starting the ring. But the tie is left slack or on a picot gauge such that a decorative woven picot is created with 2 joining points. It can be made both on chains and rings since the core thread remains free.
CKPs both in the inner round as well as outer round, facing opposite direction.

3. Puncetto Knot by Ninetta Caruso (April 2011)   and
4. Pointed Chain by Jon Yusoff (June 2011)  are basically the same.
a tensioned overhand tie to create an angular point in a chain.

An overhand tie is made with the ‘chain’ thread or 2nd shuttle, encapsulating the core thread within, and then tensioning it. One knot each for the 2 half stitches, thus adding a bit of bulk to the caps to create a visual point. It can only be made on a chain or mock ring, not on a true ring, since the core thread becomes locked.

In Puncetto, by pre-forming a SH2 loop under core thread, & passing SH2 through it, there is an economy of movement -- the link is accomplished in 'one pass'. This may be easier to do in direct tatting (wrapped/unflipped/reverse stitch) as in the bookmark leaf above since the shuttles are already in position.
In this vintage edging pattern, the inner circle is done as directed in the pattern. 
However, for the outer circle, I made the chains pointy 
& suddenly the pattern seemed to acquire character :-)


BUT 
there is one major difference between the techniques listed in this set. 
Can you spot that when you compare the tutorials ?
scroll down further for the answer

Update Set 1 of Common Threads has been renamed ‘Overhand Tie’ (instead of overhand knot) after a discussion on Craftree. Two ties in succession create a knot. A knot conjures up the image of something that has been tightened, whereas a tie is like a ‘half-knot’ with slack that can be loosened easily if required.

happy tatting :-)

 Related Posts : Rounds 1-3
 & Round 4


ANSWER :  The overhand tie for SLT is made by overlapping both the threads ; the knots for CKP, Puncetto knot & Pointed chain are made using only one thread. In CKP, there is no encapsulation of other thread ; in the other two, there is encapsulation of core thread.