A doily tat-along by Renulek

Both rounds
5 & 6 were tatted quickly. Nothing much to relate here. Cream thread in size 40.
In Round 5,
with just a few repeats left, the thread in one shuttle was on the verge of
running out. So I made an overhand knot (SLT – see below) & switched
shuttles.

With 5
picots, it was difficult to guess where Renulek would join her next round. So I
decided to cut & hide threads & start Round 6 afresh.
Round 6 : I
chose to tat entire round clockwise from front, hence inner ring with RODS
& chain & floating ring tatted normally. This was an extremely fun round! There is clearly only 1 joining point for the next round, so I climbed out with a split chain & split floating ring.

Shuttles are waiting for the next round pattern to be released.
–Ω–Ω–Ω–Ω–Ω–Ω–Ω–Ω–Ω–Ω–Ω–Ω–
A tat-along bookmark by Ninetta Caruso
I already
posted an image of the first strawberry. No beads. Can’t bring myself to have
beads, howsoever small, within the pages of a book. First strawberry posted
here.

For 2nd
strawberry (the left one), I tweaked the outer chain round by +/- a couple of stitches,
depending on how much curve I wanted. We each tat with different tension &
it becomes necessary to adjust accordingly.
Both
strawberries were made with decent lengths of scrap threads in size 40 & the curled
ring calyx tatted with silk thread doubled up.
Made with 2
silk threads in shaded green.
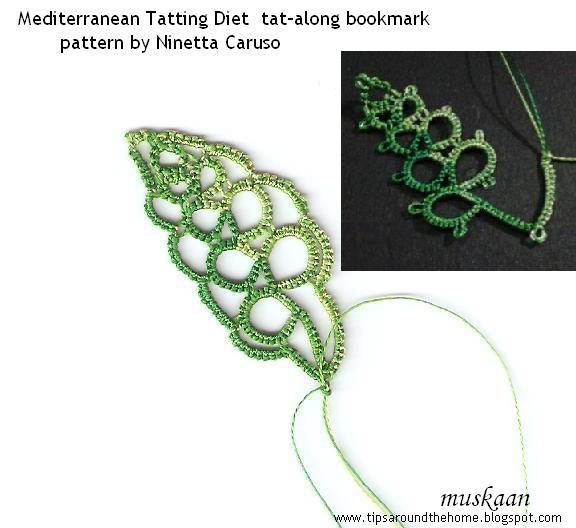
What I did for Leaf
#1 ...
- Instead of using a pin/clip to hold picot, small picot & direct tatting (reverse stitch) of chain;
- Slope & Roll join instead of Lock Join in order to avoid colour blips ;
- Pointed chain for tip, but within the reverse stitch ! Then I switched shuttles in order to keep the shade same.
- Instead of LJ, SS at the last ring , I used Reverse Join which automatically does that same job but in one motion.
- Directional tatting throughout, including for split rings.
I Love the fact that there are no ends to hide in the end !!! But I have had to make a knot to keep the silk threads from unraveling.
–Ω–Ω–Ω–Ω–Ω–Ω–Ω–Ω–Ω–Ω–Ω–Ω–
COMMON THREADS
I was going
to do a couple of posts under the heading Common Threads in order to tease out
underlying commonalities between seemingly different techniques or effects.
Details about the topic in a separate post, but it seems appropriate to share
this set here.
So, what does a shoelace knot have in common with a Celtic picot or angular chains ???
So, what does a shoelace knot have in common with a Celtic picot or angular chains ???
SET 1 : Overhand Tie
The
underlying common factor is a regular overhand tie made on the ‘chain’/auxiliary thread
(or the thread that forms the stitches). This set focuses on the similarity of construction,
though it’s applicability and visual effect may be different.
1. Shoelace Trick (SLT) – an overhand tie for
functionality.
It is used to switch shuttles either for colour change or if
thread in one shuttle is running low. Needle tatters use it to close rings
& chains.


The ‘SLT picot’ in above picture served to change colour midway through a chain,
with a small picot added to follow the overall pattern.
2. Celtic Knotted Picot (CKP) by Sabina Carden-Madden (May 2005)
an overhand knot for decorative picots that also provide an extra joining
point.
An overhand tie is made to the ‘ball’ thread for chain or to the ring thread before
starting the ring. But the tie is left slack or on a picot gauge such that a
decorative woven picot is created with 2 joining points. It can be made both on
chains and rings since the core thread remains free.

CKPs both in the inner round as well as outer round, facing opposite direction.
3. Puncetto Knot by Ninetta Caruso (April 2011) and
4. Pointed Chain by Jon Yusoff (June 2011) are basically the same.
a tensioned
overhand tie to create an angular point in a chain.
An overhand tie is made with the ‘chain’ thread or 2nd shuttle, encapsulating
the core thread within, and then tensioning it. One knot each for the 2 half
stitches, thus adding a bit of bulk to the caps to create a visual point. It can only
be made on a chain or mock ring, not on a true ring, since the core thread
becomes locked.
In Puncetto,
by pre-forming a SH2 loop under core thread, & passing SH2 through it,
there is an economy of movement -- the link is accomplished in 'one pass'. This may be easier to do in direct tatting
(wrapped/unflipped/reverse stitch) as in the bookmark leaf above since the shuttles are
already in position.

In this
vintage edging pattern, the inner circle is done as directed in the pattern.
However, for the outer circle, I made the chains pointy
& suddenly the
pattern seemed to acquire character :-)
BUT
there is one major difference between the techniques listed in this set.
Can you spot that when you compare the tutorials ?
scroll down further for the answer
scroll down further for the answer
Update : Set 1 of Common Threads has been renamed ‘Overhand Tie’ (instead of overhand knot) after a discussion on Craftree. Two ties in succession create a knot. A knot conjures up the image of something that has been tightened, whereas a tie is like a ‘half-knot’ with slack that can be loosened easily if required.
happy tatting :-)
& Round 4
ANSWER : The overhand tie for SLT is made by overlapping both the threads ; the knots for CKP, Puncetto knot & Pointed chain are made using only one thread. In CKP, there is no encapsulation of other thread ; in the other two, there is encapsulation of core thread.
Oh I was thinking, as I read other blogs with Renulek's doily, some of the women felt that the tiny ring and threads were not even and wondering if we should mention that with rings you and carefully tug on them to straighten them up. Do you know what I mean? where the thread seem to tighten more on one side when pulled closed. I like the vintage sample demonstration you gave :) and all, very nice.
ReplyDeleteI remember reading that, Carollyn. Luckily I didn't face that problem this time. Could it be that because the rings are so tiny, while starting & closing them there is an uneven length of bare threads? I took extra care to overlap the thread while making the ring loop & that probably helped. Here's a pictorial I had started but didn't upload Part 2 showing how I try to make the ring as close to previous element as possible : http://tipsaroundthehome.blogspot.in/2014/02/tatting-tutorial-closing-gaps-i.html
DeleteYour doily looks fabulous!! :)
ReplyDeleteLove the pieces of your strawberry bookmark!! :)
Great tips!! :)
Love the vintage edging pieces!! :)
Thank you so much, Sue :-) I'm having fun with both tat-alongs. Funnily, I don't want to add colour to the doily !
DeleteThe outer vintage edging was sewn on to a cushion cover .
Your doily is looking wonderful! I agree with you... I just cannot add beads to a bookmark, at least not if it's really going to be used as a bookmark! I also prefer size 40 or finer for a bookmark... too much thickness with 20 or 10. Thanks for sharing your tips. I'm thinking of printing out my personal copy of muskaan's T*I*P*S when I retire just so I can flip through and reference all that I've learned from you!
ReplyDeleteSize 40 is quite addictive & so delicately lacy! Diane, I don't have a single printed page of my own tips & have to reference them online or on my computer files ! Haven't gotten around to wasting ink & paper for my own work yet, tho' hubby keeps telling me to ... ;-P
DeleteGreat post! I too cannot put beads on a bookmark. Nor can I starch a bookmark. So, I rarely end up with a bookmark in my books! They tend to take up residence in a picture frame or part of a collection on a shelf.
ReplyDeleteHappy tatting on the next round of the doily.
Thanks, Mel :-) So far I haven't had to starch any of my bookmarks, and am replacing all my other bookmarks with tatted ones . Ambitious project, but gives me an excuse ;-)
DeleteGreat post, love your strawberries. Love watching your doily grow.
ReplyDeleteThanks, Bernice :-)
DeleteInteresting post, love your strawberrys, and your mat is growing nicely
ReplyDeleteMargaret
Thanks, Margaret :-)
DeleteLove the pointy flower petals in your last doily! :-)
ReplyDeleteGreat post, muskaan! Love the leaf and the strawberries. I like the points.
ReplyDeleteThank you Grace & Susan :-) I agree about the pointed version !
ReplyDelete