Showing posts with label quick tips. Show all posts

Wednesday, 15 April 2026

literally out of the box

Pin It now!

and functioning as a threader holder! Why didn't I think of this solution ages ago?! Here's the full story ...

Going back a few weeks, Anita showed me a vintage edging she had picked up at a thrift store. A single shuttle trefoil/clover edging with a curious way of joining the rings. It looked so good, too. Thought I'd work a sample but somehow I let my shuttle take over and ended up with this medallion.

Now I wasn't in the mood to use a picot gauge despite having a few handmade folded picot gauges, which is why the bare thread spaces are not perfect.

Nevertheless the highlight of this medallion is the little twist at the base of each ring. 

All I am doing is attempting to make a 1st half-stitch (ie. bringing the thread from Under the previous thread) without actually transferring or flipping it. This leads to all that twisting. One has to be careful with it. As you can see, the stitch is not tensioned and snugged completely since I wanted a loose twist. 
There is ample scope to play around with the effect, adding more half-stitches, etc.

It then reminded me of something that Ninetta had done. Turns out she used a lock join to simulate a twist in this vintage motif here - https://ninettacaruso.blogspot.com/2020/08/locked-in-old-corner.html - from Emmy Liebert's 1916 book.

So coming back to the problem that was awaiting a solution. I whip stitch tail ends using tapestry needles and a threader to thread the needle. The latter is kept in a different box within the larger project box. I wanted a way to have both the needle container and the threader to be together - pick them up in one go. Didn't want to use tape; couldn't use a magnet; couldn't glue it down for obvious reasons. 

This medallion which happened to lie over the circular box struck me as the perfect solution. I glued it down with a spot of glue at 3 points, that's it! 

Being so open and airy, the threader easily slips through any space yet stays put! And no fear of the wire being bent or getting caught anywhere. A safe haven!
Anita called this the Threader Keeper!!! Now she's one to think out of the box and guess it is rubbing off on me, LOL.

Oh, and I am submitting this BTS medallion (my 5th submission) for Natalie Rogers' Picot Bingo 2026 Level 2, crossing out one box -  
  • Use Bare Thread Space. 

Thursday, 16 May 2024

a simple solution

Pin It now!
 A month back, Ines-Carmen Wischniewski asked for help in a FB group. She wanted to load seed beads on an existing picot but her crochet hook was too large for the small beads. She received answers and finally this is what she came up with.... Sharing with her gracious permission.

1. The Objective - To add seed beads on the long chain picots (in the lace below). 

2. The Dilemma - Size mismatch or tools lacking. Beads are smaller or thread is thicker. 


I use the following methods whichever works for the project in hand --
  • My go-to is using a fine crochet hook obviously.
  • If possible, I use this threader which I showed here - https://tipsaroundthehome.blogspot.com/2017/07/productive-designs.html
  •  And when both these fail, I use the finest tapestry needle threaded with sewing thread. After inserting the needle through the picot, I tie the thread in a simple, slim knot. Then needle the beads and pass them over the picot. Then snip off the thread near the knot and reuse. This is very effective, but a bit cumbersome. Hence you can imagine my excitement at seeing this easy threader hack!

3. The Hacked Threader - Ines-Carmen solved her dilemma by cutting the wire threader on one side. In the photo 3 beads are loaded on the wire.

4. The Hook - The cut portion of the wire acts like a crochet hook to snag the picot. The beads are moved over this 'hook' towards the picot.

5. The Transfer - The 3 beads are then transferred on to the picot, leaving the threader 'hook' free to be removed.

6. Continue - The join is made to the beaded picot and tatting continues. Notice the hacked threader lying on the side.

I remember buying a beading wire with some findings a few years back, hoping to use it to thread beads. It turned out to be too thick for the purpose. Threader wires are fine, hence work nicely. 

The Backstory - This is where it all started. A simple insertion which Ines-Carmen thought to convert to 3D. But there were no picots. So she had this idea to sew the edges at intervals and cover the thread with bead(s). Since it worked, she decided to tat a real model but encountered the above dilemma and then found the solution! 
See the transformation into 3D earrings in this mini video - https://drive.google.com/file/d/1HmAwUzaskmukA3_gxsYVSAPjplm2NV66/view

There is always a new or different way to do things! You never know what might work or be a better option. I have a couple of projects lined up where I can use this in the near future. Also, it does not necessarily have to be beads on a picot. We can use it to add a free bead wherever required during the work in progress. 

Many many thanks to Ines-Carmen for sharing

Sunday, 30 January 2022

who knew

Pin It now!

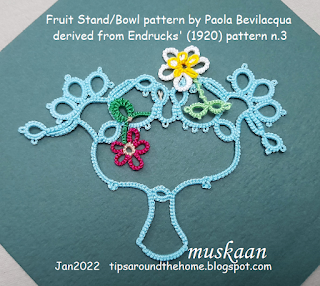
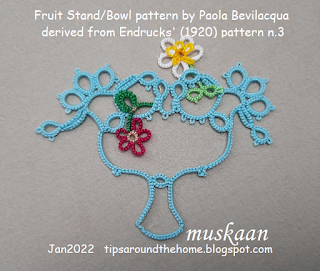
 ... who knew a fruit stand or fruit bowl would emerge from an edging pattern! Who knows what a designer's imaginative eye can see?!

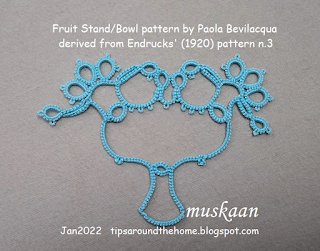
Endrucks' n.3 edging pattern gave rise to 2 square motifs and now the seed has sprouted a fruit bowl, thanks to Paola Bevilacqua. Recently she shared her prototype, with sketched pattern, in our Endrucks 1920 Project Facebook group and the very next day she tweaked the count and posted a beautiful new version with modified count, in stepwise pics and diagram. It immediately caught my fancy and I quickly tatted it up.

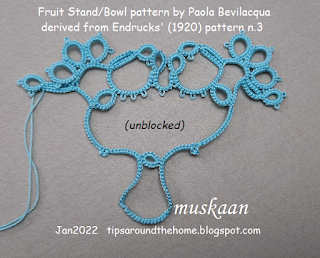
This is fresh off my shuttles, unblocked. And I was trying not to snug the chain stitches too tightly, resulting in uneven lengths on either side. Lesson re-learned: snug tightly; you are no good with loose tension ;-P Or, apply Anita's tip to measure the chain but using a grid paper background to assess the curve as well.
As I worked the motif, so many minor details emerged making me truly appreciate the thought Paola put in!

My Thoughts/Notes -
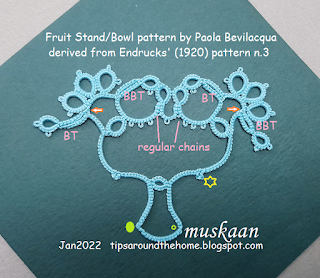
1. I started at the leftmost single ring.

2. Techniques: 2 shuttle tatting, fs/bs tatting, thrown/floating rings, changing the direction of a chain, inward picot, lock join, mock ring using a lock join.

(refer to pic below)
3. Inward picot - the orange arrows show where I used a folded chain to flip a picot down - set-a (picot, 2fhs) and set-b (2shs, p) because I wanted a bit of space before the thrown ring. At other places I used a paper clip.

4. There are 3 types of paired chains! 
    BT: worked as block tatting - parallel chains where the new chain lies above the previous one and a lock join is made through picot; 
    BBT: worked as block below tatting - parallel chains where the new chain lies below the previous one and is joined normally through an inwards picot;
    regular chains: where the stitches face each other and the chains are joined normally. Now here's an idea for yet another Block Tatting effect !!!
5. Tiny Mock Ring -The yellow star is another important designer detail. This is a 3ds chain lock joined at the base to form a mock ring. Now if it was a SCMR, we would've had a clear point/break/dip in the chain's inner edge. By using a lock join, the picot creates a kind of continuum with barely a break in the inner edge!
I should add small mock ring to my Mock Ring series since the visual effect is different from that of  larger mock rings

6. Pointed Chain - The small green ring is where I tried to make a 1ds SCMR to create a point, and failed miserably, forgetting that the chain turns course at that point. 
Hence I followed Paola's example for the left one, switching shuttles and reversing/turning work to continue. The point is more marked here. 

In Anchor size 20, it measures 10.5cm x >7cm at the extremes. I rummaged and found these 2 daisy picot flowers to add some colour and density. When I tat this again, I'd like to add lots more colour and picots for a bowl of flowers, and/or strategically placed beads to enhance the effect! 
It could well be a trophy, too, right?!
This is very appealing to applique or glue to a card topper. Otherwise it needs stiffening to hold it's shape. Of course the bowl outline can be padded tatting (either BDS or inserting extra core thread). Perhaps some graduated treble tatting, too, especially at the base!

Many many thanks, Paola, for stretching the boundaries!

Please don't go by my sub-par model.... once we have her permission, we can put her model and pattern in our Project doc here -

Sunday, 12 December 2021

inward picot with marker

Pin It now! Often a picot is required on the core thread. But when the core thread is pulled to snug stitches, the 'picot' would disappear! In order to hold this picot in place till we need it for joining, a temporary marker or holder is inserted in a loop of the core thread. Most common is the paper clip, but coil-less safety pin, scrap thread, stitch marker, etc, are also employed.

TIP: Always remember that the thickness of the marker/holder will affect the size of the picot formed. Hence choose a marker carefully.

This is a common enough picot and you must have your own method down pat. But if I am not careful mine turn out to be fiddly to handle (with marker getting in the way) and untidy or twisty. Yet this method gives the best visual result. So here's what I do to keep the inward picot tiny and neat ---

Inward Facing Picot in normal tatting –

1. Pull a longish loop of the core thread. Make the first DS. Then insert marker.
https://tipsaroundthehome.blogspot.com/2016/07/double-duty-due-to-delegated-dusting.html
2. Continue to tat at least 2 to 4 stitches, before snugging the stitches and closing the loop.

Advantages –
  1. Avoids any gapsosis in the knotting/chain thread, keeping the stitch before and after the picot close together.
  2. The picot on the core thread remains tiny or the required size.
  3. No twisting of chain/element.
  4. The marker does not get in the way of working.
2 motifs/repeats have been worked above....
...and when it is time to join, remove the paperclip and join through that tiny loop, taking care to not let it slide and hide! A crochet hook is handy.

Inward-facing picots in direct tatting
 – 

For direct tatted chains, where reverse (unflipped) stitches are worked, Ninetta demonstrates how she twists the marker to hold the picot in place. https://youtu.be/d02yb-cKSLI 
This twist makes it easier to hold the picot and work unhindered.

TIP: It is important to realise that this twist adds some length to the picot. Hence choose a marker that is finer than the required picot size.
        Alternate solution: Once all stitches are completed in that chain, untwist the marker and pull the core thread taut. This will bring the picot to desired size.

We can actually use this twist for the normally tatted chain, too, instead of leaving the loop long as photographed above. And when it is time to snug, untwist and remove slack from the core thread.


There are many other ways to make such inward, downward, starter, or drop picots (https://ninettacaruso.blogspot.com/2017/10/fun-or-fan-in-direct-tatting.html). Since the most common is using a paperclip the above tips are limited to markers. 
This post is in response to a recently raised query. 

Wednesday, 22 September 2021

go round once

Pin It now!

 I don't like such long periods of silence in my blog! So here's a quick peek into how I tat 

Like many tatters, I have an individual way of tatting and of all the videos I've watched so far, none comes close. Some day I might make a video to show my tatting hold and movements, but here's one uploaded by Beth Vawter - https://youtu.be/Q23FakixLp0.  I, too, follow my knitting style for both crochet and tatting! 

In answer to a query, I had shared these 2 pics in Craftree many years back showing how I wrap the ball/knotting thread only once around my pinky when tatting a chain! 

On rare occasions when I cannot get the required tension, I wrap it twice (below). The spacing out is deliberate to illustrate the wrap clearly.

But watch the initial portion of Beth's video to get the correct picture.
I find this very comfortable and those who have arthritis might find it similarly comfortable. My pinky has never to date been starved of blood or felt tired 😁 and I save time by that single wrap.

For crochet I was taught to wrap thread multiple times around my index finger and it used to put me off because the blood supply would be hampered. Until I used my knitting wrap around pinky and now I don't mind crocheting!

Do you wrap thread multiple times around the pinky or just once, when tatting?

Monday, 5 July 2021

continuous paths

Pin It now!

There are some lovely doilies in Endrucks' book, all worked in one pass. What I find, though, is that unlike her straight lace patterns, the circular doilies tend to either ruffle or cup, and some tweaking of count is required. I think it is a matter of individual tatting tension?

Another thing I've noticed is that perle cotton (as in the one above) is more forgiving than mercerised cotton which makes sense due to the difference in their twist. The tight twist of mercerised cotton thread tends to keep the lace stiffer and less flexible. 
Despite all the colours in the mandala, false CTM gave me a sense of continuous tatting. However, for the Endrucks 1920 Project, I needed to tat a model that could be more easily shared in modern style which is why I chose this pistachio green in Anchor size 20. It is tatted in one pass using mock picots, split chains, and split rings to climb out. 
Above I have traced the 'modern' path of climbing out of rounds (in blue). For this to work smoothly, I had to work a couple of rounds counterclockwise. The orange path shows how Frau Endrucks moved to the next round - simply add another chain(s) till you reach the point where you can climb out! 
UPDATE: I  have coined the term 'SHADOW CHAIN' for this extra chain(s) used to climb out to the next round, row, or motif, thus enabling continuous tatting.
No need to learn any techniques, and the direction of each round remains unchanged. But as seen above, it does add extra chains along the path....something which 21st century tatters may not like. Although in fine threads, it may pass inspection, and clearly speed up tatting.

UPDATE: Pattern for this doily is uploaded, showing both methods of climbing out - https://drive.google.com/file/d/1vG2g0JCVsy8cy2DfGKHEhxleq_7Rveba/view

 
Since the first few rounds can be worked off a shuttle and ball, I used my earlier tip about extending the thread between 2 shuttles. All the extra thread in left pic was wound on to the ball temporarily, till it got used up and the 2nd shuttle was needed.
Of course, one can simply keep shuttle 1 and ball thread continuous and tat till the 2nd shuttle is needed. At that point, pull out the length required, cut from ball, and wind up shuttle2.

There was a lot of ruffling in the green model, despite adding a few stitches to a later round. So I started another in tinted Anchor size 20, with modified stitch count. Worked beautifully and lay flat. The 3rd round does ruffle till the 4th round is added, but this is a structural problem.
Ran out of thread after 5 rounds, hence added a bold violet shade to add a spot of colour. I kinda like it - what do you think?
I am busy with pattern #17, hence this pattern pdf will have to wait a bit. However, for those who'd like to try it right away, you can find the written instructions and tips by Georgia here.

This is Pattern #28 from Schiffchen-Spitzen 1920 by Eleonore Endrucks-Leichtenstern. You can find all the links in the Endrucks 1920 Project doc here along with all other patterns in modern format. We are hoping to have all of Endrucks' patterns in modern format by this November - a year from when we started. 

Friday, 2 July 2021

luscious lychees

Pin It now!

 The male of the human species can be quite the baby when it comes to eating berries or peeling fruits! They much rather not eat such fruit. At least the specimens around me show these symptoms, sigh. So as a good housewife I have to find ways to keep my sanity .... errrrr, keep fruits fresh for longer and also to serve them with least amount of effort to both genders.

So here's how I store and peel lychees.....thankfully, I no longer have to deseed and slice away the pulp. My specimen has been tamed a bit ;-P
After several different ways, here's the one that works foolproof for me (the batch above had been bought and stored 4 days before taking these pics and one helping already served)

1. Do not cut away the twigs and leaves... keep the lychees attached. 

2. Put the entire bundle in a cotton bag and wrap nicely. 

TIP : I use old cotton pillows, folded and sewn along the sides to give me an open bag with double cloth layers. These are ideal to store select fruits and veggies. My MIL handed me her spare new cotton pillow covers for use, like the one photographed ;-D 

3. Place inside any air-tight container, be it a zip lock pouch or lidded container, and refrigerate.
The berries stay fresh easily for 10 or more days! 

Now comes the serving and eating part where the male specimen cannot be bothered! 
4. Break the berries from their stems, rinse, and soak in clean water for a couple of minutes. With your bare fingers, simply tug the stub and start peeling. Voila, the hard dry skin has softened and peels off smoothly. 
Gone are the days when I used to struggle to peel the skin in small bits and pieces.

Notice the new batch of pre-soaked almonds in the bottle?

Lychees served with cherries and soaked almonds. The condensation is still visible on the cherries! That's how quick this entire exercise was.

Other berries such as cherries and Indian blackberries (jamun), strawberries, too, are best stored in similar fashion. Line a container with paper towel5/napkins or cotton cloth, place the cherries, cover with another sheet of paper napkin, then close lid and refrigerate. They stay fresh for days.

Friday, 25 June 2021

fumble fingers

Pin It now!

 I swear if you watch me do beaded tatting you will forget how to tat with beads! My fervent wish is that a beading friend sit beside me and help me use the tools and materials I have effectively and efficiently. I simply fumble my way through, taking a ginormous amount of time even for simple patterns. And nothing comes simpler than this earring pattern!

Remember I told you about receiving many gift patterns around ITD this year? This simple one-shuttle earring pattern is a special gift from Jill McLean! Here is my journey ....

1. My first trials with new metallic thread (Natvarlal brand) failed. The single thread broke soon after starting my 1st attempt. 
So I used 2 threads above, but while closing the ring, one thread broke. Had to be abandoned.

2. Played safe on my next trial, using size 20 metallic thread.  
My only variation was using 2 different coloured beads. The yellow ones (up beads) went around the hand on the ring loop, while the blue ones (down beads) were pulled from the shuttle. 
Stringing beads didn't require too many brain cells - load all of one colour, then all of the other!
TIP : One can work the small ring as a SSSR hiding the tail without any sewing! (Miranda pictorial ; Marilee video)

3. Friends urged me to use my silk threads. So here's one Opella silk skein (all 6 strands) along with faceted bicone crystals in 2 colours - the inner green are a tad smaller than the outer silver crystals. 
I used metallic silver thread to make jump rings for the 2 teardrops. Huh, they don't look too bad in the pic, but I had a tough time getting them into shape, especially doubled up. 
Here the large ring took patience while closing - had to slide the stitches to the left in batches till the ring finally closed. 
This time the small ring on top is a split ring, sewing in tails on either side after making an overhand tie. 
TIP : But there's a way to end on a SR without sewing, too.

4. How would it look if the size of beads was inverted? So, large black wooden beads on the inside and small seed beads (17/0) on the outside! 4 seed beads per wooden bead. 
This time I decided to make a mock ring and was going to make onion rings, but switched to a red Swarovski crystal surrounded by seed beads instead. Both used Floating Beads methods.
The black beads are strung through 5 strands of Anchor silk thread on shuttle1; and silver metallic thread with seed beads on shuttle2. 
My idea was to have the red colour show up in the stitches between the black beads. How wrong was I! Unless I used reverse (unflipped) stitches, the red is hidden. Felt like a fool, but didn't feel like undoing the first few stitches, so continued.
QUICK TIP : Tatting with Metallic thread 
This metallic thread is pretty much a wire with silver thread wrapped around it and it was difficult to get a flipped stitch, especially the first half stitch.... till I hit upon a little movement!
1. Floating beads at the start, and an open chain in progress which will be joined back into a mock ring using a lock join.
2. Making the 1st half stitch. The silk thread does not have enough strength to make the metallic thread flip. With any free finger/thumb, gently push the loop indicated by arrow ... push it upwards and it's a Flip!!!
[The inset shows how direct tatting would've worked.]
3. And there it is - the 1st hs. The 2nd half stitch poses no problem. 

And that's it for now. Other ideas percolating in my head will have to wait for another day.
Isn't it amazing how simple variations and combinations can create a range of effects?!
Design TIP : The size of the down/inner bead, besides the size of thread used, affects the size of the earring as is evident above. The up beads do not affect size of ring. 
The double layer of beads adds stability of shape and structure, besides the visual effect.
And this is such an easy but versatile pattern that one can make a pair for every dress!

Many many thanks, Jill, for your gracious, exciting, and enjoyable gift ...
made me push my beading boundaries 💖