Showing posts with label BBT. Show all posts

Sunday, 30 January 2022

who knew

Pin It now!

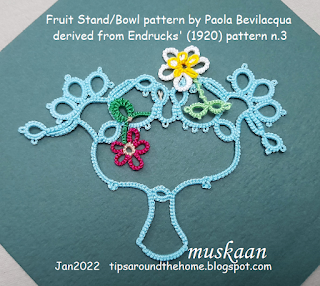
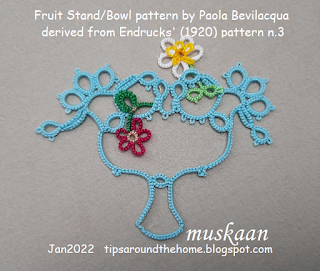
 ... who knew a fruit stand or fruit bowl would emerge from an edging pattern! Who knows what a designer's imaginative eye can see?!

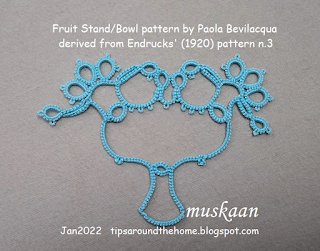
Endrucks' n.3 edging pattern gave rise to 2 square motifs and now the seed has sprouted a fruit bowl, thanks to Paola Bevilacqua. Recently she shared her prototype, with sketched pattern, in our Endrucks 1920 Project Facebook group and the very next day she tweaked the count and posted a beautiful new version with modified count, in stepwise pics and diagram. It immediately caught my fancy and I quickly tatted it up.

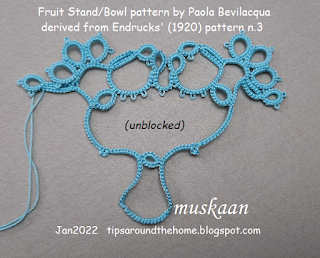
This is fresh off my shuttles, unblocked. And I was trying not to snug the chain stitches too tightly, resulting in uneven lengths on either side. Lesson re-learned: snug tightly; you are no good with loose tension ;-P Or, apply Anita's tip to measure the chain but using a grid paper background to assess the curve as well.
As I worked the motif, so many minor details emerged making me truly appreciate the thought Paola put in!

My Thoughts/Notes -
1. I started at the leftmost single ring.

2. Techniques: 2 shuttle tatting, fs/bs tatting, thrown/floating rings, changing the direction of a chain, inward picot, lock join, mock ring using a lock join.

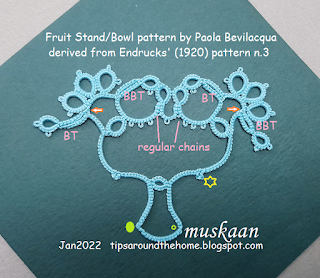
(refer to pic below)
3. Inward picot - the orange arrows show where I used a folded chain to flip a picot down - set-a (picot, 2fhs) and set-b (2shs, p) because I wanted a bit of space before the thrown ring. At other places I used a paper clip.

4. There are 3 types of paired chains
    BTworked as block tatting - parallel chains where the new chain lies above the previous one and a lock join is made through picot; 
    BBT: worked as block below tatting - parallel chains where the new chain lies below the previous one and is joined normally through an inwards picot;
    regular chains: where the stitches face each other and the chains are joined normally. Now here's an idea for yet another Block Tatting effect !!!
5. Tiny Mock Ring -The yellow star is another important designer detail. This is a 3ds chain lock joined at the base to form a mock ring. Now if it was a SCMR, we would've had a clear point/break/dip in the chain's inner edge. By using a lock join, the picot creates a kind of continuum with barely a break in the inner edge!
I should add small mock ring to my Mock Ring series since the visual effect is different from that of  larger mock rings

6. Pointed Chain - The small green ring is where I tried to make a 1ds SCMR to create a point, and failed miserably, forgetting that the chain turns course at that point. 
Hence I followed Paola's example for the left one, switching shuttles and reversing/turning work to continue. The point is more marked here. 

In Anchor size 20, it measures 10.5cm x >7cm at the extremes. I rummaged and found these 2 daisy picot flowers to add some colour and density. When I tat this again, I'd like to add lots more colour and picots for a bowl of flowers, and/or strategically placed beads to enhance the effect! 
It could well be a trophy, too, right?!
This is very appealing to applique or glue to a card topper. Otherwise it needs stiffening to hold it's shape. Of course the bowl outline can be padded tatting (either BDS or inserting extra core thread). Perhaps some graduated treble tatting, too, especially at the base!

Many many thanks, Paola, for stretching the boundaries!

Please don't go by my sub-par model.... once we have her permission, we can put her model and pattern in our Project doc here -

Sunday, 12 December 2021

inward picot with marker

Pin It now! Often a picot is required on the core thread. But when the core thread is pulled to snug stitches, the 'picot' would disappear! In order to hold this picot in place till we need it for joining, a temporary marker or holder is inserted in a loop of the core thread. Most common is the paper clip, but coil-less safety pin, scrap thread, stitch marker, etc, are also employed.

TIP: Always remember that the thickness of the marker/holder will affect the size of the picot formed. Hence choose a marker carefully.

This is a common enough picot and you must have your own method down pat. But if I am not careful mine turn out to be fiddly to handle (with marker getting in the way) and untidy or twisty. Yet this method gives the best visual result. So here's what I do to keep the inward picot tiny and neat ---

Inward Facing Picot in normal tatting –

1. Pull a longish loop of the core thread. Make the first DS. Then insert marker.
https://tipsaroundthehome.blogspot.com/2016/07/double-duty-due-to-delegated-dusting.html
2. Continue to tat at least 2 to 4 stitches, before snugging the stitches and closing the loop.

Advantages –
  1. Avoids any gapsosis in the knotting/chain thread, keeping the stitch before and after the picot close together.
  2. The picot on the core thread remains tiny or the required size.
  3. No twisting of chain/element.
  4. The marker does not get in the way of working.
2 motifs/repeats have been worked above....
...and when it is time to join, remove the paperclip and join through that tiny loop, taking care to not let it slide and hide! A crochet hook is handy.

Inward-facing picots in direct tatting
 – 

For direct tatted chains, where reverse (unflipped) stitches are worked, Ninetta demonstrates how she twists the marker to hold the picot in place. https://youtu.be/d02yb-cKSLI 
This twist makes it easier to hold the picot and work unhindered.

TIP: It is important to realise that this twist adds some length to the picot. Hence choose a marker that is finer than the required picot size.
        Alternate solution: Once all stitches are completed in that chain, untwist the marker and pull the core thread taut. This will bring the picot to desired size.

We can actually use this twist for the normally tatted chain, too, instead of leaving the loop long as photographed above. And when it is time to snug, untwist and remove slack from the core thread.


There are many other ways to make such inward, downward, starter, or drop picots (https://ninettacaruso.blogspot.com/2017/10/fun-or-fan-in-direct-tatting.html). Since the most common is using a paperclip the above tips are limited to markers. 
This post is in response to a recently raised query. 

Wednesday, 3 November 2021

a trip to the beach

Pin It now!

Reworked patterns, in modern style, from Frau Eleonore Endrucks-Leichtenstern’s ‘Die Schiffchen-Spitzen’, 1920, for Endrucks 1920 Project.

This pattern #39 fell into my lap and it has such a range of possible effects to play with that one cannot get easily bored. Despite my resolve to not play, temptation triumphed. So come to the beach with me and let's pick up shells, pearls, oysters, and more ..... (not in chronological order)

Download Shells and Pearls pattern #39 herehttps://drive.google.com/file/d/179E9JeCMeM7RXFcq-wThF0iPiBLfQZ4_/view

Made of 2 alternating motifs, the tiny ring reminded me of a pearl between shells and called it Shells and Pearls circular edging. I broadened the shells a tad. 

Now this is how the edging should've worked out - a straight line, not a circle! But notice the picots and loose chains? We really don't tat like this in this century. 

The tautness and smaller picots resulted in a circle. There are a few more minor tweaks made, all listed in the pdf.
Notice the cute little bows? If we tat these in one colour and use white for the alternating motif (a narrower shell), we get Bows and Cravats!  

And yet, I could not resist straightening out the edging - after all that's how the Frau envisioned it. Unfortunately tweaks were needed again, at least with my tatting tension. These are also shared in the pdf.
These are all my practice pieces where I was trying out the original pattern and also tweaking to get them to be as symmetrical as possible. And I couldn't resist arranging them like a necklace with teardrop crystals. Imagine this with many more beads placed strategically!
A single shell motif could make cute earrings to pair with a complete parure made from this basic pattern!

Or a simpler necklace version with a large teardrop and those small pearls. 
Using 2 colours for a pattern presentation makes sense because one can tell at a glance which of the 2 shuttles is to be held in the hand. And I get to play with colour combinations, LOL.

And when I brought the trial stretch into a tight circle, look what emerged! A Buttercup! Those shells (or cravats) now take the form of beautiful slightly overlapping petals. An easy idea to execute in colours of your choice for the flower of your choice.

This close-up shows clearly how the shell motif leans to one side. This happens because the chains are all parallel as in block tatting. It is an inherent structural dilemma. 
From an early stage I wanted to see if it could be 'corrected' by changing the direction of the 3rd pair of chains. Also, I wanted to try a standalone 3D shell. So I took the plunge with both....

If you ignore my personal tatting flaws, the shell is now symmetrical! The 3rd pair of chains has inward picots (Block Below Tatting or BBT). They should've been tinier, but oh well. 
This is my first tatting with hand-dyed thread (HDT) - a gift from Denise 3 years back. It seemed the perfect choice with the colours of golden sand, blue waves, purple-tinged clams, green kelp, etc. and I dived in.
Huh, a clean dive would've been good. But that short distance held many other commitments and the tatting was sporadic with several day intervals in between. Not having jotted any notes, I lost my trend of thought and made several mistakes. The 3D effect needs more tweaking so this is a prototype.
That large pearl inside is a real pearl from Hyderabad - the pearl capital of India.

So here ends our trip to the beach for now. Someday I will get back to both 3D models (buttercup and oyster) to create better version. Hope some of the above ideas have caught your attention?

And don't forget to visit the Endrucks 1920 Project document to see what our wonderfully talented volunteers have contributed - https://docs.google.com/document/d/17LEVftXweztBIOWh4sL4BB7bX65ssoOsOn4oXIgCepY/view

Wednesday, 29 September 2021

stepping stones

Pin It now!

Life’s paths are strewn with numerous types of stones. Whether we use them as stepping stones is what matters.

Grazia Butterflies (with pattern) from Endrucks' #16

Pina Pinto stepped up thrice, choosing 4 patterns and then a 5th when one of our volunteers opted out, tatting with speed, enthusiasm and sending in-progress pictures. Oh yes, we can safely say that she became addicted, working not just the samplers but also derivatives and adaptations!

Ninetta and I stepped in to handle the presentations, which Pina was not equipped for. Not an easy task, I tell you. When you are doing it from scratch, you can decide where and when and how each step or section would be. Having to work with and work around another tatter's pics and visualization can be an onerous task as both Nin and I can attest. Especially considering some of these elaborate patterns are not easy to portray.

In the end each of the 5 patterns turned into a triumvirate of collaborative effort!

We thanked Pina for her first 3 reworkings of patterns 9, 15, & 16 here - https://ninettacaruso.blogspot.com/2021/03/crab-or-candle-holder.html . Since then, she adapted n.9 into a pendant and beaded her blue earrings from a motif extracted from n.16.
  

But the clincher is this gorgeous 3D butterfly she named after her mother, Grazia, also extracted from n.16. Ninetta has done a wonderful job in presenting the butterfly pattern despite the many travails and tribulations. I hope that effort bears fruit when we see colourful Grazia butterflies taking flight from shuttles around the globe.

After quickly completing her first 2 selections, Pina was thirsty for more! She encountered some trouble understanding pattern #17. It has been a revelation that despite the diagrams and textual pattern, many tatters have been looking at Endrucks’ tatted model and counting off the stitches. I drew the entire pattern by hand, taking and sending her stepwise pics. She sent back progress and final sampler pics.
Pina worked it as a bilaterally symmetrical model which entailed block below tatting (BBT) where the blocks are worked in opposite direction (below previous chains) requiring picots on the core thread. For a visual comparison, see https://tipsaroundthehome.blogspot.com/2021/07/a-pernickety-question.html.

Both options are included in the pattern pdf.
Endrucks n.17 - https://drive.google.com/file/d/1sStHg5IQmuwizC7QcKRaX951CvVoURbn/view (with cornered frame pattern included)
It has taken me close to a year after multiple interruptions (life’s stones!), frustration and apologies to complete the pdf to our satisfaction, doctoring a few of Pina’s pics to fit seamlessly. I also had to resort to tatting a sampler myself in order to get everything straight. Happily, this led to many lovely derivations – the earrings, edging, snowflake, cornered frame (pattern included in this pdf). [There will be a separate post on some surprising design possibilities of n.17. Derivative patterns from n.17 shared or in the works - earrings ; edging/insertion/bookmark ; snowflake].

This is what my partner, Ninetta says -

The patterns Pina chose, especially the n.17, still intimidates me, Muskaan wrote "these patterns are elaborate", I think elaborate is an euphemism.

In previous pattern 9, 15 and 16, Pina used the BBT and at the time of my post (13 March) we hadn't "coined" the acronym yet (and I think that in 15 I even didn't notice it, but it's there, in Pina's sample). She has been particularly accurate in tatting these patterns using strict symmetry, even if in the original models there is only BT in the traditional way. The "strict Eleonore" has been beaten in strictness! LOL!

Then, in the butterfly "Grazia", she showed off all her skill in that BBT technique. I had trouble and definitely I don't like tatting BBT, but in all honesty I had to prepare the document respecting Pina's design. It took me many errors and trials before I got acceptable stepwise pics... but I hadn't finished yet, because the instructions were cumbersome and I didn't know how to write them. Luckily, Muskaan stepped in to rescue me, in two ways: one directly, correcting my mistakes in more than one draft I sent her, and the second indirectly, with her blog post "a pernickety question". Just after I'd finished reading your post, dear Muskaan, I started calling it BBT!

  
Endrucks n.20 - https://drive.google.com/file/d/1BF_4mbN8xDAhBb3lTyVBd3plPcEhUGDZ/view (with 2 corners, colour alternatives, etc.)with 2 corners, colour alternatives, etc.)

And then the n.20 arrived... I got only the bracelet pictures from Pina and had to prepare the document. I needed to understand the pattern, first of all. But, as soon as I tatted the first chain, I saw possible variations in the pattern! That's how the yellow and green insertion started. I really fell in love with the n.20 and visualised very many different adaptations and derivative models and I felt despair that I had not the time to tat them all! (ah, Nin, you echo my thoughts!)


Two corners later, I had the Purple Dandelion Garland and a document of more than 20 pages!!! My dearest friend Muskaan helped to rationalise, shorten, clean up, improve... her contribution to the n.20 doc was decisive. And finally pages went down from 20 to 10, yet respecting all versions and variations and Pina's too! Phew!

The basic pattern is fairly simple and fits in one page. But including off-shoot patterns and options takes up pages but we have more goodies to play with! And perhaps more rounds in the garland, too!

Pina has been a reliable and gracious contributor despite our mutual linguistic limitations. She has now shown interest in learning how to present pdfs! This is her level of enthusiasm, commitment and passion for our favourite lace form! We thank you once again, dear Pina, for making our life temporarily frustrating but eternally happy and hope to see many more adaptations from you over time.

Pina shares a bit about her tatting journey -

Qualche tempo fa, ho dovuto allontanarmi da casa per lavoro. La mia amica e vicina di casa, Giulia, mi consigliò di imparare il chiacchierino, mi diceva: "La mente e le mani devono essere sempre impegnate!" Così ho iniziato e in breve tempo mi sono appassionata. I miei preferiti sono i gioielli e i fiocchi di neve, per farli rubo ogni minuto libero dalle faccende e dal lavoro! Sono entusiasta del chiacchierino e sono in continua ricerca per imparare tecniche nuove.

Some time ago, I had to leave home for work. My friend and neighbor, Giulia, advised me to learn to tat, she told me: "Your mind and your hands must always be busy!" So I started and in a short time I got hooked. My favorites are jewels and snowflakes, to make them I steal every minute free from chores and work! I am enthusiastic about tatting and am constantly looking to learn new techniques. (Google translated)

Look closely – she has inserted an earring hook! She even sent me a beautiful photo of herself wearing another pair of tatted earrings, just as she said above. Because of this old book I have made yet another new friend!

Through the lens of our shared passion, we often don’t see (and show) the underlying stones life throws at each of us. This collaboration embodies that spirit of stepping around stones or using them to fly to our happy destination.

With love and gratitude 
muskaan and Ninetta

**********************
Endrucks 1920 Project is a community project, we welcome every one of you to join in! Please let us know where we can find your renditions and derivative tatting!
We created the hashtag #Endrucks1920Project, so please use it!
We all enjoy sharing and the project is awaiting every one of you!
All info and links (original and modern) are in the Endrucks 1920 Project Document, here:
https://docs.google.com/document/d/17LEVftXweztBIOWh4sL4BB7bX65ssoOsOn4oXIgCepY/view
Remember there are many more modernised patterns, derived and extracted patterns/ideas, already listed in the project document, with still more to come! So, do visit and scroll through.

*********************