Showing posts with label oysters. Show all posts

Monday, 15 July 2024

so many

Pin It now!

 Quite by chance I noticed that this is my 912th post since starting in Dec 2013. So many posts, hmmm, and yet not enough coz there are so many more that haven't yet seen this space. Hopefully in time. Today's post also shows the many potential forms the simple E43 petal from my last post can take. Many of these shapes were suggested by keen observers (listed at the end)! So many eyes :-)))

It is difficult to photograph a 3D model and I truly wish I could've done a better job or taken a video. Nevertheless, ... 

Please Note that in the right colours, with the right number of petals, and if and where the petals are joined, a range of flower impressions can be achieved, besides other shapes. Hence I am calling this a E43 3D Generic Flower. I still need to tat in the stem, pistil, sepals, etc. For pattern details - https://tipsaroundthehome.blogspot.com/2024/07/what-heart-wants.html . I will share the specific petal/flower pattern soon.

In the following, the join is made at the side of petal and at the base.

1. Three petals joined, curved inwards. In the right colours, it could be a spiderwort, a buttercup, a tulip (with unattached petals). And how about a butterfly (2 or 4 petal wings)?!
TIP: When joined, the petals (and flower) hold their shape though each one can be pushed in or out. If left unattached, stiffening or some wire would be needed to hold the petals in place.
2. Two petals facing each other. Could be a flower bud, pendant, fairy light bulbs, or even a strawberry!

3. Two petals could also become a clam shell, oyster with pearl, or a tulip bud. Perhaps even a little gift pouch.

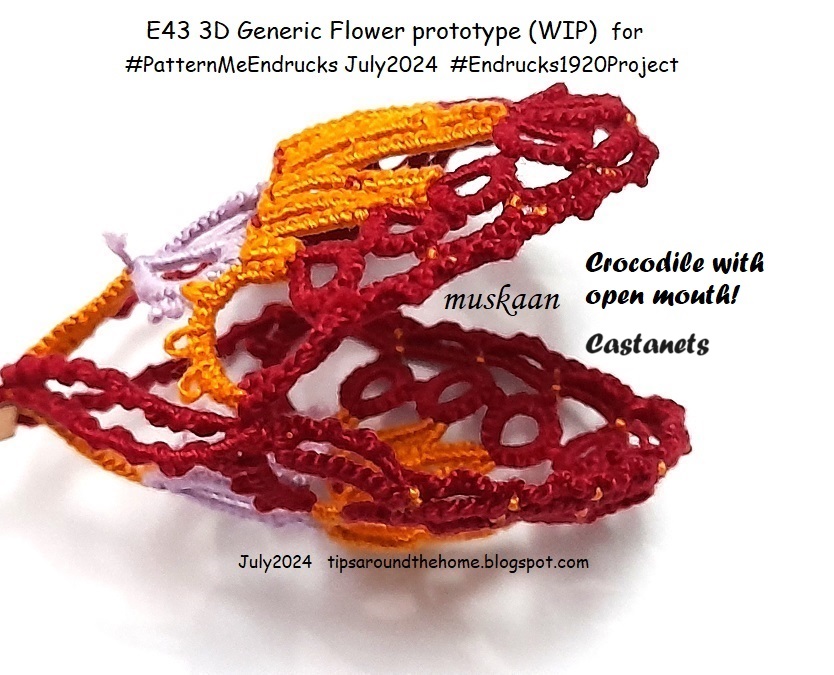
4. Two petals. Now this reminds me of an open-mouthed crocodile. Or castanets? Perhaps even a pair of oven mitts.

5. Two petals, another angle. These pics were taken at night when I was too lazy to get some pearls to insert inside. 

6. This is the 3rd petal. Now the entire flower with any number of petals and joined only at the sides and base, can be tatted in one pass, provided the outermost row is worked in one go at the very end. I had to tat this separately since there wasn't any forethought, LOL.

7. Single petal (#3) without the outermost additional trim around the rings. With beads and gems it would make a lovely pendant or earring.
TIP: For a more rounded tip, remove the middle ring of the trefoil.

8. Three petals joined. Don't you see a butterfly?

9. Three petals joined, facing inward. Same flower, but upended. Could be any number of decorative embellishment or jewellery. Perhaps even a candle decoration at the base.

10. Three petals joined and curved outwards. With the right number and colour of petals, and additional pistils, etc., this really would make a nice hibiscus or petunia.
 
11. And I have to share the lead pic again coz Anita saw this ... 
"This looks like a frightened lady. Can you see her? Her lavender eyes are wide open & picots look like eye lashes, and her orange mouth is open wide, with her orange hair standing straight up.
Or, an Alien. Hmmmm. What’s in my coffee today? Hahaha.
The lady in the petals.
Spell-bound flower, maybe?"

And what do You see? 
Giving credit to my friendly eyes ... what each one saw ...
  • Pendant - Maria Burgo & Vani Kattoju
  • Shell - Jane McLellan
  • Tulip - Ninetta Caruso, Anita Barry
  • Petunia, Hibiscus - Anita Barry
  • Open umbrella for a clown - Anita Barry
  • Spiderwort - Ninetta Caruso
Further, Ninetta has this to say -
"The E43 is like a festoon imho, you had a great idea to extract petals! This pattern has that last double chain over the rings, it "close" the drawing, something that is not present in the E14 even it is similar. So E43 makes a better petal than E14 (or E10)."

Related Posts -

 Thanks for all the friendly suggestions and nudges, ladies! There can never be too many!

Wednesday, 3 November 2021

a trip to the beach

Pin It now!

Reworked patterns, in modern style, from Frau Eleonore Endrucks-Leichtenstern’s ‘Die Schiffchen-Spitzen’, 1920, for Endrucks 1920 Project.

This pattern #39 fell into my lap and it has such a range of possible effects to play with that one cannot get easily bored. Despite my resolve to not play, temptation triumphed. So come to the beach with me and let's pick up shells, pearls, oysters, and more ..... (not in chronological order)

Download Shells and Pearls pattern #39 herehttps://drive.google.com/file/d/179E9JeCMeM7RXFcq-wThF0iPiBLfQZ4_/view

Made of 2 alternating motifs, the tiny ring reminded me of a pearl between shells and called it Shells and Pearls circular edging. I broadened the shells a tad. 

Now this is how the edging should've worked out - a straight line, not a circle! But notice the picots and loose chains? We really don't tat like this in this century. 

The tautness and smaller picots resulted in a circle. There are a few more minor tweaks made, all listed in the pdf.
Notice the cute little bows? If we tat these in one colour and use white for the alternating motif (a narrower shell), we get Bows and Cravats!  

And yet, I could not resist straightening out the edging - after all that's how the Frau envisioned it. Unfortunately tweaks were needed again, at least with my tatting tension. These are also shared in the pdf.
These are all my practice pieces where I was trying out the original pattern and also tweaking to get them to be as symmetrical as possible. And I couldn't resist arranging them like a necklace with teardrop crystals. Imagine this with many more beads placed strategically!
A single shell motif could make cute earrings to pair with a complete parure made from this basic pattern!

Or a simpler necklace version with a large teardrop and those small pearls. 
Using 2 colours for a pattern presentation makes sense because one can tell at a glance which of the 2 shuttles is to be held in the hand. And I get to play with colour combinations, LOL.

And when I brought the trial stretch into a tight circle, look what emerged! A Buttercup! Those shells (or cravats) now take the form of beautiful slightly overlapping petals. An easy idea to execute in colours of your choice for the flower of your choice.

This close-up shows clearly how the shell motif leans to one side. This happens because the chains are all parallel as in block tatting. It is an inherent structural dilemma. 
From an early stage I wanted to see if it could be 'corrected' by changing the direction of the 3rd pair of chains. Also, I wanted to try a standalone 3D shell. So I took the plunge with both....

If you ignore my personal tatting flaws, the shell is now symmetrical! The 3rd pair of chains has inward picots (Block Below Tatting or BBT). They should've been tinier, but oh well. 
This is my first tatting with hand-dyed thread (HDT) - a gift from Denise 3 years back. It seemed the perfect choice with the colours of golden sand, blue waves, purple-tinged clams, green kelp, etc. and I dived in.
Huh, a clean dive would've been good. But that short distance held many other commitments and the tatting was sporadic with several day intervals in between. Not having jotted any notes, I lost my trend of thought and made several mistakes. The 3D effect needs more tweaking so this is a prototype.
That large pearl inside is a real pearl from Hyderabad - the pearl capital of India.

So here ends our trip to the beach for now. Someday I will get back to both 3D models (buttercup and oyster) to create better version. Hope some of the above ideas have caught your attention?

And don't forget to visit the Endrucks 1920 Project document to see what our wonderfully talented volunteers have contributed - https://docs.google.com/document/d/17LEVftXweztBIOWh4sL4BB7bX65ssoOsOn4oXIgCepY/view

Thursday, 9 January 2014

Tatting Patterns I : 4 Vintage Edgings

Pin It now!
Your sewing project looks too plain?
Looking for some Vintage Edging Patterns ?
Leaning towards Tatting ?

An Edging can uplift And highlight any project from the mundane/uninteresting to a decorative, customized piece of work. Use tatting edgings & insertions to adorn throw & pillow cases, lingerie, garments, sleeves, collars, necklines, towels, kitchen linen, table linen, handkerchiefs, .... or create beautiful jewelry in the form of bracelets, chokers, necklaces, belts, etc.
I have a collection of Vintage Tatting patterns, collected from friends & magazines, over the decades. Unfortunately, I did not jot down the Original source. I will unhesitatingly give due credit if/when the actual source(s) to any of these patterns is found.

Some months back, I uploaded & shared some of the patterns & samples on Pinterest. All are on my board My Projects 4 : Tatting , & many are floating around {they keep re-surfacing from time to time, especially Shamrocks in a Row & Dancing Clovers ;-) }

I share, here, Four Vintage Tatting Edging Patterns.

But it is so boring & generic to simply call each one a 'vintage/tatting edging'. Moreover, how does one remember exactly which edging is being discussed or referred to? Hence, I decided to give them individual names based on my visualization of the end result.

1 . Waves

This is a pattern I took down from a friend’s tatting book back in the 80’s. Ever since I made a single-color sampler some months back, I have seen many beautiful variations / versions / applications of this pattern, especially in bracelets. These usually use a single color with or without beads. Some repeat the pattern as a 2nd row, joining the picots either chain-to-chain or ring-to-ring. In my notebook, this is the 1st of a 3-row sari lace edging / border pattern, which I will share eventually.
I have tacked on this narrow edging along one of my throw cases, as in pic.

Waves Vintage Edging with Tatting pattern, inked

TIP : Change the effect of this simple pattern by using only one color, using variegated color, adding another row where the 2 rings become 4 rings, adding &/or increasing the number of picots, etc.

Width : 1/2' (1 cm)
Length : 3 complete repeats (or 6 waves/chains) = 3'
(B-19. Row 1)

2 . Dancing Clovers

Another Vintage edging pattern sampler from my 'unknown' collection. Each clover repeat looks like they are holding hands & dancing , hence the name :-)
This is a Single Shuttle, one-pass pattern, with yarn lengths (instead of chains) to space out the rings. The trick, however, is to keep the lengths even & regular so that the edging lies flat.
Notice the use of Long & Short/Normal Picots? The largest ring has 10 Long/Large Picots separated by 2 ds each, creating a nice effect.

Dancing Clovers Edging Sampler, with inked tatting pattern

TIP : One can improvise this pattern by tying ball & shuttle threads together & tatting Chains instead of yarn lengths between the rings. However, chains will add bulk to an otherwise delicate, lacy pattern.

Width : slightly more than 1' (~ 2-1/2 cm).
Length : 2 repeats ~ 2'
(B-2)

3 . Shamrocks in a Row

This vintage edging also uses small & large picots. It is a 2-row pattern, using both ball & shuttle threads. Row 1 comprises 3 rings that form a shamrock, & a long chain. Row 2 comprises only chains that are joined to base of each shamrock. This pattern makes very good use of small (smp) & long (Lp) picots in Row 2.

ROW 1 : R 6-5-1, R 1-5-5-1, R 1-5-6. (These 3 rings form 1 Shamrock). Rw.
               Chain 16.
               Repeat to desired length, joining adjacent shamrock picots as in sampler.
               Tie & cut OR Turn & continue.
ROW 2 : Chain 2, smp, 4, 7 Lp sep by 2 ds, 4, smp, 2.
                Join to base of the 3-ring shamrock, Repeat to end.

TIP : To keep work neat & flat, leave a slight space at the base of the shamrock where Row 2 chains can be worked. 
Shamrocks in a Row Edging with tatting pattern

The arrow at end of sampler indicates where I Turned my work to start Row 2, instead of tying & cutting off the threads & rejoining again. It was possible because this is just a sampler.
When making the actual edging, it can be done by simply continuing along Without turning, Once the required length is achieved. OR. One can leave a tiny-tiny bit of yarn while turning (this is the space where Finally, the Last chain will be worked & tied off) & work Row 2 chains back along Row 1.
I hope this is clear? If not, I'd love to answer any doubts/queries... 

TIP : This edging can be worked with Only one row, too! Add a few picots to the 16 chain & it's done! However, the 2nd row does add a sturdiness & some body to the edging.

Width : ~  3/4 ' (2 cms)
Length : 4 repeats = 3'
(B-4)

4 . Crowns

This is an edging pattern I found via Pinterest, & modified to suit my purpose. Instead of a double round, I chose to do a single pass (the lower navy blue image in link). And, I modified the center ring into a Smaller half-circle so that each pattern repeat looks more like a flower slit in half. I actually wanted it to be an exact semicircle, with a flat base. But this looks good too, doesn’t it?
This is the altered Ring pattern : (-3-3-3-9 ). Starts with a picot ! ( I am lining up a step-by-step tutorial on how to start with a picot.)
I used this edging in a square throw / cushion case. And here are Two examples of  how this edging can be cornered : Cornering an Edging : Tatting

Crowns Edging with tatting pattern

Width : 3/4' (`2 cms)
Length : 1 repeat = 1'
UPDATE : This pattern is Originally called Anniversary from "Tatting with Visual Patterns by Mary Konior .

Yarns Used in the 4 edgings above, along with the Color Shades :

I Love Coats Anchor Mercer Crochet. The colors are fast & durable. They retain their sheen for years & years, despite frequent washing. I did use Red Heart for black color, but one of the balls had knots/breaks in the yarn !!! Never again.
I've used size 20 yarn throughout. I find it easier to work with - easier on my eyes - and the work progresses faster.

Coats Anchor Thread along with highlighted Shade numbers

TIP : Always buy a minimum of  TWO balls of the Same color when starting any tatting project. Why? Because, one ball can be used to load the shuttle while the other ball yarn can be used to attach to shuttle thread when working a ball-and-shuttle or 2-shuttle pattern. Now you won't have to break off the ball (or 2nd shuttle) thread Every time a shuttle reload is required ! I prefer this method to loading more than 1 shuttle, especially for smaller projects. Minimum breakage of yarn, minimum 'joins', hiding the 'knots', etc.
Happy Tatting, 
and
ta-ta for now...