Showing posts with label facebook. Show all posts

Monday, 3 January 2022

feeble firsts

Pin It now!

Believe me, I have never done bauble tatting! Oh, every year I think I will embellish at least one bauble, but all for nothing. In December 2021, the admin of the Italian FB group 'Chiacchierino: Filo Amore e Fantasia' held an online event with my MatheMagical Star pattern and several tatters used it to cover their bauble ornaments. All this really inspired me to do one..er 2, er 4.

Due to paucity of time and energy, I settled on using whatever motifs I had on hand - a SOUP (Sewing On/Using Pieces) moment. These 4cm ornaments will soon celebrate their 20th buy-day! At the time we didn't have a lot of options in this city and since the tree was decorated only the 1st 2 years, I am hesitant to buy. Next time I will certainly include more beads and crystals, more flamboyance. Perhaps I Should buy a few good quality and larger sized baubles. This little exercise has got me excited and more confident.

In chronological order - 

Bauble #1 - This edging is draped diagonally and temporarily taped down behind. (don't look behind!). But in Anchor size 20, it is too thick. A daintier edging/insertion would look better. And a tiny motif or 2 on the bare side spaces? 
Interlaced Cumulus pattern - https://tipsaroundthehome.blogspot.com/2020/05/puffy-clouds.html
Bauble #2 - There is no good angle to capture both flakes in a pic. These are in Lizbeth 20 and perhaps the reason I put them together. Spin Away above and ConcentriCity below.
I used a matching blue metallic thread to join the 2 flakes together. It really isn't difficult! Without cutting the thread from the reel, I sewed through the picots, and finally adjusted the tension and positions before snipping, tying, and hiding. Keeping the thread on the reel gave me a lot of leeway with no fear of running short.

Bauble #3 - This is the small version of the MatheMagical Star in size 40 - the only one that ... the others were too large for this bauble. And I kind of liked how the crystals sat like a crown on top.
On the underside is the Folded Fun Star. I hope you can see how I went a bit adventurous and joined the 2 stars.
Bauble #4 - Messy but looks better in real. I was going for an organic look by not tying down each twisted picot. But very difficult to photograph.

I simply sprinkled a few of my snowflakes instead of suspending them - yup lazy. Hubby even offered to put up a string of lights but I hope to be better prepared next time.

It happens Every year! I let the sunny days slip by and when I finally get around to decorating the tree, the sun gives me the slip! So the pic comes out insipid. Oh well, this should be a staunch reminder to start early this year!

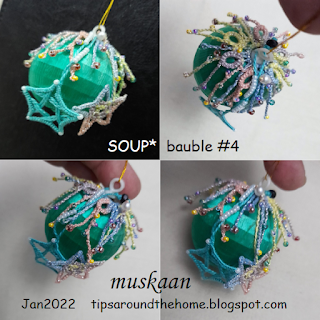
I really want to thank all the wonderful versions shared by tatters around the globe - in the event (one tatter inserted it inside a transparent star ornament; and others who used beads in exciting arrangement) as well as ornaments in general - that got my juices running, finally. Feeble firsts, but determined to be better later this year!

All the star and snowflake patterns can be found here -https://docs.google.com/document/d/1r4OmXX_c5LjFebMN2UbSNiYqXYETLmoridK0X1YIQco/view

Monday, 12 July 2021

every day is lace day

Pin It now!

This is the first time I have posted a pattern elsewhere and not in my blog first. But it was crazy busy this weekend and I was simply too knackered to write out a proper post and share my notes, despite having uploaded a few pics yesterday morning. 

So, without much ado, here's the Lace Day earring/pendant pattern - click to download diagram-only pdf. Eventually I will write out the pattern and add it to this, including a pic of the beaded model. 

It all started when I thought of making a corner for Frau Endrucks'  pattern #17 by extracting one of the lovely motifs from it. Here you see it attached to the 2 sides in order to estimate that it would work. After snipping it off and turning it around, it looked lovely as a possible earring motif!

 
Found out it was International Lace Day on the 11th of July and I registered with a Facebook group and decided to quickly tat and create the pattern to share. The above 2-coloured model is worked in Lizbeth size 20.
TIP : Pattern starts with a chain. In order to avoid too many tail ends at the beginning and also to position the autumn leaves colour for the top ring, I used False CTM! Pull out enough length of thread from the shuttle (Sh2 in this case), work the first chain, and add the 2nd colour in that ring which I worked as a SCMR in order to avoid knots.
Getting ready to start a beaded model on ILD. I used Anchor pearl cotton size 8 along with metallic thread in a darker shade. Size 16/0 beads and earring hook, along with 2 shuttles wound ctm.

work in progress ...
TIP : If one adds bead(s) at the start of the first chain, there is no need for a paperclip to hold the picot. There is sufficient space to make a join later! I started with 3 beads at that corner (seen at the bottom center in above pic).

NOTE: In order to add beads, I made the short chain 4ds instead of 3ds. This is how it now-  (2ds, 3 beads on picot, 2ds, lock join).
Here it is all finished. Unfortunately the metallic thread and beads do not sparkle in the pics. However, if you are on Facebook, check out Anita Barry, Krystyna Mura and Ninetta Caruso's beautiful beaded models. Anita and Krystyna's models can be seen in my FB page and hopefully Ninetta will blog hers. 
This measures 3.5 x 6 cms

In another event organised in the Italian group for the same event, there was a spiral tatted/Josephine chain for eye glasses. I took the opportunity to simply add a short beaded length to make this a necklace.
This pendant measures 2.5 x 6 cms.

Download Lace Day Earrings pattern pdf here.


This is my ILD 2021 badge. There were almost 4,500 participants worldwide and many tatters, too! I'll be looking forward to it next year and hoping you will also join lace makers in our passion for lacing!
Please accept my belated wishes for a Happy Lace Day.... for lacers, everyday is a lace day 💖

Friday, 9 July 2021

a pernickety question

Pin It now!

 When I focused on bilateral symmetry in this pattern, I forgot about the blocks (see 3rd pic below). Thus, while most rings on left and right halves face the same way, the chains in the left and right blocks are incongruous -- instead of being mirror images, they all face the same direction.

Block Tatting is made up of rows/tiers of chains. These rows/tiers can be worked one above the other, or one below the other.

1. Block tiers moving up ie. tatted ABOVE the previous, are simple to make, joining below with a lock join to the picot(s) on previous chain. Like the blocks in pic #1 below -

The block on the right is tatted the same way starting from the shortest chain on top, and moving 'above' to the next row/tier (though it looks upside down).
Now compare the left and right blocks with respect to 2 variables - the colour of each chain/block, and where the chains face. Not symmetrical, right?!

2. When the next tier is tatted BELOW the previous one, it means we need a picot on the core thread to which the new chain level can join. We need down/downward/inward facing/intruding picots! Of the many methods, holding the picot space with a paper clip is most common. This is how the right block was tatted ....

In above model, the left block is tatted 'normally' with chains stacked above. But for a mirror image, the block on the right is tatted with the next chain worked Below the previous one, with a regular picot join instead of lock join. The penultimate chain (beige) in the right block held 4 paper clips till each join was made! (sorry about the shoddy tatting)
Again, compare the 2 blocks in terms of colour placement and chain direction.
Mirror images!!! 
This is the way Pina Pinto has worked her sampler for the Endrucks Project - I will be sharing the pattern when it is diagrammed.

In the above model, all the blocks (in cream and in purple) face towards the right. (The cream rings along the 'belt' are not mirror images since I did not think ahead). Since the row moves from left to right, it is easier to tat in this manner.
Frau Endrucks tats all her blocks with the next chain above the previous one, although she states clearly in her tips that it is not necessary to have picots. Simply move the stitches a bit, clearing space to make the join.

Now here's my pernickety question - Would you be Mr Meticulous with perfect mirroring of blocks despite the invasion & interference of all those paper clips or would you rather be Dr Downplay, just going with the flow without bothering overly much about the left and right sides?
 
Which factors would influence your choice -  whether working with 1 or 2 colours; mood; time constraints; competition submission; etc. 

Please enlighten and entertain ....


And hopefully you will join the global lace community on International Lace Day (July 11th) ....choose your form of lace-making and celebrate the day. I have already registered (free, but only a few hours left, so hurry) with this ILD group on Facebook and intend to tat a new earring/pendant - the motif can actually be repeated to create a lovely edging! I am hoping it will work .... let's see. Off to load my shuttles. Maybe I can upload a diagram on or before 11th, in case you wish to tat and experiment with the same pattern? Stay tuned .....

Wednesday, 19 May 2021

rosebud heart rings

Pin It now!

Recently a tatter wished to understand how these inserted rings in the Rose Circle doily were made. I, too, had tried to figure it out back in 2018 from which arose this Rosebud Heart. Following is the roughly and quickly drawn sketch I shared in the group illustrating how the rings are interlaced/stacked/inserted .... 

Note that it can be made with one shuttle and ball. It has the Russian ANKARS-style stamp on it.


After a lengthy search in my compy, pen drives, and other storage areas, I finally found my original pictures (haven't looked for the real heart yet) and decided to share the prototype pattern. You are welcome to tweak it and hopefully share the adjusted count so that we can all benefit.

Start with the central ring (each ring is 15-15) and move around, ending with the tiny mock ring at the base.
Design TIP: The central (1st) ring is squished. My tip is to increase the chain segments , thus pulling that ring upwards.

Back to the original query (may 3rd, 2021) in the Chiaccherieno FB group.... It led to a diligent search for the original designer/pattern. This is Ninetta's summary of all the findings -
'Summary: The pattern of the centipede is by Reiko Akimoto (who signed ©️ April Fool's) and the pattern was granted by the author during a course held in Japan in 2016. This information can be found on the website of Ka-ryun (link is above in my comment). Until now the scheme has never been made available online, neither free nor paid. The pink element, formed by inserting circles into each other, is similar to the one used in a JTatter paid scheme (Celtic 3), on etsy (link is above in Linda's comment -https://www.etsy.com/listing/400761825/tatting-pattern-pdf-celtic-3?ref=shop_home_recs_1).'

If you wish to see the Rose Circle doily by Reiko Akimoto (April Fool’s) taking shape, check this out - https://ka-ryun.com/category/tattinglace/april-fools/


Friday, 26 March 2021

colour temptation

Pin It now!
 
Nefertiti seems content with this necklace adaptation of Daniela Galli's Primula della Vita motifs😊
We are enjoying a long spring heading into the festival of colours (Holi) after which summer will set in (lunar calendars are way more accurate when it comes to seasons). No wonder I wanted to capture some of those colours in thread through this addictive floral motif shared by the very talented Daniela Galli for an event on facebook in early February.
Primula della Vita! And once started, I couldn't stop! Such a pleasing shape.
Each motif is 3.5cms in Anchor Pearl cotton size 8.
Would you believe that 3 years back I had saved an image hoping to convert the lovely primula flowers into tatting. That Primula mercerium image led me to this cluster which became my template for colour choices. This was my Mom's go-to flower to sketch! 
These are still unblocked and I like the slight overlap of petals! What to do now? A spring necklace! How to join? With leaves! 
On the top is the first leaf I tried, but cut off. Tried a few more ideas, including beads, and rejected all.
Finally settled on simple single-shuttle rings in different sizes. Strategically distributed to join adjacent motifs. 

Following 6 pics are close-ups where the 2nd of each pair has a Swarovski crystal in the center. Which do you prefer?
The core thread remains same through both rounds. After completing the central medallion, only the knotting thread was snipped off and hidden; a new colour was joined as knotting thread for the outer petals - false CTM method.
   
Tatting moves clockwise, all from the front. SCMR with thrown rings, climbing out with mock picot, and lock join are the only techniques for motif. 
TIP: Notice how I always use 2 metal jump rings? It is my way of assuring that even if thread slips off one ring, the other will hold it, till we can fix and close the gap.

My favourite kind of tatted lace - a bit of freeform, overlap, flowers - bringing in Nature in some small way!
These are all the materials used. Anchor Pearl cotton size 8 threads and beads, crystals. The details are notated on the pic.
Crystals sparkle in real life and give weight, body, and a finish to the necklace. 

Many many thanks, Daniela, for this wonderful pattern! I thoroughly enjoyed this project and hope to that the motifs in future as well.
Currrently there's an Easter 3D egg and cute chick pattern that Daniela has shared with the Chiacchierino: Filo, Amore e Fantasia group, if you wish to join in. It's on my to-tat list for later, but these amuse-bouches are so tempting for a relaxing distraction!

Thursday, 11 March 2021

blistering barnacles

Pin It now!

 I started with gusto, especially after seeing the fabulous versions being posted in the Italian facebook group - Chiacchierino: Filo, Amore e Fantasia. Through the ups and downs, I ended up with a slightly modified version.

La Presentosa designed and shared by the prolific and hugely talented Paola Bevilacqua. And her handwriting is so beautiful!

The above was actually my 2nd start, since I had to unravel the first (I will share a quick tip about that in another post) where the teardrop proved too big. Although I noticed that the Josephine Ring and surrounding beads are a bit large for the blue arch space, I persevered, but ended up with a knotted ring that refused to come undone. Scrapped and restarted.
The central heart is a mock dimpled ring (lock joined at base). The crystal and beaded ring use Floating Beads method. While the crystal is loose, the silver beads were pre-strung. 
Continued with white as core, but added blue thread on chain.
And this time the JR is substituted with picot ring.
I crystal flanked by a silver bead is loaded on blue thread above the picoted ring. 
Round 1 complete. I finished off with 3 silver beads on either side of teardrop crystal which was attached with FB method. 
I'm very happy with this, though not impeccable.
Started round 2 at a different picot from the instructions so that I could hide ends in 'new' elements.
Billions of bilious blue blistering barnacles !!!
I joined the final teal arch incorrectly. AND this was despite the fact that I kept tugging and pulling before joining wondering why it was being so difficult! Instead of the southernmost tip, the penultimate arch should've gone over to the other side where that empty picot lies. I honestly debated long and hard whether to leave it be since I saw this only when I was blocking it. But Mr Meticulous moved in this time, sigh!

Snipped and unraveled and added new thread. But I still had to add an extra teal arch because of which it looks a bit cramped. If I hadn't, the teardrop and beads would get hidden.

When tatting round 2 I had to unwind from shuttle to weave for overlapping arches. Used only 1 shuttle throughout. The blue and teal were scrap lengths. Seed beads were strung. 

Anchor Pearl cotton (size 8) is my best choice for colour & shade range and for stringing tiny beads. However, not so good for tiny rings, Josephines, etc. with the fibres and loose twist causing friction. Which is why I switched to picot flowers instead of the JR.
Working with Lizbeth for the snowflake (in previous post), brought out the comfort, ease and joy when tatting with Lizbeth. But I have to ration myself ;-P

My apologies to Paola. Despite all the time and fiddling demanded by beads, I enjoyed tatting it and am happy with it. Only wish I'd done a better job with this medallion.

Many many thanks, Paola, for creating and sharing this pattern and the inspiration you provide. 

All tutorial links can be found here - https://tipsaroundthehome.blogspot.com/p/tatting-resources.html

Wednesday, 3 March 2021

lounging by the sea

Pin It now!

...if only ;-D But one can always bring the sea home or a friend can send us the sand and waves, sprinkled with pearls!  

This is a slight adaptation, in trying to manifest Ninetta Caruso's Heart by the Sea in thread, which is the reason for this unusual colour combo. An island surrounded by the sea and pearls, and palm trees!
It'd been ages since I picked my shuttles and you can see how my first attempts failed due to uncooperative threads. The yellow one is in metallic-wound size 20 which was no fun this time. The beige one got stuck while closing! 
So, in my 3rd attempt, I worked the hearts as mock rings (SCMRs). Worked. Notice the extra hearts? I wanted to show partially open oysters with a pearl inside. Not my best effort, but Dr Downplay came out to play :-) I really just wanted to enjoy some tatting time.
And for fun, I used a CWJ to join the small heart to the lower large one. Hmm, please don't, unless the picot is long! While the small heart had a smooth outline, it distorted the large one slightly.
I love the flower she inserted! I chose tinted green to represent a palm grove and the brown crystal could be coconuts?
The tiny seed beads represent the frothy waves on pristine blue waters, hitting the shores! The almost white sands and brilliant blue sea is an image stamped in my mind from the outskirts of Perth (Australia).
TIP: If you start the heart frontside, the pattern will move counterclockwise unlike that indicated in the diagram (starting with A). I was following the diagram only, and hence all my subsequent rings were worked backside. It is only now that I noticed her stepwise pics showing her counterclockwise WIP pics!
In Anchor Pearl cotton size 8, the heart measures 5cmsx5.5cms.
TIP: I started the green motif at the ring marked E in diagram, moving clockwise, so that there was more open space to close out the motif in the end.
Beads used - size 10/0 pearls (rescued as can be seen in their darker tinge!); 2 pearls - 4mm; crystal size 9/0; silver seed beads size 26/0.
For all pearl beads, I used my Floating Beads method - no need to load beads on a shuttle! However, I added one more step - capturing the bead within the first half stitch as in this onion rings method. It was Kathleen Minniti who captured the 'floating ring' in our round robin doily instead of simple FB method. 

This lovely pattern and instructions can be found here - https://ninettacaruso.blogspot.com/2021/02/hearts-friends-and-flower.html I had not realised until I read her post, that the heart is derived from her doily - one that was already on my to-tat list! 

Many thanks to Ninetta for sharing her pattern and also for creating a lovely pictorial for my Block Heart ( I need to update the post). Both were chosen for the Un Coure Per Te event in the very active and inspiring Italian facebook group - Chiacchierino:Filo, Amore e Fantasia. My heart is late for the event, but I'm happy to have tatted something! And there's an event every fortnight, so join in!