Showing posts with label Mr Meticulous. Show all posts

Friday, 9 July 2021

a pernickety question

Pin It now!

 When I focused on bilateral symmetry in this pattern, I forgot about the blocks (see 3rd pic below). Thus, while most rings on left and right halves face the same way, the chains in the left and right blocks are incongruous -- instead of being mirror images, they all face the same direction.

Block Tatting is made up of rows/tiers of chains. These rows/tiers can be worked one above the other, or one below the other.

1. Block tiers moving up ie. tatted ABOVE the previous, are simple to make, joining below with a lock join to the picot(s) on previous chain. Like the blocks in pic #1 below -
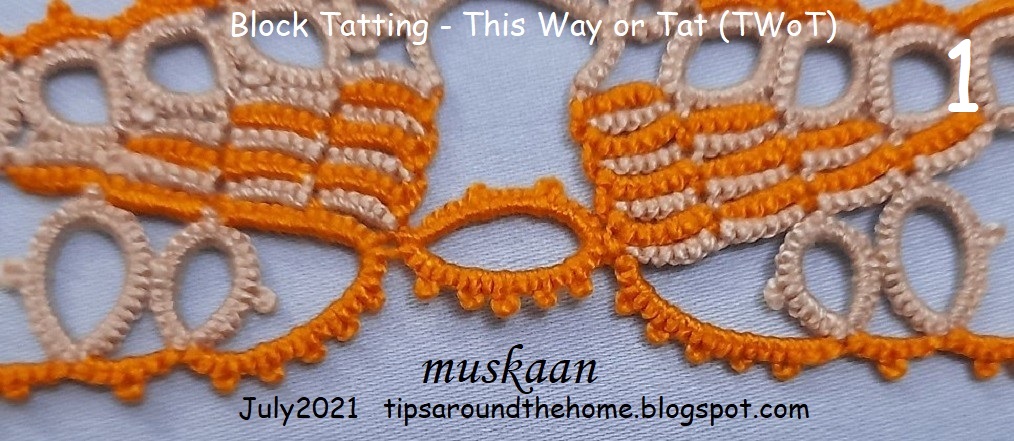
The block on the right is tatted the same way starting from the shortest chain on top, and moving 'above' to the next row/tier (though it looks upside down).
Now compare the left and right blocks with respect to 2 variables - the colour of each chain/block, and where the chains face. Not symmetrical, right?!

2. When the next tier is tatted BELOW the previous one, it means we need a picot on the core thread to which the new chain level can join. We need down/downward/inward facing/intruding picots! Of the many methods, holding the picot space with a paper clip is most common. This is how the right block was tatted ....

In above model, the left block is tatted 'normally' with chains stacked above. But for a mirror image, the block on the right is tatted with the next chain worked Below the previous one, with a regular picot join instead of lock join. The penultimate chain (beige) in the right block held 4 paper clips till each join was made! (sorry about the shoddy tatting)
Again, compare the 2 blocks in terms of colour placement and chain direction.
Mirror images!!! 
This is the way Pina Pinto has worked her sampler for the Endrucks Project - I will be sharing the pattern when it is diagrammed.

In the above model, all the blocks (in cream and in purple) face towards the right. (The cream rings along the 'belt' are not mirror images since I did not think ahead). Since the row moves from left to right, it is easier to tat in this manner.
Frau Endrucks tats all her blocks with the next chain above the previous one, although she states clearly in her tips that it is not necessary to have picots. Simply move the stitches a bit, clearing space to make the join.

Now here's my pernickety question - Would you be Mr Meticulous with perfect mirroring of blocks despite the invasion & interference of all those paper clips or would you rather be Dr Downplay, just going with the flow without bothering overly much about the left and right sides?
 
Which factors would influence your choice -  whether working with 1 or 2 colours; mood; time constraints; competition submission; etc. 

Please enlighten and entertain ....


And hopefully you will join the global lace community on International Lace Day (July 11th) ....choose your form of lace-making and celebrate the day. I have already registered (free, but only a few hours left, so hurry) with this ILD group on Facebook and intend to tat a new earring/pendant - the motif can actually be repeated to create a lovely edging! I am hoping it will work .... let's see. Off to load my shuttles. Maybe I can upload a diagram on or before 11th, in case you wish to tat and experiment with the same pattern? Stay tuned .....

Tuesday, 20 October 2020

multiples of 7

Pin It now!

 and a voracious scissor!

My journey leading to this destination - https://tipsaroundthehome.blogspot.com/search?q=swirling+butterflies  

Ta-daa! My variation of Ninetta Caruso's beautiful and multi-technique Swirling Butterflies doily, with due apologies. But let's continue from the last post where I had worked split round 10 to make all motifs similar, preferring to work the butterflies separately.

I've used numerous little tricks to keep my working smooth but those are mostly personal preferences, not compulsory.

ROUND 10 (part 2) - Cedronella, and 'Hugging' Butterflies variation.
Each of these 3 butterfly motifs has no tails to hide, since threads end at the head and tails are snipped into antennae. In each case, a short length was left at the start to finger-tat the final few stitches in the split ring head.
The profile butterflies are identical mirror images, one worked frontside, the other backside (optional).
To attach the side butterflies to green chains, I used the luggage tag loop at start and Dora Young Join, thus showing a complete stitch at both ends of the body.
TIP : For maximum overlap of wings, keep the joining picot in previous ring as small as possible.

Remember the lasagna I showed last time? Well, what does this look like, with the motifs turned under? I couldn't resist the sensation of autumnal forest floor.

ROUND 11 (a variation) with butterfly (Cedronella) and leaflet motifs
Oh, the heartache of having used that dark green! None of the lighter colours worked for the final round. Following are the 3 trials I did ....

Hubby gave me a lecture that the final round should be a dark shade, DUH (the all yellow was his choice)! But in 20/20 (or was 2020 at work?) hindsight, the flower motifs should have included cream, leaving me with the dark green or brown for round 11.

I was so disgusted by the end of this that, with the gracious permission from Ninetta, I worked on a different final round which was required in order to link the adjacent flowers. I visualized inserting cream leaf and flower motifs (from the earlier cream rounds) on the outer margins. 
But when Ninetta sent me her idea of placing the florets on the inner side, I loved it. And the free butterfly I had fit perfectly! So I made 7 of these between the 14 large flowers. I attached the wings directly to the green chains in a bid to decrease the darkness.
And then inspiration struck. What if I make an EPJ (Grace Tan's encapsulated picot join here). Even though there is no layering. The one on right neat, but the one on left shows the picot - my insertion was incorrect, but I didn't re-do.
Always options!
On the outside, I went with my original idea of leaflets linking adjacent flowers. This is similar to the ones on round 4, with an extrapair of rings. One shuttle. Attach thread with a luggage tag loop, tatting over tail. The 1st ring is joined to the next green chain. On the way back from the tip, 5th and 7th rings are joined to adjacent motif. I deliberately layered it slightly to hide some green.
Again 7 such motifs. And love the gentle swirl they create.
Going for minimal instead of inserting 14 motifs inside and outside.

UPDATE : For a continuous swirl, the leaflet motif can be worked between all 14 motifs.
But if one works 7 motifs in the opposite direction, they can appear like a laurel wreath over Motif A (the ones without butterflies) - like those on Roman Emperors!
It was fiddly to insert these motifs, though. And my scissors had a field day! There are still 2 butterflies I'd like to change, but it's a wrap. Hence if a tatter wishes to make this variation, it is advisable to do it simultaneously rather than at the end. 
After soaking to block, I remembered a snipped chain! Oh well, Mr Downplay decided to let it be! Can you spot the snip?
But in a moment of weakness, Mr Meticulous took over and I fixed it ;-P

The final doily just touches 14 inches across the widest part, worked in Anchor cotton size 40.

This is the colour palette. The black labels indicate the threads are about 15-20 years old - vintage. 
It was already late night and I 'threw' the doily on my dining table in order to keep it flat. And suddenly the swirls and butterflies came to life! Quickly took a couple of pics. Hubby is happy, too, and approves the choices ;-P

My sincerest thanks to Ninetta for choosing me to tat this wonderful doily. It kept me happily engaged (except for the last stages where it kept my scissors engorged ;-P) as a tatter and learner. Hope some of the learning rubs off in my future designs. 
Her pattern presentation (in Italian at present) is Stupendous! What an eye for detail - both in the text and and the schem
https://ninettacaruso.blogspot.com/2018/08/spiral-rings-with-treble-tatting.htmlatics. She also included detailed pictorials of elements and techniques used here (many of which are already shared in her blog). I just wish my colour placement had been a bit better. Oh well ...

Complete list of posts so far (chronologically) (click on blue link) : 
Ninetta

My posts (including the tat-along) -