Showing posts with label luggage tag loop. Show all posts

Tuesday, 14 October 2025

Starter Picot pictorials

Pin It now!

 Ninetta and I have been working on a resource page dedicated to the Endrucks 1920 Project. Over the years many tips and pictorials have been shared but they were scattered. In our attempt to finally gather and organise them, we discovered certain lacunae and decided to create pictorials and/or videos to address the issue. 

One such is the Starter Picot or Starting with a Chain. Elgiva Nicholls calls it the Link Loop or link loop picot. Several of Eleonore Endrucks' patterns in her 1920 book 'Die Schiffchen-Spitzen', start with a chain. She ties two threads together, and starts with a chain of 1ds, picot, and the rest of the chain. Of course most tatters now start directly with a picot and with continuous thread (CTM). Yet there are different approaches. Following are glimpses into the options detailed in the PDF which I won't repeat here....

Please note that this is a compilation sourced from various sites/blogs, some of which are no longer accessible. It is the reason Ninetta and I wanted a resource that did not have to rely on outside links, as far as feasible. The only outside link we included is for The Online Tatting Class, besides our own blogs. As it is my Tatting Resources page (tab above) lists tons of outside resources with credit. 

Starter Picot Options with Pictorials by Muskaan Oct2025 (starting with a chain) - https://drive.google.com/file/d/1vzSHMxas51Yn5iujdmror1obx27AuIhw/view

1. Starter Picot with paper clip, marker, or coilless pin.

Between the choice of spacers, I prefer the thread marker (or luggage tag loop) as you might remember from my past posts. I find it less interfering, and more importantly we can measure the picot to the exact size required - https://tipsaroundthehome.blogspot.com/2023/01/measured-picot-on-core-thread.html

2. Starter Picot with 1st half-stitch

or 2nd half-stitch
I left out this 2nd hs collage from the PDF since it is basically the same as the 1st hs pictorial.

3. Starter Picot with lock stitch


What happens when we want to work with two colours or we have leftover threads on our shuttles and wish to use them? Obviously CTM is not an option, but we do have False CTM

4. Starter Picot with false ctm in two-colour tatting

5. Starter Picot with false ctm in two-colour block tatting

The above collage was shared by Ninetta showing a two-coloured block in progress. And she starts the 1st chain with 1ds, picot like Endrucks. However, instead of tying the threads together, she uses the false CTM method.

For many more situations in which a False CTM comes in handy, click on the tag at the end of the post. I have two dedicated posts along with some specific projects where I used it. https://tipsaroundthehome.blogspot.com/search?q=false+CTM

Hope this is helpful in your future projects. 

Saturday, 1 February 2025

direct method tatting

Pin It now!

I had a very interesting experience earlier this week. In her book 'The Complete Book of Tatting' (1985), Rebecca Jones highlights six methods of tatting, one of which is what she calls the Direct Method Tatting. This should not be confused with Direct Tatting which entails using reverse stitches to tat chains, etc.

The stitch really doesn't care how it is made, as Patty Dowden famously said!

Since I hadn't intended to do a pictorial, I merely took a few pics for my own reference. Hopefully these will be enough to give you an idea and a way for me to recall easily. 

DIRECT  METHOD  TATTING

Rebecca Jones (1985)

1. We start by looping the ring thread around the shuttle as seen in the pic - a luggage tag loop, such that when the shuttle is passed through the loops, and tensioned, it forms a lark's head knot (LHK). 
Notice the starting tail of the shuttle thread. 
This step can be a tad tricky, so try to focus on the entry and exit points of the thread. Fortunately it is only needed once for the very first stitch.

2. After the shuttle is pulled through and the stitch snugged, this is how it looks. It appears upside down when compared to a normal shuttle-tatted ring. However, as we move along they right themselves.


3. After the starting or foundation LHK, tatting continues by making each half-stitch. 
For 1st half-stitch, loop the thread counterclockwise and pass shuttle through. Snug.
TIP: Make kind of a one and a half turn before passing shuttle through otherwise the stitch is not formed.

4. Making the 2nd half-stitch ... turn the ring loop clockwise, pass shuttle through and snug.

5. Notice the second direct method stitch is made. Repeat steps 3 and 4 for required number of stitches. 
Picots can be made by leaving some space as we do normally.
6. When the ring is closed, the stitches face outwards and the ring looks exactly like a shuttle-tatted ring.
The same steps can be applied to chains as well using loops made with the ball or left-hand thread.

*****
UPDATE (4th March 2025): A lady bought the book after reading this post and also tried to work the method. However, she had trouble with how to continue with the half-stitches. Here is my quick video to help her out. Hope it is clear enough to be of use in case you wish to try it too. 
And here is the direct link to the video: 
I have tatted 3 double stitches in a ring in this demo. Hope it helps. Please excuse my clumsiness and background ... videography is not my go-to format ;-D

What I later realised is that this in one of two ways to make a lark's head picot join (LHPJ) or lark
*****
WHY?
You may justifiably ask why this method. I think it is a nice way to transition from needle tatting to shuttle tatting. Even if a tatter cannot manage the flip/transfer, s/he can use a shuttle just as easily! As a knitter, I have used my thumb to make the loops to cast on stitches and I used the same movements for needle tatting. Hence I found this pretty easy-going.
Besides, Rebecca also points out that this method might be easier on arthritic hands and a tatter can continue to enjoy making lace. 

I haven't had time to explore this further. Hopefully some of you will be interested and share your observations and experiments ... 

Saturday, 24 August 2024

on the fringes

Pin It now!

 Or not so much on the fringes? 

FRINGE(s) is a kind of decorative edge made of lots of hanging threads.  

FRINGE TATTING usually involves very long adjoining picots at the outermost edge of the piece, which are then cut and trimmed to size. These may be frayed if needed. (thanks to Anita Barry, who also shared a pic for the Glossary)


TATTED  FRINGE  AND  ADAPTATIONS -
Then came the Tatted Fringe shared by Corina Meyfeldt in November 2015 here - http://cmhandmade.blogspot.com/2015/11/fringe-sort-of.html . 
Unlike the former, the tatted fringe requires an auxiliary or spare thread.
She first tatted a chain with long adjoining picots on the main core thread; then snipped and trimmed the picots, spread them out and wound the shuttle to start the project. Snipping the picot tips separates the individual stitches.  Corina brought forth each fringe from the core thread as required. 

Tatted Fringe on Picot -
Notice that in the above WIP ring, I placed some of the fringes on the ring loop or left-hand thread while others remain on the shuttle thread. Thus we have the option of placing the fringe on the picot as well as on the core. Just like one would do for beads!

The above tatted fringe (made of metallic thread) is positioned on both the core as well as picot threads.
An extended application of Corina's method.
This can be done on rings as well as chains and gives a thicker fringe.

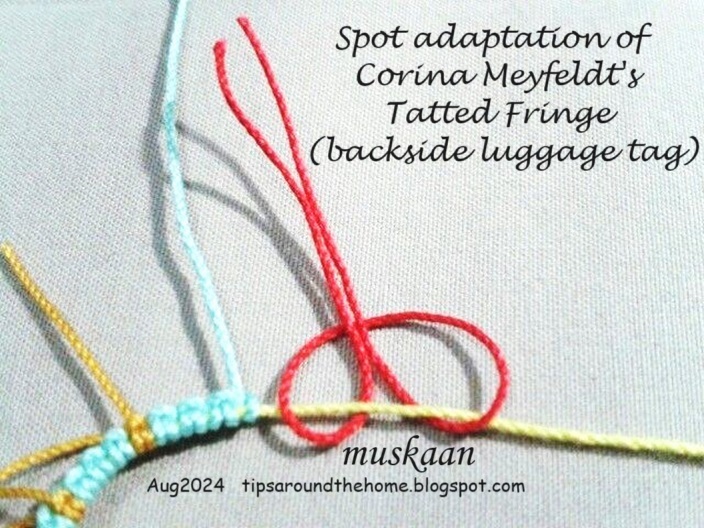
Spot Adaptation (using luggage tags) -
In December of the same year I shared my spot adaptation, with pictorial, here - https://tipsaroundthehome.blogspot.com/2015/12/fringe-benefits.html
Instead of tatting a chain of long picots, I used luggage tag loops to make a lark's head knot on the core thread wherever and whenever required. These scraps can be tied frontside or backside (see next pic).
Besides, we have the freedom to include as many colours and threads as desired. Again, though not shown, the tag can be tied to the left-hand thread (on picot) or the core thread.

Seen together on a chain. Look closely and you will see that I brought the left-hand thread over and between the luggage tag, thus securing the fringe. 

NOTE: Since the tatted fringe makes a stitch on the core thread, care must be taken with the total stitch count in a pattern not written for a fringe. 

Tatted Fringe Picot! -
Now this is probably something new. Or at least I haven't come across it yet.
Since I had a few fringes left on the shuttle after tatting the first sample, I tatted a second ring but put all the fringes on the loop around the hand. And made a picot! 

UPDATE (Dec2024)
BEADED FRINGE - aka Beaded Stem (Corina Meyfeldt) and Single File Beaded Picot (Nina Libin)


So, that's all for now folks. Editing (and tatting samples for) the book Six T's of Shuttle Tatting, by Net Best, is taking me to the fringes of the tatting world and tatting literature! It is making me delve deep and wide and sometimes inspiration strikes and I go off on a short explorative excursion. Hope you enjoyed this short journey and can find some applications for these fringes. And if you have any new  technique or effect, please let me know so that it can be included in the Glossary. 

Friday, 12 July 2024

what the heart wants

Pin It now!

.... the heart follows! I hadn't planned on playing the game of this month - Pattern Me Endrucks (July2024) because I wanted to focus on other tasks and had told Ninetta. Yet the heart yearns and one gives in to that knotty call. 

E43 Pattern pdf https://drive.google.com/file/d/1JRu7OggaSna0eXDRA2P18dRu6uE4-1J7/view

Some entries have already come in and wow, each of the participants has seen a different aspect in this motif and followed that direction! Can you blame my heart for wanting to join them? I could see an orange segment, but you know my penchant for complicating my life. So, while not a very unique idea or shape, I decided to go for a 3D flower.

Mind you, this is a prototype with a few mistakes, lots of retro-tatting, and Dr. Downplay ruling. Hopefully the next petals will turn out better.

My goal was to deviate as less as possible from the original pattern. 

My Notes, TIPS, and Future Ideas 

Since I wanted to work with two colours, here's how I started without tying the threads together -

A] Started with false CTM, pulling out a short length (A). from the shuttle.
B] Attached a marker/luggage tag loop to the starter picot (B).
C] Using A as core thread, finger-tat the chain using thread (C) from shuttle for the stitches.
D] 2nd shuttle with thread in another colour was added at the end of the chain. The A thread is cut short and hidden in the next element (tat over tails).
For more False CTM scenariosPart 1 ; Part 2 .

  • The tatting proceeds from right to left, unlike the diagram. I think the reason could be that if one direct tats the chain (reverse stitches), it will proceed from right to left. This dawned on me when I noticed the inset diagram showing the start! The written instructions are for normal tatting.
  • As it turns out, on reaching the other end, I decided to keep the chain maroon, hence you can see the colour difference between left and right.
  • In order to position colours lots of Reverse Join (RJ) is used.
  • Midways I decided to use the Catherine Wheel Join (CWJ). However I was tatting the return chain backside. I have done the CWJ from the back before, several times, including my cheat trick of a half-stitch shift! However this time I watched Marilee Rockeley recent video CWJ from the back sidehttps://www.youtube.com/watch?v=EqxTqb8UMww

  • The outer row of chains is done with Victorian sets or zigzag tatting. Continued down.
  • The left chain was made first and is a bit longer than needed.
  • I decided to use the small motifs on the sides (in original pattern) to cover some of the negative space. Added a 3rd colour to make the twin rings and cut off the thread. I've deliberately left short tails instead of hiding them.
  • Then picking up the original shuttles I continued with the chains to complete the first petal.
The shuttles are still attached and I can easily continue with the next petal. I'm thinking a total of 3 petals should complete the flower. While I'm not too thrilled with my colour choices, Dr Downplay rules! 
I have deliberately created a 3D version for the petal. Otherwise the motif lies flat.
You can find tutorial links to the terms mentioned, here - https://tipsaroundthehome.blogspot.com/p/tatting-resources.html

FUTURE IDEAS

  • This same petal, with a bit of tweaking can become a peacock plume! 
  • Or joining 3, 4, or more motifs in the round to create a broad round for a doily. And then design inner and outer rounds to complete the doily. This, however, will be a big project for another year!
  • And of course, orange fruit carpels/segments!

Do you have any suggestions for improvement or any more ideas? Please share ....

More to come; hoping to finish tatting this today so that I can get back to the other stuff.

Many thanks to Maria Grazia and Ninetta Caruso for the reworked pattern, and to Marilee Rockeley for her demo.

Related Posts -

Thursday, 20 July 2023

luggage tag loop

Pin It now!

 Since Georgia Seitz's site is still in transition to the new site (https://www.theonlinetattingclass.com/) and not everything has been transferred, I needed a link to the luggage tag loop or lark's head knot. So I took a few pics from my Jan 3, 2023 post (https://tipsaroundthehome.blogspot.com/2023/01/measured-picot-on-core-thread.html), making it easy to share.

This loop or knot looks like a double stitch and in the same colour it can be an 'invisible' join/addition. Following are some of the ways and situations in which it can be used - 
  1. To add new thread. I have used it add green thread in the Blossoms Project. https://tipsaroundthehome.blogspot.com/search/label/blossoms%20project
  2. To add new thread in a ring. When running out of thread, new thread can be added before closing the last ring using a LHK. Credited to Judi Banashek (thanks, Gillian Buchanan). See Marilee Rockeley's video here - https://www.youtube.com/watch?v=w9pmL1kyirc
  3. Marilee uses the method to add the third (core) thread in pearl tatting in the above demo.
  4. To start on a paper clip - https://tipsaroundthehome.blogspot.com/2017/05/rising-month-late.html
  5. To hold space on the core thread for an inward picot or a starter picot on chain instead of using a pin or clip. https://tipsaroundthehome.blogspot.com/2023/06/bigger-flower.html
  6. To make measured mock picots and inward picots - https://tipsaroundthehome.blogspot.com/2023/01/measured-picot-on-core-thread.html
  7. To attach a tassel - https://tipsaroundthehome.blogspot.com/2015/01/tatting-away-x.html
  8. (UPDATE) To add a fringe - a spot adaptation of Corina Meyfeldt's method - https://tipsaroundthehome.blogspot.com/2015/12/fringe-benefits.html)
  9. (UPDATE) To tat short floating chains or to add a 3rd colour for a specific element - eg., the E3 Inside Out flower by Michelle F - https://tipsaroundthehome.blogspot.com/2024/01/what-heart.html and PDF link 

These are a few that I can recollect at the moment, but I am sure I'm missing something ;-P Perhaps the knot in my head will clear at a later date and I will update this post.

Saturday, 21 January 2023

double juggle

Pin It now!

 I'm calling it double juggle, not double trouble, coz I'm thoroughly enjoying myself and only wish I had more time and brain space to spare. I am deeply involved in 2 large projects with 2 different partners and have to juggle between both - I find that my brain is compartmentalised and have to 'get into each mode'. 

First project is my late friend's tatting book I am editing- it is over 200 pages consisting of a manual and a dictionary. This will take many more months but Angela is an enthusiastic and quick worker, providing excellent technical and formatting support and then some more.

Second project is our current tat-along in our EP Facebook group with Ninetta. some of our participants have already completed the entire doily even though 2 more parts need to be shared. They followed Reiko's diagrams without waiting for us ;-D Oh, and the colours and combinations that are emerging are truly inspiring!

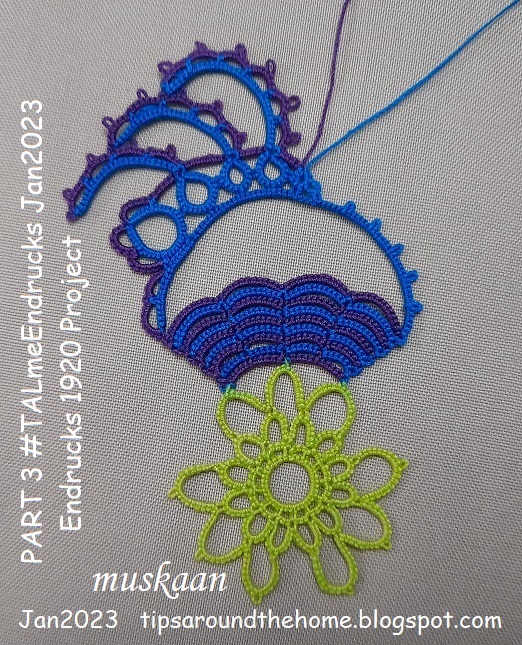
Parts 1-4 of #TALmeEndrucks completed in size 40 threads, going for a peacock impression.
Parts 1 & 2 posted here - https://tipsaroundthehome.blogspot.com/2023/01/tat-along-doily.html

PART 3 - After the central 'flower' and the 'basket', we work the first half over the 'handle' of the basket, continuing from Part 2. 

There is one inward picot and the rest is simple rings and chains.

Endrucks worked the entire doily continuously. However we are following Reiko Akamatsu's modified pathway and count.


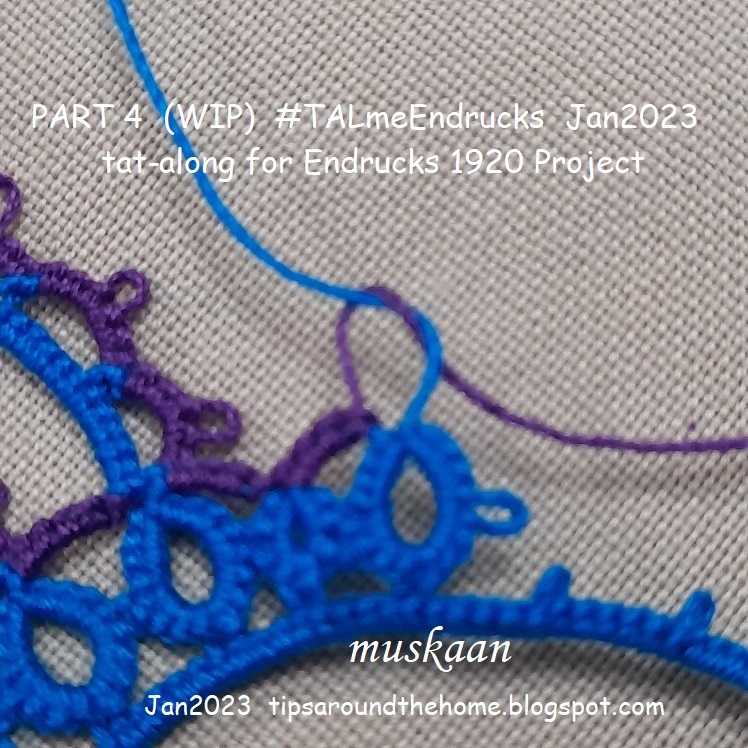
PART 4 - This is a mirror image of Part 3. Working with 2 colours means we need to switch shuttles before working the floating chains in order to get the same colour, unless one wants to use inward picots or Block Below Tatting (BBT).
I decided to work the lower chain first, then the upper scalloped chain. And since after this pair is made we need to anchor to the base and move to the right, I made an overhand tie/SLT, leaving a vsp space to lock join to later. 
I've used this SLT Picot before in a different scenario - https://tipsaroundthehome.blogspot.com/2015/03/experimenting-with-colours.html

And then again, for a mirror effect so that the last ring tilts accordingly, we need an inward picot on the chain. https://tipsaroundthehome.blogspot.com/2023/01/measured-picot-on-core-thread.html

As you can see, the first and last rings are reflections of each other. Believe me, I tried the ring 'normally', thinking the chain could be attached to the ring accordingly. But it looked all wrong and I had to undo it. So it is worth the effort.

I absolutely love the clever arrangement of the floating chains. Even if they are not joined to each other, there are so many possibilities - peacock's plumes, a jester's hat, a rooster's tail, foliage, .....what else?

Playing with flipping to see what comes up, LOL. Nothing to write home about.
The blue colour runs a bit and has seeped into the green below.

Fortunately, no more seepage occurred. Parts 3 and 4 are worked twice more.

Part 5 will be released tomorrow as 3 detached motifs and I will share my fun arrangements in a future post. But first I have to get back to juggling the editing and tatting the final part of this cover doily!

Tuesday, 3 January 2023

measured picot on core thread

Pin It now!

 It is difficult to get an accurate measure of an inward picot on the core thread which is held by a paperclip or coil-less pin, etc., till the time of joining. 

Then we have a mock picot where the norm is to make an overhand tie and then work the stitches. This is something I have never been comfortable with. 

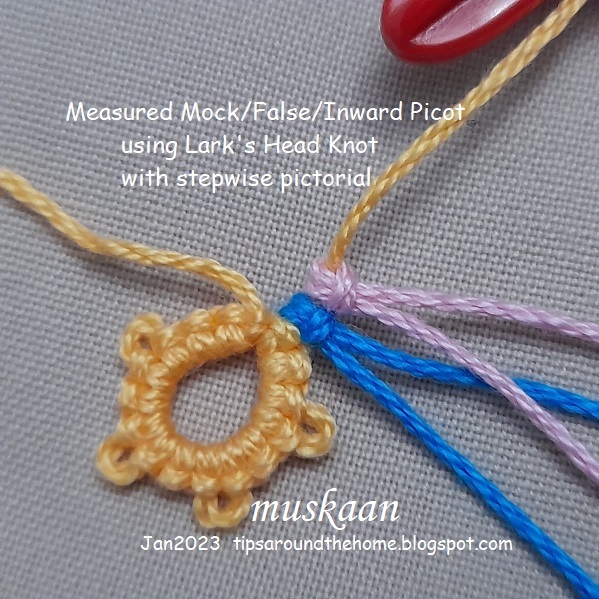
And it is these that led me to use scrap thread to hold the space, by making a lark's head knot (LHK), which is exactly the size and form of a double stitch. Now this gives me an accurate measure of a picot even when it is on the core thread.

Measured Mock/Inward Picot with LHK pdf  (click to download) https://drive.google.com/file/d/1GciBBglABtYVt3Jew5zn6chqhMjLQuqG/view 


1 Lark's Head Knot = 1 Double Stitch

The best part is that we can alter the size as desired! 
For a very small picot, make 1LHK with a smaller size scrap thread;
for a regular picot, use the same tatting thread and make 1LHK;
for a longer picot, use thicker thread for 1LHK, or several scraps for 2 or more LHK. 
The possibilities are endless. The mock or inward picot needn't even be regular. You can easily have an irregular picot with a longer core thread side and barely any space on the ball thread side, if a future join is to be made only on the lower end. 
The marker/scrap thread can be removed once the element is joined and the core thread is locked either with a lock join or with a ring.
Notice how all the picots above are of the same size and all the stitches are the same with not a single thread or bar out of place.

I put together some pics in a one-page pdf to show the steps involved.  Measured Mock/Inward Picot with LHK pdf  (click to download)https://drive.google.com/file/d/1GciBBglABtYVt3Jew5zn6chqhMjLQuqG/view 

If you remember, I've used the LHK to join at the beginning - it was called luggage tag loop (Georgia Seitz). eg. Radiant Sun paper clip tatting, Blossoms motifs, etc. (click for search results and patterns). The LHK is also used to add new thread since it gives the appearance of a double stitch. 

Related articles/resources -
Measuring the Picot - https://drive.google.com/file/d/1Kk6rtyIUvo5JFA5u3vE3ruU2Z7zQ9fuq/view

Tuesday, 20 April 2021

unmasked

Pin It now!

 Finally, after 3 years, when masking is almost a given globally, Alibaba has decided to unmask 5 of the 40 thieves. Dare he expose them to the pandemic without they being vaccinated? Is he cruel or is he testing their bravado? Only time will tell.

For now, whichever hemisphere you are in, let's enjoy the all-weather blooms, with these quick single shuttle sprays that can be used for appliqué, cards, tags, decorations, and so much more. 

Techniques : rosette ; picot join to the right ; luggage tag loop or larks head knot ; lock join.
All worked in Lizbeth size 20 threads (Sunkist mix) with a single shuttle.

Blossoms Motif #31  
2½ x 1½" 
  

Blossoms Motif #32 
<2½ × <1½"
 
Some joins are made between a ring segment. It helps to control the curvature of the spray besides being more stable.
 
Blossoms Motif #33 
2½ × 1¼"
 

Blossoms Motif #34 
> 2 × > 1½”

Blossoms Motif #35 
> 1¼ ×  1"

As with previous motifs, these can be arranged together in various formations to create new shapes and larger designs. I will share these after the last of the thieves are nabbed! So keep an eye out....who knows there might even be more than 40?

stay masked even if Alibaba comes calling! 😁

All Blossoms Motifs patterns are being listed under Nature 2D.


Friday, 26 March 2021

colour temptation

Pin It now!
 
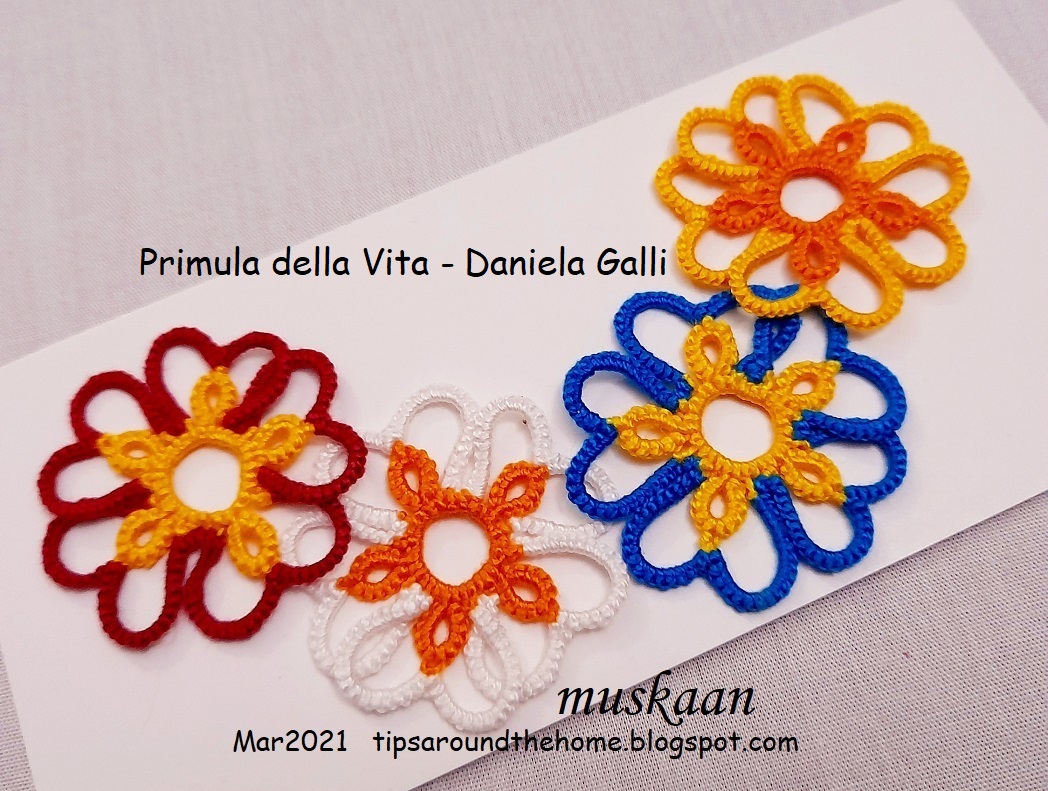
Nefertiti seems content with this necklace adaptation of Daniela Galli's Primula della Vita motifs😊
We are enjoying a long spring heading into the festival of colours (Holi) after which summer will set in (lunar calendars are way more accurate when it comes to seasons). No wonder I wanted to capture some of those colours in thread through this addictive floral motif shared by the very talented Daniela Galli for an event on facebook in early February.
Primula della Vita! And once started, I couldn't stop! Such a pleasing shape.
Each motif is 3.5cms in Anchor Pearl cotton size 8.
Would you believe that 3 years back I had saved an image hoping to convert the lovely primula flowers into tatting. That Primula mercerium image led me to this cluster which became my template for colour choices. This was my Mom's go-to flower to sketch! 
These are still unblocked and I like the slight overlap of petals! What to do now? A spring necklace! How to join? With leaves! 
On the top is the first leaf I tried, but cut off. Tried a few more ideas, including beads, and rejected all.
Finally settled on simple single-shuttle rings in different sizes. Strategically distributed to join adjacent motifs. 

Following 6 pics are close-ups where the 2nd of each pair has a Swarovski crystal in the center. Which do you prefer?
The core thread remains same through both rounds. After completing the central medallion, only the knotting thread was snipped off and hidden; a new colour was joined as knotting thread for the outer petals - false CTM method.
   
Tatting moves clockwise, all from the front. SCMR with thrown rings, climbing out with mock picot, and lock join are the only techniques for motif. 
TIP: Notice how I always use 2 metal jump rings? It is my way of assuring that even if thread slips off one ring, the other will hold it, till we can fix and close the gap.

My favourite kind of tatted lace - a bit of freeform, overlap, flowers - bringing in Nature in some small way!
These are all the materials used. Anchor Pearl cotton size 8 threads and beads, crystals. The details are notated on the pic.
Crystals sparkle in real life and give weight, body, and a finish to the necklace. 

Many many thanks, Daniela, for this wonderful pattern! I thoroughly enjoyed this project and hope to that the motifs in future as well.
Currrently there's an Easter 3D egg and cute chick pattern that Daniela has shared with the Chiacchierino: Filo, Amore e Fantasia group, if you wish to join in. It's on my to-tat list for later, but these amuse-bouches are so tempting for a relaxing distraction!