Showing posts with label SLT picot. Show all posts

Saturday, 21 January 2023

double juggle

Pin It now!

 I'm calling it double juggle, not double trouble, coz I'm thoroughly enjoying myself and only wish I had more time and brain space to spare. I am deeply involved in 2 large projects with 2 different partners and have to juggle between both - I find that my brain is compartmentalised and have to 'get into each mode'. 

First project is my late friend's tatting book I am editing- it is over 200 pages consisting of a manual and a dictionary. This will take many more months but Angela is an enthusiastic and quick worker, providing excellent technical and formatting support and then some more.

Second project is our current tat-along in our EP Facebook group with Ninetta. some of our participants have already completed the entire doily even though 2 more parts need to be shared. They followed Reiko's diagrams without waiting for us ;-D Oh, and the colours and combinations that are emerging are truly inspiring!

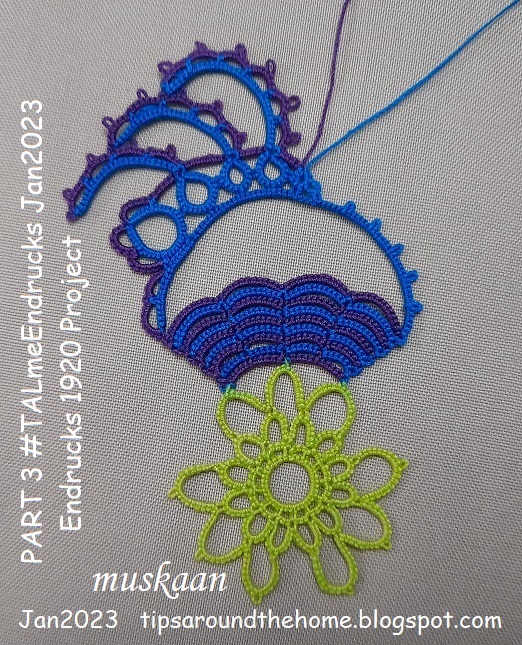
Parts 1-4 of #TALmeEndrucks completed in size 40 threads, going for a peacock impression.
Parts 1 & 2 posted here - https://tipsaroundthehome.blogspot.com/2023/01/tat-along-doily.html

PART 3 - After the central 'flower' and the 'basket', we work the first half over the 'handle' of the basket, continuing from Part 2. 

There is one inward picot and the rest is simple rings and chains.

Endrucks worked the entire doily continuously. However we are following Reiko Akamatsu's modified pathway and count.


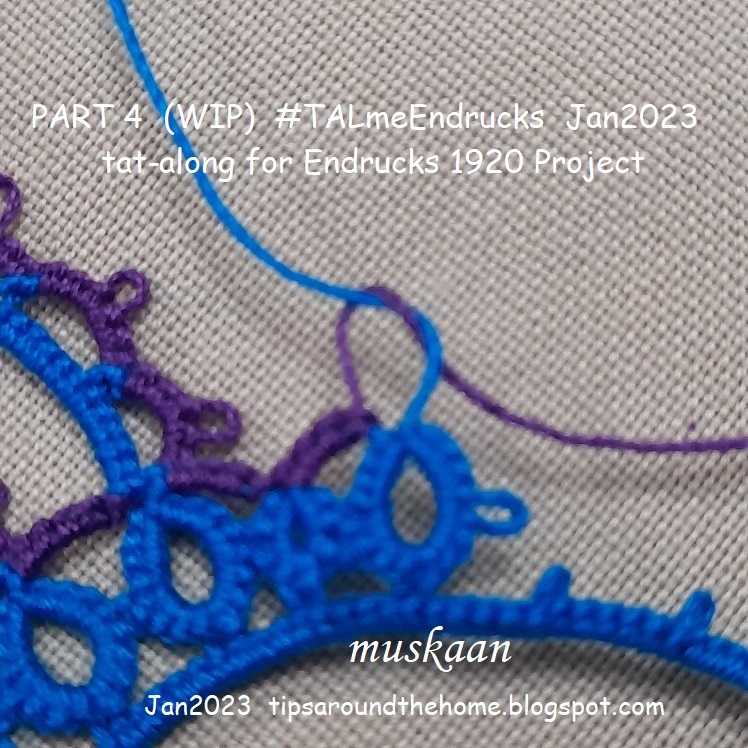
PART 4 - This is a mirror image of Part 3. Working with 2 colours means we need to switch shuttles before working the floating chains in order to get the same colour, unless one wants to use inward picots or Block Below Tatting (BBT).
I decided to work the lower chain first, then the upper scalloped chain. And since after this pair is made we need to anchor to the base and move to the right, I made an overhand tie/SLT, leaving a vsp space to lock join to later. 
I've used this SLT Picot before in a different scenario - https://tipsaroundthehome.blogspot.com/2015/03/experimenting-with-colours.html

And then again, for a mirror effect so that the last ring tilts accordingly, we need an inward picot on the chain. https://tipsaroundthehome.blogspot.com/2023/01/measured-picot-on-core-thread.html

As you can see, the first and last rings are reflections of each other. Believe me, I tried the ring 'normally', thinking the chain could be attached to the ring accordingly. But it looked all wrong and I had to undo it. So it is worth the effort.

I absolutely love the clever arrangement of the floating chains. Even if they are not joined to each other, there are so many possibilities - peacock's plumes, a jester's hat, a rooster's tail, foliage, .....what else?

Playing with flipping to see what comes up, LOL. Nothing to write home about.
The blue colour runs a bit and has seeped into the green below.

Fortunately, no more seepage occurred. Parts 3 and 4 are worked twice more.

Part 5 will be released tomorrow as 3 detached motifs and I will share my fun arrangements in a future post. But first I have to get back to juggling the editing and tatting the final part of this cover doily!

Saturday, 11 June 2016

something new, something old

Pin It now!
all text in blue are active links 
test-tatting for Jane Eborall
do you really think her patterns need testing ?!

I’m sure we’ve all seen Jane’s latest necklace. It is such a beautiful piece – simple elegance ! So when the opportunity to test tat it came, I grabbed it, even though (or perhaps especially because) I consider myself bead-challenged.
Don’t get me wrong – I love beads & admire all the exquisite beaded tatting & tatters who can accomplish it. Beads add not just beauty & ornamentation; they have functional significance too – adding more colours, adding texture & dimension, bridging spaces, eliminating auxiliary threads, …. you know more than I do. It’s just that when I work with beads, my eyes get all beady, my threaded hands get all knotty, and my head goes for a long beaded spin ! Time seems to whirl away while my tatting seems to crawl. So beads go from affecting my eyes, to hands, to brain, and the whole Time dimension :-(
Trial 1 : vintage threads Anchor size 30 ; size 9 beads ;
finished length - 2"
Instead of the necklace, I chose to tat only the earrings. Loved it !!! It was fun because large beads were used & no stringing them; and a great learning experience. It also turned out a blessing in disguise, because this bead in SCMR has solved a problem I was facing with one of my patterns. Thanks to Jane at so many levels :-)
Trial 2 : Anchor size 20 threads ; size 6 beads ;
finished length - 2½
My Notes :
  1. When closing the SCMR half-way, keep enough loop space on either side of bead. This eases joining back. Learned from the 1st trial.
  2. There was some mismatch between threads & beads which has stumped me. But the pattern is very forgiving.
  3. Instead of lock join, I used the outer thread join (Teiko Fujito). With LJ I was getting a distinctly visually split ring (as seen in the lowermost ring in both versions ; see arrows in pic below). The outer thread join reduced the colour blip at both ends of ring, giving it more of a complete circle effect.
  4. Bead within half SCMR is a great bridging technique for making a pattern in one-pass !

I didn’t have to refer to any tutorial ! My beads & attaching findings learning is taking shape ;-P

◘◘◘◘◘◘◘◘◘◘

Filet in Silhouette

I had been admiring Amanda’s filet tatting projects on Craftree for quite a while. Recently she offered to create a tutorial tat-along. How could I stay away ?!
Finally started yesterday. Went pretty smoothly.
Her directions & instructions are very clear & well laid out. 
Related Links : Craftree thread preparation ; Lesson 1 ; Lesson 2
My Notes :

  1. I used size 20 thread, hence increased chain stitches to 6ds for each chain segment.
  2. Ch5 can be made to face outwards as Ch1 & all the other chains in that ‘line’ (eg. Ch9, 13, etc).
  3. I used directional (fs/bs) tatting.
  4. The striver acts as a tiny picot gauge in position B, when used after the SLT . In position A, it acts as a barrier while including the tiny picot.
  5. Not all chain turns require an SLT & SPB. I could accomplish most of then with SPA, which, in effect incorporates an SLT, but around the striver.
  6. The construction using the strivers & SLT is also reminiscent of the Celtic Knotted Picot discussed in the overhand tie here
Incidentally, I have used what I called the “SLT picot” in Round 6 of Renulek’s Wiosna last year ! I wanted to change colour midway through a chain, but the pattern called for a small picot too (see pic below). I didn’t use a striver, just SLT, then a small picot. SLT or overhand tie helps to switch shuttle positions.

So, Lesson 1 (partially) is how far I got when I had to break for dinner & chores. But it must’ve been on my mind 'coz I filleted my own finger !!! Gotta give the shuttles a break :-(

◘◘◘◘◘◘◘◘◘◘

A doily tat-along by Renulek
Rounds 9 & 10 (size 40 cream Anchor thread)

Round 9 measures 10½”
A simple rings and chains round. So I went with direct tatting (reverse stitch) for the chains. I find it easier/faster to switch shuttles & work from the front than reel in & reel out the bobbin in main shuttle & reverse work. Worked counter-clockwise.
Yes, there was some ruffling, but Renulek had assured us that it will go away in a few more rounds.
Split chain to climb out to round 10

Round 10 measures 11½” 
Went with normal 2-shuttle tatting, since there were frequent floating rings. Didn’t make sense to do direct tatting. So working in clockwise direction, with reverse work & switch shuttles.
Again used a split chain & split ring to climb out for round 11.

◘◘◘◘◘◘◘◘◘◘

That’s all there is for now. I have finally taken photographs of my recent projects, so you can expect more posts soon :-)
Thanks for reading along …
and
many thanks to Jane, Manda-tory, & Renulek 

Wiosna 2016 Rnds 1-3 ; Rnd 4 ; Rnds 5-6 ; Rnds 7-8


Friday, 27 March 2015

Experimenting with Colours

Pin It now!
Do colours go round & round when tatting a doily ?
Do they Have to?
How about adding colour-stylishness to traditional rounds ?


Renulek’s  Wiosna  Doily 2015
Rounds 6 & 7 (pattern here)

I used a lot of collective wisdom in the earlier rounds of the Wiosna doily here. But wanted to do something more as the rounds progressed. And then I remembered Ninetta’s experiment with colour on her Anne Orr Doily here , & here ! Quelle inspiration.

Now, I liked the twirling effect of round 6 & did not want to use 2 colours within (ie. for chains & rings) since that would break up the ‘continuity’. But how about using 2 colours in segments ?! Why not play around with colour placement ?!
I also find Celtic interweaving very inspiring. Some superb effects have been created using normal shuttles, merely by placing colours appropriately. A recent excellent example is Sue’s working of Jane Eborall’s Roundabout Motif here !
  
So there I had it ; Collecting Inspiration !!! 
Round 6 would be broken into 2-colour repetitive segments & Round 7 would be the same 2 colours, but in alternating placement to previous round, creating a kind of undulating wave.

Sharing some of the techniques I used/worked out to put the visualization to practice.

  • “SLT Picot” (Round 6) 

Switching shuttles midways through a chain, And a picot required there ! So, Shoe Lace Trick to the rescue, but with a tiny space that became the picot.
The one shown in photo looks pretty good. But not all were good. This was very tricky to do since the natural tendency of this technique was to close the gap.
Why did I not use a Lock Stitch instead ? Because the colour blip of one unflipped stitch would show.

·        Large Rings (Round 7)
A little way into round 7, I came across Patty Dowden’s excellent tip on how to work large rings. Immediately tried it out with the 24ds ring & it worked Beautifully & smoothly !

In Patty’s own words & diagrams, which she has kindly permitted me to share here ( Thanks, Patty :-) ) :

Working with Large Rings
© Patty Dowden 2013

(This pattern) calls for large rings that require more than the normal amount of thread to be wrapped around the left hand that holds the working thread.
To avoid moving the working thread back and forth and produce a better double ring, or causing the thread to fray:
1. Enlarge the thread wrapped around your hand for each ring by doubling (or more) the amount of thread you normally use.
Wrap the excess around your pinkie, as for a chain, except hold the thread above your pinkie and wrap toward yourself instead of away from yourself. This allows the extra thread to be easily released one wrap at a time from the outside in.
2. Also, after making the picot or join at the halfway mark of a ring, leave a loop of core thread to allow for more easily closing the large ring in two steps. Close the first half by tensioning the core loop and then finish closing the ring by tensioning the shuttle thread.
                                           ooooooooooooo

It has many advantages – one does not have to keep pulling thread from shuttle at intervals ; it keeps the large ring from distorting ; it keeps the thread from twisting ; keeps the stitches neat & even ; closes the ring much smoother ! What’s not to like ;-P
But since habits are not easy to change, I felt more comfortable starting a ring normally, make 2 ds, Then pull the extra length of thread to wrap around my pinkie. Also, I totally forgot about the 2nd step, but pulling the thread all the way through, worked fine for this size ring.

  • Switching colours (Round 7) :

Lock Join for 1st ring of new segment
Each segment in this round is made of 6 repeats in one colour, before changing to next colour. At this point of change, a simple LJ using the core thread shuttle works because it is the same colour that will be continued for next 6 repeats.

Slope & Roll join for subsequent rings within segment …
However, while working these repeats within a segment, each shuttle has a different colour. Hence, when starting the 2nd to 6th repeats in a segment, I used the Slope & Roll Join as described/illustrated here.

…. accompanied by Shoe Lace Trick
Also, make an SLT Before & After the S & R join :
Before, in order to switch from chain to ring ; and
After, in order to move from ring to chain.
The S & R join does create a slight mismatch of surface. But it is a necessary evil in order to avoid the colour blip. The SLT helps flatten it to some degree. Tiny picot joins work better as noted next.

·        Tiny  Picot  Join  between  Chains  (Round 7) :

As mentioned above, there is a slight distortion/level-mismatch caused by the S&R join, mitigated only partially by the SLT. A tiny picot join between chains in round 7 , however, might have brought the chains more at the same level. This occurred to me halfway through the round, & didn’t want to ‘change’ at that stage. After all the next round & some ironing would bring it all together. Yet, caved in towards the last couple of segments & you can see the difference in the pic.

·        Wait  Before  Cutting  Out  Errors

When in doubt, wait ! Keep scissors at bay.
After 2 segments of round 7, I was dissatisfied with the ‘weaving’ effect because of the ring colour that connected to form a ‘wave’.
But I wasn’t certain a change would work better. So, kept off the scissors – after all 1/6th round was already complete - & started tatting a little distance away. I now had the option to either continue with the 2nd version & snip off the 1st, or vice versa.
Eventually, I stayed with the 2nd version & snipped off the earlier portion.


My  Dissatisfaction :
  • The thread colours in themselves were not inspiring enough. Too similar to bring the experiment to light. Will have to use black for next round.
  • “Interweaving” effect not prominent enough, again because the colours were pretty similar.
  • Secondly, I should’ve used Karen Cabrera’s 2-coloured Ring technique for the “interwoven”/crossover ring! As indicated in the picture above. 
  • A mistake exactly halfway through Round 7 which I discovered only at the very very end ! No patience to cut & redo half the round again.

Despite my dissatisfaction, I think it is worth trying out such an experimentation with colours even if one is working on traditional-type doilies. It probably lends some interest, some character, some modern stylishness.
Now on to the next rounds ...