Showing posts with label tatting tutorial. Show all posts

Friday, 26 December 2025

full of options tatting

Pin It now!

 In our endeavour since July 2025 to update patterns in our Endrucks 1920 Project collection, some PDFs posed a dilemma. For instance whether to leave the E1 shamrock and it's butterfly offshoot in the same PDF or to separate them. A survey in our FB group voted overwhelmingly in favour of the former. We took the opportunity to include a stepwise pictorial, add some missing portions, as well as options to work certain parts through some mini-pictorials.

E1 Happy Hands Shamrock and Butterfly by Diana Howe and Muskaan : 
https://drive.google.com/file/d/1_D5xY68NyfsKMB4LDr0GUv-WYC0VCba6/view (updated pattern link)

Following are some notable features -

This Way or Tat? (TWoT Notes): This is one of those patterns where many paths and options are possible.  Diana had diagrammed both clockwise and counterclockwise pathways (my E1 Happy Hands Heart from which it was derived could also be worked either way), and my working of the shamrock followed a third. Since it is a two shuttle pattern, just follow the shuttle which is in the right position, but adjust the instructions accordingly.  

I used contrasting colours in size 10 knitting cotton for the pictorial to clearly indicate which shuttle is in use.
Dimpled Yorkie: Since the heart ring is fairly large, it is a good idea to apply the two-step closure option as in the dimpled yorkie. Notice the bare thread on the left, just before the ring starts? It is part of the false picot ....

False Picot: Since there will be two back and forth chains at the base of the heart, a false picot is needed to prevent overcrowding. And the bare threads need to be long enough to accommodate them.

False Picot v/s Mock Picot): I distinguish between a false picot and a mock picot. The former is just bare thread left before and/or after an element to simulate a picot. The latter usually uses an overhand tie, a lock stitch, or a paperclip/spacer to make the picot. False picot is a much more vintage term than a mock picot, often used interchangeably, and the construction is left to the discretion of the tatter. However one should be aware of this since it may affect which of the two shuttles you will be using to continue. Does it coincide with what the designer intended? If not, the tatter will need to adapt accordingly.

Lock Join and Under-Over Join (U-OJ) aka Alligator Join: During my early trials with the original E1 pattern, I finally settled on making a lock join through the false picot in order to keep the chain in place. This was followed by ensuring that the two threads/shuttles were on either side of the picot (one above and one under).  
However the lock join can be eliminated completely and only the U-OJ can be used if so desired. And which thread you wish to keep above and which under is entirely up to the tatter. Just make sure to adjust instructions accordingly.

The first heart motif is complete in the above image. 

Armadillo join: While in the above model we went with the original consecutive joins (picot join on top and lock join below), this can be substituted with the armadillo join as explained in my previous post. https://tipsaroundthehome.blogspot.com/2025/12/armadillo-join.html . 

Over The Top Join (OTT): This is an adaptation of the U-O join when the space is too small for a shuttle to pass under (or one forgets to position the shuttles ahead of the final chain segment in the pattern). Above image shows Ninetta working it in the 2nd or 3rd repeat.

 
Ninetta's E1 shamrock and butterfly versions! Can't thank her enough for all her enthusiastic and prompt support in so many unexpected ways!

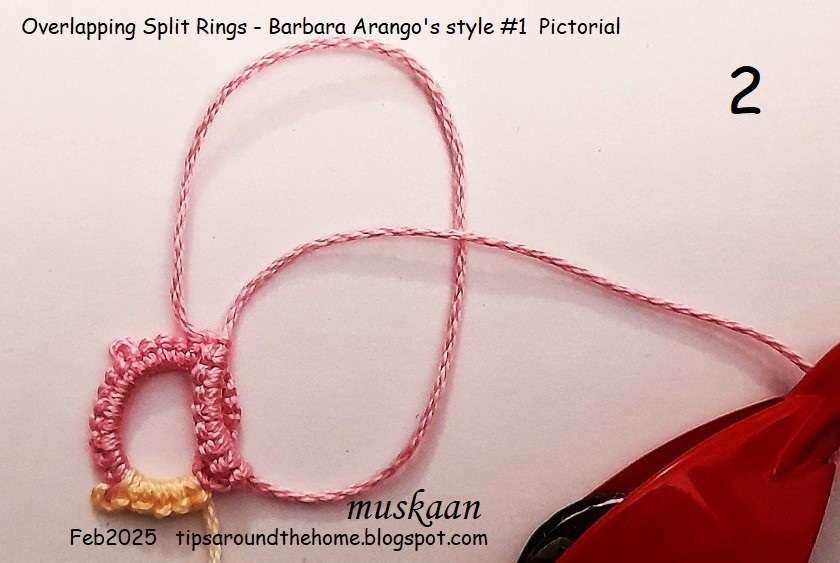
Stem : Diana recommended the BDS or padded chain for a stem. However, any decorative chain or cord can be applied such as the lock chain in above model, a pearl tatted chain, etc. 

Never let it be said that tatting is just rings and chains and picots, LOL.

We will soon be releasing the EP Tutorials document which endeavours to list all tatting techniques, effects, and terms used in the Endrucks patterns - original, reworked, and derived. Until then you can find tutorial links in the Tatting Resources tab above (https://tipsaroundthehome.blogspot.com/p/tatting-resources.html).

Please give credit to the designer and pattern, and use the tag #Endrucks1920Project when you post your version of the pattern.

Friday, 21 February 2025

overlapping interests

Pin It now!

Barbara Arango first caught my attention on FB several years back when she tried to recreate a design at the back of a hand mirror into a tatted motif! Since then she has successfully recreated more fabric prints into tatted lace. And in order to get the desired effect, she comes up with her own solutions. Some of these are clever adaptations or applications of existing techniques, though they evolve from her own trials and errors, the fruit of her own labours, without realising prior existence.

My recent post showing a tatted ring made with her overlapping split rings generated quite some interest and a couple of requests to show the steps. With Barbara's permission, I am sharing my pictorials along with pics of a few projects where she used them ... see for yourself how wonderfully they can be applied. Some quick practice patterns are also included but let your imagination take you places! All you need to know is how to tat split rings!!!

In the end, for immediate comparison, I have also included my own 2016 effect where I first coined the term. Links to a snowflake using the effect are also listed at the very end.

💦💦💦💦💦💦💦

Abbreviations used: Sh=shuttle in hand; CTM=continuous thread method; SR=split ring; vsp=very small picot; ds=double stitch; Ch=chain; - = picot; + = join to; LJ=lock join to.

There is no need to reverse work. The motifs are worked from the front continuously in clockwise direction or from left to right.

A]  Overlapping  Split  Ring  Braid, Barbara Arango style (2019)

2 shuttles (CTM if working in single colour). For pictorial I used two colours - Sh1: pink, Sh2:cream - Anchor knitting cotton size 10.
1. SR1: 8 vsp 5 vsp 8 / vsp 5.
NOTE: While the first ring can be worked as a normal ring, I prefer to start with a SR here so that the shape of all rings remains the same.  
2. Start SR2 leaving a very small false picot.
SR2: 8 +(SR1) 5 vsp 8 / 5.
3. 2nd split ring tatted and is being closed.
4. Two split rings made and you can see the overlap between them.

5. Repeat SR2 for desired length, joining to previous ring as you go.

Practice Pattern for ring, bracelet or choker
6. Above is the braid I had shared in the post, using the same count. This can be started CTM as a normal ring, too.
After tatting a few more rings, I joined the last ring to the first, keeping the overlap consistent. Think of this as an ANKARS joining, positioning one ring above the other before joining. 
Pre-string beads to embellish as desired and use as jewellery.

I like the rectangular shape created by the rings with the above count. Got to thinking how even SRs would overlap. 
So, here I used 8ds between each vsp. Rings are rounder, but the overlap is consistent. To get them to overlap more, the overlapping segments need to be longer.

And here are Barbara's projects (2019-2022) using the braid style -

Notice how the rings get smaller?

The applique and embroidered designs on the left inspired her to recreate it in tatted lace and she used the overlapping SR braid effectively.

And to remind you of the practice pattern I shared in my previous post: 
💦💦💦💦💦💦💦

B]  Overlapping  Split  Rings , Barbara Arango style #2 (2021)

The same technique as above but used in a kind of onion ring formation, in one pass. Here Sh1 has cream and Sh2 has pink thread.  If working with single colour, use continuous thread.

1. SR1: 5 vsp 10 / vsp 5.

2. Leave a very small false picot and start 2nd split ring.
SR2: 10 +(SR1) 5 / 5. Switch shuttle
3. With Sh2 in hand, continue for chain...
Ch: vsp 10 - 10 LJ(SR1) 10 - 10 LJ(SR2). Switch shuttle
4. One motif of overlapping split rings made, all worked from the front.
5. Start 2nd motif with Sh1 in hand, leaving a very small false picot.
SR3: 5 vsp 10 / 5.
6. Repeat from SR2 onwards for desired length. 
TIP: Instead of a lock join  through the false picot, one can make an under-over or alligator join from the 2nd motif onwards.

Wouldn't this make a lovely bracelet or choker when embellished with a few choice beads!

And here's how Barbara applied it in a doily (2021) -
This is the doily inspired by a design behind a hand mirror. And to get the effect, she cleverly used this formation of the overlapping split rings! Since then she has created several more designs which you can view in the Just-Tatting FB group.
💦💦💦💦💦💦💦

 Overlapping Split Rings , Muskaan (2016)
It was back in 2016 that I first shared my nascent trial and coined the term Overlapping Split Rings. As you can see from the pic below, my method involves a braid of uneven split rings which are folded and joined back to create an overlap in the center. The SRs remain free in the center creating a distinct 3D and faux Celtic effect. 
SR-A: 9 / vsp 12.
SR-B: 4-1-1-4 / 12.
SR-C: 9 / 12.
Lock join to vsp of A.
One motif created. 

I used this motif to design a snowflake. Despite the immediate help of my trusted test-tatters, I haven't published the pattern here. I called it the Mutant Snowflake. Following are respective posts - 
We can also increase the number of rings to get polygonal shapes and interesting overlaps!

I realise this is a long post. However, if I didn't post now it would further get delayed. Thanks for your patience in reading this and hope you try and experiment with some of them.
💦💦💦💦💦💦💦

In case you wish to use leftover threads for trials, here are a couple of pictorials that will help you start knotless with a split ring without CTM
How to start a split ring with a picot - PDF: https://drive.google.com/file/d/1OS_9VdZSoWVSsOtQYT8UVb4nV6exmf2p/view
💦💦💦💦💦💦💦

Many thanks to Barbara for extending the boundaries! All in the eye of the beholder!

Saturday, 13 January 2024

association

Pin It now!

 When we come across a new tatting term/technique, always try to place it within the larger set of techniques you already know. You will be surprised to find that you might already know the technique or at least parts of it. And then learning becomes easier, smoother, and associative.

One of the first messages waiting for me yesterday morning was about the Loop Tatted Ring (LTR) in the Christmas Star pattern by Krystyna Mura, an E31 adaptation. [pdf: https://drive.google.com/file/d/1fz0Hd9jgGnS_qWKayw4UX2Ikr-mp-npb/view]. It starts with a LTR over a bead. 

Despite the video and pictorial links suggested in the pdf itself, Ulrike found it difficult to grasp. I, too, watched a few videos, consulted a few tutorials and found that it could indeed be difficult to grasp, despite the resources themselves being good.  For one, they were all about a LTR on a ring which meant there are too many loops to consider, keep track of, and can become confusing.

That got me thinking and here's how I went about it. Deconstruct the LTR and you will find the basic concept, or at least some steps, is something you might've done before.

Step 1. Can you finger-tat?

Step 2. Have you tatted a single shuttle split ring (SSSR) Mathew Takeda style?

If the answer to both these questions is YES, then you are well on your way to tatting a Loop Tatted Ring! 

Very soon, she came back with her SSSR braid , having consulted a few resources listed in my Resources page [https://tipsaroundthehome.blogspot.com/p/tatting-resources.html]

Step 3. Now tat an entire ring using only the finger-tatting method. After all finger tatting with a loop employed for part of the segment of a SSSR is exactly what you do in LTR, but for the entire ring! 

And by jove, she got it! All within a few hours.

Step 4. Now we can tat the LTR over a bead easily as shown in several tutorials. 

I had written the entire post yesterday but then thought a limited/specific pictorial would help other tatters facing a similar issue, to work this lovely Star pattern too. Hence today I created a stepwise how-to for Rounds 1 & 2 of the pattern. I also took the time to read Miranda's post and pictorial again after several years and discovered the similarities of association! She also gives a nice history of this technique. I apologise for the unintentional repetition. Unfortunately Sabina Madden's site is down though she is trying to find another server to reinstall paradisetreasures.com.


LOOP TATTED RING for E31 STAR - pictorial pdf - https://drive.google.com/file/d/19q6JKdOyACqh8oz-Z0vzHgh-YCIZ5xBd/view

Now a Loop Tatted Ring or LTR is not limited to a LTR on Ring (LTROR). It can be used in several different ways, including on a chain as a thrown ring [https://tipsaroundthehome.blogspot.com/2021/08/thrown-floating-and-8-rings.html pages 7-8 in the pdf] or after a chain. 

Here it is used as a central ring. We could've used a normal ring or a mock ring. But with both methods, we would not have been able to seamlessly add the bead through both threads to resemble the bead on a picot. LTR allows us the freedom to work continuously with the bead. In a lot of circumstances LTR allows us to tat something that would normally require a 2nd shuttle.


Related Posts
-
https://tipsaroundthehome.blogspot.com/2016/07/refresher.html

Wednesday, 27 April 2022

from innie to outie

Pin It now!

 Ahem, not quite so graphic! The title of this post refers metaphorically to the Leaflike Rings shown in my last post.  https://tipsaroundthehome.blogspot.com/2022/04/show-stopper-or-show-topper.html

Krystyna Mura tweaked the Dimpled Ring to create this cute and usable shape. After making the dimpled ring, pull out the dimpled part ('un-dimple' the ring) and we have a ring resembling a leaf!!! Simple. I just had to try it despite the paucity of time.

Here I used the same effect for flower petals as well as the leaves on a Josephine Chain stem. 

The best part is that these leaflike rings can be made with a single shuttle or thread, since they are true rings.
However they can also be worked as Mock Rings, especially if the ring is too large. 

Above is my very first trial soon after reading the method, without referring to it. In my haste, the joining as well as the 'un-dimpling' became martyrs. 
I added a picot in the hopes of creating a pointier tip. And now it looks like the silhouette of a bird, doesn't it? Can you also see birds on a wire? 

I tried the bird idea, with a 3/4th profile and beads for eyes, and a mock ring for easy closure. I even added a tail. However, it is still incomplete and I haven't been able to get back to tweaking it to give it my visualized look. Some day soon ....

You can download the mini-tutorial with clear instructions prepared by Krystyna Mura by clicking this pdf link - https://drive.google.com/file/d/1X9hjCbchDxQbPhUn30dviKExAeGUocI-/view 
She has cleverly used these leaflike rings to simulate the eyes of a Bat! So how are You going to use this simple dimple un-dimpled effect?

Friday, 17 July 2020

lock join plus

Pin It now!
Many months back, in response to some curiosity and confusion among several tatters, I decided to illustrate the simple progression and functional similarity between a few techniques. Here the underlying common factor is the ubiquitous Lock Join. Add one extra step to the LJ, and it opens up the canvas to change colours, shuttles, and even direction of chains.
I took stepwise pics for each of the combinations back then, but preparing a proper stream-lined article has taken way more time than intended. I am immensely grateful to Anita Barry, Master Tatter, for her proofing and editing.


In order to make the document manageable, it is uploaded as a series of 5 pdfs, each a stand-alone (click on each title to download) –
PLEASE NOTE - Most of these are also Reposition Methods which can be used even without a lock join to change direction, create points or curves, etc.

  1. Lock Join Plus – Executive Summary and practice Patterns for further exploration. (3 pages)
 
How one extra movement after a lock join can open up the canvas to change colours, shuttles, and even direction of chains. 

For starters, a simple 2-colour motif is used where all chains face the same direction. But for further exploration, more patterns are listed. 

  1. LJ Plus - Lock Join (LJ) pictorial (1 page)
 
How to make the lock join using both up and down loops. 

Notice how the colour blips in the 2 right joins are larger than the remaining 3. If the down loop LJ is followed by a 2nd half-stitch, the blip is almost hidden completely.
Links to undo a LJ and variations that include making a LJ with 2nd shuttle.
See also Lock Join in Mock Rings


  1. LJ Plus – Reposition pictorial (1 page)
 
A laissez-faire crossing of threads. Simple, quick, vintage. Compare how chain segments change colour and the slight overlap at the start of each chain.

  1. LJ Plus - Shoe Lace Trick (SLT) pictorial (1 page)
 
Tying a half knot outside the LJ – overhand tie or SLT. Again chain colours get switched. SLT also allows us to switch the core thread in instances when the shuttle is running low on thread.

  1. LJ Plus – Reverse Join (RJ) pictorial (2 pages)
 
Encapsulating or entrapping the other thread within the LJ. Created by Elaine P Gan (tattingbox). 

Pics showing an up loop and a down loop. The latter 
minimises the colour blip in a RJ as well.

Functionally the same as crossing and SLT after LJ, but more elegant and efficient – a smooth transition.


After each or either of these, if we turn work, reverse work, switch shuttle, and/or direct tat (unflipped stitches) the next chain, we add another dimension – changing the direction of the chain! Along with colour. Our choices multiply! And we might even be able to work throughout with just one shuttle and ball. To explore these choices, some practice patterns are listed in the main pdf. Besides block tatting, think also of filet tatting, especially in 2 colours, where these can be used effectively. I forgot to mention the role of lock join plus in mock rings and mock onion rings, but you get the idea, right? Wherever you have 1 or more chains joined below, play with LJ Plus!
I used all the above 4 in this vintage edging from Priscilla Tatting Book3 Fig 29 where the chains move to and fro. We can turn work after each chain or we can work every alternate chain directly (reverse stitch - unflipped). I started with LJ, then tried reposition, SLT, and RJ after every 3rd chain. Shuttle in hand changes depending on our choices.

So I'm sure there is no need to spell out why I presented this article/pdfs in the way I did? There is lot of scope to play and design because each method has it's own pluses and minuses!
Do you see a butterfly in the above arrangement? Time to pick up my shuttles again and work out a pattern ;-D
Before that you might get fed one more lesson, so stay locked in ;-P

UPDATE 1: When working with only one shuttle and ball, changing the direction of chain using direct tatting - https://tipsaroundthehome.blogspot.com/2021/06/2nd-shuttle-or-ball.html 
UPDATE 2: Carrying on with functional movements, see pictorial Twist Work (TwW) -


Wednesday, 15 July 2020

splitting the mesh

Pin It now!
My Italian Connection is at play again, splitting chores! Couple of days back Elisabetta De Napoli shared a picture of her filet tatting in an Italian facebook group. On request, she readily created a series of pics and explanation to share through my blog. Ninetta, ever gracious, did the translation and added her notes. Yours humbly had the privilege to assemble, 'polish', and present. So without more ado, here’s her split chain method of filet tatting.
At the end is her Italian version, verbatim.

Filet Tatting (split chain method)
by  Elisabetta De Napoli
Two shuttles, continuous thread (CTM).

Fig1) Foundation Row: Start a dead end chain, holding a picot space. work for desired length, finishing with 4ds. The above model has 6 picots separated by 4ds.
       Ch: picot, 4ds, [1 picot, 4ds]x5 

Fig2) Turn the Corner: Reverse Work and switch shuttles or do a shoe lace trick (SLT), then continue with a chain to move to the next level or row.
Row 1: consists of 6 split chains, joined to the foundation row picots.
       SCh: 4ds, 1 picot, 4ds / 4ds.
To make a Split Chain (SCh) leave bare thread just enough for 4ds, lock join to nearest picot of previous chain, tat 4ds. 
(see tutorials - https://tipsaroundthehome.blogspot.com/p/tatting-resources.html )

Fig3) Make split chains for the entire length/till the end.
       [SCh: 4ds / 4ds]x5

Fig4) Repeat steps 2 and 3 for as many rows as desired.
This creates an Open Filet or mesh.

To Fill a Square: Plan ahead in the previous row to include small picots for joining. As can be seen in the image, the 2nd and 5th chain segments in Row2 have very small picots. This is how it is done here …
Picoted Chain segment (pCh): To fill a square in the next row, in the previous row a plain 4ds chain includes tiny picots as follows -  
       pCh: 1ds and 1fhs, 1vsp, 1reverse order ds (1shs and 1fhs), 1vsp, 1shs and 1ds.
(basically, 4 ds is divided into 1.5ds at the ends and 1rods in the center flanked by 2 small picots. The picots are made within a ds rather than at the end of a ds - as in backside chains)

Fig5) Row 3: Of the 6 squares, the 2nd and 5th squares will be filled here, which means there are 2 extra split chains within the square.
       Make 1st open square:  4ds, 1picot, 4ds, SCh: 4ds.
       Filled square: [SCh: 1ds / 4ds]x3
       2 open squares: [SCh: pCh / 4ds]x2
       1 filled square: SCh: 1ds / 4ds.
       Last open square: SCh: 4ds / 4ds.
       Move up to Row 4.

Fig6) Row 4. We planned ahead in Row3 which squares we want to fill in this row. Hence picots were included and accordingly in Row 4, squares 1&2 are open, 3&4 are filled, and 5&6 are open.

For Filled Square Over Filled Square:
If next row has an empty square over this filled one, tat normal ds between split chains (total 4ds). If next row has a filled square over this filled one, tat the same sequence as in the picoted chain segment in this way: 
       the chain is 1ds and 1fhs, 1split chain (4ds), 1reverse order ds (1shs and 1fhs), 1split chain (4ds), 1shs and 1ds, all in place of 4ds.

∞∞∞
This is what Elisabetta says, for our Italian friends –
Ciao Ninetta, ti invio le foto che ho fatto e le spiegazioni:
2 navette e filo continuo
1° lavorare un arco di 1 pip  4 nodi fino a raggiungere il numero di spazi vuoti
 che occorrono;
2° girare e lavorare 4 nodi 1 pip 4 nodi e agganciarsi al primo pip  lasciando lo spazio per uno split chain di 4 nodi e ripetere, 4 nodi e split chain di 4 nodi, fino all'ultimo piop;
3° girare il lavoro e ripetere come il primo giro agganciandosi al piccolo pip che si crea tra i gruppi di 4 nodi;
4° per avere degli spazi pieni occorre prevedere, nel giro precedente dei piccoli pip nei gruppi di 4 nodi. (*)
Spero sia sufficiente, in caso contrario io sono qui.
Ti abbraccio e ti ringrazio anticipatamente **
∞∞∞

Filet Tatting - some other methods (with updates):
I have little experience with actual filet tatting. But here are links to a few other methods –

  • 'Reversing Chain' method in John’s and Jeff’s blog. Read the comments, too, for answers.
  • Mary Konior's rings/floating rings and chains method in Margaret's blog (image only).
  • and a similar 'Filet-Ochhi' rings and chains method by Christel Wutzmer and Agnes Focke from "Doppelknoten" Nr. 7 (2005) in Jeff's blog (image only).
  • Shoe Lace Trick method by Mandatory (my notes on this method here- https://tipsaroundthehome.blogspot.com/2016/06/something-new-something-old.html ) She has done quite some experimenting with filling effects (pics in her Craftree album)
  • Sue Hanson's tiny split chain basket (taught at Spokane, 2008 and pattern shared in many facebook groups) is a bit similar to the above method and uses 2 colours. 

I have been working on a tutorial series about lock join and chains, and this fits right in, especially if you take up a 2-colour challenge – I had forgotten about filet tatting! Life has intervened major-ly hence the delay in polishing it up. But soon – Anita has been proofing it …


Many many thanks to Elisabetta and Ninetta – share the joy!