Showing posts with label starting rings without a knot. Show all posts

Friday, 21 February 2025

overlapping interests

Pin It now!

Barbara Arango first caught my attention on FB several years back when she tried to recreate a design at the back of a hand mirror into a tatted motif! Since then she has successfully recreated more fabric prints into tatted lace. And in order to get the desired effect, she comes up with her own solutions. Some of these are clever adaptations or applications of existing techniques, though they evolve from her own trials and errors, the fruit of her own labours, without realising prior existence.

My recent post showing a tatted ring made with her overlapping split rings generated quite some interest and a couple of requests to show the steps. With Barbara's permission, I am sharing my pictorials along with pics of a few projects where she used them ... see for yourself how wonderfully they can be applied. Some quick practice patterns are also included but let your imagination take you places! All you need to know is how to tat split rings!!!

In the end, for immediate comparison, I have also included my own 2016 effect where I first coined the term. Links to a snowflake using the effect are also listed at the very end.

💦💦💦💦💦💦💦

Abbreviations used: Sh=shuttle in hand; CTM=continuous thread method; SR=split ring; vsp=very small picot; ds=double stitch; Ch=chain; - = picot; + = join to; LJ=lock join to.

There is no need to reverse work. The motifs are worked from the front continuously in clockwise direction or from left to right.

A]  Overlapping  Split  Ring  Braid, Barbara Arango style (2019)

2 shuttles (CTM if working in single colour). For pictorial I used two colours - Sh1: pink, Sh2:cream - Anchor knitting cotton size 10.
1. SR1: 8 vsp 5 vsp 8 / vsp 5.
NOTE: While the first ring can be worked as a normal ring, I prefer to start with a SR here so that the shape of all rings remains the same.  
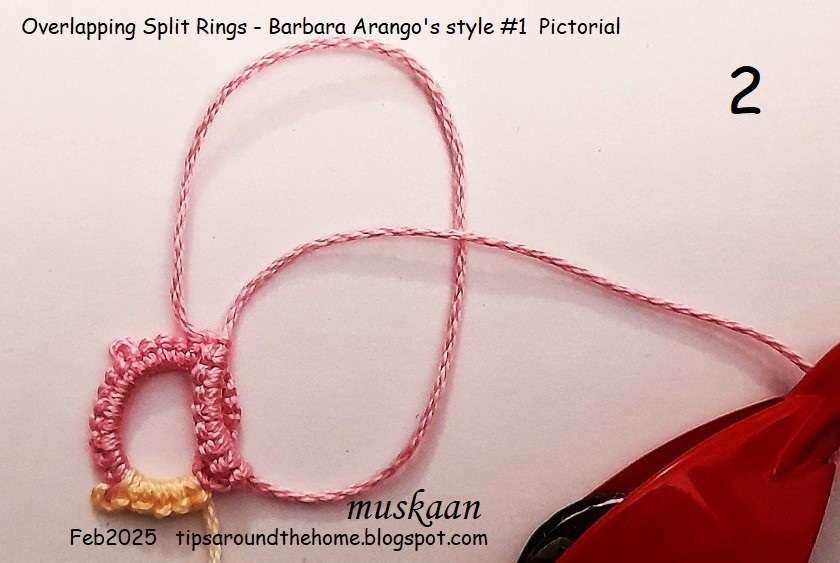
2. Start SR2 leaving a very small false picot.
SR2: 8 +(SR1) 5 vsp 8 / 5.
3. 2nd split ring tatted and is being closed.
4. Two split rings made and you can see the overlap between them.

5. Repeat SR2 for desired length, joining to previous ring as you go.

Practice Pattern for ring, bracelet or choker
6. Above is the braid I had shared in the post, using the same count. This can be started CTM as a normal ring, too.
After tatting a few more rings, I joined the last ring to the first, keeping the overlap consistent. Think of this as an ANKARS joining, positioning one ring above the other before joining. 
Pre-string beads to embellish as desired and use as jewellery.

I like the rectangular shape created by the rings with the above count. Got to thinking how even SRs would overlap. 
So, here I used 8ds between each vsp. Rings are rounder, but the overlap is consistent. To get them to overlap more, the overlapping segments need to be longer.

And here are Barbara's projects (2019-2022) using the braid style -

Notice how the rings get smaller?

The applique and embroidered designs on the left inspired her to recreate it in tatted lace and she used the overlapping SR braid effectively.

And to remind you of the practice pattern I shared in my previous post: 
💦💦💦💦💦💦💦

B]  Overlapping  Split  Rings , Barbara Arango style #2 (2021)

The same technique as above but used in a kind of onion ring formation, in one pass. Here Sh1 has cream and Sh2 has pink thread.  If working with single colour, use continuous thread.

1. SR1: 5 vsp 10 / vsp 5.

2. Leave a very small false picot and start 2nd split ring.
SR2: 10 +(SR1) 5 / 5. Switch shuttle
3. With Sh2 in hand, continue for chain...
Ch: vsp 10 - 10 LJ(SR1) 10 - 10 LJ(SR2). Switch shuttle
4. One motif of overlapping split rings made, all worked from the front.
5. Start 2nd motif with Sh1 in hand, leaving a very small false picot.
SR3: 5 vsp 10 / 5.
6. Repeat from SR2 onwards for desired length. 
TIP: Instead of a lock join  through the false picot, one can make an under-over or alligator join from the 2nd motif onwards.

Wouldn't this make a lovely bracelet or choker when embellished with a few choice beads!

And here's how Barbara applied it in a doily (2021) -
This is the doily inspired by a design behind a hand mirror. And to get the effect, she cleverly used this formation of the overlapping split rings! Since then she has created several more designs which you can view in the Just-Tatting FB group.
💦💦💦💦💦💦💦

 Overlapping Split Rings , Muskaan (2016)
It was back in 2016 that I first shared my nascent trial and coined the term Overlapping Split Rings. As you can see from the pic below, my method involves a braid of uneven split rings which are folded and joined back to create an overlap in the center. The SRs remain free in the center creating a distinct 3D and faux Celtic effect. 
SR-A: 9 / vsp 12.
SR-B: 4-1-1-4 / 12.
SR-C: 9 / 12.
Lock join to vsp of A.
One motif created. 

I used this motif to design a snowflake. Despite the immediate help of my trusted test-tatters, I haven't published the pattern here. I called it the Mutant Snowflake. Following are respective posts - 
We can also increase the number of rings to get polygonal shapes and interesting overlaps!

I realise this is a long post. However, if I didn't post now it would further get delayed. Thanks for your patience in reading this and hope you try and experiment with some of them.
💦💦💦💦💦💦💦

In case you wish to use leftover threads for trials, here are a couple of pictorials that will help you start knotless with a split ring without CTM
How to start a split ring with a picot - PDF: https://drive.google.com/file/d/1OS_9VdZSoWVSsOtQYT8UVb4nV6exmf2p/view
💦💦💦💦💦💦💦

Many thanks to Barbara for extending the boundaries! All in the eye of the beholder!

Friday, 5 June 2020

peony interlaced

Pin It now!

Moving beyond linear designs, my next interlacing project is circular. It is still a work in progress since I want to go beyond a single round. I have an idea of what I want, but the exact number of rounds is still a mystery.
And this time there are 4 shades, one in each shuttle. Here’s how I started the first split rings without any knot(scroll down to 'C')

A short while back Anita sent me a photo of her peonies, and I have tried to capture the flower as best I can in the shades I have.
Anchor cotton, size 20.
4 shuttles. Shuttles 1 & 2 have the darker reds; shuttles 3 & 4 have pinks.


Basic pattern :
SR1 : 12 / 11, do not close. Pass shuttle #3 front to back through SR1.
SR2 : 10 / 10. Pass Sh3 front to back again, close both split rings and repeat, joining back to first pair.

Peony Wreath pattern
For a floral effect, as seen in the model, the outermost edge has graduated picots and the pattern is as follows –
SR1 : 1 (–1)x11 / 11, do not close. Pass shuttle #3 front to back through SR1.
SR2 : 2 (–2)x4 / 2 vsp 6 vsp 2. Close both SRs after posting Sh3 again.
Repeat these 2 SRs, joining to the vsp of previous ring, and back to first pair. There are 10 pairs in total.

This can be a standalone project. Add beads and findings for earrings or pendant, or use as a tree ornament. Perhaps a miniature frame? It measures 2" across.

If you wish to continue, here’s the next round with petals….
Peony pattern (DIP)
Folded chain technique or Victorian Sets is used to create the dimples – a set of 1st half stitches (fhs) followed by a set of 2nd half stitches (shs) creates a beautiful dent.

Worked with one shuttle and ball, continuous thread. Attach to space between outer split rings.
Chain : 2 vsp 8, 4fhs 4shs, 3 – 5 vsp 2. lock join to next space.
[Chain2: 2 + 8, 4fhs 4shs, 3 – 5 vsp 2. lock join to next space.] Repeat all around.
Note: I count the lock join, followed by 2nd half stitch as 1 double stitch.

Since the next rounds are going to be in variegated pink, yellow was chosen to break the excess of pink (not a shade I am fond of). However, one can continue with pinks or any colour of your choice, and climb out using split chain.
At this stage it measures 2½” across.

So, what do you think? I’m pretty happy at how it’s shaping out, though there is ample scope for improvement in all areas. But I'll let it be for now. 

Saturday, 29 November 2014

Interlaced Rings - III

Pin It now!

How to Start Interlaced Split Rings Braid

When I posted a couple of step-by-step tutorials on Interlaced Split Ring Braid, that had not been my intention at the onset. Clicking the photos was merely a means of keeping track of what I was doing & for future reference. Hence, the pics start only from the 2nd pair of rings. While the same technique can be easily applied to start the 1st set of rings, some have found it difficult to do so. I am grateful to Susan  for bringing this to light. At the time, I was engaged in other activities & quickly tatted up a pair (using the same colours that she had been working with) & emailed the pics ( Here is her final version). I have finally gotten around to preparing a systematic tutorial for all those who may have found this a little difficult to tackle.

Abbreviations used :
SR – Split Ring ; ds – double stitch ; CTM – Continuous Thread Method ; Sh – Shuttle ; SLT – Shoe Lace Trick

Pattern :
Each SR is 9/9 ie. a total of 18 ds per ring.

Starting with Single-Coloured Rings , CTM
(Click on images to enlarge) 
If one is making single coloured rings , the 2 pairs of shuttles can be wound CTM. 
It is, then, a simple matter, of tatting Normal’ rings or tatting rings in the 
normal way (Not as SRs) but interlacing them before closing either ring !
 αØαØαØαØαØαØαØαØα

A. Over & Under Rings (Front to Back Movement)
1. Start with Sh1, make a normal ring of 18 ds. Do Not Close. Pass Sh3 through the ring, from front to back.


2. Make a loop with Sh3 thread with the part that is at the front, in order to commence 2nd ring.
3. This pic shows how the loop will be formed front to back.
 
4. 1ds of ring#2 made with Sh3.
5. 9ds completed. Since the thread is wound CTM, continue making the next set of 9ds with same Sh3, as a normal ring.
6. 18ds (9+9) of ring#2 completed as a normal ring. Do Not Close.
  
7. Pass the Sh3 Again front to back. (post the shuttle). 
8. Start closing both rings, After posting shuttle.
 
9. Both rings closed & interlaced Over & Under (ring#1 is ‘Over’ & ring#2 is ‘Under’ in relation to each other).
10. Another set of interlaced rings made, this time Split Rings, but following the same basic technique as above, or as demonstrated in the detailed tutorial here.

αØαØαØαØαØαØαØαØα

B. Under & Over Rings (Back to Front Movement)
1. With Sh1, make a normal ring of 18ds (9+9), if working CTM. Do Not Close. 
Pass Sh3 through this open ring from back through to the front.
2. Pull out a loop with Sh3 with the part that is at the back, in order to commence 2nd ring. 
3. This pic shows how the loop will be formed back to front.
4. 9ds of Ring#2 made with Sh3.
Since the thread is wound CTM, continue making the next set of 9ds with same Sh3, as a Normal ring. 
 5. 18ds (9+9) of ring#2 completed as a normal ring. Do Not Close.
 6. Pass the Sh3 Again back to front through Ring#1 (post the shuttle).
7.  After posting shuttle, both rings are closed. These are interlaced Under & Over 
(ring#1 is ‘Under’ & ring#2 is ‘Over’ in relation to each other). 
8. Another set of interlaced rings made, this time Split Rings
but following the same basic technique as above, or as demonstrated in the detailed tutorial here.

αØαØαØαØαØαØαØαØα


C. Starting with Two-coloured Split Rings or Separate threads
When each ring is made of 2 colour, Or the threads in each pair of shuttles is not wound continuously 
(for instance one may want to make use of some leftover threads), 
then the interlaced rings Have to be started with Split Rings.

I have used 4 left over threads. If it can be helped, I never start tatting with a knot, and that is how I have demonstrated here. However, you can follow your own method. 
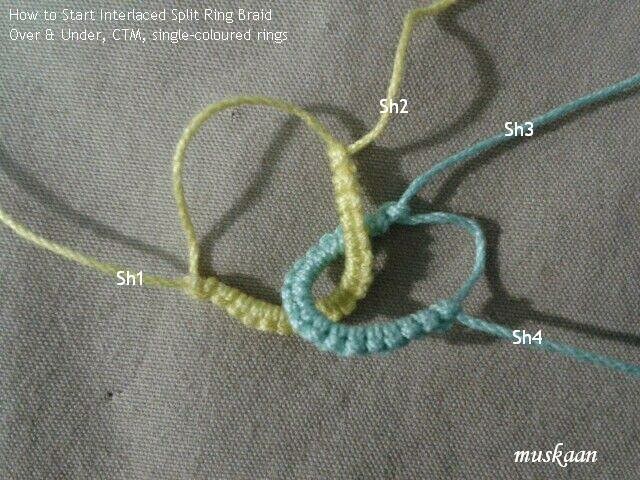
 1.Each pair of threads is simply intertwined as shown, without any knotting.
 2. Make loop with Sh1 to start Split Ring #1. 
9ds made with Sh1, enclosing/hiding the short beginning end within the stitches.
TIP : Generally the thread is hidden only within the 1st 3-4 ds. But I like to hide it till the 1st picot is reached or as in this case, till the end of ring. This provides a seeming evenness to the tatting, Especially while closing ring.
 3. 9ds made with Sh2 to complete the other half of the split ring, 
enclosing/hiding the short beginning end within the unflipped stitches. Do Not Close the SR.
4. Sh3 is brought through the SR#1 from back to front & looped to start Split Ring #2. 
(for details on looping, refer to section B above). Keep the thread pair entwined.
Note that the tiny tails that were still visible in SR#1, have now been snipped off. 
 5. 9ds made with Sh3, hiding the thread end within these stitches. 1st half of SR#2 completed.
 6. 9ds made with Sh4 to complete the 2nd half of the split ring, hiding the thread end 
within these unflipped stitches. Do Not Close the SR.
7. Post the shuttle (Sh3) through SR#1, back to front, & begin closing both rings. 
 8. One pair of starting Interlaced Split Rings completed (Under & Over type).
I have shown detailed steps for only this Under & Over kind of Interlaced SRs, but I’m sure the basic idea is now clear & one can similarly Start with Over & Under Interlaced SRs using 2 or more colours.
9. This pic shows how I switched Both the colours along each side of the braid (ie the SRs), 
As Well As the overlap – the 2nd pair of interlaced SRs are Over & Under type. 
In order to switch the colours, all I did was an SLT ! 
Love the potential of this as an Sinusoidal Bracelet & will be making it soon !!!

αØαØαØαØαØαØαØαØα

Important Note :
There may be different ways that tatters pick up the thread & loop it around when starting the 2nd (interlaced) ring. This difference may mean a slight variation in the penultimate step where shuttle might not need to be posted. Follow what is comfortable to Your tatting style. Just make sure Before closing both rings, that the shuttles are on opposite sides : Sh1 & Sh2 pair should be on opposite sides of Ring #2, while Sh3 & Sh4 pair should be on opposite sides of Ring #1.

UPDATE :  See how to pick up and wrap the loop around the hand to start tatting this ring in this pictorial.

UPDATE : Patterns using interlaced rings have also been uploaded in 2020. Click to see all posts with interlaced rings.
Happy Tatting J