How to Start
Interlaced Split Rings Braid

When I posted a couple of
step-by-step tutorials on Interlaced Split Ring Braid, that had not been my
intention at the onset. Clicking the photos was merely a means of keeping track
of what I was doing & for future reference. Hence, the pics start only from
the 2nd pair of rings. While the same technique can be easily
applied to start the 1st set of rings, some have found it difficult
to do so. I am grateful to Susan for bringing
this to light. At the time, I was engaged in other activities & quickly
tatted up a pair (using the same colours that she had been working with) &
emailed the pics ( Here is her final version). I have finally gotten around to preparing a systematic
tutorial for all those who may have found this a little difficult to tackle.
Abbreviations used :
SR – Split Ring ; ds – double
stitch ; CTM – Continuous Thread Method ; Sh – Shuttle ; SLT – Shoe Lace Trick
Pattern :
Each SR is 9/9 ie. a total of 18 ds per ring.
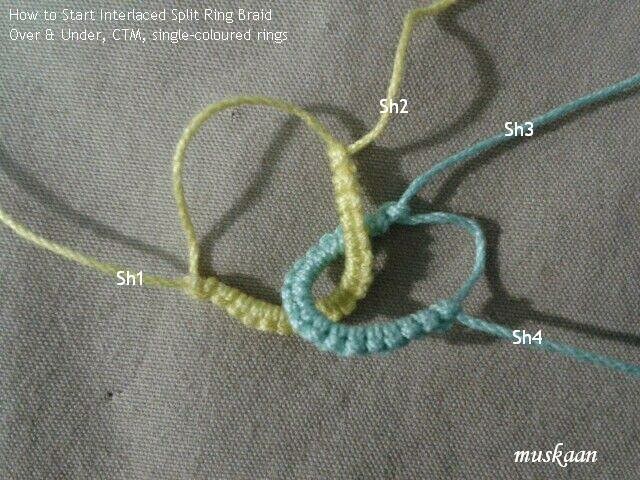
Starting with Single-Coloured
Rings , CTM
(Click on images to enlarge)

If one is making single coloured rings , the 2 pairs of
shuttles can be wound CTM.
It is, then, a simple matter, of tatting ‘Normal
normal way (Not as SRs) but interlacing them
before closing either ring !
A. Over & Under Rings
(Front to Back Movement)

1. Start with Sh1, make a normal
ring of 18 ds. Do Not Close. Pass Sh3 through the ring, from front to back.

2. Make a loop with Sh3 thread with
the part that is at the front, in order to commence 2nd ring.
 |
3. This pic shows how the loop
will be formed front to back.

4. 1ds of ring#2 made with Sh3.

5. 9ds completed. Since the
thread is wound CTM, continue making the next set of 9ds with same Sh3, as a
normal ring.

6. 18ds (9+9) of ring#2
completed as a normal ring. Do Not Close.

7. Pass the Sh3 Again front to
back. (post the shuttle).
8. Start closing both rings, After posting shuttle.

9. Both rings closed &
interlaced Over & Under (ring#1 is ‘Over’ & ring#2 is ‘Under’ in
relation to each other).

10. Another set of interlaced rings made, this time Split
Rings, but following the same basic technique as above, or as demonstrated
in the detailed tutorial here.
αØαØαØαØαØαØαØαØα
B. Under & Over Rings (Back to Front Movement)

1. With Sh1, make a normal ring of
18ds (9+9), if working CTM. Do Not Close.
Pass Sh3 through this open ring from
back through to the front.

2. Pull out a loop with Sh3 with
the part that is at the back, in order to commence 2nd ring.

3. This pic shows how the loop
will be formed back to front.

4. 9ds of Ring#2 made with Sh3.
Since the thread is wound
CTM, continue making the next set of 9ds with same Sh3, as a Normal ring.

5. 18ds (9+9) of ring#2
completed as a normal ring. Do Not Close.

6. Pass the Sh3 Again back to
front through Ring#1 (post the shuttle).

7. After posting shuttle, both
rings are closed. These are interlaced Under & Over
(ring#1 is ‘Under’
& ring#2 is ‘Over’ in relation to each other).

8. Another set of interlaced
rings made, this time Split Rings,
but following the same basic
technique as above, or as demonstrated in the detailed tutorial here.
αØαØαØαØαØαØαØαØα
C. Starting with Two-coloured Split
When each ring is made of 2
colour, Or the threads in each pair of shuttles is not wound continuously
(for
instance one may want to make use of some leftover threads),
then the
interlaced rings Have to be started with Split
Rings.
I have used 4 left over
threads. If it can be helped, I never start tatting with a knot, and that is
how I have demonstrated here. However, you can follow your own method.

1.Each pair of threads is
simply intertwined as shown, without any knotting.

2. Make loop with Sh1 to
start Split Ring #1.
9ds made with Sh1, enclosing/hiding the short beginning
end within the stitches.
TIP : Generally the thread is
hidden only within the 1st 3-4 ds. But I like to hide it till the 1st
picot is reached or as in this case, till the end of ring. This provides a
seeming evenness to the tatting, Especially while closing ring.

3. 9ds made with Sh2 to
complete the other half of the split ring,
enclosing/hiding the short beginning
end within the unflipped stitches. Do Not Close the SR.

4. Sh3 is brought through the
SR#1 from back to front & looped to start Split Ring #2.
(for details on
looping, refer to section B above). Keep the thread pair entwined.
Note that the tiny tails that were still visible in SR#1, have now been snipped off.

5. 9ds made with Sh3, hiding
the thread end within these stitches. 1st half of SR#2 completed.

6. 9ds made with Sh4 to
complete the 2nd half of the split ring, hiding the thread end
within these unflipped stitches. Do Not Close the SR.

7. Post the shuttle (Sh3)
through SR#1, back to front, & begin closing both rings.

8. One pair of starting
Interlaced Split Rings completed (Under & Over type).
I have shown detailed steps for only this Under & Over kind of Interlaced SRs, but I’m sure the basic idea is now clear & one can similarly Start with Over & Under Interlaced SRs using 2 or more colours.

9. This pic shows how I switched
Both the colours along each side of the braid (ie the SRs),
As Well As the overlap –
the 2nd pair of interlaced SRs are Over & Under type.
In order
to switch the colours, all I did was an SLT !
Love the potential of this as an Sinusoidal Bracelet & will be making it soon !!!
αØαØαØαØαØαØαØαØα
Important Note :
There may be different ways
that tatters pick up the thread & loop it around when starting the 2nd
(interlaced) ring. This difference may mean a slight variation in the
penultimate step where shuttle might not need to be posted. Follow what is
comfortable to Your tatting style. Just make sure Before closing both rings,
that the shuttles are on opposite sides : Sh1 & Sh2 pair should be on
opposite sides of Ring #2, while Sh3 & Sh4 pair should be on opposite sides
of Ring #1.
UPDATE : See how to pick up and wrap the loop around the hand to start tatting this ring in this pictorial.
Happy Tatting J
Related Posts : Interlaced Split Rings I & Interlaced Split Rings II
Great pattern, thanks a lot !
ReplyDeleteThanks, & welcome, Emilie :-)
DeleteThis comment has been removed by the author.
ReplyDeleteLovely pattern. Will try this weekend. I added a link to your blog on my Facebook Tatting Page and will post my attempts soon . I hope you don't mind :) https://www.facebook.com/TatsRight
ReplyDeleteHello Em :-)
DeleteI visited your fb page & Loved your tatting ! I am not on fb, but have started following you on pinterest. Would Love to see what your version of the interlaced split rings :-)))
If you need any assistance, just email me or leave a comment .... Looking forward to your tatting & feedback.....
Thank You. Posting a couple of pics of my interlaced rings on Facebook and also on Pinterest for you! https://www.pinterest.com/tatsright/tatting/
DeleteWell done, Em ! Love the colours you've chosen, as well your superb tatting :-)
DeleteThanks for sharing the links.
Great examples!!!
ReplyDeleteThank you so much, Meme :-)
DeleteThank you so much for sharing your patterns with us muskaan...
ReplyDeleteMost welcome, Maggie :-) Hope you enjoy them
DeleteThank you so much for this... I hadn't seen this before and am ready for the challenge :)
ReplyDeleteWelcome, and have fun, happygranny 💖🌹💖🌹
Delete