Showing posts with label comparison. Show all posts

Thursday, 12 February 2026

who knew

Pin It now!

 What can I say?! So many comments in response to my previous post ... besides my blog, I had asked the same question in two FB groups and my own FB timeline. Received a range of answers from a spectrum of tatters. So instead of simply updating the post as previously intended, I decided to write this separate post and cover all points. But firstly I'd like to apologise for my tardy response - life has this habit of getting in my way, and also for the length of this post.

I]  Most commentators misread or misunderstood my question (or perhaps I need to improve my English writing/questioning skills ;-D). Most answers referred to HOW to shape the ring into desired shape. I will try to share all tips, answer questions, etc., in no particular order -

1.  Define Central Ring - According to Elgiva Nicholls' classification, it is an enclosed space medallion, a ring with many picots, at the center of a formation such as rosettes. The next round is attached to these picots which divide the pattern into equal segments. It is such a  common starting point in vintage patterns (and sometimes even used as fillers) where the thread was cut off after making the ring. Later, of course, false picot and/or mock ring replaced the true ring so that one could climb out for continuous tatting. 

2. Post the Shuttle - for a rounder version. This has never worked for me. I post the shuttle only in backside or RODS rings after ending with an extra 1st half-stitch. My trials and experiments. So, in my samples, since both rings were tatted frontside, I did not post the shuttle.

3. SCMR for Roundness - This is true BUT it needs two threads whereas the example I showed is a single shuttle/thread model. This can be seen in the bare thread between the two rings.

4. Closing the Ring - Several comments focused on how they close their ring to attain the desired shape. The above sampler by Anita Barry employs both the movements outlined below.

Shape and Pinch: While closing the ring, bring the two ends together, hold in pinch and close the ring in desired shape. 

Direction of Pull: Further, if core thread is pulled downwards, we get a teardrop, while if it is pulled to the left (for right-handed tatters), a rounder ring emerges. In my samples, I closed both rings exactly the same way -- I did not 'pre-shape' under the pinch, and I pulled the shuttle thread downwards and very slightly to the left (which has been my go-to for decades).

5. The Tension of Tension! - The tension while pulling the shuttle thread to close the ring can reflect on the shape of the ring. The tension of stitches can also affect the amount of play the core thread has. Are stitches just a wee bit looser in a highly picoted ring than when only a few picots grace the ring?

Conscious: A ring closed too tightly results in a teardrop shape and when closed "more loosely" can result in a rounder version. 

Subconscious: A couple of comments pointed out perhaps our subconscious works differently while closing a picoted ring as compared to a plain ring (including the knotting of stitches). It is certainly possible! Brains work in mysterious ways, don't they? Or perhaps our muscle memory wasn't trained meticulously enough ;-D

6. Pull into Shape - This is done after closing the ring. I agree that if a regular teardrop is tugged outwards with gentle fingers, it can become rounder. Yet, in my opinion, the type of thread and the tatter's tension also play a role. And blocking was also suggested. Both my samples were fresh off the shuttle without any finger-shaping or blocking. However in the new sample above I pulled the middle ring for a rounder shape.

7. The Pull of Additional Rounds - When new rounds are joined to the central ring, it pulls the ring into a rounder shape. Agree, but my samples were free, unattached.

8. Twist of the Thread - Perhaps the S or Z twist in a thread affects the shape of the ring. It, however, does not apply if tatted with the same threads at the same time, with the same shuttle. The bare thread between the rings is evidence.

I think this covers all the HOW answers. And, I believe after working new samples, that some subconscious pull and tension might partly be accountable for the shape of my rings. And I used Anchor knitting cotton size 10 for the old green and new blue samples which is twisted less tightly than the yellow samples done in Anchor mercerized cotton size 20 below which is relatively stiffer and holds its shape better despite any attempt to post-shape. Also I don't bring the ends of ring together to pre-shape before closing, which leaves more room for the structure to take its own natural shape.


II] Now to the WHY part which was my main question. My theory pertained to the presence of a lot of picots and I even sought hubby's help in trying to tease out the exact physics behind it. The following listing is chronological.

A. His response was that the outer edge of the picots creates a larger circumference than a picot-free ring in relation to the inner edge, which tends to pull the structure outwards, hence the rounder shape. This was similarly echoed by some respondents.

The 3rd blue ring with picots on one half was hubby's idea. However, more tests with larger rings might be required to reach any conclusion or visual cue.

B. I was happy to see many identified the presence of picots as a major factor. The picots provide extra thread between stitches which might "ease", "relax" or "give permission to" the movement of stitches away from the otherwise tight squish of a picot-less teardrop. This was my contention, too, before I asked hubby. Some also pointed out that the picots circumference gave an impression of a rounder ring even if the inner edge remained more teardrop-ish.

C. Barbara A was reminded of her teacher who was an engineer and the maths behind it is that each picot acts like another ring. So basically there is an outward pull or one can say a mix of pulls, leading to a rounder ring. She shared this short video: https://www.youtube.com/watch?v=y87yq5E4Ok0 

III] On The Side Lines

i) Mary A asked "Have you ever wondered why Josephine rings are always beautifully circular... until a tatter tries to put picots on them?" This is my understanding - JRs are inherently small-ish spiral rings made by repeating the same half-stitch. Unlike double stitch which is 'balanced' due to mirrored 1st and 2nd half-stitch, the spiral stitch is made of only the same half-stitch hence the inner edge circumference is way smaller than the outer edge, resulting in an almost perfect circle. {the horizontal bar is broader than the vertical leg of any half-stitch or double stitch}
When a picot is added, it causes a disruption and the inherent tendency to spiral becomes more pronounced affecting the smooth roundness. You can test this by tatting a larger JR where the spiraling effect becomes evident as in a Josephine chain and gives an indication of the picot's behaviour.
Hope this makes sense? Jump in ....

ii) Round Split Rings were mentioned by some. There are books (by Karen Bovard) where she explains how to make a rounded SR. Goes to show that we can shape any ring as desired using specific means and pre-planning. Remember Square Rings?

iii) Gimme a Leg Up! Now here's an interesting issue that emerged when Anita Barry tatted up samples using paracord and her hubby noticed that the legs of the half-stitches seemed a bit different. Is there a "dominant" and a "recessive" leg?! Obviously the movements of tatting the 1st and 2nd halves are different; does our subconscious hold the reins differently? 

Phew! Since everybody has been so forthcoming and enthusiastic with their input I will end this post with a few more possible factors to ponder --- 
  • Thread size; 
  • Thread type; 
  • Individual Tatting Styles - so many nuances that can affect our tatted lace; 
  • Very Small Joining Picot which may stretch the ring, 
If you have managed to read this far I am truly thankful. And my next post will have a cute little heart pattern to relax from this avalanche :-)))

Many many thanks to all you wonderful tatters for chipping in with your experience and advice! This is how the community grows, evolves, and flourishes. 

Saturday, 20 December 2025

Finnish finish

Pin It now!

 Oh yes, this is how Marja Jalo, from Finland, calls her way of ending on a chain. She has kindly agreed to share her method through a pictorial here - 

Finnish Finishing by Marja Jalo, 2025 - https://drive.google.com/file/d/1Kv1tc3msre8seFo58jjpPj4ON6_3XXR-/view

Can't have a post without a pic, so this is my quick version of the Finnish finishing method. I deliberately left a bit of the end tails to show where each one finally ends.  

Comparison and Thoughts -

This is a slight adaptation of Frivole's Finishing on a Chain method -https://www.flickr.com/photos/28725259@N02/albums/72157626237151128/with/5514379237  which I had tried here - https://tipsaroundthehome.blogspot.com/2015/03/hiding-ends-sans-sewing.html  and Ninetta had applied here - https://ninettacaruso.blogspot.com/2015/06/better-late-than-never.html .

  • Basically we tat the final chain as a single shuttle split chain (SSSCh) by pulling out a loop of thread from the shuttle and tatting with it. 
  • Frivole ends without any sewing while Marja sews in one end. Since I have no issue with sewing tails now, I didn't mind it. I whip stitched the green (ball) tail on the chain itself, but one can sew it under the ring or any other element to reduce bulk. 
  • My slight variation is that after passing the green (ball thread) tail through the shuttle thread loop and pulling the latter tight, I needled this green tail and only then joined it to the picot on the ring.  
  • I also find that Frivole's method requires a long enough chain to hide both tails while Marja's can work even on short chains.
I used a similar method when Ending on a Floating Chain, which was worked partially as a SSSCh - https://tipsaroundthehome.blogspot.com/2019/12/open-treasures.html 

And for a whole host of hiding ends methods, check out this post - https://tipsaroundthehome.blogspot.com/2016/11/beginning-or-ending.html

Many many thanks to Marja for sharing her method ... we are always the richer for having options! And check out her blog, if you haven't already.... besides all her other projects and experiments, I always remember her when talk of using yarn in tatting arises. https://solmujenlumoissa.blogspot.com/2025/

My next post will have a brand new join pictorial! Hope to see you then...

Thursday, 31 July 2025

interwoven beaded bracelet

Pin It now!
As promised, here is another pattern and technique reveal from my bead tatting post back in May. All relevant links are listed at the end of this post.
A simple name - Muskaan's Interwoven Beaded Bracelet, made using four shuttles with pre-strung beads on each and Barbara Arango's variation of the Interlocking split rings technique.

Above is a practice pattern I am sharing. As you can see in the inset, traditionally 4 shuttles are used and the split rings are tatted simultaneously, lying close to each other. The idle pair of shuttles is passed through the open SR and then the ring is closed so that the next SR will is encapsulated and overlap with the previous. video link at end

Barbara used the flexibility of 4 shuttles to distance the SRs with a chain between two SRs. She used it to create the desired effect in a round doily! 
Practice Pattern: 
To keep track, I used 4 different thread colours in each shuttle....
Sh1: yellow; Sh2: cream; Sh3: pink; Sh4: blue.
I started with two normal rings.
Sh1) R1: 18. dnrw, SS
Sh2) Ch1: 6.
Sh3) R2: 18. dnrw, SS [insert R1 through R2]
Sh4) Ch2: 6.
Sh1) SR3: 9 / 9. dnrw, SS  [pass shuttles 3 & 4 back to front through SR3 before closing it]
Sh2) Ch3: 6.
Sh3) SR4: 9 / 9. dnrw, SS  [pass shuttles 1 & 2 back to front through SR4 before closing it]
Sh4) Ch4: 6.
Continue the SR steps for desired length.
Posting the shuttles front to back will give the opposite overlap.

Having 4 shuttles meant I could have beaded strings instead of Barbara's chains between the SRs! Which led to the bracelet above. 
Muskaan's Interwoven Beaded Bracelet   ©May2025
String all 4 shuttles with seed beads. In my model worked with Anchor Pearl Cotton size 8 ---
Sh1 & Sh2 with teal thread, CTM, and purple seed beads
Sh3 & Sh4 with dark purple thread, CTM, and yellow seed beads

Follow the process and instructions as explained in the practice pattern. However, instead of chain, slide beads from both shuttles before starting the next ring or SR. 
Sharing only the repeated portion of the pattern ---
Sh1) R1: 3 [- 3]x7. Slide 5 beads from Sh1 & 2. dnrw, SS
Sh3) R2: 3 [- 3]x7. Slide 5 beads from Sh3 & 4. dnrw, SS [insert R1 through R2]
Sh1) SR3: 3 [- 3]x3 / 3 [- 3]x3Slide 5 beads from Sh1 & 2. dnrw, SS [pass shuttles 3 & 4 back to front through SR3 before closing it] 
Sh3) SR4: 3 [- 3]x3 / 3 [- 3]x3Slide 5 beads from Sh3 & 4. dnrw, SS [pass shuttles 1 & 2 back to front through SR4 before closing it] 
Repeat SR3 and SR4 for desired length. 
Posting the shuttles front to back will give the opposite overlap.

I ended with a curled ring (see inset) that works as a toggle for a quick & lazy finish.

Note: The beads are a slightly different size. Unfortunately I can't find my notes but I remember there was a little TIP I wanted to share. Oh well, perhaps I will find it some day and make a proper PDF presentation. 

Future Ideas - Add more beads in place of the picots. Throw off rings or decorative picots on one or either side. Attach more braids with same or additional colour for a broader version. The alternate SRs can differ in size or different sized threads can be used.

UPDATE (18th Aug, 2025) - Splocik has used the tweaked braid as a foundation, adding rounds around it, for two bookmark versions here - https://oczka2.blogspot.com/2025/08/zakladka-na-podstawie-motywu.html

💛💛💛

INTERWOVEN  versus  INTERLOCKING

Often the two are used interchangeably in tatting terminology. Confining myself to the split ring braids,  there are several techniques and effects that tatters have created over the years. These may range from a single row of split rings (called a SR braid or cord), or a double row where the SRs are interlaced and lie adjacent to each other. 

Or the braids may lie 'stacked' with overlapping SRs. These are the SR braids that are interwoven where the SRs from two braids lie intertwined through each other. These are also called interlocking SR braids and can be made with either 2 or 4 shuttles - two independent braids woven through each other; a foundational braid encapsulated within the second on-going braid; simultaneously tatting the SRs using 4 shuttles. 

Then there is the 3D chain maille effect where each subsequent SR lies at right angles to the previous one just like in interlocking chains and links in jewellery. I prefer to call these 3D SR braids Interlocked and the 'flat' ones Interwoven. This gives a more exacting visual especially since there are several ways to interweave and interlock the braids, whether 2D or 3D. 


Related Posts and Links -
 
 
Simple interweaving - https://tipsaroundthehome.blogspot.com/2024/03/exciting-firsts.html 
Interlocking split rings 2 Karen Cabrera Lesson 79 - https://www.youtube.com/watch?v=ZR04RLHdmA0   (2 shuttles)
Interlocking split rings 2 Karen Cabrera Lesson 80 - https://www.youtube.com/watch?v=BBrDRLFibO8   (4 shuttles)
How to start and end SR without a knot - https://tipsaroundthehome.blogspot.com/2016/11/beginning-or-ending.html 
SR braids, including beaded, some with pictorials - https://tipsaroundthehome.blogspot.com/search?q=SR+braid 
Interlaced SR braids with pictorials and patterns - https://tipsaroundthehome.blogspot.com/search?q=interlaced+SR
Tatting with Beads - a few effects - https://tipsaroundthehome.blogspot.com/2025/05/bead-tatting.html

Thursday, 22 May 2025

bead tatting

Pin It now!

Over the past couple of years I have approached many experienced and expert or domain tatters for some explanation or confirmation and feedback, or even to ask for a pic of their work ... all in the cause of the book/glossary. Not only have I learned a lot, but everybody has been very cooperative!

Late last year I had approached Nina Libin regarding her BEANILe tatting and if she would share a pic of one of her models for the book (I didn't like any of the beaded models I had tatted till then). Despite her ailment, she willingly obliged with both an explanation and a pic. However, she was adamant on one point - do NOT call it Beanile or BEANILe lace! Shocked, I asked her why and she said it was merely her 'arrogance' for wanting her name associated with the term. She told me in no uncertain terms to call it Bead Tatting instead. 

Bead Tatting (formerly known as Beanile lace) is tatted lace decorated with lots of beads that are incorporated during the tatting process itself. Earlier the beads used to be strung on the ball thread so that they would embellish the picots. Nina was instrumental in stringing the beads in the shuttle thread as well, in order to position them in beautiful arrangements. 

I am uncertain about beads being used in single shuttle tatting before the introduction of chains (or 2nd thread). Did they use beads to cover bare thread between rings? Do you have any idea?

Nina differentiated this from Beaded Tatting, where beads are sewn into finished lace, as in ANKARS. 

Tatting with Beads is another common term. This would mean that beads are used in lace either during tatting, pre-strung or free, or stitched in later .... any which way(s). Thus this term encompasses both Bead and Beaded tatting and any other method (for instance pinning down beads on a foam ornament covered with tatted lace).

It would be great if you leave a comment with  your thoughts on the matter or any other input you may have. 

Now despite what Nina says and wishes, it will be difficult to erase the term Beanile lace from our tatting lexicon! And the terms above are not airtight categories! We all use them interchangeably.

Some of my recent bead tatting samples ... all are my own designs applied in different situations or techniques. See if you can guess them!  Since these are all prototypes, mostly tatted on the go, there are minor errors or untidiness. 
1 - Beads On / Over Picot
UPDATE (June2025): Fan Palm Motif/Pendant patternhttps://drive.google.com/file/d/16amEUnVT7ERSySRJqbMsj0af0Xu_MFsP/view

2

3

4

5 - 4-shuttle Interwoven SR braid Barbara Arango's variation -
UPDATE (July 2025): Muskaan's Interwoven Beaded Bracelet pattern.


At a future date I will try to share more details about each model, and a pattern wherever possible. At present I'm just relieved to write this post which has been pending for so long.

I have tried to keep in touch with Nina, as she requested, sending out an email every 4 to 6 weeks. However, I haven't heard back from her for several months now. Sending her my best wishes for good, manageable health. 
Read her interview here - http://www.beadsky.com/nina_libin.php

Many many thanks to Nina Libin for her continued help and support through the past 10 years and the inspiration her work continues to provide ! 

Monday, 14 April 2025

playful tatting

Pin It now!

I had started tatting these cute balloon dog doodles couple of days before ITD and realised that there were a couple of elements left to tat, which started off my 'shagun tatting' for the day! Of course, I later found the time to tat the heart, too! Actually my list had contained a different heart which I still haven't gotten around to tatting. Some other day, soon, perhaps. 

Sarah Nielson shared two versions of her Balloon Dog Doodles - 2D & 3D. You can download the pdf from her blog here - https://laceandbees.blogspot.com/2025/03/balloon-dog-doodle.html
Quick to tat with lots of split ring practice. And one doesn't have to hide ends! Simply tie an overhand knot and snip close for the nose or 'balloon' end. 
I chose this tinted colourway for the added fun factor. Size 20.

The model starts at the tail end. 
My piece doesn't much resemble a dog here, does it? Is it how the shades spread themselves out ... how the darker shade pooled at the lower half? Or is it my tatting tension?

Now this 3D version I like. It does look like a dog frolicking in the park or flying high! Very happy indeed.

Technically, the highlight of this 3D doodle is the Folded Split Ring

Overall, I am happy with these doodles - fun and quick and excellent doodles to embellish cards, etc. Some time in the future I will paint some background to give them a context, a story ;-D

Many many thanks to Sarah for these innovative and fun doodles!

Related Posts -
https://tipsaroundthehome.blogspot.com/2025/04/shagun-tatting.html
https://tipsaroundthehome.blogspot.com/2017/02/in-fold.html

Wednesday, 5 March 2025

update with video

Pin It now!
There are frequent requests for videos instead of a pictorial or a schematic to showcase a technique or even a pattern. A sign of changing times which is fine by me except that videography is not my preferred method. I have watched several of Karen's videos over the years and learned from them. Yet I prefer the stepwise layout whether in a blog or printed so that I can try at my own pace; study each step and position of thread minutely when required; and I don't need to rewind back and forth. Refreshing my memory is also easier with pictorials and diagrams coz I can easily skip steps and focus on what I need. Personal preferences, no judgment. 

Anyways, in one of the FB tatting groups, a tatter bought Rebecca Jones'  1985 book, 'The Complete Book of Tatting' after I shared my direct method tatting post here -https://tipsaroundthehome.blogspot.com/2025/02/direct-method-tatting.html . She could figure out the first step of how to start a ring or chain with a lark's head knot. However, she had trouble with how to continue with the half-stitches. I decided to make a quick video for her eyes only. But I think it isn't too bad and would perhaps be of help to others, too. 

So here is the direct link to the video - Rebecca Jones' Direct Method Tatting: 
https://drive.google.com/file/d/1bsXzAGaSacKqw06CC3Uq24ImB2t6-sUA/view

I have tatted 3 double stitches in a ring in this demo. Hope it helps. Please excuse my clumsiness and background. Like I said, videography is not my go-to format, and I shot this in one go ;-D

Comparison - 
What I later realised is that this in one of two ways to make a lark's head picot join (LHPJ) or lark's head join (LHJ)! Watch Karen Cabrera's Lesson #101 - Lark's Head Join.

And now I remembered that Ninetta Caruso uses the 1st half-stitch movement while tatting the wide picot! Her video - https://drive.google.com/file/d/1XsqlFZHcVpopvRFBhTgR6_oQWqf98Bw7/view  and my pdf and post here - https://tipsaroundthehome.blogspot.com/2024/02/going-wide.html .

Love to find connections! Happy tatting! 

Friday, 21 February 2025

overlapping interests

Pin It now!

Barbara Arango first caught my attention on FB several years back when she tried to recreate a design at the back of a hand mirror into a tatted motif! Since then she has successfully recreated more fabric prints into tatted lace. And in order to get the desired effect, she comes up with her own solutions. Some of these are clever adaptations or applications of existing techniques, though they evolve from her own trials and errors, the fruit of her own labours, without realising prior existence.

My recent post showing a tatted ring made with her overlapping split rings generated quite some interest and a couple of requests to show the steps. With Barbara's permission, I am sharing my pictorials along with pics of a few projects where she used them ... see for yourself how wonderfully they can be applied. Some quick practice patterns are also included but let your imagination take you places! All you need to know is how to tat split rings!!!

In the end, for immediate comparison, I have also included my own 2016 effect where I first coined the term. Links to a snowflake using the effect are also listed at the very end.

💦💦💦💦💦💦💦

Abbreviations used: Sh=shuttle in hand; CTM=continuous thread method; SR=split ring; vsp=very small picot; ds=double stitch; Ch=chain; - = picot; + = join to; LJ=lock join to.

There is no need to reverse work. The motifs are worked from the front continuously in clockwise direction or from left to right.

A]  Overlapping  Split  Ring  Braid, Barbara Arango style (2019)

2 shuttles (CTM if working in single colour). For pictorial I used two colours - Sh1: pink, Sh2:cream - Anchor knitting cotton size 10.
1. SR1: 8 vsp 5 vsp 8 / vsp 5.
NOTE: While the first ring can be worked as a normal ring, I prefer to start with a SR here so that the shape of all rings remains the same.  
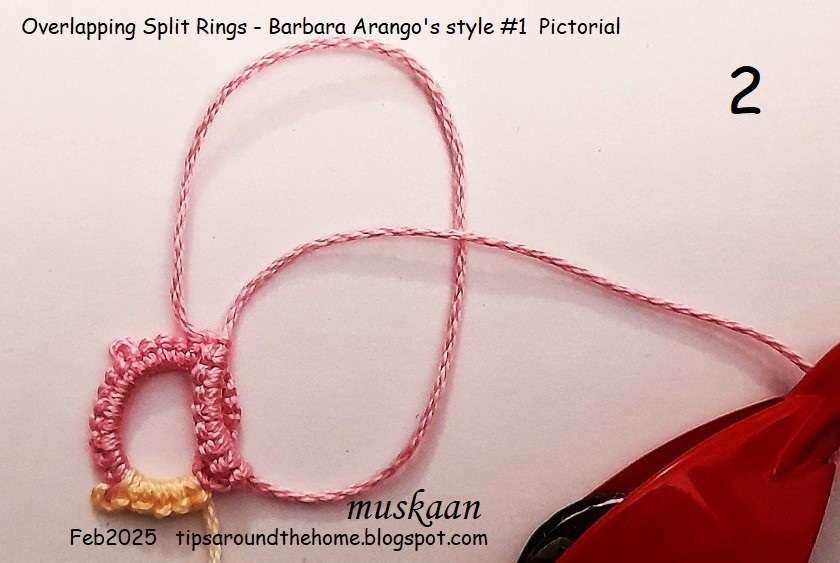
2. Start SR2 leaving a very small false picot.
SR2: 8 +(SR1) 5 vsp 8 / 5.
3. 2nd split ring tatted and is being closed.
4. Two split rings made and you can see the overlap between them.

5. Repeat SR2 for desired length, joining to previous ring as you go.

Practice Pattern for ring, bracelet or choker
6. Above is the braid I had shared in the post, using the same count. This can be started CTM as a normal ring, too.
After tatting a few more rings, I joined the last ring to the first, keeping the overlap consistent. Think of this as an ANKARS joining, positioning one ring above the other before joining. 
Pre-string beads to embellish as desired and use as jewellery.

I like the rectangular shape created by the rings with the above count. Got to thinking how even SRs would overlap. 
So, here I used 8ds between each vsp. Rings are rounder, but the overlap is consistent. To get them to overlap more, the overlapping segments need to be longer.

And here are Barbara's projects (2019-2022) using the braid style -

Notice how the rings get smaller?

The applique and embroidered designs on the left inspired her to recreate it in tatted lace and she used the overlapping SR braid effectively.

And to remind you of the practice pattern I shared in my previous post: 
💦💦💦💦💦💦💦

B]  Overlapping  Split  Rings , Barbara Arango style #2 (2021)

The same technique as above but used in a kind of onion ring formation, in one pass. Here Sh1 has cream and Sh2 has pink thread.  If working with single colour, use continuous thread.

1. SR1: 5 vsp 10 / vsp 5.

2. Leave a very small false picot and start 2nd split ring.
SR2: 10 +(SR1) 5 / 5. Switch shuttle
3. With Sh2 in hand, continue for chain...
Ch: vsp 10 - 10 LJ(SR1) 10 - 10 LJ(SR2). Switch shuttle
4. One motif of overlapping split rings made, all worked from the front.
5. Start 2nd motif with Sh1 in hand, leaving a very small false picot.
SR3: 5 vsp 10 / 5.
6. Repeat from SR2 onwards for desired length. 
TIP: Instead of a lock join  through the false picot, one can make an under-over or alligator join from the 2nd motif onwards.

Wouldn't this make a lovely bracelet or choker when embellished with a few choice beads!

And here's how Barbara applied it in a doily (2021) -
This is the doily inspired by a design behind a hand mirror. And to get the effect, she cleverly used this formation of the overlapping split rings! Since then she has created several more designs which you can view in the Just-Tatting FB group.
💦💦💦💦💦💦💦

 Overlapping Split Rings , Muskaan (2016)
It was back in 2016 that I first shared my nascent trial and coined the term Overlapping Split Rings. As you can see from the pic below, my method involves a braid of uneven split rings which are folded and joined back to create an overlap in the center. The SRs remain free in the center creating a distinct 3D and faux Celtic effect. 
SR-A: 9 / vsp 12.
SR-B: 4-1-1-4 / 12.
SR-C: 9 / 12.
Lock join to vsp of A.
One motif created. 

I used this motif to design a snowflake. Despite the immediate help of my trusted test-tatters, I haven't published the pattern here. I called it the Mutant Snowflake. Following are respective posts - 
We can also increase the number of rings to get polygonal shapes and interesting overlaps!

I realise this is a long post. However, if I didn't post now it would further get delayed. Thanks for your patience in reading this and hope you try and experiment with some of them.
💦💦💦💦💦💦💦

In case you wish to use leftover threads for trials, here are a couple of pictorials that will help you start knotless with a split ring without CTM
How to start a split ring with a picot - PDF: https://drive.google.com/file/d/1OS_9VdZSoWVSsOtQYT8UVb4nV6exmf2p/view
💦💦💦💦💦💦💦

Many thanks to Barbara for extending the boundaries! All in the eye of the beholder!

Tuesday, 11 February 2025

dizzying no more

Pin It now!

.... thanks to Ninetta who always delivers with her engineering brain! I was trying out Mark Myer's (Tatman) Dizzy Double Stitch and simply could not get the 1st half-stitch right. Sought Ninetta's help and she surprised me with a video showing the process! I based my pictorial on this video. 

'Tatman' Mark Myer's DIZZY  DOUBLE  STITCH
Ninetta Caruso's video (Feb 2025) - https://drive.google.com/file/d/1U2SwGQGFf-zbn24ANMIxNmotW8l7-uIe/view
Muskaan's pictorial PDF (Feb 2025) -https://drive.google.com/file/d/1WymeZxilPxO159R2kz0mX19O-3LUBTjz/view

This stitch can be considered a form of padding the stitch where only the knotting thread has extra bulk or padding while the core thread remains unaffected. See Padded Double Stitch - http://tipsaroundthehome.blogspot.com/2014/05/tatting-experimenting-with-stitch.html
The extra twist in the thread creates a nice texture and height and tries to recreate a crochet stitch. We now know of another tatting stitch that mimics crochet - the Treble Tatting Stitch!
💟💟💟💟💟

Above is my first trial while following Ninetta's video. Notice the extremely thick cord I used, LOL!
💟💟💟💟💟

While I am sharing all pics for the pictorial here, for more details, please refer to the links given above.

 
1. Working in two colours, blue in shuttle and yellow ball. I started by making a small ring followed by a chain with a few double stitches (DS) and 3 dizzy DS. Here’s how the latter is done …
2. 1st half-stitch: Make a loop with the ball thread keeping it behind the shuttle thread. Hold the base of the loop in a pinch along with the shuttle thread (black arrow).The loop is held taut around your other finger- middle or index finger, whichever you use (red arrow).
TIP: It is very important to know where to insert the shuttle and which thread to pull while snugging.

 
3. Bring the shuttle above the loop and
4. pass it through the loop from back to front, from the lower/right part that lies behind your finger ...

 
5. and pass the shuttle from behind the core thread (between loop and shuttle thread).
6. Transfer/flip and remove all slack by pulling on the upper/left part of the loop. Notice there is a twist in the half-stitch.
 
7. 1st half-stitch of the dizzy DS is made and neatly snugged.
TIP: For the twist to show, keep the stitch a bit loose. Pulling on the ball thread too much will hide the ‘weaving’ effect. 
8. 2nd half-stitch: Start a loop just like for the 1st half-stitch and hold in pinch. Refer #2.
 
9. Bring the shuttle up keeping the thread in front and
10. pass it through the loop from front to back at the lower/right part of loop and above the core thread between the space between loop and shuttle thread.

 
11. Transfer or flip the stitch and remove all slack. Again, keep the stitch a bit loose for the twist to show. 
12. 2nd half-stitch made and neatly snugged.
One Dizzy Double Stitch made. Repeat the steps for as many stitches as needed.

A chain with dizzy DS. Notice how the stitch gets better when I kept the knotting/ball thread 'loose'.
A dizzy DS chain joined back for a mock ring.

TIPS / NOTES:
Tatted by Anita Barry (comparing tightly snugged and loose stitches)
  • The samples above clearly show the reason why we need to keep the dizzy DS a bit loose.
  • Ninetta 'cracked' it because Mark pointed out the similarity with working the 2nd side of a split ring. Perhaps this can be kept in mind.
  • It is a good idea to leave a small picot before the first stitch and after the last stitch to compensate for the extra height (Ninetta).
  • Picots can be made in the normal way by leaving space in the ball thread.
  • For a straight chain, use a thicker core thread. 
💟💟💟💟💟
  
Initially I thought we couldn't use the stitch in a ring. However, when Ninetta said we can, I gave it a try and it worked! However, it turns out that I approached it a bit differently, reminiscent of a Loop Tatted Ring! Meanwhile Ninetta made another video for a ring, following Mark’s instructions. 
Ninetta's video for Dizzy Double Stitch in a Ring - https://drive.google.com/file/d/1WhDgd9w1U7PZ9buVq_c8r8FA0-VIU5gn/view
So here's my slight variation .... 

I started a ring with 1DS. And above is how I worked the dizzy DS, just like in the chain. I divided the ring loop into two and held the base of loop and shuttle thread in a pinch. On the lower/right part of the top loop, I followed the steps for each half-stitch as shown in the chain pictorial. 
💟💟💟💟💟

Jane Eborall (2009) used the 2nd half-stitch to make textured Josephine Rings that are denser. Josephine Ring (alternative way) – http://janeeborall.freeservers.com/TipsAssorted.html
I had used this in the buds for my Poppy pattern back in 2014 -https://tipsaroundthehome.blogspot.com/2014/09/tatting-pattern-tiny-heart-poppy-part-2.html

Karen Cabrera (2010/11) shows a slightly different method of working the stitches which can be considered a variation of the original. Lesson 37 - http://www.youtube.com/watch?v=CUtHpsIIknE
Ninetta Caruso (2025) compares Mark’s and Karen’s stitch in this video - 
https://drive.google.com/file/d/1UGlvqk4mPiWz9BEQ4AoKVnkxhQw72Blt/view
I hope you like this revisit to a 'forgotten' stitch and will use it to decorate some of your future tatted lace. It's a fun and quick tat once you get a hang of it! You can find tutorial links for all terms mentioned here - https://tipsaroundthehome.blogspot.com/p/tatting-resources.html

Many many many thanks to all mentioned above!