Showing posts with label reposition. Show all posts

Wednesday, 23 June 2021

2nd shuttle or ball

Pin It now!

 A question was asked recently in the context of a specific pattern. The pattern contained chains that faced opposite directions in an edging. It would be an easy "switch shuttle" if one were to use 2 shuttles. But she wanted to know if it could be done with one shuttle and a ball?

Yes! Of course, the easiest way is to do a shoe lace trick (SLT) or overhand tie, but you know I avoid it as much as possible, preferring other options such as Reposition, Twist Work, Reverse Join, and/or Reverse Stitch, whichever is most effective at the time. (See https://tipsaroundthehome.blogspot.com/2020/07/lock-join-plus.html)

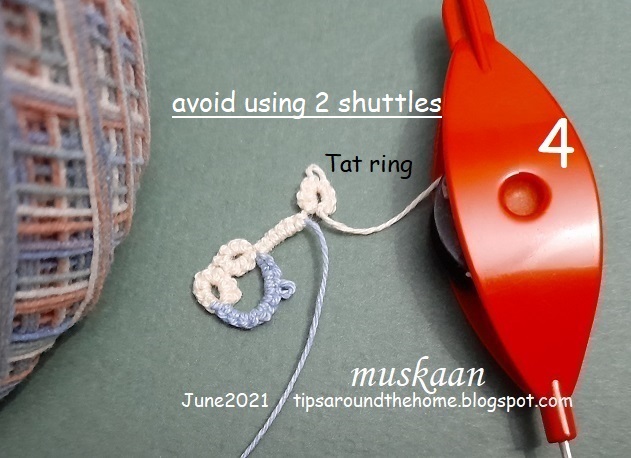
Here's a quick sampler I tatted to show one way of  How to Avoid Using 2 Shuttles - using direct tatting.

Please note that this is Not the original pattern, though the general shape, and direction of each element, is similar. I also made up my own stitch count.

1. I started with the middle ring, unsure how long the leftover thread would last. But basically, we are tatting ring and chain segments, reversing work (RW) each time.
2. Now here is where the chain changes direction and our single shuttle is not in position. To bring it in position, either do a SLT, or follow what I did -
Turn work (as if turning the page), and direct tat the chain ie. with unflipped or reverse stitched (as in 2nd side of split ring).
Notice the chain takes the colour of shuttle thread, unlike the previous chains. 
3. Reverse work after completing the segment. This brings the shuttle to the top ...
4. .... and tat the 1st ring of next repeat. It looks like a thrown/floating ring.
5. Rest of the motif is again worked as alternate chains and rings, with RW between each element. Repeat the direct tatted chain and continue for desired length.

TIP: If you want all chains to have the same colour, SLT or Repositioning at the start and end of chain would be a better choice, and the chain would be worked with normal flipped stitches.


A couple of days back I stumbled upon Jon Yusoff's How-to - Avoid using the 2nd shuttle . See, thrown rings using one shuttle !!!! 


One might inquire 'Why replace 2nd shuttle with a ball?

My answer is that it may be a matter of preference, sometimes mood! It can also be a means to reduce the number of tails to hide especially if it's going to be a looooong edging. Of course, one will need to either have 2 balls of the same shade (in order to reload the shuttle) or preload several shuttles before using the remainder of the ball for the 2nd thread.

One other scenario is when the rings are worked as mock rings (MR) or as self-closing mock rings (SCMR), a single shuttle and ball can work well.

Personally, I do not mind hiding ends, and 2 shuttles are more portable and manageable (a shuttle won't unravel if it slips off, unlike ball of thread). 2 shuttles also provide a lot of flexibility and freedom. 

As I always say, there's no absolute right or wrong in tatting. Choose what you feel comfortable with, or what the pattern demands, or how the pattern can be adapted to colour(s) and techniques. My point is merely Be Aware that there are several paths to the same destination, and with a bit of thinking ahead and adaptation you can travel any road!


You can find all tutorials here - 

Friday, 17 July 2020

lock join plus

Pin It now!
Many months back, in response to some curiosity and confusion among several tatters, I decided to illustrate the simple progression and functional similarity between a few techniques. Here the underlying common factor is the ubiquitous Lock Join. Add one extra step to the LJ, and it opens up the canvas to change colours, shuttles, and even direction of chains.
I took stepwise pics for each of the combinations back then, but preparing a proper stream-lined article has taken way more time than intended. I am immensely grateful to Anita Barry, Master Tatter, for her proofing and editing.


In order to make the document manageable, it is uploaded as a series of 5 pdfs, each a stand-alone (click on each title to download) –
PLEASE NOTE - Most of these are also Reposition Methods which can be used even without a lock join to change direction, create points or curves, etc.

  1. Lock Join Plus – Executive Summary and practice Patterns for further exploration. (3 pages)
 
How one extra movement after a lock join can open up the canvas to change colours, shuttles, and even direction of chains. 

For starters, a simple 2-colour motif is used where all chains face the same direction. But for further exploration, more patterns are listed. 

  1. LJ Plus - Lock Join (LJ) pictorial (1 page)
 
How to make the lock join using both up and down loops. 

Notice how the colour blips in the 2 right joins are larger than the remaining 3. If the down loop LJ is followed by a 2nd half-stitch, the blip is almost hidden completely.
Links to undo a LJ and variations that include making a LJ with 2nd shuttle.
See also Lock Join in Mock Rings


  1. LJ Plus – Reposition pictorial (1 page)
 
A laissez-faire crossing of threads. Simple, quick, vintage. Compare how chain segments change colour and the slight overlap at the start of each chain.

  1. LJ Plus - Shoe Lace Trick (SLT) pictorial (1 page)
 
Tying a half knot outside the LJ – overhand tie or SLT. Again chain colours get switched. SLT also allows us to switch the core thread in instances when the shuttle is running low on thread.

  1. LJ Plus – Reverse Join (RJ) pictorial (2 pages)
 
Encapsulating or entrapping the other thread within the LJ. Created by Elaine P Gan (tattingbox). 

Pics showing an up loop and a down loop. The latter 
minimises the colour blip in a RJ as well.

Functionally the same as crossing and SLT after LJ, but more elegant and efficient – a smooth transition.


After each or either of these, if we turn work, reverse work, switch shuttle, and/or direct tat (unflipped stitches) the next chain, we add another dimension – changing the direction of the chain! Along with colour. Our choices multiply! And we might even be able to work throughout with just one shuttle and ball. To explore these choices, some practice patterns are listed in the main pdf. Besides block tatting, think also of filet tatting, especially in 2 colours, where these can be used effectively. I forgot to mention the role of lock join plus in mock rings and mock onion rings, but you get the idea, right? Wherever you have 1 or more chains joined below, play with LJ Plus!
I used all the above 4 in this vintage edging from Priscilla Tatting Book3 Fig 29 where the chains move to and fro. We can turn work after each chain or we can work every alternate chain directly (reverse stitch - unflipped). I started with LJ, then tried reposition, SLT, and RJ after every 3rd chain. Shuttle in hand changes depending on our choices.

So I'm sure there is no need to spell out why I presented this article/pdfs in the way I did? There is lot of scope to play and design because each method has it's own pluses and minuses!
Do you see a butterfly in the above arrangement? Time to pick up my shuttles again and work out a pattern ;-D
Before that you might get fed one more lesson, so stay locked in ;-P

UPDATE 1: When working with only one shuttle and ball, changing the direction of chain using direct tatting - https://tipsaroundthehome.blogspot.com/2021/06/2nd-shuttle-or-ball.html 
UPDATE 2: Carrying on with functional movements, see pictorial Twist Work (TwW) -