Showing posts with label vintage edging. Show all posts

Sunday, 5 January 2025

last and first

Pin It now!

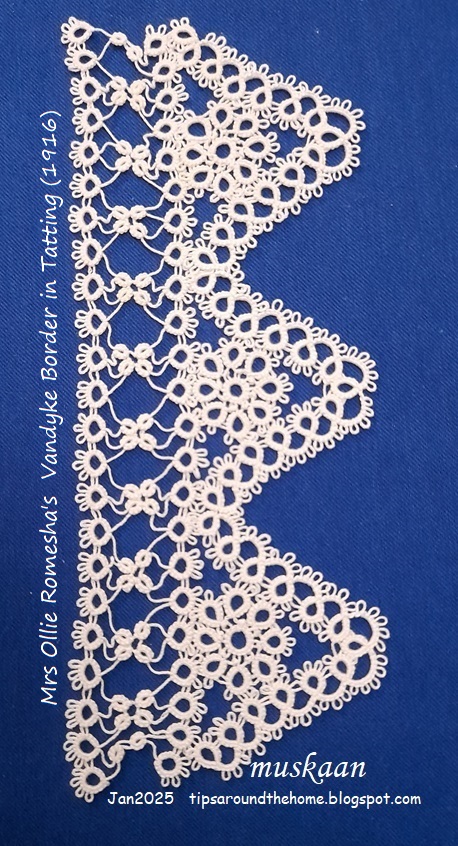
 So this is the last thing I tatted and the first I picked up at the turn of the year. And I have my tatting buddy Anita to thank for it. She was on a determined mission to finish off her ongoing works before the new year came around. Impressed and motivated, I chose this sampler I had shared here and finished it on the night of 31st Dec 2024 with an hour to spare! 

And in 2025, I picked it up again to hide the tails, block and photograph it. Notice the thread going across at the top? I won the thread chicken race!!!

Pattern is Vandyke Border in Tatting by Mrs Ollie Romesha  published in Needlecraft Vol. VII, No. 8, April 1916 and the PDF can be downloaded here - https://www.antiquepatternlibrary.org/html/warm/tatting.htm

One headside motif showing wheel surrounded by a scroll.
NOTE - The pattern calls the circular medallion a 'wheel'. However the correct term for this classic formation is 'daisy'. https://tipsaroundthehome.blogspot.com/2024/03/counts.html

My Notes - 
1. Pattern calls for starting the scroll at the ring indicated by white arrow. I started with the one indicated by orange arrow.
2. 4ds is missing in the pattern for ring indicated by blue arrow. All 5 rings are identical.
3. Pattern calls for tatting the scroll first and later tat the wheel (daisy) joining it to the scroll on the go. I preferred tatting the wheels separately and joining the scroll to each. 

A single motif turned around looks like the letter A! In Anchor size 40, it is 4cms high and just under 4cms wide.

Three repeats without the footside or sewing edge is more pliable and can be used for a collar, necklace, etc.

4. This lace is worked in four parts as per original pattern - wheels, pointed edge, two rows of a straight edge on the upper side. Worked with one shuttle (and ball only in scroll) throughout. 

5. Continuous Tatting in Wheel using Slip Stitch - Determined to keep it vintage, I did not use any continuous tatting method to climb out of the rows in the lace. However, the wheel is an exception where Mrs Ollie works it in one pass using only one shuttle. She works the central ring then instructs us to close the ring and 'fasten thread to 1st picot and tat ring ....'. Basically leave a very short bare thread space, make lock join in 1st picot, and start outward facing ring. I recently learned this is called a SLIP STITCH - leaving bare thread to span the distance in order to climb out at a different point. We've all used this in some form, some situation or other. Now we have a term (Judith Connors' An Illustrated Dictionary of Tatting, 2007 ed.) and Judith patiently clarified it for me. In a future post I will elaborate on these situations, one such being this Rosette Enchained snowflake .

6. In Anchor mercerised cotton size 40, measurements for 3 repeats: 7cms high x 17cms long. Without the footside rows, the triangle is 4cms high. 
Not happy with the bare thread lengths in the footside rows. I used a 5mm gauge. 4mm would've been better. My fear, despite the trial, came true, sigh.

From this upturned side, the peaks remind me of temples in India.

I hope to use this short length on a greeting card or card topper once I visualise what else should go into the composition. Your suggestions are welcome.

Related posts

Tuesday, 10 December 2024

incomplete

Pin It now!

Suddenly the month is slipping away fast and I have ton of tatting to do. I hadn't been able to tat for almost a month due to life interruptions which put me back a whole lot. Prioritizing is the need of the hour or what's remaining of this month. 

This is the Vandkye Border in Tatting by Mrs. Ollie Romesha which I had hoped to complete before showing. I've decided to postpone it's completion hence sharing the WIP pic. It was published in Needlecraft Vol. VII, No. 8, April 1916 and the PDF can be downloaded here -https://www.antiquepatternlibrary.org/html/warm/tatting.htm   

Vandyke formations are inspired by portraits painted by 17th century Flemish artist Anthony van Dyck and refer to the distinct peaks or points like in the V-shaped chevron strips. I decided to go with this edging despite the bare thread space that kind of terrifies me. Then there was the headache-inducing task of transcribing the old text into short notations or diagrams. I took the plunge! 

However I tatted the flower medallions first unlike what the instructions stated. Decided it would be more comfortable when joining. 

There is one minor omission in the written pattern (part of the pattern is missing). The image of the tatted model was of great help.

The sewing side consists of single shuttle work with lots of bare thread. I started at the right to gauge the length of bare thread. It turned out to be a wee bit tight when the final row is tatted above. Started afresh at the left end, but have left it for the present. Once my other time-bound commitments for this month are done, I'll get back to this and share more details. 
Worked in Anchor size 40.


I am submitting this for Natalie Rogers' PICOT Bingo game, striking off the block - Tat an Edging. Now this game is another project I probably won't be able to complete despite starting in January itself. At least not in the way I wanted to. But never say die, LOL. 

Wednesday, 23 March 2022

linked hands trial

Pin It now!

 I had finished this prototype bookmark soon after this post (https://tipsaroundthehome.blogspot.com/2022/03/one-month-several-years.html) but look how long it has taken me to upload the final pics! Too much going on ....

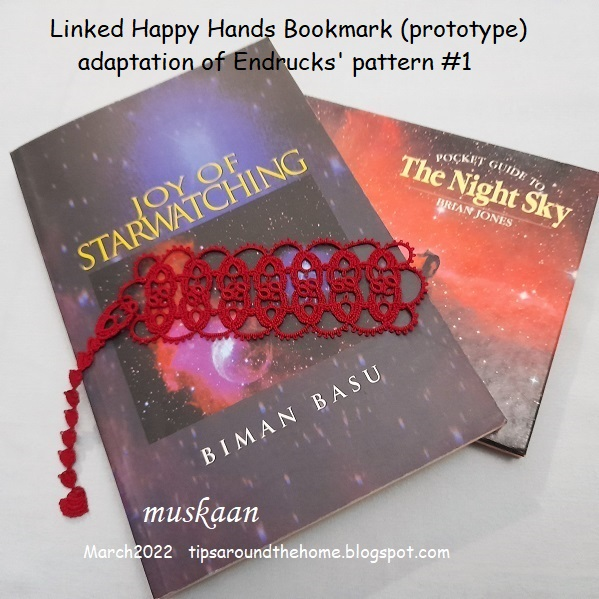
In Anchor size 40, it is 12 cms long and 4 cms wide, all tatted in one pass.

Since the linked hands are not joined, look how they can stand up like an elongated teepee! One could also imagine hands joined in prayer?

Simple bookmark without a tail. 2 side chains (on the bottom right) are shorter (count the 5 picots instead of later 6). This was the start and I didn't like the soft stretch of the chain. Hence from the 3rd repeat onward, I added another 3ds for a better curve. 
I had made the edging for the pattern pdf here - https://tipsaroundthehome.blogspot.com/2021/11/from-one-to-many.html
Playing with a filter. This is how it looks horizontally, in case someone is thinking of an insertion. I haven't blocked it to shape. This is merely my trial piece after all. I like the simple chain trim around. A balance between dense motifs and airy edge.

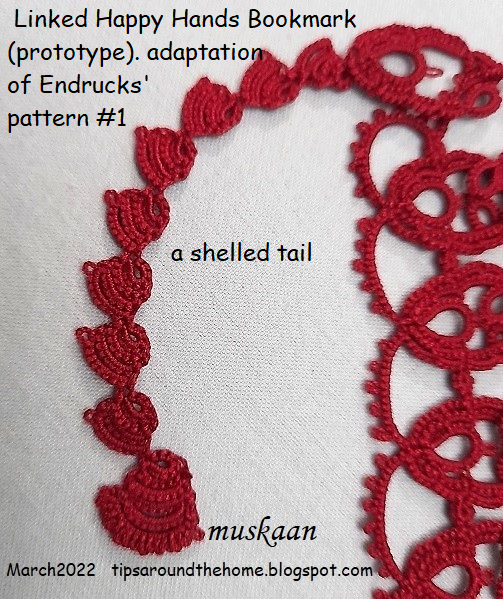
What's a bookmark without a tail?! Several ideas had been spinning through my head as I worked the body. However, when it came time, here's how I went about it - made a Happy Hands motif, linking it through the top chain.
Then followed these shell-shaped blocks. The first one wasn't a nice shape, but eventually they took on a better shape. The final 'charm' is simply a larger version of the smaller shells, with a final row of picots for a wavy effect. I was playing a tight game of thread chicken at this stage.

UPDATE (July 2023) - Pattern for the tail 
pic showing tail detail and charm
Start with a ring (4 vsp 5), then a graduated block of 3 chains (6, 7, and 8) (the last chain has a decorative picot), and repeat. Please note that I used Endrucks' method of climbing to next row of block chain, viz., 1ds vsp, followed by chain stitches.
The charm at the end follows the same principle but with more number of chains (5 or 6) of which the final chain has adjoining decorative picots for a dense frill.


I would've like to continue for a longer tail, but was running out of thread on one shuttle. And sometimes one just isn't in the mood to find the ball, wind the bobbin and ....

What do you think? Should I add this tail in my final bookmark or should I add a  long tassel? 
I have a colour scheme in mind and am hoping it will work.

Hoping to post a few more blogs in quick succession ....


Sunday, 13 March 2022

one month several years

Pin It now!

It's been a month since I last picked up my shuttles today, and boy did it feel good! All my time away from life activities was being spent on the compy trying to complete presentations, diagrams, reviews, or other backroom Project stuff.

This is a prototype of Linked Happy Hands Bookmark - an adaptation of Endrucks' pattern #1 edging. If you remember, I always felt they looked like arms extended above a head, and linked together, which is why I gave it a name.

I first tried the idea of cross-linking in 2015, using size 20 Red Heart thread. Too thick, but the contrasting colours bring out the interlinked 'hands'. 
This time I picked up the straight edging in Anchor size 40 (https://tipsaroundthehome.blogspot.com/2021/11/from-one-to-many.html) to continue and see how I could turn the corner. 
I have deliberately kept it simple for now, with lots of picots to provide choices for whatever might follow later.

Because, my goal is to tat each motif in a different colour to represent the collective diversity of our Endrucks 1920 Project, like I explained in the last para here - https://tipsaroundthehome.blogspot.com/2021/03/balancing-act.html.

So what do you think? Any ideas or suggestions?

There is a lot of pattern #1 related activity and adaptations going on in our FB group. It is the pattern I have chosen for the next article to send to IOLI Bulletin. It was chosen after consulting with Ninetta and a lot of thought, for various reasons, one of them being that many tatters had gotten involved with adaptations from this motif, including needle tatting. It was also 'modernized' while still retaining the 100-year old flavour. Thus it seemed like the perfect reflection of what our Project represented - a community effort to modernize patterns from the 1920 book. There are some spectacular models that have come in but a couple are under wraps for now. Hopefully I'll be able to showcase them all in my blog a few months down the line.

Endrucks 1920 Project details , links, patterns, ..... - 
This doc is also in the process of being updated and reorganized. Takes time, though. And this time I have a deadline to meet, hence tatting will continue for the next few days, yay!


Thursday, 10 March 2022

girl interrupted

Pin It now!

 Despite the best of intentions, commitments can fall by the wayside. Usha Shah and Ayşe Özgür were among our original volunteers and started tatting immediately after selecting their respective patterns, sending in the first trial pictures.

Then life intervened, interrupting their commitment, and we lost their participation. However, their trial samplers are inspiring and a wee bit different from the original pattern, making it a pleasure to share with everybody. Both ladies are highly accomplished and talented and we expected nothing less, right!

The other commonality lies in the way the tatted they ‘block’ without switching shuttles, seemingly like a continuous chain. Hence despite working with 2/3 colours, their block chains remain the same colour.

Ayşe Özgür worked pattern #7 in 3 colours! Her sampler resembles oya mekik or Turkish lace, partially because of the thread used. If we compare closely, this sampler is a modification of the original pattern not merely in colours but also techniques, direction of chains, etc. A possible variation to keep in mind when tatting.

This is the pattern that went through many hands before landing in mine and the pattern was shared here - https://tipsaroundthehome.blogspot.com/2021/11/the-foster-child.html

Ayşe tats a range of flower motifs, both 2D and 3D. These original designs are very pretty and colourful and impeccably made – a mix of tatting and Turkish oya. However she uses shuttles instead of needle. Besides her Facebook profile, she hosts a FB group (Tatting Ayse), has a YouTube channel, and an etsy shop. Do check out her inspiring work. 


Usha Shah of Shuttle Creations is another talented tatter, designer who needs no introduction. All one needs to say is Dot Picot! She chose pattern #39 and sent in this trial sampler.

Again, if one examines closely, it is a modification or variation of the original, with the block chains worked continuously without switching shuttles or turning work. The vertical segments stand up straight, providing a nice symmetry.

The way her chains stack up, reminds me of peacocks! Do you see birds with open plumes, too?

When Usha could not return to this project, despite wanting to, I was at a stage where it was easier to do it myself than request for volunteers and review their work. (We wanted different names on the modern pdfs than repeating the same). The entire review process is very time- and energy-consuming, without the pleasure of actual tatting ;-D If you remember, I had tremendous fun doing the pattern and adaptations - https://tipsaroundthehome.blogspot.com/2021/11/a-trip-to-beach.html

Usha has shared many lovely original and unique patterns for free in her blog - https://shuttlecreations.blogspot.com/. She, too, is on various social networking platforms including Facebook, Instagram, WhatsApp. If you haven’t yet, do check out her inspiring work.


We are grateful to both ladies for their attempts, even if they could not see their projects through to the end.

muskaan and Ninetta

*********************

Endrucks 1920 Project is a community project, where patterns from Endrucks’ German book of 1920 were converted to modern-style presentations and pdfs. We welcome you to join our Facebook group “Endrucks 1920 Project” (please read the group’s description and rules before joining :  https://www.facebook.com/groups/1235560633606162)  where the fun continues with derivative tatting, new variations, activities, etc. all within the gamut of Endrucks’ patterns.

Using the hashtag #Endrucks1920Project when posting in FB or Instagram, ensures that your pic will show up in a search.

If you enjoy sharing and experimenting, or even test-tatting, the group is waiting for you!  All info and links to patterns (original and modern), including model images, are in the Endrucks 1920 Project Document, here   https://docs.google.com/document/d/17LEVftXweztBIOWh4sL4BB7bX65ssoOsOn4oXIgCepY/view There is still a lot to explore and extract, derive and apply and scrolling through this document will give you an idea of the possibilities and beyond.

*********************

Wednesday, 24 November 2021

willing non-volunteer

Pin It now!

Sounds crazy oxymoronic? Read on …

We have just thanked our very first volunteer, Mariantonietta here https://ninettacaruso.blogspot.com/2021/11/willing-volunteer.html and now we take equal pleasure in thanking Julie, our last ‘voluntary non-volunteer’.

In Nov 2020 volunteers had chosen pattern(s) from Endrucks’ book to tat and present in modern forma,. Over time 3 of our volunteers had to step back for personal reasons and mid-2021 we opened up their selections for pickings. They were pounced upon and selection was closed.  

Direct link to pdf (updated version) - https://drive.google.com/file/d/1SmqcWxtPAlvveValWZmTlq-tHucSa6wr/view

It just so happened that Julie Santos Villegas was in neither of these volunteer lists. Yet, she could not contain her enthusiasm and almost overnight she tatted pattern n.7 and shared her sampler which was slightly modified from the original. When asked if she would like to present her work in a proper pdf with pattern, she readily and whole-heartedly agreed, roping in her son to diagram it too!

Does ‘willing non-volunteer’ makes sense now? Turned out Julie was the last person to make it to the community project since all patterns were finally chosen at the time. Few changes occurred subsequently but the story will continue in respective posts. Mind you, we still have to introduce and thank many more contributors since we are not following any chronological order. And new ones are cropping up in our FB Group, too!

Throughout our collaboration and engagement, Julie has been enthusiastic, responsive and receptive in equal measure -  a true team player. It has been a pleasure to get to know her. Her son, Robbie, has been instrumental in drawing the diagram(s).

Julie had started her first sampler from the lower central ring (starred in above pic) instead of with a chain as in the original and we uploaded the pdf in July. Since then she altered the start to the side ring and also tatted a 2-colour sampler and included a written pattern so that more tatters could benefit. Robbie had to alter the diagram. They make a good mother-son team and we thank them both! 

She graciously shared her tatting journey …..

“I learned tatting in high school. I remember having a good teacher who constantly reminded me of my thread tension. I enjoyed the craft so much that I tatted a green edging for a blouse collar. It was just rings and bare thread. College and adult life followed and tatting was completely forgotten until I retired in 2008. Thinking of what to do next to occupy my retirement, I looked back to what I enjoyed most doing when I was younger. Thankfully the Internet was already dominating our lives. I googled “tatting” and the rest is history. Through you tube I learned from generous tatting masters how to make chains, cluny, split rings, onion rings and many more. There is a lot more to learn but I am not complaining. I think tatting and I will grow old together.”

Her last sentence is quite philosophical and a good way to ‘grow’…

Ninetta joins me in thanking Julie for her willing contribution, team spirit and enthusiasm.

**********************

Endrucks 1920 Project is a community project, we welcome every one of you to join in and enjoy the modern-style pdfs that have been uploaded! Please let us know where we can find your renditions and derivative tatting!

We created the hashtag #Endrucks1920Project, so please use it for your pics to show up in a search.

*** NEW! *** We have a Facebook Group (please read the group’s description and rules before asking to join) – “Endrucks 1920 Project”: https://www.facebook.com/groups/1235560633606162   

We all enjoy sharing and experimenting and the group is waiting for you!  All info and links (original and modern) are in the Endrucks 1920 Project Document, here: https://docs.google.com/document/d/17LEVftXweztBIOWh4sL4BB7bX65ssoOsOn4oXIgCepY/view

Remember there are many more modernised patterns, derived and extracted patterns/ideas, already listed in the project document, with more still to come! So, do visit and scroll through.

*********************
With love and gratitude,
muskaan & Ninetta

Saturday, 25 July 2020

applying techniques rakhi

Pin It now!
It's that time of the year again - Rakshabandhan is round the corner and Indian tatters are already posting lovely tatted rakhis. Here's my rakhi for 2020 ... AppliTech rakhi/bracelet!

The portmanteau 'AppliTech' refers to the fact that it is kind of a test or trial or experimental piece for applying a few techniques. It started as an observation piece for the Lock Join Plus methods as posted here - https://tipsaroundthehome.blogspot.com/2020/07/lock-join-plus.html where lock join, reposition threads, SLT, and reverse join (and switch shuttle) were all used in batches, resulting in randomly placed colours on one side.

Then, in response to a question on facebook, I re-demonstrated what I had discovered last year - whether you hold the gauge above the core thread or below it (as in Ninetta's Tuft picot), provided it goes through the leg of half stitch, the final result is the Same!

All tutorial links here, including my study of picots (Interlocking, Mrs Mee, Tuft} - https://tipsaroundthehome.blogspot.com/p/tatting-resources.html
I will share my detailed comparison in next post, along with more observations.

I continued on to make the 3rd Josephine Ring placing the gauge above core thread.
Each ring starts and ends with 1ds, and has a picot after every half-stitch.
Each JR is made of 20 1st half-stitches with a 5mm gauge.

Many of us have already come across this beautiful Lavender sprig by tatting_art on pinterest or Instagram and she has uploaded a how-to video here (thanks for sharing the link, Karen Cabrera).

Next, I started mock rings with treble tat stitch. I started each chain with an Intruding picot which served as the starting picot for first tds, also to join back the chain into a mock ring!

Why mock rings, you ask?! Because I did not know how big the ring should be, what the count should be.  With mock rings,  I had the freedom to keep 'bending the curve' to gauge the chain length.  Hence, no tds count. 

Close-up of the dimensional/stacked flower. Bead was added before starting the last mock ring, by pulling up a loop...
Continued with the Priscilla edging (Fig 29 from her Tatting Book 3), though this time I followed a symmetry in colour placement. Lock Join and Reverse Join are used in alternating chains to move up to the next chain. By direct tatting (unflipped/reverse stitches) every alternate chain, I could tat all from the front. No RW or turn work!
Added findings after it reached 7" length. Anchor Pearl Cotton size 8.

Perhaps with a bit more effort, I could work the 2nd part of the edging to face opposite, rather than appear continuous. But there are a lot more things on my over-full plate ;-P
See you soon ....

Oh, but before I go, Sue Fuller taught my 2017 rakhi (in March) and Bonds of Love rakhi/bracelet (in April? she liked the blue, red, white version) in the Online Tatting Class earlier this year. I didn't get a hold of the logs, though, so have no idea what transpired in the class ;-D

Friday, 17 July 2020

lock join plus

Pin It now!
Many months back, in response to some curiosity and confusion among several tatters, I decided to illustrate the simple progression and functional similarity between a few techniques. Here the underlying common factor is the ubiquitous Lock Join. Add one extra step to the LJ, and it opens up the canvas to change colours, shuttles, and even direction of chains.
I took stepwise pics for each of the combinations back then, but preparing a proper stream-lined article has taken way more time than intended. I am immensely grateful to Anita Barry, Master Tatter, for her proofing and editing.


In order to make the document manageable, it is uploaded as a series of 5 pdfs, each a stand-alone (click on each title to download) –
PLEASE NOTE - Most of these are also Reposition Methods which can be used even without a lock join to change direction, create points or curves, etc.

  1. Lock Join Plus – Executive Summary and practice Patterns for further exploration. (3 pages)
 
How one extra movement after a lock join can open up the canvas to change colours, shuttles, and even direction of chains. 

For starters, a simple 2-colour motif is used where all chains face the same direction. But for further exploration, more patterns are listed. 

  1. LJ Plus - Lock Join (LJ) pictorial (1 page)
 
How to make the lock join using both up and down loops. 

Notice how the colour blips in the 2 right joins are larger than the remaining 3. If the down loop LJ is followed by a 2nd half-stitch, the blip is almost hidden completely.
Links to undo a LJ and variations that include making a LJ with 2nd shuttle.
See also Lock Join in Mock Rings


  1. LJ Plus – Reposition pictorial (1 page)
 
A laissez-faire crossing of threads. Simple, quick, vintage. Compare how chain segments change colour and the slight overlap at the start of each chain.

  1. LJ Plus - Shoe Lace Trick (SLT) pictorial (1 page)
 
Tying a half knot outside the LJ – overhand tie or SLT. Again chain colours get switched. SLT also allows us to switch the core thread in instances when the shuttle is running low on thread.

  1. LJ Plus – Reverse Join (RJ) pictorial (2 pages)
 
Encapsulating or entrapping the other thread within the LJ. Created by Elaine P Gan (tattingbox). 

Pics showing an up loop and a down loop. The latter 
minimises the colour blip in a RJ as well.

Functionally the same as crossing and SLT after LJ, but more elegant and efficient – a smooth transition.


After each or either of these, if we turn work, reverse work, switch shuttle, and/or direct tat (unflipped stitches) the next chain, we add another dimension – changing the direction of the chain! Along with colour. Our choices multiply! And we might even be able to work throughout with just one shuttle and ball. To explore these choices, some practice patterns are listed in the main pdf. Besides block tatting, think also of filet tatting, especially in 2 colours, where these can be used effectively. I forgot to mention the role of lock join plus in mock rings and mock onion rings, but you get the idea, right? Wherever you have 1 or more chains joined below, play with LJ Plus!
I used all the above 4 in this vintage edging from Priscilla Tatting Book3 Fig 29 where the chains move to and fro. We can turn work after each chain or we can work every alternate chain directly (reverse stitch - unflipped). I started with LJ, then tried reposition, SLT, and RJ after every 3rd chain. Shuttle in hand changes depending on our choices.

So I'm sure there is no need to spell out why I presented this article/pdfs in the way I did? There is lot of scope to play and design because each method has it's own pluses and minuses!
Do you see a butterfly in the above arrangement? Time to pick up my shuttles again and work out a pattern ;-D
Before that you might get fed one more lesson, so stay locked in ;-P

UPDATE 1: When working with only one shuttle and ball, changing the direction of chain using direct tatting - https://tipsaroundthehome.blogspot.com/2021/06/2nd-shuttle-or-ball.html 
UPDATE 2: Carrying on with functional movements, see pictorial Twist Work (TwW) -