Showing posts with label daisy. Show all posts

Sunday, 5 January 2025

last and first

Pin It now!

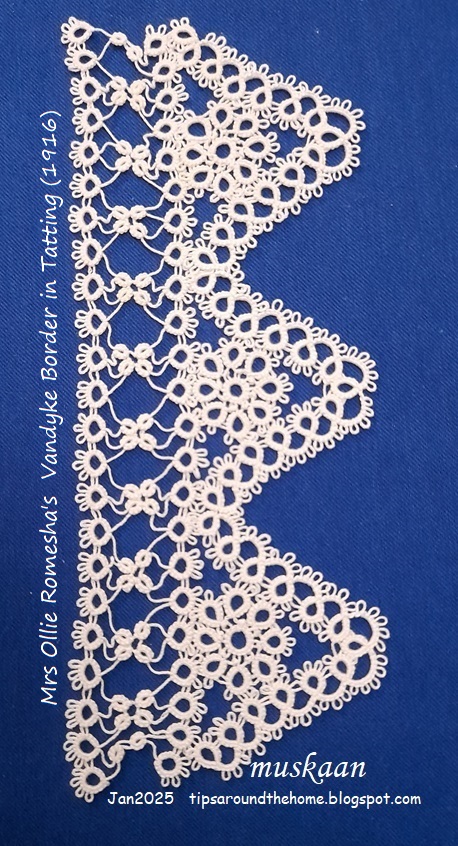
 So this is the last thing I tatted and the first I picked up at the turn of the year. And I have my tatting buddy Anita to thank for it. She was on a determined mission to finish off her ongoing works before the new year came around. Impressed and motivated, I chose this sampler I had shared here and finished it on the night of 31st Dec 2024 with an hour to spare! 

And in 2025, I picked it up again to hide the tails, block and photograph it. Notice the thread going across at the top? I won the thread chicken race!!!

Pattern is Vandyke Border in Tatting by Mrs Ollie Romesha  published in Needlecraft Vol. VII, No. 8, April 1916 and the PDF can be downloaded here - https://www.antiquepatternlibrary.org/html/warm/tatting.htm

One headside motif showing wheel surrounded by a scroll.
NOTE - The pattern calls the circular medallion a 'wheel'. However the correct term for this classic formation is 'daisy'. https://tipsaroundthehome.blogspot.com/2024/03/counts.html

My Notes - 
1. Pattern calls for starting the scroll at the ring indicated by white arrow. I started with the one indicated by orange arrow.
2. 4ds is missing in the pattern for ring indicated by blue arrow. All 5 rings are identical.
3. Pattern calls for tatting the scroll first and later tat the wheel (daisy) joining it to the scroll on the go. I preferred tatting the wheels separately and joining the scroll to each. 

A single motif turned around looks like the letter A! In Anchor size 40, it is 4cms high and just under 4cms wide.

Three repeats without the footside or sewing edge is more pliable and can be used for a collar, necklace, etc.

4. This lace is worked in four parts as per original pattern - wheels, pointed edge, two rows of a straight edge on the upper side. Worked with one shuttle (and ball only in scroll) throughout. 

5. Continuous Tatting in Wheel using Slip Stitch - Determined to keep it vintage, I did not use any continuous tatting method to climb out of the rows in the lace. However, the wheel is an exception where Mrs Ollie works it in one pass using only one shuttle. She works the central ring then instructs us to close the ring and 'fasten thread to 1st picot and tat ring ....'. Basically leave a very short bare thread space, make lock join in 1st picot, and start outward facing ring. I recently learned this is called a SLIP STITCH - leaving bare thread to span the distance in order to climb out at a different point. We've all used this in some form, some situation or other. Now we have a term (Judith Connors' An Illustrated Dictionary of Tatting, 2007 ed.) and Judith patiently clarified it for me. In a future post I will elaborate on these situations, one such being this Rosette Enchained snowflake .

6. In Anchor mercerised cotton size 40, measurements for 3 repeats: 7cms high x 17cms long. Without the footside rows, the triangle is 4cms high. 
Not happy with the bare thread lengths in the footside rows. I used a 5mm gauge. 4mm would've been better. My fear, despite the trial, came true, sigh.

From this upturned side, the peaks remind me of temples in India.

I hope to use this short length on a greeting card or card topper once I visualise what else should go into the composition. Your suggestions are welcome.

Related posts

Thursday, 21 March 2024

counts

Pin It now!
A bit of mixed media card for my March 2024 Small Decorations entry. My heartfelt thanks to splocik for graciously accepting the earring I made in February and I hope this card meets the requirements of the game. 

This is where it all started with a counting error I frequently make, despite my cautious counting! Notice that one daisy has an extra petal.

Pattern for the classic daisy is from 'The Complete Book of Tatting' by Rebecca Jones  (Fig. 122 page 47, 2011). Worked in Olympus size 40 (equivalent to Lizbeth size 20).  

Elgiva Nicholls calls this medallion a Classic Daisy formation, made with a single thread/shuttle, in 2 rounds. Olympus size 40). 

The more modern style  (coloured motif) is worked in one go, using two shuttles to throw rings off a mock center. I used the exact same pattern for the petals, but added 2 ds in the SCMR between each petal. 

Which version do you like? The Classic or the Modern?


A few more pics of the card ---


Actually when I opened my box of watercolours, I found most of the jars empty! Hubby quickly ordered a box online and while I waited for the delivery (about 15 minutes), I doodled this with the watery remains. And was too impatient to wait for the leaf to dry, hence the smudging.

Probably the last time I painted was 15 or 20 years back! 


I painted the leaves, then glued the daisies. The little orange florets are from my 2022 flag project (link below). After trying out a few arrangements, I painted the brown twigs and glued the florets. Added a few more twigs, leaves, .... and finally the diamonds. Can't even remember when or where I bought those highlights!
TIP: I deliberately glued the orange flowers on the frontside, coz the backside is more dimensional- the picots curve up a bit.
You can easily see how amateurish my painting is! Nevertheless, it felt good to hold and reacquaint myself with my brushes. This was a very hasty project - probably a half hour from start to finish. Hopefully it has opened the gates to some more doodling in the future. 

Check out the Feb gallery here - https://splocik2.blogspot.com/2024/03/male-dekoracje-galeria-lutowa.html


Related Posts
https://tipsaroundthehome.blogspot.com/2017/10/meddling-with-medallions.html
https://tipsaroundthehome.blogspot.com/2022/08/har-ghar-tiranga.html   https://tipsaroundthehome.blogspot.com/2025/01/last-and-first.html

Tuesday, 17 October 2017

meddling with medallions

Pin It now!

Going over the medallions document, I realized that it needed more samples – visuals are so much better than words. Excited, I got down to it. Here are a few of them.

Most of the samples in the document seemed to have single rings around the center. But trefoils, clovers, layered rings (ANKAR style), etc. can also form an enclosed space. So I created this pattern using inward facing clovers. There are thrown rings on the chains.
‘Tis the season, hence I’m calling it the Clover Wreath. Wouldn’t it work well as the center of another doily ?! The large rings need to be joined, though.


Now here’s something I don’t remember ever doing – a Central/common Picot on a Chain.

I tried to create my own pattern with 1 horizontal and 1 vertical ring on each ‘spoke’, but it wasn’t working (do you have any idea why?). Finally I took the design idea from the model #69 in Elgiva Nicholl’s ‘Tatting: Technique and History’ but used my own stitch-count and single decorative picots.

TIP: For straight chains, avoid snugging the chain too tight – we don’t want it to curve/arch. 

A central ring with picots (also called rosette by Mlle Riego) is a common feature of many patterns. Traditionally it was tatted separately. Now we have multiple options to incorporate it without cutting off thread : climb out with a mock picot ; work it as a mock ring ; and so on.

In this square, the central ring is thrown off the first chain -
When I was first learning split rings during Jane's TIAS 2014, I attempted the Fandango coaster to practice on the side. So not happy with the working ! Time to try it again. Much better.

This is a Classic Tatted Daisy. It starts with a central ring with picots. Then we add a round of outward facing rings – lock joined to the picots and separated by bare thread. Traditionally it was worked as separate rounds and with a single shuttle, hence bare thread separates adjoining rings.

Now we make it in one pass and the bare thread is sometimes substituted with chains.

Incidentally, my Aspiration Doily (trial 2) now has a Daisy center ! It is a modern construction using 2 shuttles (or a long tail for shuttle 1) with the outward rings/petals thrown off the central mock ring (SCMR).
It lies flat and the center is more solid than bare threads between rings in previous trial. 

And here’s another interesting variation :
a central ring with picots, surrounded by concentric chains, lock joined to picots on previous rounds, and a final round tatted like the traditional daisy petals with bare thread and lock joins !
So, the rosette turns into a daisy !
(a central ring with closely packed chains around it is Also called a rosette!)

These were tatted over 15 years ago when I had no notion of a lot of tatting techniques nor how to hide ends. You can clearly see spiraling rounds rather than discreet ones. Although I did get better over time and in one of the size 40 yellow ones (made a few years after the size 20 red), the inner circle is almost round with equal-size picots.

Pattern is part of a lace from ‘Tatting Favourites’ by Anchor Design Center. Each medallion is worked in 2 parts but I now realise that the outermost rings can be worked as thrown rings. 
It has been one of my favourite go-to patterns when travelling. The medallions were later joined with a wavy scroll with opposing medallions, thus functioning as motifs. 

Medallions – never too meddlesome when tatted !


Tuesday, 18 April 2017

a central harmony

Pin It now!
Merry Christmas Snowflake
Sharon Briggs

Some patterns have an inherent harmony. I believe this snowflake is one such – elegance personified.

Clearly, there’s a flower within (remember the flower within series of snowflakes?). But this time I went with pristine white.
Tatted in one pass, in size 40, it measures a tad over 2 inches.
Tatted up so quickly, too - all in one sitting while supervising the AC servicemen ! Errr, I did have pre-loaded shuttles – so that’s a huge time-saver right there :-) 


Entire snowflake is worked clockwise.
If we start the daisy with shuttle 1, and climb out with split rings, then because we are moving clockwise, shuttle 2 becomes the main shuttle for all subsequent tatting (rounds 2 & 3).
With fs/bs tatting, the rings in both outer rounds will be worked backside (RODS) and these are cross-hatched clearly in the diagram !
Sharon’s diagrams are so self-explanatory. There are a couple of symbols (on top right of each pattern) that I am not very sure about, but this is no way hampers the working.
UPDATE : The explanation of symbols used in her patterns can be found here. Thanks Sharon :-)

Techniques :  2 shuttles, CTM, fs/bs tatting, daisy, split ring, mock picot, lock join.

I thoroughly enjoyed working this pattern and the actual result is better than what the lens or scanner captured !
This, and many more of Sharon's patterns can be found here
Besides patterns, and the inspiring display on her 25 Motif Challenge blog, I have learned a great deal from the design lessons she posted !

Many many thanks, Sharon :-)


And here’s what I did with the heart I tatted in previous post – made another SOUP ribbon bookmark charm! (tatting SOUP : Sewing On/Using Pieces of tatting)

  I did start reading this book a long time back, but never completed it. Should pick it up again...
Nina Libin's Heart for Kay acting as a ribbon bookmark charm ! All is harmony, all is peace ...


wishing you many stress-free harmonious hours of tatting :-)