Showing posts with label slip stitch. Show all posts

Sunday, 28 June 2026

happeeeeee birthday

Pin It now!

 28th June is Eleonore Endrucks' birth anniversary and we had shared 6 derivatives of the E monogram for a combined ILD 2026 and birthday celebrations. I got so caught up that I tatted all six ... they are fairly quick tats anyways. 

So, here's wishing our designer of Endrucks 1920 Project a very Happeeeeee Birthday with expectations that she would be looking down on her Endrucksian tribe with pride.

All worked in size 20 threads (though some are closer to Lizbeth size 10) and arranged in ascending order for comparison.

My original idea was to arrange them in an arc as if we were calling out in a rising crescendo but it didn't quite make the mark as seen above.
All six patterns were shared here - https://tipsaroundthehome.blogspot.com/2026/06/double-celebration.html
Sharing my thoughts and details in the same order as above -
Letter E Cursive from E32 by Paola Bevilacqua - I already shared my notes here - https://tipsaroundthehome.blogspot.com/2026/06/multiple-celebrations.html
Measurement: 3cm wide, 4cm high.
Letter E from E1 by Manju Talekar. Notes shared here - https://tipsaroundthehome.blogspot.com/2026/06/multiple-celebrations.html
Measurement: slightly more than 4cm x 4cm.

Letter E from E41 by Julie Villegas. This was an easy and quick tat.
Measurement: 3½ cm wide, 4½ cm high

Letter E from E1 by Vani Kattoju. I have tatted sooo many E1 original/reworked and derivative patterns that my motor memory kicked in and I made a mistake in the vertical chains. Instead of 4ds between picots, I made 3ds as in the original. Discovered this only on the return journey and had to un-tat a few segments before tweaking the count by 1 less stitch each. Thankfully it doe not seem to have made difference.
My slight tweak which isn't too obvious since I did it too late - In the 2nd motif I shortened chains and rings in the arms by 1ds to make the horizontal arm of E shorter than the end ones.
I was forced to play thread chicken for several of the final elements but managed to have just enough tails left to be able to sew them in. Reposition methods help a great deal as did not cutting for 2nd row - simply made a slip stitch.
Measurement: 4cm wide, approx 6cm high.

And when it is rotated we get some interesting possibilities! I see a chandelier, a bowl, but also an elephant, LOL.

Letter E from E41 by Ninetta Caruso. Now I had always intended to tat this with bugle beads, but this time I went for speed. And I was so inspired by Ninetta's version of Julie's E (for ILD) that I copied her colourway ;-D
Measurement: 4cm wide, > 6½ cm high
.... When rotated 

Letter E from E17 by Manju Talekar. I could've done a better job with sharper angles and straighter lines. 
Measurement: 5cm wide, >7cm high.

So that's it for now. 
For plenty more derivative patterns, tutorials, and the original reworked patterns from Endrucks' 1920 book, Die Schiffchen-Spitzen save this EP LINKS url - https://docs.google.com/document/d/1w1TZBg-HIzseGEUoJ-rko7tNbtSgZY5A18Oy2Y9Hh0Y/view
Hopefully my PIC Ninetta and I can return to our FB group activities in full earnest next year.

Many many thanks to all designers and participants!

Sunday, 5 January 2025

last and first

Pin It now!

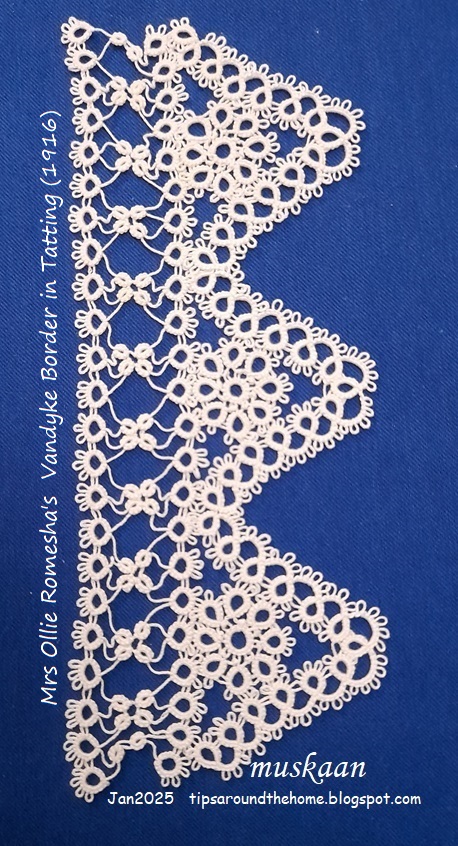
 So this is the last thing I tatted and the first I picked up at the turn of the year. And I have my tatting buddy Anita to thank for it. She was on a determined mission to finish off her ongoing works before the new year came around. Impressed and motivated, I chose this sampler I had shared here and finished it on the night of 31st Dec 2024 with an hour to spare! 

And in 2025, I picked it up again to hide the tails, block and photograph it. Notice the thread going across at the top? I won the thread chicken race!!!

Pattern is Vandyke Border in Tatting by Mrs Ollie Romesha  published in Needlecraft Vol. VII, No. 8, April 1916 and the PDF can be downloaded here - https://www.antiquepatternlibrary.org/html/warm/tatting.htm

One headside motif showing wheel surrounded by a scroll.
NOTE - The pattern calls the circular medallion a 'wheel'. However the correct term for this classic formation is 'daisy'. https://tipsaroundthehome.blogspot.com/2024/03/counts.html

My Notes - 
1. Pattern calls for starting the scroll at the ring indicated by white arrow. I started with the one indicated by orange arrow.
2. 4ds is missing in the pattern for ring indicated by blue arrow. All 5 rings are identical.
3. Pattern calls for tatting the scroll first and later tat the wheel (daisy) joining it to the scroll on the go. I preferred tatting the wheels separately and joining the scroll to each. 

A single motif turned around looks like the letter A! In Anchor size 40, it is 4cms high and just under 4cms wide.

Three repeats without the footside or sewing edge is more pliable and can be used for a collar, necklace, etc.

4. This lace is worked in four parts as per original pattern - wheels, pointed edge, two rows of a straight edge on the upper side. Worked with one shuttle (and ball only in scroll) throughout. 

5. Continuous Tatting in Wheel using Slip Stitch - Determined to keep it vintage, I did not use any continuous tatting method to climb out of the rows in the lace. However, the wheel is an exception where Mrs Ollie works it in one pass using only one shuttle. She works the central ring then instructs us to close the ring and 'fasten thread to 1st picot and tat ring ....'. Basically leave a very short bare thread space, make lock join in 1st picot, and start outward facing ring. I recently learned this is called a SLIP STITCH - leaving bare thread to span the distance in order to climb out at a different point. We've all used this in some form, some situation or other. Now we have a term (Judith Connors' An Illustrated Dictionary of Tatting, 2007 ed.) and Judith patiently clarified it for me. In a future post I will elaborate on these situations, one such being this Rosette Enchained snowflake .

6. In Anchor mercerised cotton size 40, measurements for 3 repeats: 7cms high x 17cms long. Without the footside rows, the triangle is 4cms high. 
Not happy with the bare thread lengths in the footside rows. I used a 5mm gauge. 4mm would've been better. My fear, despite the trial, came true, sigh.

From this upturned side, the peaks remind me of temples in India.

I hope to use this short length on a greeting card or card topper once I visualise what else should go into the composition. Your suggestions are welcome.

Related posts