Showing posts with label edging adaptation. Show all posts

Friday, 14 March 2025

lets go clubbing

Pin It now!

 aha, don't get the wrong idea! The reference is to clubbing of laces to create a new version! And being Holi, it's an excuse to play and party with friends today.

So, Bandini approached me with her pattern to do the presentation and also share with the community through my blog and I couldn't say no. She very cleverly joined two edgings on either side of a central braid giving rise to a broad tatted lace that looks quite different from its individual constituents. 

Lace Club Border by Bandini Maisheri (2025) -https://drive.google.com/file/d/1aVWxNtGBoRlK9Hmx3UScuKHMvillA-4o/view

This is my small WIP sampler in size 40 showing the central SR braid and one edging joined to it. 
The same edging is also joined on the other side of the braid in the border.
Except for the SR braid which requires two shuttles, the edgings can be worked with a shuttle and ball.

And here the 3rd edging is attached to the 2nd one for a medium-sized border.
Again this is done on the other side as well.
But you get the idea! You can pick and choose as many or as few edgings for the desired width.
Play with tatting in more colours and beads and this widens the canvas even further! More in tune with colourful Holi ;-D
You can even change the sequence of working each row to suit your preference. I chose a sequence which was simplest to present as a diagram and text.
 
She tells me that her mother has already tatted 9 meters of this border, no doubt for a saree!
And I like the term she used - 'clubbing'!

Another fun aspect is that each can be a standalone edging, too! So we get a LOT more in this pattern than a single broad border!

All details are in the PDF (click to download) - Lace Club Border by Bandini Maisheri (2025) - https://drive.google.com/file/d/1aVWxNtGBoRlK9Hmx3UScuKHMvillA-4o/view
Hope you enjoy playing with it!

Many many thanks to Bandini for graciously sharing her cleverly clubbed pattern !

Thursday, 6 October 2022

not just an edging

Pin It now!
Oooo là là
This stunning necklace is tatted by Ninetta Caruso for our Endrucks 1920 Project. An adaptation of Endrucks' 1st pattern!
But let me get the nitty gritty out of the way first, some of which has already been shared.

Edging pattern #1 from the book German book ‘Die Schiffchen-Spitzen’,1920, by Frau Eleonore Endrucks-Leichtenstern. The pdf shared earlier is now updated with a lot of cleaning up and additions. 
Above we have a straight edging, a circular edging, playing with 2-colours, and with a modified pathway for mirror imaging.


This collage shows some of the several paths ranging from 
1. the simpler but unsymmetrical original. However, it starts with a chain and moves from right to left;
2. the modified symmetrical adaptation which starts with a ring. This central ring is worked as a thrown ring from 2nd motif onwards (hence different colour) and the edging moves from left to right;
3. playing with some colour positions using Reposition Methods, and where the 1st motif is worked with 2 small side rings and each subsequent motif with only the right side ring to be made. Ninetta finds that this is easier than making the left ring in repeats.
4. (see square edging below) 2 small rings on each motif also makes it easier to keep the threads in place. 
These are but a few options and each tatter can follow their own path. 

This is Antonia Lai's adaptation of the edging as well as the addition of a corner, giving us a nice square or rectangular frame. - https://drive.google.com/file/d/1fsiET9ZJvXSD0kcAMKsuUNZt-rznFkO9/view
Pattern notes are included in the updated pdf above.

Happy Hands Linked Bracelet is almost exactly the same as the bookmark, except for using numerous colours and beads, and a different tail, etc. I made this specifically to represent our common efforts to create, complete, and continue the Endrucks Project.
If only the gold and silver beads sparkle in the photos as they do in real, sigh.
Pattern notes included in updated pdf.
 
This is my sampler from 2019 in Lizbeth 20 where I conceived the idea of a necklace and played around with bead arrangements. However, I knew I would never do justice to it, hence asked Ninetta to step in and she did so willingly and in such a spectacular fashion!

And now for the awesome part! This is a very short video Ninetta sent with her Happy Hands Necklace pics. And here is the link, in case - https://drive.google.com/file/d/1dOwk3l0vei-RApDrBPeJCe06FzpBeaqC/view

These are her work in progress pics. She used treble stitches to add height and texture to the chain arches between motifs.
She substituted the hand rings with swarovski crystals.

This is the clasp at the back.
And a close-up of how she used tatting to join the necklace to the clasp.

The cabochon is attached later using this pattern - https://ninettacaruso.blogspot.com/2020/06/pattern-for-tiffany-bezel.html
As seen from the back.

The clasp and part of the necklace. This could so easily also become the front!
Notes, as well as tutorial links, are included in the updated pdf.

And Ninetta tatted yet another as a gift! 

Remember all these goodies are included in the updated Happy Hands Edgings and Adaptations pdfhttps://drive.google.com/file/d/1IRlJ7bnx-c27PYtgXymx_ps-KL2pen_m/view

The Sunflower coasterhttps://tipsaroundthehome.blogspot.com/2021/03/happy-sunflowers.html )  which was earlier a part of it, has been removed. I am in the process of adding diagrams to the pattern and cleaning up the presentation as a stand-alone. For the impatient tatter, I can send you the old pdf; although I'd prefer patience ;-D  

All modernised patterns and so much more can be accessed from the EP dochttps://docs.google.com/document/d/17LEVftXweztBIOWh4sL4BB7bX65ssoOsOn4oXIgCepY/view

Ninetta, my true partner in crime (PIC), thank you from the bottom of my heart! 
I'd also like to thank Winnie Ho for her feedback which made me 
re-think and re-do the presentation. Hopefully, it is now better laid out
with plenty of choices to work the pattern.

Sunday, 27 March 2022

a confused flower

Pin It now!

Story narrated by the flower herself! 

"I started life wanting to be a Snowdrop or a Crocus - in pristine white. 

But metamorphosed into a Lotus! For now at least...(sighing deeply)
This is how I looked at the start as a white 3-petaled snowdrop-wannabe. But this lady who thought she knew better, added rings to join the petals. Now which snowdrop has rings or joined petals?! (snickering)
As you can see, my petals took wing and spread out further than the required conical shape. And don't even get me started on the flattish tips. (scowling)
It is good that she recognised her faux pas and decided to manage the mistake. Happy Hands need to be Happy!
This is the next stage of my development. See I've grown new wings, errrr, petals!!! And though late, there is now a bit of a point to the tips. 
And I became a Lotus. Or am I a Water Lily? I can live with either for now, but not for long. My final  transformation has already begun - it's March and I am in time to be a Daffodil! Meet me here in a few days in my new avatar ..."   
𐩕𑁍𐩕𑁍𐩕

So you must've recognised the motif from Endrucks' #1 edging - the one I christened Happy Hands. This flower might not be too happy at present but I had decided at the 2nd stage itself to convert it into a daffodil, hence the slightly different set of petals. It looks like a lotus only because I lifted my first set of hands. If I allow them to rest back, they are a bit flatter - like in a daffodil. .

Happy Hands Flower Variations Pattern (prototype model)
adaptation of Endrucks' pattern #1

Some on FB asked for the pattern so while I work to finish the Happy Hands Daffodil, you can choose to start tatting the petals. The petals are worked exactly like the main edging pattern with minor tweaks. Hence, download the pattern here and follow the diagram and instructions incorporating the tweaks as follows -  https://drive.google.com/file/d/1IRlJ7bnx-c27PYtgXymx_ps-KL2pen_m/view  [for stepwise pictorial, refer - https://tipsaroundthehome.blogspot.com/2021/03/balancing-act.html ]

  1. Round 1 petals are exactly like the main pattern. Except that there is no chain L between the motifs/petals. I deliberately left the tails hanging below (for a thick stalk later).
  2. Snowdrop/Crocus variation : For a more conical shape, skip the thrown rings E and J. Make 4 unlinked petals. Also, make the petals tapering/pointy - see r-C and also Note below.
  3. While making the 3rd petal of the flower, make sure the threads are on the outer side so that we can continue the next 3 petals without cutting.
  4. Lotus or Water Lily : For Round 2, follow the same sequence and basic pattern. Except
  •  ch-B: 4 LJ 4 LJ 5 - 5 rw
  •    r-C: 8 vsp 2 - 6 dnrw SS
  • ch-D: 5 LJ 5 LJ (Tr-E) .....   Make similar changes to ch-G, join r-H to r-C, and ch-I.
  • ch-L: 1ds or 1 reverse (unflipped) stitch. Join to base of Round 1.
Make 3 such petals, leaving the thread tails at the back of work. Slightly twist these petals so that they lie between the previous ones. Lotus or Water Lily is done. You can work the leaf, stalk, etc. as desired.
Note: For a more pointed petal tip, we can make a long double picot in ring-C and later stiffen it into points, or make a twisted picot while joining. Twisted picot will hold it's shape, but ensure the double picot is long enough to accommodate the twist.

Daffodil : I will continue with the corona, anthers, calyx, and stalk patterns for the daffodil pattern as soon as I finish tatting the leaf. Eager to show you and hoping you like it, too.

The flower is worked in Anchor Pearl Cotton size 8 and measures about 5cms across.

In case of doubt, please don't hesitate to ask ..... Enjoy 💗

Friday, 25 March 2022

bowled over

Pin It now!

Can you imagine an edging taking on the shape of a bowl?! Paola Bevilacqua did just that! For the life of me I still cannot imagine how she visualized it in the first place!

free pattern (pdf link below)
This is the prototype she shared in the Endrucks 1920 Project FB group in January. She also uploaded stepwise pics with the pattern and I was immediately tempted to tat it. If you remember, I posted my version here - https://tipsaroundthehome.blogspot.com/2022/01/who-knew.html along with my notes. And now you can see how horrible my bowl is compared to this, since I did not tension my long chains properly. 
 
Paola tatted another version in metallic thread, and has removed the 2 side 'branches'. So we now have a choice to work it either way. 
The bowl can hold anything you wish to make it unique. Fill it with colourful eggs - it will make a good motif for a handmade card?!
It was so gratifying when Paola loved my idea of placing flowers in the bowl and immediately adopted it by adding these freeform sprigs and flower!

And here's the good news - the pattern is now in pdf and available to enjoy. It is a one-page diagram-only presentation. 
Fruit Bowl pattern by Paola Bevilacquahttps://drive.google.com/file/d/1OiSq1LijwjST84u_QnSSIpW2jBOLLegW/view  (click on the link to download)

Many many thanks to Paola for continuing to share her creativity with us! Grazie mille, amica.

Find all modernised and adapted pattern,s in the form of individual pdfs, from the Endrucks 1920 Project here - 

Wednesday, 23 March 2022

linked hands trial

Pin It now!

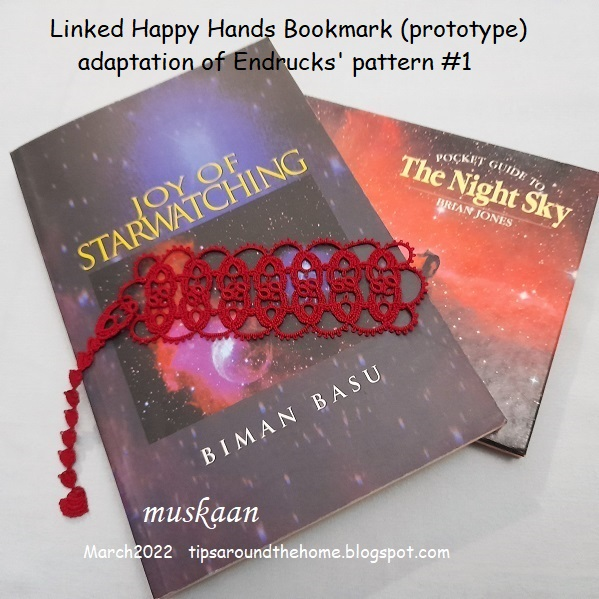
 I had finished this prototype bookmark soon after this post (https://tipsaroundthehome.blogspot.com/2022/03/one-month-several-years.html) but look how long it has taken me to upload the final pics! Too much going on ....

In Anchor size 40, it is 12 cms long and 4 cms wide, all tatted in one pass.

Since the linked hands are not joined, look how they can stand up like an elongated teepee! One could also imagine hands joined in prayer?

Simple bookmark without a tail. 2 side chains (on the bottom right) are shorter (count the 5 picots instead of later 6). This was the start and I didn't like the soft stretch of the chain. Hence from the 3rd repeat onward, I added another 3ds for a better curve. 
I had made the edging for the pattern pdf here - https://tipsaroundthehome.blogspot.com/2021/11/from-one-to-many.html
Playing with a filter. This is how it looks horizontally, in case someone is thinking of an insertion. I haven't blocked it to shape. This is merely my trial piece after all. I like the simple chain trim around. A balance between dense motifs and airy edge.

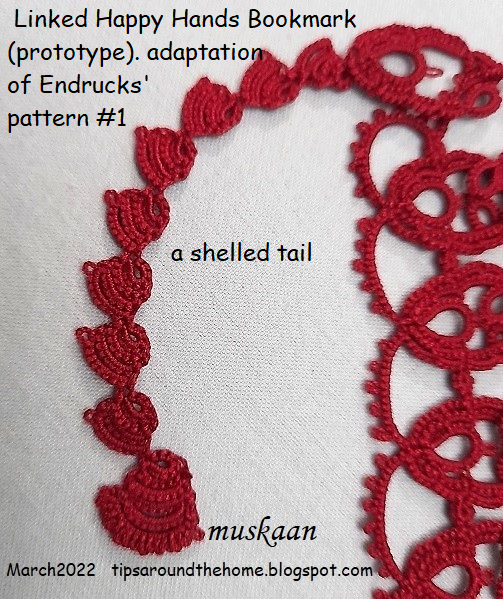
What's a bookmark without a tail?! Several ideas had been spinning through my head as I worked the body. However, when it came time, here's how I went about it - made a Happy Hands motif, linking it through the top chain.
Then followed these shell-shaped blocks. The first one wasn't a nice shape, but eventually they took on a better shape. The final 'charm' is simply a larger version of the smaller shells, with a final row of picots for a wavy effect. I was playing a tight game of thread chicken at this stage.

UPDATE (July 2023) - Pattern for the tail 
pic showing tail detail and charm
Start with a ring (4 vsp 5), then a graduated block of 3 chains (6, 7, and 8) (the last chain has a decorative picot), and repeat. Please note that I used Endrucks' method of climbing to next row of block chain, viz., 1ds vsp, followed by chain stitches.
The charm at the end follows the same principle but with more number of chains (5 or 6) of which the final chain has adjoining decorative picots for a dense frill.


I would've like to continue for a longer tail, but was running out of thread on one shuttle. And sometimes one just isn't in the mood to find the ball, wind the bobbin and ....

What do you think? Should I add this tail in my final bookmark or should I add a  long tassel? 
I have a colour scheme in mind and am hoping it will work.

Hoping to post a few more blogs in quick succession ....


Sunday, 13 March 2022

one month several years

Pin It now!

It's been a month since I last picked up my shuttles today, and boy did it feel good! All my time away from life activities was being spent on the compy trying to complete presentations, diagrams, reviews, or other backroom Project stuff.

This is a prototype of Linked Happy Hands Bookmark - an adaptation of Endrucks' pattern #1 edging. If you remember, I always felt they looked like arms extended above a head, and linked together, which is why I gave it a name.

I first tried the idea of cross-linking in 2015, using size 20 Red Heart thread. Too thick, but the contrasting colours bring out the interlinked 'hands'. 
This time I picked up the straight edging in Anchor size 40 (https://tipsaroundthehome.blogspot.com/2021/11/from-one-to-many.html) to continue and see how I could turn the corner. 
I have deliberately kept it simple for now, with lots of picots to provide choices for whatever might follow later.

Because, my goal is to tat each motif in a different colour to represent the collective diversity of our Endrucks 1920 Project, like I explained in the last para here - https://tipsaroundthehome.blogspot.com/2021/03/balancing-act.html.

So what do you think? Any ideas or suggestions?

There is a lot of pattern #1 related activity and adaptations going on in our FB group. It is the pattern I have chosen for the next article to send to IOLI Bulletin. It was chosen after consulting with Ninetta and a lot of thought, for various reasons, one of them being that many tatters had gotten involved with adaptations from this motif, including needle tatting. It was also 'modernized' while still retaining the 100-year old flavour. Thus it seemed like the perfect reflection of what our Project represented - a community effort to modernize patterns from the 1920 book. There are some spectacular models that have come in but a couple are under wraps for now. Hopefully I'll be able to showcase them all in my blog a few months down the line.

Endrucks 1920 Project details , links, patterns, ..... - 
This doc is also in the process of being updated and reorganized. Takes time, though. And this time I have a deadline to meet, hence tatting will continue for the next few days, yay!


Thursday, 10 March 2022

girl interrupted

Pin It now!

 Despite the best of intentions, commitments can fall by the wayside. Usha Shah and Ayşe Özgür were among our original volunteers and started tatting immediately after selecting their respective patterns, sending in the first trial pictures.

Then life intervened, interrupting their commitment, and we lost their participation. However, their trial samplers are inspiring and a wee bit different from the original pattern, making it a pleasure to share with everybody. Both ladies are highly accomplished and talented and we expected nothing less, right!

The other commonality lies in the way the tatted they ‘block’ without switching shuttles, seemingly like a continuous chain. Hence despite working with 2/3 colours, their block chains remain the same colour.

Ayşe Özgür worked pattern #7 in 3 colours! Her sampler resembles oya mekik or Turkish lace, partially because of the thread used. If we compare closely, this sampler is a modification of the original pattern not merely in colours but also techniques, direction of chains, etc. A possible variation to keep in mind when tatting.

This is the pattern that went through many hands before landing in mine and the pattern was shared here - https://tipsaroundthehome.blogspot.com/2021/11/the-foster-child.html

Ayşe tats a range of flower motifs, both 2D and 3D. These original designs are very pretty and colourful and impeccably made – a mix of tatting and Turkish oya. However she uses shuttles instead of needle. Besides her Facebook profile, she hosts a FB group (Tatting Ayse), has a YouTube channel, and an etsy shop. Do check out her inspiring work. 


Usha Shah of Shuttle Creations is another talented tatter, designer who needs no introduction. All one needs to say is Dot Picot! She chose pattern #39 and sent in this trial sampler.

Again, if one examines closely, it is a modification or variation of the original, with the block chains worked continuously without switching shuttles or turning work. The vertical segments stand up straight, providing a nice symmetry.

The way her chains stack up, reminds me of peacocks! Do you see birds with open plumes, too?

When Usha could not return to this project, despite wanting to, I was at a stage where it was easier to do it myself than request for volunteers and review their work. (We wanted different names on the modern pdfs than repeating the same). The entire review process is very time- and energy-consuming, without the pleasure of actual tatting ;-D If you remember, I had tremendous fun doing the pattern and adaptations - https://tipsaroundthehome.blogspot.com/2021/11/a-trip-to-beach.html

Usha has shared many lovely original and unique patterns for free in her blog - https://shuttlecreations.blogspot.com/. She, too, is on various social networking platforms including Facebook, Instagram, WhatsApp. If you haven’t yet, do check out her inspiring work.


We are grateful to both ladies for their attempts, even if they could not see their projects through to the end.

muskaan and Ninetta

*********************

Endrucks 1920 Project is a community project, where patterns from Endrucks’ German book of 1920 were converted to modern-style presentations and pdfs. We welcome you to join our Facebook group “Endrucks 1920 Project” (please read the group’s description and rules before joining :  https://www.facebook.com/groups/1235560633606162)  where the fun continues with derivative tatting, new variations, activities, etc. all within the gamut of Endrucks’ patterns.

Using the hashtag #Endrucks1920Project when posting in FB or Instagram, ensures that your pic will show up in a search.

If you enjoy sharing and experimenting, or even test-tatting, the group is waiting for you!  All info and links to patterns (original and modern), including model images, are in the Endrucks 1920 Project Document, here   https://docs.google.com/document/d/17LEVftXweztBIOWh4sL4BB7bX65ssoOsOn4oXIgCepY/view There is still a lot to explore and extract, derive and apply and scrolling through this document will give you an idea of the possibilities and beyond.

*********************

Sunday, 23 January 2022

more multiples

Pin It now!

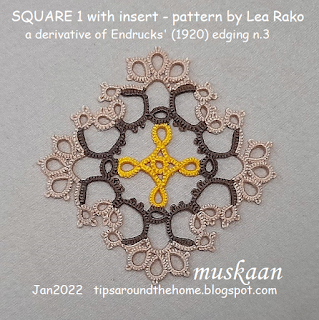
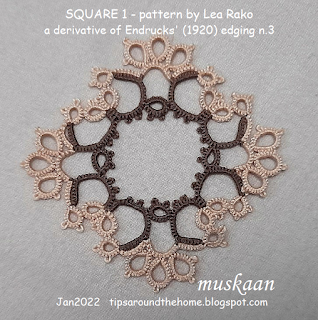
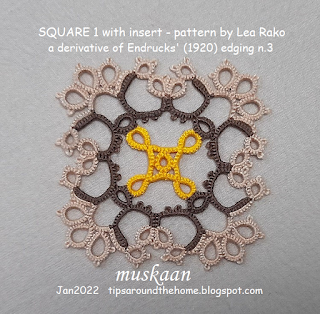
 I couldn't resist! Lea Rako (of AlenAlea fame with her gorgeous hand dyed threads and patterns) turned an edging into 2 square motifs by turning it outwards and inwards! The pdf will soon be uploaded to the project doc and I will update the link here.

I tired it with colours. The insert is an optional variation to Square #1 for those who do not like large open spaces.  
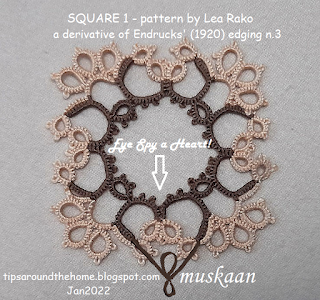
This is how the square looks without the insert. I don't mind it at all. In this pattern, the edging is turned outwards and the motifs look like an open lotus to me.

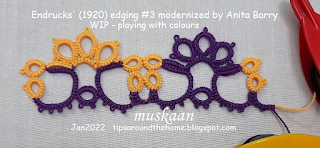
This is how the edging is, which I tatted back in August. Anita Barry modernised the pattern and presented the pattern in modern style. I shared her beautiful sampler and direct pdf link here - https://tipsaroundthehome.blogspot.com/2021/09/700-and-promises-still-to-keep.html. And of course, you can access it from the main document.

 
I loved playing with colour positions, using repositioning methods (I don't exactly remember which was used where) - See Lock Join Plus series. I haven't cut off the threads, wanting to play some more in future. There are so many more possibilities!

In Anchor Pearl size 8, this measures 2.5cms across and 3cms diagonally. Good for a mug coaster.

Imagine the edging turned inwards; the triad lying inside and a few elements added to span the distance. That is the 2nd square pattern included in her pdf. 
Lea also tessellated the squares into a beautiful fabric! For both squares, Lea indicates the joining picots when tessellated. 

And before I sign off, Eye Spy yet another heart!!! It will require a bit of juggling to get a smooth outline since the 2 side rings tend to lie beyond the outline. Worth a try, though, right?

Endrucks 1920 Project link for all patterns and derivations - https://docs.google.com/document/d/17LEVftXweztBIOWh4sL4BB7bX65ssoOsOn4oXIgCepY/view

Thank you so much, Lea, for sharing these beautiful squares!