Showing posts with label tatted corner motif. Show all posts

Sunday, 23 January 2022

more multiples

Pin It now!

 I couldn't resist! Lea Rako (of AlenAlea fame with her gorgeous hand dyed threads and patterns) turned an edging into 2 square motifs by turning it outwards and inwards! The pdf will soon be uploaded to the project doc and I will update the link here.
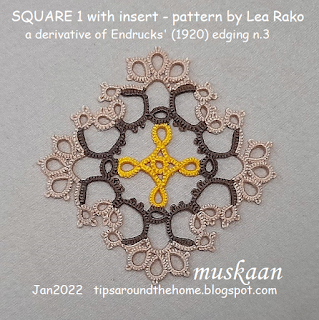
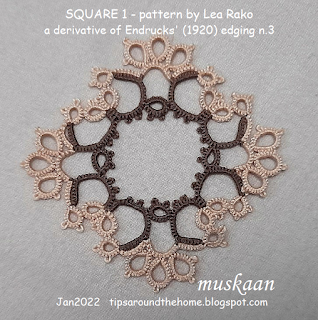
I tired it with colours. The insert is an optional variation to Square #1 for those who do not like large open spaces.  
This is how the square looks without the insert. I don't mind it at all. In this pattern, the edging is turned outwards and the motifs look like an open lotus to me.
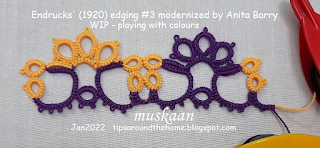
This is how the edging is, which I tatted back in August. Anita Barry modernised the pattern and presented the pattern in modern style. I shared her beautiful sampler and direct pdf link here - https://tipsaroundthehome.blogspot.com/2021/09/700-and-promises-still-to-keep.html. And of course, you can access it from the main document.

 
I loved playing with colour positions, using repositioning methods (I don't exactly remember which was used where) - See Lock Join Plus series. I haven't cut off the threads, wanting to play some more in future. There are so many more possibilities!
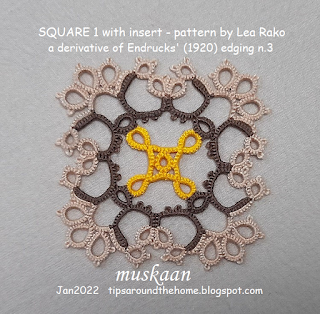
In Anchor Pearl size 8, this measures 2.5cms across and 3cms diagonally. Good for a mug coaster.

Imagine the edging turned inwards; the triad lying inside and a few elements added to span the distance. That is the 2nd square pattern included in her pdf. 
Lea also tessellated the squares into a beautiful fabric! For both squares, Lea indicates the joining picots when tessellated. 
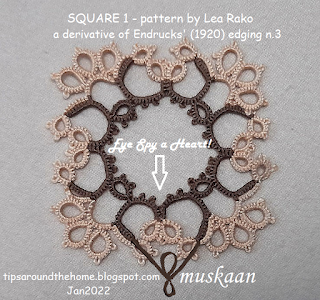
And before I sign off, Eye Spy yet another heart!!! It will require a bit of juggling to get a smooth outline since the 2 side rings tend to lie beyond the outline. Worth a try, though, right?

Endrucks 1920 Project link for all patterns and derivations - https://docs.google.com/document/d/17LEVftXweztBIOWh4sL4BB7bX65ssoOsOn4oXIgCepY/view

Thank you so much, Lea, for sharing these beautiful squares!

Thursday, 14 October 2021

spirited seventeen

Pin It now!

When posting the pattern recently, I said I'd share some possible ideas from pattern #17 in a separate post. Well, this will be like a static slide show, without much text except for the idea. I hope you put on your coloured glasses to figure/pick out the possible images from this spirited #17!

Endrucks pattern #17 - possible ideas, adaptations, extraction, derivations 

By simply folding, removing 'unwanted' areas, and/or joining at appropriate points, a plethora of patterns are possible ...

1 - kimono
 
2 - Eskimo or gingerbread man

3 - wheelbarrow with flowers or prams with babies in between
Or Marilyn Monroe in her iconic flying dress image
The wheelbarrow and pram are what Ninetta saw! Took me a few minutes to extract those images.
This is the 2-repeat sampler I had tatted and have folded to create most of these other ideas .....
Click here to download the pattern and get into the spirit -  https://drive.google.com/file/d/1sStHg5IQmuwizC7QcKRaX951CvVoURbn/view
4 - yet another possible corner for a triangular motif or a square mat.

5 - is it a bird? is it a plane? is it a boomerang?!

6 - folded into a bow - good around the neck or waist,
to hold up long hair or decorate a gift!

7 - cat ears for Catwoman!

8 - a 3D crown or headgear

9 - mojaris (Rajasthani footwear) for men

10 - 2 grasshoppers munching their way through leaves! 
So what if they are the wrong colour?!

11 - 2 swans facing each other

12 - Reiko Akamatsu's rearrangement for a square frame

13 to17 - These have moved from the realm of ideas to patterns ....
Superimposed Square frame  - https://drive.google.com/file/d/1sStHg5IQmuwizC7QcKRaX951CvVoURbn/view
Reflections motif and snowflake - https://tipsaroundthehome.blogspot.com/2021/08/more-reflections.html

So, is it just me or could you spot the possibilities as well? Did you come up with something else? Do share.


Thursday, 13 September 2018

cornered Alibaba ropes in a ninth

Pin It now!
Alibaba has been cornered and held captive in the cave! But stealthily, he has been weaving a rope, using straw and stuff lying around. And when a few robbers return after a long hiatus, he ropes in one more to make the toll 9 and escapes to the wilderness! Read on for tatting translation ;-P

Cornered !
Blossoms Corner Motif #1
So here’s the pattern for the corner motif for the hanky. It is not part of the 40 motifs needed, and I haven’t decided whether the saree will have any corner motifs. Hence this standalone is Alibaba himself!
Measurements in Lizbeth size 20 : 2¼” x 2¼” x 2¾”
If desired, the leaf triad on the right can be repeated on the left instead of the 2 leaves.

 
Anita & I often exchange ideas & pics of our current projects. I sent her the above WIP pics, and asked her a few questions. She confirmed that the central negative space needs to be filled and sent me a Flower Cluster Edging pic for ideas. Wow! From 1944. It was the first time I saw this, but the similarity is astounding, isn't it?! The entire book can be downloaded from the same site.

Now I knew my flowers were very basic – deliberately so. In the last millennium, I had made these for another of my MIL’s saree – yellow and maroon flowers with greens. This pic is of the few leftovers that I sewed to my kitchen napkins. This flower, one of my favourites, was my inspiration. And you can see how old and used the tatting has become ;-P 

The Rope !
Leaf Braid
When the motifs were placed on the saree, clearly an edging was needed to 'hold' them in. What else but a 9m long rope – Jane McLellan's Leaf Braid again ;-P She has now uploaded a flowery variation with free pdf. I had chosen beige, but it was too light. This brown complements the colourful blossoms. Since this pic was taken 7+ meters have been tatted.
  
TIP : What is interesting is that this braid has a tendency to stretch due to the slight elasticity in size 20 Anchor thread. Size 40 did not have that elasticity and kept it's length for the hanky. So I’ve been manually stretching this braid every so often to get a correct final length – don’t want it to sag after sewing!

NOTE: Despite the length, and change of 19 shuttles so far, I haven't had to sew in any tails! I'll share my tip later.

Roped In !
Blossoms Motif #9
After almost a month, the 9th of 40 thieves came to fruition. Here's the notated pattern...
Measures 2¼” x <1” in Lizbeth size 20.

A couple more pics with the motif oriented differently ...
 
And finally 2 shuttles (including the green) have run out of thread. Still enough left in other shuttles to hopefully get a 10th motif in.


Back to Cluny tatting - along with a bracelet pattern :-)

Sunday, 2 September 2018

gifts with tatting

Pin It now!
for a relative – a card, snood and handkerchief... 

gluing old tatting to a card
is creative ; not at all hard!
Remember the Butterfly Edging card when I elicited suggestions? 
This is the After pic, with 2 more Josephine chains on opposite corners.

I think this simple addition has been successful in 
maintaining the integrity of the composition, 
while closing in the bare white space ?

And I finally found my stick-on embellishments (flat-based pearls, rhinestones, etc). So keep an eye out for more SOUP cards  ;-P  

a doily is very good
for an instant snood!
Remember this beautiful Cherry Blossom doily by Hye-oon Lee? 

To cover the large negative space and add body, I tatted a central medallion (all rings : 7+7). 
I wanted to maintain the beauty of the lovely pink round, hence chose brown. 
On second thoughts, pink would’ve created a much better dahlia-like effect!

With a diameter of 4½”, it was the perfect candidate for a snood for MIL. 
This specially tatted one I gave her was small (at 3½”) and instead she’s been using Konior’s spinning wheel glass mat (4” in size 40).

Including the finished size of projects in my posts has helped.
And what a coincidence! The name of the doily has blossom in it ;-D Serendipitous! 
TIP : With all those rings in the outer blossoms, one can easily weave the ribbon differently and alter the size of the snood.

on an edging pattern raid
I found Jane’s leaf braid!
Remember the Blossoms corner motif? 
What's a hanky without an edging?! Jane McLellan's Leaf Braid was the perfect candidate. 
Worked in size 40, the rings resemble the motif leaves and is not overbearing.

 Here they are, all sewn up, on the hanky. I think the braid was 39" long and 5 to 7mm wide. 

TIP : I tat a slightly shorter length of edging than is required, and start sewing it to fabric. This gives me an exact idea of how many more repeats are required to connect to the start. It works for me - whether it is for a cushion cover, saree, or hanky.

This time I sewed down through each picot, since it is meant to be given away….
for myself, I would’ve shied away from that extra sewing! 
White sewing thread and stitch at the back is hidden within the folds of the hem. 
I actually went round twice - first tacking between rings, then zigzagging through picots..

Hope you enjoyed this post. Some of my next posts might be pictorials of multi-coloured Cluny tatting – fair warning ;-P I’ll try to intersperse them with regular tatting and patterns to keep my sanity as well as yours!

Friday, 24 August 2018

one fifth cornered

Pin It now!
Alibaba has cornered 8 of the 40 thieves! In tatting lexicon, that’s 8 motifs and one corner ;-P

All together. 
The corner in center later sprouted more leaves (scroll down for pic)

Blossoms Motif #7
 
Notice the number of petals in each flower is different – 9, 5 and 6. 
2¼” x 1¾” in Lizbeth 20

Blossoms Motif #8
Here the 2 end flowers are the same, except for colour.
2¼” x 1¼” in Lizbeth 20

Blossoms Square Motif ?
When placed together, motifs 7 & 8 can form a square with a wee bit of tweaking....

Blossoms Corner Motif
This corner is not part of the 40. It is for a handkerchief, to be gifted soon. The sewing is all done, but I still need to iron it before taking final pics. I’ll share it, along with pattern, in a future post.
In Lizbeth 20, the sides are 2¼” each, and diagonal is 2¾”

How to store?
Here’s how I’ve been storing the motifs till now....
A transparent envelope with a handmade paper envelope inside, giving an opaque background. But the envelope is full and I need a better storage solution. Obviously I want them to lie flat and separate. I have a few half-baked ideas, but would love to hear your suggestions. How would you store them for easy visibility and access?


happy tatting J