Showing posts with label snood. Show all posts

Friday, 30 September 2022

dilly dally doily

Pin It now!
Well, not dilly dally in the literal sense, more in the lack of frequency and smoothness sense. Perhaps some fogginess crept in besides general fatigue....

I can't remember when exactly I started tatting it - perhaps 2 months back? Remember Erika's doily I made for my hair bun net? https://tipsaroundthehome.blogspot.com/2022/06/vanity-takes-fall.html
It didn't work out for the purpose. My hair thinned down (thank you meds); the doily was not only large, but I somehow no longer liked the thread thickness. It felt bulky against my smaller bun. Hence it continues to sit prettily on my dining table.

Yet, I still needed one in red/maroon and chose Daniela Mendola's Tatting sharing MIX -https://web.archive.org/web/20231123065741/https://danielamendola.blogspot.com/2020/06/tatting-sharing-mix-round-9.html 
And you wouldn't believe the amount of trouble it gave me especially in the initial rounds, through no fault of the designer.

Started with Lizbeth size 80, but kept making mistakes. Thread is too tiny to keep un-tatting. 
Switched to Anchor size 40.
I behaved like a novice in Round 1!!! Kept forgetting to work the ring as a SCMR, and kept having to undo the initial stitches. I could've worked it as ring-on-ring, but ....
Then the thread started to break and have now labeled the ball as unsuitable for tatting. It will be interesting to see whether keeping the ball in the freezer will help (I came across this tip somewhere)  
But I was so adamant to see it through that I persevered. 

It spoiled my future colour composition; at one stage I couldn't find the ball I wanted and had to choose another shade; but I'm happy with the way it finally turned out.. 
There were more heartaches along the way which I don't even remember now. Sometimes I could only manage a single ring; some rounds needed close attention to the count; the going was slow and unsteady. Didn't even feel like taking pics after each round, despite the beautiful design.

I took this pic because it needed to be blocked after round 3.

It measures a tad over 7 inches at the ring-to-ring tips.
These are only 6 of the 9 rounds. If only the size 80 had worked out, all 9 rounds could've been accommodated and it would've looked so much better.

All's well that ends well and it is the beauty and utility that will remain in front (and back ;-P) of me. The journey is already a dim memory. 

Many thanks to Daniela for sharing such beautiful patterns!

Thursday, 9 June 2022

I am a hair model

Pin It now!

 My friend Jane McLellan has been asking to see a hair bun net modelled every time I tat one. Several other friends joined in this time, so here is a quick pic.

This photo was taken last night at the end of a long day out. Hence the hair and net is a bit messed up, but it was then or who knows when. Hubby obliged 💙. 

The occasion was such that I opted for a sari rather than the churidar set I had shown previously - https://tipsaroundthehome.blogspot.com/2022/05/snatched.html . This is one of my favourite sari and print - a pure handloom chiffon with hand-dyed Jaipuri Lehariya tie-and-dye. I have several in different colours, some in 2 colours. 

Originally, this blue sari was a crepe chiffon. We were told to never send it to the dry cleaners, nor iron it. My laziness ended up with the crepe effect flattening out to a flat chiffon. Still looks good, though - the vibrant blue is unbeatable.

I strung a white satin ribbon through the last round. All I need is an overhand tie and the 2 ends are wound around the base of the bun, one in either direction. There are several ways, but this is how I prefer it, since the tension can be adjusted easily (I keep it slightly on the loose side). 
Like I said in my earlier post, if planned early, beads could've been arranged in some inner rounds so as to be more visible.

And this morning, the ribbon was removed, the hair bun net slightly dampened and blocked, and back on the table as a doily. Cinderella's day out has come to an end, LOL

Monday, 6 June 2022

vanity takes a fall

Pin It now! I am not happy with my work on many counts.
This is the completed Gooseberry Tree pattern from Erika Tashiro's 'Tatting Lace, Marmelo'.

The last time I showed you, 3 rounds had been completed - https://tipsaroundthehome.blogspot.com/2022/05/indulging-my-vanity.html

This is after 6 rounds. The 6th round was a doozy to control! the little rings and chains kept twisting. The black colour didn't help. I had to block it before continuing to the last round.

Adding a 4th colour - brown - was an afterthought otherwise I might've used it for the center round instead of black. I noticed how beautiful the combo of light and dark green in Erika's coloured version looked. The clovers could be distinguished yet the apposite clovers and chains created an elegant dense curvaceous circle, which I sought to replicate with the brown. However, I should've used a much darker shade to blend with the black clovers.

In the final round I substituted thrown rings with regular picots since I intend to use this as a hair bun net. I don't think it has altered the appearance much.

All those tiny rings are not Josephine Rings. They are small rings or dots.
The doily uses simple techniques - rings, chains, thrown rings, and dots. And several rounds can be worked with a ball and shuttle.

Erika works the 4th round in 3 colours. However, I stuck with black and yellow.

In Anchor Pearl Cotton size 8, the diameter is 8 inches, a tad larger than what I need. Hence I will string it through the rings. I wish I'd worked it in size 40 for a more delicate lace.
Lesson learned - never be vain! And try not to indulge too much in anything, LOL.

Friends have asked me to show the net in action. I am a bit tied up at present to undertake posing and modeling, but will try to definitely post all my 4 current nets. 😁

Monday, 30 May 2022

indulging my vanity

Pin It now!

 I've taken a mini break from Endrucks' tatting to work on another hair net bun for myself. This time I've chosen warm colours and Erika Tashiro's Gooseberry tree doily. The pattern is from her book "Tatting Lace, Marmelo".

These are the first 3 rounds, in Anchor Pearl Cotton size 8. I am following Erika's colour placement, however instead of green I chose black to match my dress. 

The diameter so far is 9.5cms. I have already started round 4.
I truly wish my stitches and overall look were as perfect as the designer's. Nevertheless, my enjoyment and the usefulness of this piece far outweigh any small regrets, LOL.

Saturday, 21 May 2022

snatched

Pin It now!
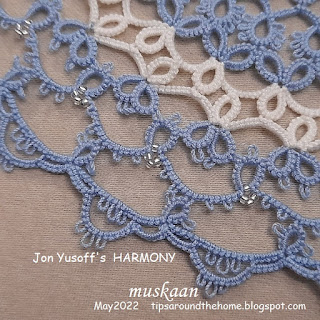
This is a project that I've been on for weeks, doing a few elements whenever time permits. It is something I was making for myself - a hair bun net to go with a cool new summer suit.
  
This time I chose Jon Yusoff's beautiful Harmony doily - 
 https://tatsaway.blogspot.com/2020/08/harmony-with-full-chart.html

My colour scheme was already decided blue with white highlights similar to Jon's black. No other thought or planning - a simple relaxing project. Even the white in round 2 was a spur-of-the-moment pick.
On reaching Round 6, Jon's note about beads caught my eye. Well, why not?! Threaded these Japanese silver seed beads and used a diamond formation - 1 bead at the base of the ring and 3 on the ball thread.

If I'd read this sooner I might've been tempted to add beads in some previous round(s) too.

To make up for that, I sewed on a bead string through picots in the center space. Very fiddly work and the circle disappeared when I knotted too tight at the end.

It has 2 mistakes which I didn't fix and I lost the thread chicken race twice! For several rounds I went with ball and shuttle.
Worked in Anchor size 40. It measures about 6.5 inches across which is a bit on the smaller side.

So, about the title - when I left it on the table to dry after blocking, hubby snatched it up to use as a doily. Sigh, I'll just string and use it as a hair bun net when I wear the churidaar suit. At other times, it will be his. Best of both situations.

Wednesday, 26 February 2020

another doily snood

Pin It now!
Elizabeth  Doily  Round Robin #15
- snood adaptation -
Started in Oct 2019 as a side project to all those designing projects, completed last month. Sue Hanson remembered the site – it has lots of round robin patterns ranging from snowflakes, butterflies, hearts, to doilies. However, this particular Doily #15 is missing. Check out the pages that are still there.

I like how this doily seems to change shape. From largely circular, these 2 green rounds define a clear octagon.

Designers :
Round 1 – Elizabeth Watts (3 central rounds)
Round 2 – Andrea Vanderpool
Round 3 – Bettina Lauth
Round 4 – Kathy Lowe

Round 5 – Emma Thomas-McGinnis

Worked with Anchor size 40.
False ctm was used several times while adding new thread. 
Some rounds were worked with one shuttle and ball. Keeping it simple!

With due apologies, I substituted the last round designed by Ruth Kurz, with my own. 
I was making this specifically for my hair bun/snood and needed a diameter of 7”. The original round 6 was quite broad and would have worked to around 9”.

This simple round holds the clovers in position and a satin ribbon was woven through the outer spaces (no pic). I’ve happily worn it a couple of times. The choice of dark and light colours was deliberate - to highlight the floral imprint when covering my hair. 

Thanks to the round robin team for this beautiful design ; 
to Jenni Clark for sending me the pattern, and 
to Sue Hanson for her incredible resourcefulness. 

Thursday, 24 October 2019

a friendly neighbourhood

Pin It now!
I count my blessings to have such talented and generous friends in my global/digital neighbourhood. Here are a few ‘gifts’ I gratefully received recently….
In the order they were worked....

Elizabeth’s doily Round Robin 15.
Jenni Clark (Liyarra) posted her beautiful pink version on facebook & I liked it for a snood. She shared the pattern with me. It is from an old blog ‘tattingroundrobin’. Does anybody have a link?

More rounds to go.
Not happy with my chains - some overlap. Not a problem as it will not show up when worn.  I used 2 colours to showcase the flower shape, the green showing up as foliage.
Does the center look familiar?  Yes, it's what started the whole False CTM exploration. And to think I started this as a slow side project to disengage my mind and focus on downsizing my UFOs ;-P

Spool Pin Doily 
Who else but Anita Barry can come up with a butterfly to place under the spool pin?! How cute to have a butterfly sitting pretty on the sewing machine, keeping an eye on our sewing (or current lack of it, in my case)?! She is making these to sell at fairs, etc. yet shared the pattern with me!
Again playing with colour placement and had to include some lavender! It is worked continuously using 2 shuttles.
Now this is an example where we can continue into next rounds using the same core thread (in this case the mustard) but adding new colours for each round since they are chains with thrown rings : false ctm! If only I had remembered ;-P
This time I simply twisted the long antennae picots when it was wet. One picot is missing on one of the purple chains - can you identify it?

Walla-Walla Sweet Onion Motif 
Kathleen J. Minniti is not only talented but also explains so well! I understood Aurora’s onion ring technique when Kathleen used it for my dancing peacocks doily! But she uses only a half stitch instead of a full ds to capture the inner ring. I do like this method!
She PM-ed this pattern a couple of months back, with 3 versions for the center leaf. The left motif has a dot picot tip, and right one has a bullion knot (which got pulled out when I closed the ring).
A clever feature of this motif is the captured picots! Multiple alligator joins across the same picot. The left one has smaller picots than the right one. I like it, but need more practice.

Both these patterns (butterfly & onions) can be worked in one pass using 2 shuttles.
We mostly get pink/red onions here, but I've eaten similar onions in Australia.

Bobble stacked rings
And finally below is my trial of Rhoda Auld’s bobble technique posted by Ninetta Caruso which she shared with everybody ;-D  
Here again, one captures the previous thread in the current ring. It reminded me of how Ninetta curled her small rings.
I wanted to see if a circle could be formed with the stacked rings and then to see how it works with different ring sizes. I want to use this in one of my snowflake centers. Many textured effects are possible with this technique! 

Captured together...the butterfly & onion motifs are worked with Anchor Pearl cotton size 8, and the bobble trial is in Anchor size 20. Elizabeth's doily measures 4½" so far in Anchor size 40.

You generous ladies have captured my awe and gratitude J


Friday, 21 June 2019

first doily pattern

Pin It now!
Repetition Doily / Snood
pattern pdf (click to download)
Please scroll down for an Update

Remember the doily/snood I was trying to design out of a mistake? Well, it’s all done, including the pattern writing! In size 40 Anchor, it measures 7 inches in diameter.


Continuing the design story …. I completed the final round with long twisted picots instead of simple double picots. I like how they arch and are sturdy, giving a sense of finality.

I wanted a relatively open center, hence tried a basic spirographic filling – like in string art. A quick trial above looked fine, and I was going to stabilize the long threads with another single round of beige in the center. I had even tacked the doily on fabric in an embroidery hoop! After several days I snipped it off..... 
 
… and this was the result ! A star is born ;-D
I overcame the odd number in previous round (15) by skipping 2 picots and joining to every 3rd picot, thus resulting in the star shape.

 
But those free picots bothered me and I snipped off both central rounds replacing those 2 picots with a long double picot parallel to the star curves! 
Double picots also follow the thematic repetition of outer brown rounds. Star remained the same.
Tadaa !!!


UPDATE (July 2019): This doily has long measured picots which are Functional. The pattern gives picot sizes for Anchor size 40, but what if one wants to use a different thread size?
I worked a short chain with same thread and found that a 7mm picot is equal to the width of 7 double stitches! And so on. Easy to remember and convert.
Just substitute 1mm tall picot with 1ds width.

While picots are normal throughout, the long picots differ in length in each round and a picot gauge is required. I have included the gauge requirement for each round in the pattern.

Each round in this doily is worked separately with shuttle and ball and easy elements. Writing/presenting the pattern was a tough ask! It took me days and days to simplify it as best as possible since the working sequence of the 9 rounds is not a regular order from small to large or in to out.
Jane McLellan kindly and quickly ran her eye through the final presentation with valuable feedback. She is my reliable go-to "glazometer" (((Thank You)))! 
I hope you enjoy the pattern. It is my first complete doily pattern that I have completed and written. My first - Aspiration Doily still awaits that day ;-D