Showing posts with label Sabina Madden. Show all posts

Saturday, 15 June 2024

picot me roundup 3

Pin It now!

 I had shifted Ninetta's entries to this Part 3 in order to equalise all 3 posts. And then I got caught up in a lot of other stuff and this post got delayed. It turned out to be a blessing in disguise 'coz a few more butterflies fluttered in! 
Game - #PicotMeEndrucks April2024
Pattern - Antonia Lai's E32 adaptation 'Life is Bliss butterfly' 
Objective - Use ornamental picots to embellish the butterfly motif. 
Roundups and details - Part 1  ; Part 2

21. Ninetta Caruso - started a virtual butterfly effect when she used Celtic Knotted Picots! Many members used the CKP, albeit in different ways, as you would've seen in previous roundups.
Calling it her Frilly Butterfly, she says, "This is the frilly butterfly that I got, ....  I tried for my first time the "Celtic knotted picot", developed by Sabina Carden-Madden, I followed her tutorial shared years ago, that luckily can be reached again using the wayback machine:
https://web.archive.org/web/20190108165755/http://www.paradisetreasures.com/ckp.html. Thank you for the fun! It's wonderful that in tatting we never stop learning!"
To me, her CKPs themselves looked like tiny butterflies!
Her 2nd entry was even frillier than the first one and she called it the Fluffy Butterfly.
She says "This is my fluffy butterfly, ... these are "layered picots", they are called also floral picots or ruffled picots, it is like the Victorian set but with picots between sections of half stitches, it's a technique already found in Priscilla's patterns."
The top view is in the inset.

22. Reiko Akamatsu - started this circular edging with a series of butterflies.
It's still a WIP and the amazing part is that she does not seem to have altered the stitch count at all. A truly versatile motif!

23. Sabine Robert - joined us for the first time with 3 versions!
She says, " - I start tatting with this Life is Bliss Butterfly pattern (2nd project, after some trainings). Not so easy, I need to do more and more"
One can already see her progress and improvement! And adding beads is not always easy for a new tatter.

24. Sara Dougan - is a new member, too. 
She used a combination of long decorative picots, double picots, and butterfly picots!

25. Silvana Buonvino - sent in these delightfully coloured versions!
Besides the pearls and beads, she used double picots, triple picots, and Josephine Picots. She asked whether the JPs could be made on rings and tried out the suggestions for her 4th butterfly! 

Voila, her 4th entry has Josephine Picots on rings as well as on chains! 
Silvana embellished her own skills along with the butterfly! 

26. Stephanie Mc (Tattimic) - shared her ideation and design process and has promised us the pattern, too!
Her 3 idea sketches (which inspired Lauretta Tondelli to learn the CKP) for which she asked for feedback.
The 3 versions that finally emerged. The one on the right uses balanced double stitches to stabilise the long "wobbly" chains and a scroll of rings and chains for the bottom wings.
She says, "But then, I still didn't have any picots, which wouldn't do for a #picotmeendrucks, right? So I asked myself how I could add a shape inside the largest loop and still use the crocheted picots suggested in the list of ideas (I like it! It's so super cute!). That's when all hell broke loose, because it meant to rethink again the initial pattern (so no real onion rings, for exemple), and I ended up with the design you see on the left. 
That being said, thank you for the initial challenge, haha. It sparked my imagination!"
And what a spark it is! 

The metamorphosis process in thread!
She says, "And here are a couple of tests I made along the way. I often see people wondering how to create new design. That's one way to go : trial and error, haha."
This is proof that designing is not always easy, despite the numerous paths one can take to convert an idea into thread.

27. Vani Kattoju - heeded my request and shared her 3 versions though she was not fully satisfied with her working. Appreciate it, Vani!
She says, "My first attempt at using vapor picots, Mrs Mee picots and tuft picots. A little Not so perfect butterfly.
She used a mix of double picots, "...layered picots and twisted picots."
 
For her 3rd version,  "I tried daisy picots as the highlight along with few double picots."
This motif has been the vehicle for a lot of first learnings and practice makes perfect.

28. Wanda Salmans - created 5 versions and blogged about each of them.
She says, "My first try at the Picot Me Endrucks April 2024 Game of the Month. The one on the left is the pattern adaption by Antonia Lai. I started it several times - it helps not to be tired or distracted when starting something new. For the second one, I played around with picots. I used HH20-126 Purple Splendor."
Her 2nd version has overlapping double picots and twisted picots. 
Her post - https://www.wandasknottythoughts.com/2024/04/playing-with-butterflies/
3rd version is decorated with chains on long picots, giving a scalloped edge to the wings. She has used several bits and pieces on her 'Safety Pin Brooch'.  
Read all about it here: https://www.wandasknottythoughts.com/2024/04/safety-pin-brooch/
Both 4th and 5th versions use what Mark Myers' called the Picot Lock Join. It is basically a lock join made with the 2nd shuttle to a picot and the basic join in inverted tatting. 

29. Lou Bunker - made sure her butterflies fluttered around in June.
She says, "Fun little pattern works up fast, very addictive.
Some of her cuties have beads and double picots.

30. Manju Talekar - has this beaded beauty to share, sent in June.

She says, "I tatted it with Lizbeth variegated thread #20 color 123. The transparent glass bead in the center reflects light but cannot be seen in the picture. Wings can move up and down by the side of glass bead. Enjoyed making it."
A tatted butterfly that can actually fly - wonderful!

UPDATE (Dec2025): 
31. Debbie L Fister - Sep2024
Debbie says - Question: if a pattern calls for a normal picot would substituting decorative picots change the pattern significantly? What modifications should I consider?
thank you very much. I am a bit surprised that the photo is so messy. I decided I am not a designer (yet). I have to say this was a challenge, but I really wanted to try Celtic rings. As for substitions: 3 graduated picots with 0 ds between adds 2 ds. Same with a double picot.
But what about interlocking or tufted? The rings don't seem to that different in size, but now I'm thinking the extra ds might affect the way the corner fits on the book page.

So this brings us to the end of the Picot Me Endrucks roundup. Ninetta and I are so grateful for this huge interest and the beauties that emerged from the game, besides the learning, exploration and experimentation. 

At final count we have an exciting 31 participants and 76 butterflies!!! Remember, if you have made any Endrucksian pattern you are free to send it to either Ninetta or to me at any time. Leave a comment in our respective blogs if you wish. (all relevant links on the right panel of this blog)

Many many thanks to all our participants for sharing your work and thoughts and brightening up the tatting skies with these lovely creations! 

Related Posts -

Saturday, 13 January 2024

association

Pin It now!

 When we come across a new tatting term/technique, always try to place it within the larger set of techniques you already know. You will be surprised to find that you might already know the technique or at least parts of it. And then learning becomes easier, smoother, and associative.

One of the first messages waiting for me yesterday morning was about the Loop Tatted Ring (LTR) in the Christmas Star pattern by Krystyna Mura, an E31 adaptation. [pdf: https://drive.google.com/file/d/1fz0Hd9jgGnS_qWKayw4UX2Ikr-mp-npb/view]. It starts with a LTR over a bead. 

Despite the video and pictorial links suggested in the pdf itself, Ulrike found it difficult to grasp. I, too, watched a few videos, consulted a few tutorials and found that it could indeed be difficult to grasp, despite the resources themselves being good.  For one, they were all about a LTR on a ring which meant there are too many loops to consider, keep track of, and can become confusing.

That got me thinking and here's how I went about it. Deconstruct the LTR and you will find the basic concept, or at least some steps, is something you might've done before.

Step 1. Can you finger-tat?

Step 2. Have you tatted a single shuttle split ring (SSSR) Mathew Takeda style?

If the answer to both these questions is YES, then you are well on your way to tatting a Loop Tatted Ring! 

Very soon, she came back with her SSSR braid , having consulted a few resources listed in my Resources page [https://tipsaroundthehome.blogspot.com/p/tatting-resources.html]

Step 3. Now tat an entire ring using only the finger-tatting method. After all finger tatting with a loop employed for part of the segment of a SSSR is exactly what you do in LTR, but for the entire ring! 

And by jove, she got it! All within a few hours.

Step 4. Now we can tat the LTR over a bead easily as shown in several tutorials. 

I had written the entire post yesterday but then thought a limited/specific pictorial would help other tatters facing a similar issue, to work this lovely Star pattern too. Hence today I created a stepwise how-to for Rounds 1 & 2 of the pattern. I also took the time to read Miranda's post and pictorial again after several years and discovered the similarities of association! She also gives a nice history of this technique. I apologise for the unintentional repetition. Unfortunately Sabina Madden's site is down though she is trying to find another server to reinstall paradisetreasures.com.


LOOP TATTED RING for E31 STAR - pictorial pdf - https://drive.google.com/file/d/19q6JKdOyACqh8oz-Z0vzHgh-YCIZ5xBd/view

Now a Loop Tatted Ring or LTR is not limited to a LTR on Ring (LTROR). It can be used in several different ways, including on a chain as a thrown ring [https://tipsaroundthehome.blogspot.com/2021/08/thrown-floating-and-8-rings.html pages 7-8 in the pdf] or after a chain. 

Here it is used as a central ring. We could've used a normal ring or a mock ring. But with both methods, we would not have been able to seamlessly add the bead through both threads to resemble the bead on a picot. LTR allows us the freedom to work continuously with the bead. In a lot of circumstances LTR allows us to tat something that would normally require a 2nd shuttle.


Related Posts
-
https://tipsaroundthehome.blogspot.com/2016/07/refresher.html

Thursday, 12 May 2016

tat-alongs and common threads

Pin It now!

A doily tat-along by Renulek


Both rounds 5 & 6 were tatted quickly. Nothing much to relate here. Cream thread in size 40.

In Round 5, with just a few repeats left, the thread in one shuttle was on the verge of running out. So I made an overhand knot (SLT – see below) & switched shuttles.
With 5 picots, it was difficult to guess where Renulek would join her next round. So I decided to cut & hide threads & start Round 6 afresh.

Round 6 : I chose to tat entire round clockwise from front, hence inner ring with RODS & chain & floating ring tatted normally. This was an extremely fun round! There is clearly only 1 joining point for the next round, so I climbed out with a split chain & split floating ring. 
Shuttles are waiting for the next round pattern to be released. 

–Ω–Ω–Ω–Ω–Ω–Ω–Ω–Ω–Ω–Ω–Ω–Ω–

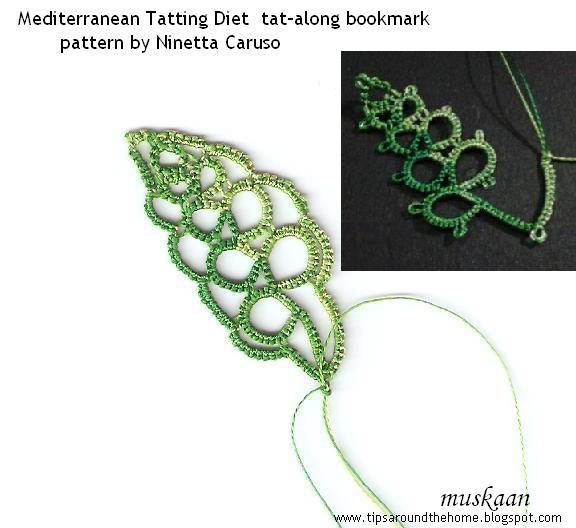
A tat-along bookmark by Ninetta Caruso

I already posted an image of the first strawberry. No beads. Can’t bring myself to have beads, howsoever small, within the pages of a book. First strawberry posted here.
For 2nd strawberry (the left one), I tweaked the outer chain round by +/- a couple of stitches, depending on how much curve I wanted. We each tat with different tension & it becomes necessary to adjust accordingly.
Both strawberries were made with decent lengths of scrap threads in size 40 & the curled ring calyx tatted with silk thread doubled up.

Made with 2 silk threads in shaded green.
What I did for Leaf #1 ...
  • Instead of using a pin/clip to hold picot, small picot & direct tatting (reverse stitch) of chain;
  • Slope & Roll join instead of Lock Join in order to avoid colour blips ;
  • Pointed chain for tip, but within the reverse stitch ! Then I switched shuttles in order to keep the shade same.
  • Instead of LJ, SS at the last ring , I used Reverse Join which automatically does that same job but in one motion.
  • Directional tatting throughout, including for split rings.
I've started the 2nd leaf as a mirror image of the 1st. Total 4 leaves are required. 
I Love  the fact that there are no ends to hide in the end !!! But I have had to make a knot to keep the silk threads from unraveling.


–Ω–Ω–Ω–Ω–Ω–Ω–Ω–Ω–Ω–Ω–Ω–Ω–
                                 
                             COMMON  THREADS 

I was going to do a couple of posts under the heading Common Threads in order to tease out underlying commonalities between seemingly different techniques or effects. Details about the topic in a separate post, but it seems appropriate to share this set here. Please note that this is based on my own comprehension & the resources at my disposal.

So, what does a shoelace knot have in common with a Celtic picot or angular chains ???

SET 1 : Overhand Tie

The underlying common factor is a regular overhand tie made on the ‘chain’/auxiliary thread (or the thread that forms the stitches). This set focuses on the similarity of construction, though it’s applicability and visual effect may be different.

1. Shoelace Trick (SLT)an overhand tie for functionality. 

It is used to switch shuttles either for colour change or if thread in one shuttle is running low. Needle tatters use it to close rings & chains.

The ‘SLT picot’ in above picture served to change colour midway through a chain, 
with a small picot added to follow the overall pattern.

2. Celtic Knotted Picot (CKP) by Sabina Carden-Madden (May 2005)
an overhand knot for decorative picots that also provide an extra joining point.

An overhand tie is made to the ‘ball’ thread for chain or to the ring thread before starting the ring. But the tie is left slack or on a picot gauge such that a decorative woven picot is created with 2 joining points. It can be made both on chains and rings since the core thread remains free.
CKPs both in the inner round as well as outer round, facing opposite direction.

3. Puncetto Knot by Ninetta Caruso (April 2011)   and
4. Pointed Chain by Jon Yusoff (June 2011)  are basically the same.
a tensioned overhand tie to create an angular point in a chain.

An overhand tie is made with the ‘chain’ thread or 2nd shuttle, encapsulating the core thread within, and then tensioning it. One knot each for the 2 half stitches, thus adding a bit of bulk to the caps to create a visual point. It can only be made on a chain or mock ring, not on a true ring, since the core thread becomes locked.

In Puncetto, by pre-forming a SH2 loop under core thread, & passing SH2 through it, there is an economy of movement -- the link is accomplished in 'one pass'. This may be easier to do in direct tatting (wrapped/unflipped/reverse stitch) as in the bookmark leaf above since the shuttles are already in position.
In this vintage edging pattern, the inner circle is done as directed in the pattern. 
However, for the outer circle, I made the chains pointy 
& suddenly the pattern seemed to acquire character :-)


BUT 
there is one major difference between the techniques listed in this set. 
Can you spot that when you compare the tutorials ?
scroll down further for the answer

Update Set 1 of Common Threads has been renamed ‘Overhand Tie’ (instead of overhand knot) after a discussion on Craftree. Two ties in succession create a knot. A knot conjures up the image of something that has been tightened, whereas a tie is like a ‘half-knot’ with slack that can be loosened easily if required.

happy tatting :-)

 Related Posts : Rounds 1-3
 & Round 4


ANSWER :  The overhand tie for SLT is made by overlapping both the threads ; the knots for CKP, Puncetto knot & Pointed chain are made using only one thread. In CKP, there is no encapsulation of other thread ; in the other two, there is encapsulation of core thread.