Showing posts with label needle tatting. Show all posts

Saturday, 14 February 2026

a new heart pattern

Pin It now!

This year our Endrucks FB group has probably felt a bit orphaned with both Ninetta and I being engaged elsewhere. We miss the interaction and games, but just cannot carve out enough time at present. So it was such a wonderful surprise to see a new heart derived from Endrucks' pattern E13 by Lella Loops! She is an excellent needle tatter and has been a participant in almost all our games and more. She sent us the diagram and I prepared the rest of the presentation for shuttle tatting.

E13 Cuore Mio (My Heart) by Lella Loops, Feb 2026 for #Endrucks1920Project ... click to download pattern PDF - https://drive.google.com/file/d/1hs_J5JF1kOf7j8RE-4xqZGK4y7fcQHFw/view  derived from Eleonore Endrucks' E13 pattern from 'Die Schiffchen-Spitzen', 1920.

It is a very clever construction ... Lella 'erased' parts of the lace and brought together two motifs to create this heart, with minimal changes to the stitch count, etc.! 

I quickly tatted up my own model with shuttle and though I am not overly happy with my work, it will have to do for now. Worked in Anchor size 20 (equivalent to Lizbeth 10), it is 2" across and a bit more than 1-1/4" high. 

It is a very easy pattern with the count being 6 or a multiple of 6 for each element and all rings are worked from the front in case of directional tatting. 

The drop or inward picot is made using the node or set stitch - 2fhs, p, 2shs.

Not only does it tat up quickly and can be used to empty shuttles (it needs very little thread on 2nd shuttle) but I also love the way the two long side chains on the lower side have that little curve before tapering down. Now if only I had noticed the uneven closure of the large ring it wouldn't have tilted to the right, LOL!

Please use the hashtag (#Endrucks1920Project) and the name of the designer & pattern when you post online. Not only is it a courteous gesture to give credit, but also makes it easier for others to find the pattern. , ......

I know it is too late for today, but hey we don't need a single day or a reason to tat hearts to our heart's content, right?! Do here are some more free heart patterns - Hearts from Endrucks directory -https://docs.google.com/document/d/1MpYw9XMB8Asz8zusj1ZpHvX8A8Ww424-rEVORtxcL1w/view  and my own heart patterns -https://docs.google.com/document/d/1LpHU69wNsQspIHgvt9pihgTNhHFDRBab3I5_MDEYyNw/view  (hmm, looks like need to update it!)

💗 Many many thanks to Lella Loops for her lovely heart and all her contributions!  💗

Saturday, 1 February 2025

direct method tatting

Pin It now!

I had a very interesting experience earlier this week. In her book 'The Complete Book of Tatting' (1985), Rebecca Jones highlights six methods of tatting, one of which is what she calls the Direct Method Tatting. This should not be confused with Direct Tatting which entails using reverse stitches to tat chains, etc.

The stitch really doesn't care how it is made, as Patty Dowden famously said!

Since I hadn't intended to do a pictorial, I merely took a few pics for my own reference. Hopefully these will be enough to give you an idea and a way for me to recall easily. 

DIRECT  METHOD  TATTING

Rebecca Jones (1985)

1. We start by looping the ring thread around the shuttle as seen in the pic - a luggage tag loop, such that when the shuttle is passed through the loops, and tensioned, it forms a lark's head knot (LHK). 
Notice the starting tail of the shuttle thread. 
This step can be a tad tricky, so try to focus on the entry and exit points of the thread. Fortunately it is only needed once for the very first stitch.

2. After the shuttle is pulled through and the stitch snugged, this is how it looks. It appears upside down when compared to a normal shuttle-tatted ring. However, as we move along they right themselves.


3. After the starting or foundation LHK, tatting continues by making each half-stitch. 
For 1st half-stitch, loop the thread counterclockwise and pass shuttle through. Snug.
TIP: Make kind of a one and a half turn before passing shuttle through otherwise the stitch is not formed.

4. Making the 2nd half-stitch ... turn the ring loop clockwise, pass shuttle through and snug.

5. Notice the second direct method stitch is made. Repeat steps 3 and 4 for required number of stitches. 
Picots can be made by leaving some space as we do normally.
6. When the ring is closed, the stitches face outwards and the ring looks exactly like a shuttle-tatted ring.
The same steps can be applied to chains as well using loops made with the ball or left-hand thread.

*****
UPDATE (4th March 2025): A lady bought the book after reading this post and also tried to work the method. However, she had trouble with how to continue with the half-stitches. Here is my quick video to help her out. Hope it is clear enough to be of use in case you wish to try it too. 
And here is the direct link to the video: 
I have tatted 3 double stitches in a ring in this demo. Hope it helps. Please excuse my clumsiness and background ... videography is not my go-to format ;-D

What I later realised is that this in one of two ways to make a lark's head picot join (LHPJ) or lark
*****
WHY?
You may justifiably ask why this method. I think it is a nice way to transition from needle tatting to shuttle tatting. Even if a tatter cannot manage the flip/transfer, s/he can use a shuttle just as easily! As a knitter, I have used my thumb to make the loops to cast on stitches and I used the same movements for needle tatting. Hence I found this pretty easy-going.
Besides, Rebecca also points out that this method might be easier on arthritic hands and a tatter can continue to enjoy making lace. 

I haven't had time to explore this further. Hopefully some of you will be interested and share your observations and experiments ... 

Tuesday, 18 January 2022

a hearty meal of tinies

Pin It now!

 There was so much interest when I asked which of the 4 trial hearts tatters preferred, that I can't help but serve up a hearty buffet for whatever each person's preference might be. However since #4 received the most votes (only written comments, no reactions counted) - 33, and #2 - 19, these are the ones I am sharing first. 8 tatters liked all 4. 

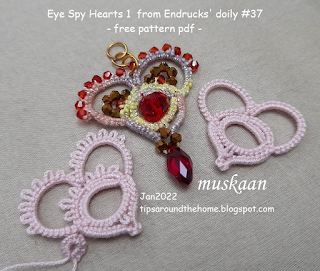
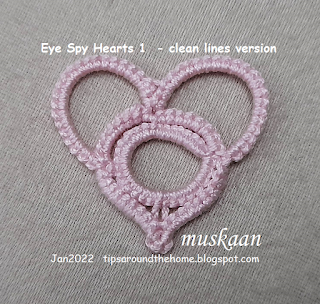
This is the first batch of Eye Spy Hearts 1 from Endrucks' doily #37 - 3 versions in the pdf - click to download : https://drive.google.com/file/d/1Auf-CIZYLUQdkA6jalQR4hkS7Ah-Deld/view

Linda Reiff saw an eye in the middle and suggested I call it 'Eye Spy' instead of 'I Spy' .... guess what, this is exactly what Anita Barry calls her extracted hearts (I had forgotten).

The hearts measure just around 3cms in Anchor size 20 which is equivalent to Lizbeth size 10.

This is by far the most favoured heart, hence the one I started diagramming first. Ninetta says this pattern can be used as a teaching model. Quite true; there are so many possibilities to play with sequence, techniques, effects, etc. It's size makes it an ideal practice pattern.

If you remember, this was the precursor to the picoted version. For first trials I keep picots to a minimum, especially decorative ones. Several tatters pointed out their personal preference for clean lines. 
It is easy to needle tat the motif. I am not focused enough to give instructions. But any needle tatter who wishes to test and share notes, please go ahead. I will include it in the pdf.
2 resources that show how shuttle patterns can be converted to needle -

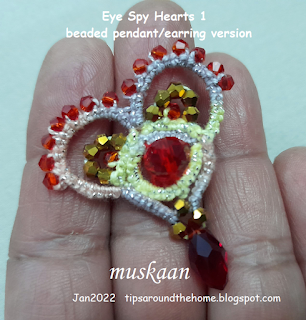
Amarilys Cwb wondered how a double picot would look. So I used that idea to string gold bicone beads over it! All the other crystals & teardrop are strung on shuttle 2 thread, with a single gold bead on shuttle 1. The large red crystal in the center can be sewn in later, or you can use this clever method by Ninetta - bead inside ring - https://www.flickr.com/photos/ninettacaruso/13713249233/.
Recently Alicja Kwartnik uploaded a video showing the same method - https://www.youtube.com/watch?v=7DbYw2A1G7Q.
I don't know why I chose this metallic thread and not the solid gold or silver! The effect would've been much better.

So, I hope you enjoy these hearts that can be made with leftover threads in a jiffy!
Here's the link again (please use it when sharing your version and also click on it to check if there are any updates, before you print or start tatting) - https://drive.google.com/file/d/1Auf-CIZYLUQdkA6jalQR4hkS7Ah-Deld/view

           I'd like to thank All respondents for taking the time to choose and answer, and also for your entertaining comments and suggestions 💖💖💖

Saturday, 20 November 2021

from one to many

Pin It now!

...in evolutionary steps

Reworked patterns from Frau Eleonore Endrucks-Leichtenstern’s ‘Die Schiffchen-Spitzen’, 1920, for Endrucks 1920 Project.

Pattern #1 from this antique book has progressed in evolutionary steps … I found myself picking it up every alternate year starting with 2015! There are written and typed notes, hand sketches and Inkscape diagrams, tweaked pathways and orientations, umpteen photographs and WIP/UFO adaptations – all witness to the slow and sporadic progress (the folders in my compy total over 135MB in size! Most of it is now fossilized).... Till this final stage resulting in stepwise pictorial and pdf.

Pattern #1 edging with modified pathway 
download Happy Hands pdf (straight and circular edgings and sunflower with modified pathway for symmetry) : 
 https://drive.google.com/file/d/1IRlJ7bnx-c27PYtgXymx_ps-KL2pen_m/view

I called this Happy Hands edging because that’s what came through – 2 happy hands raised above the head – is it a yahoo, a prayer, or a pirouette? With our tatting tension, the original edging tends to curve. The connecting chain is doubled to straighten it out.

 
Happy Hands Coaster was tatted in 2015 (the center was added this year) and I used double and triple picots to fill in spaces and add some frills. Disappointed with my picots. I used Endrucks' original pathway where all long chains face the same way.

Happy Hands Sunflower is what evolved from that coaster and makes me happy- 


Happy Hands Heart is a single motif extracted and adapted into a heart shape. 
    Needle tatting tips were shared by Pam Hemenway - 
    Happy Hands Shamrock is 3 hearts tatted continuously by Diana Howe! 
    Pattern - https://tipsaroundthehome.blogspot.com/2021/03/lucky-hands.html

Evolution is a slow process, but this heart branched out into several offshoots in rapid succession.
His Kid (Sue B) used it as a mermaid flukehttp://hiskid66.blogspot.com/2021/03/inspired-by-muskaan.html and joined 2 for a lovely butterflyhttp://hiskid66.blogspot.com/2021/03/inspired-by-muskaan-2.html

And if we add a 2nd colour and beads into the mix, the possibilities of visual effects increase manifold.

 
The stepwise pictorial which shows a few colour options can be accessed here  - https://tipsaroundthehome.blogspot.com/2021/03/balancing-act.html 

Happy Hands Beaded Necklace or choker wannabe (tatted in 2019). Increase the length of the 'hands' - graduated motifs - and we have a beautiful broader version. Or tat a single motif for earrings or brooch! I have handwritten notes and a single motif prototype for the beaded necklace, but the final version will take a while.

My fascination with this book is not that the patterns are beautiful – far from it. Her contemporaries published elegant patterns. Frau Endrucks’ elegance lies in her clever construction and the many possibilities that each pattern provides as you will see when you scroll through the modernised versions.  

I am reminded of this oft-quoted couplet by Majrooh Sultanpuri -
        maiñ akelā hī chalā thā jānib-e-manzil magar
        log saath aate ga.e aur kārvāñ bantā gayā

Literal translation - I started towards my destination all alone but
                                Others kept joining me and we became a caravan (group).

It was my solo mission to convert every pattern from the 1920 book into modern style. Then Ninetta joined me and gradually we evolved into a community, each tatting 1 or more patterns. Now one year later we have gone one step further and created a Facebook Group – Endrucks 1920 Project. (https://www.facebook.com/groups/1235560633606162) dedicated solely to this book (original/modern) and pattern offshoots and showcasing all past and future models!  

For the present, despite being a publicly visible group, the membership is strictly limited to tatters who have already tatted an Endrucks’ pattern in any form. Send us (Ninetta and I are admin) a pic of your work and we will gladly send an invitation.

Our objective is to be a focused group rather than a general tatting group. But a lot of interactive discussion, etc.is in the works!

All links are listed in our Endrucks 1920 Project document here - https://docs.google.com/document/d/17LEVftXweztBIOWh4sL4BB7bX65ssoOsOn4oXIgCepY/view

Reiko Akamatsu tatted the modern version in the above collage. This is actually her 3rd cover tat, one in 2020 and then a prototype for our Project presentation  (https://ninettacaruso.blogspot.com/2021/08/love-for-lace-music-and-nature-driven.html). She is holding a solo exhibition in Hyogo, Japan of her tatted lace and quilting, with focus on Mike Lyon's Lagniappe and our very own Endrucks 1920 Project! She even shared a virtual tour of the exhibition in out FB group! She has tatted so many models from the book and contributed a lot to our group. UPDATE: Nov 21, 2021 Reiko has uploaded the virtual tour in her feed ... check out this link -  https://www.facebook.com/100001649732912/videos/222462399961645/

.....aur kārvāñ bantā gayā

Saturday, 6 November 2021

fooled by the tool

Pin It now!
It is always such a thrill to see my pattern crop up and even more so when it comes in such wonderful versions with impeccable tatting. So which tool did these talented artists use to tat?

I have chosen a very small selection of the many that are gladdening my heart and eyes; these are presented here in chronological order. They are all needle-tatted from my patterns that were presented for the shuttle.

needle-tatted by Gloria Nelson, June 2019

Gloria Nelson's modification of the Paisley Snowflake with graduated picots has brought more character to the flake, and the design and variegate fell in sync! But can you tell it is needle-tatted?

New tatters often ask which tool is better or easier - needle or shuttle. Valid question but no easy or straightforward answers. There are tatters who spent their life using one tool and muscular ailment forced them to change to the other because their love for the craft overpowered their discomfort. On the other hand a tatter may stick with the first tool s/he learned on, for their entire life without any curiousity to try another. Then there are those who deliberately learn tatting with the other tool (&/or hand as Eliz Davis did) in order to become more proficient at teaching and diversify their knowledge.

Ninetta Caruso said it best - hand is the tool

We could take this quite literally, too! Teri Dusenbury used finger tatting a lot. Hey, where's that tool now? And for the truly determined one hand will get the task done as Marilee Rockeley has demonstrated.

needle-tatted by Amarilys Cwb, Sept 2021 
Amarilys Cwb made some mistakes in this first attempt (not that I had noticed any) and worked it a 2nd time below with minor adjustment to picot size on chains.  
needle-tatted by Amarilys Cwb, Sept 2021

Second attempt of the Silver Linings Snowflake by this tatter from Brazil who can work with both needle and shuttle.

For some reason, probably starting with it being a late entrant, the needle has been looked down on as the stepsister in tatting. To date some purists consider only shuttle as the legitimate tool for tatting. 

Why? Look at the numerous patterns Nicola Gooday Bowersox has shared with us for free. I could never identify from only seeing her model that it was needle tatted! Could you tell? 

needle-tatted by Amarilys Cwb, Oct 2021
What about this gorgeous rendition of the Floating Beads earrings?! I had to ask Amarilys whether it was done with a needle or shuttle! Those cute beads really transform my simple pattern with 'boring' pearl beads, into something fun and enticing.

Elena Kozinenko is proficient with all tools be it shuttle, needle, or a cro-tatting hook. Even a netting needle! And unless she points out, one would never guess whether she used a needle or shuttle. I asked her which tool is her favourite and this is what she says - 
'I have absolutely no choice. It all depends on the idea that needs to be implemented and even on the mood!'
Oh, to have that kind of flexibility! She has such a range of patterns and frequently uploads videos that demonstrate a technique using each of the 3 tools - https://fairylace.kozinenko.com/three-types-of-tatting/

needle-tatted by Lella Loops, Nov 2021
Lella Loops is yet another needle-tatter who has such finesse with her needle! Besides this recent Frost Flower Snowflake, she has tatted a few more of my patterns earlier and wowed me every time!


Returning to Gloria Nelson, she needs no introduction! She frequently shares her expertise with her Facebook group for needle tatters. If we follow and apply her tips, the usual 'visual identifiers' of needle tatting will disappear! 
But here are a few of her must-read articles, shared in her Sparkling Light Creation Studio page https://m.facebook.com/story.php?story_fbid=1774052256037040&id=724059564369653
  • Needle and Shuttle – What’s the Difference?
  • Can a needle tatter follow shuttle videos and tutorials
  • Patterns - Can a Needle make shuttle patterns
So any tool in the right (or left!) hands, combined with the passion to lace, is ultimately what matters. And the journey's enjoyment for accompaniment...


As an aside .... I have wondered for years how needle tatters feel when shuttle tatters collectors display their collection of shuttles? There is such a Vast range to choose from, with new designs, materials, and decorations coming out frequently. Now a tatting needle can be so boring in that sense, except perhaps for the material used? 
 
At the very least, why can't the needles be colour-coded for size at the eye end? eg these tapestry and chenille needles from Pony - https://tipsaroundthehome.blogspot.com/2018/08/needle-tips.html 
Or can some kind of fortified coloured plastic needles for tatting? 
Can needle-tatters come up with ideas to share with suppliers and manufacturers to make the needles prettier and more of a collectors' item?

I'd like to thank each of the tatters mentioned in this post for all their dedicated and inspiring work. 
I want to stress that they constitute a very thin slice of the talented multitude,
all of who I cannot name or might not even know of. 


All patterns mentioned in the post are free and can be found here - https://tipsaroundthehome.blogspot.com/p/patterns-designs.html

Sunday, 29 August 2021

thrown, floating and 8 rings

Pin It now!

Please note that the post and pdf have been updated on 30th August 2021. In case you already downloaded the pdf, kindly click on the link to refresh the document.

Tatting with an international community throws up interesting facts and ideas. All patterns in Endrucks' (1920) book use 2 shuttles and has plenty of rings made by switching the shuttle in hand - you guessed it - thrown rings! However, as Ninetta pointed out, a lot of Italian tatters have mastered the art of tatting with a single shuttle and ball, and adapting any pattern to suit this. It got me thinking about all the various ways in which we throw off a ring and here is the result of that exploration/stream of thought.

Thrown Ring Methods - a Ready Reckoner. click this link to download the complete document - https://drive.google.com/file/d/1PhXhtq9K-WiUbys0dwwZuOIat10hGlB0/view which contains pictorials for each method as well as patterns to practice. Included at the end is a list of Needle tatting resources. 

For several of the patterns, despite having a pdf, I had to give the link to the blog post because the pdf link just wouldn't work the moment I converted this doc into a pdf. Probably some formatting glitch.

 
Following is a limited glimpse into each method. 

Gapsosis - A frequently asked question is how to avoid any bare thread/gap between the chain and the thrown ring. Above is an old pictorial I had done in response to this very question, where we have a trefoil instead of a single ring thrown off the chain - https://tipsaroundthehome.blogspot.com/2017/05/squirreling-away-gapsosis.html

1. Using 2 shuttles. I prefer this method except when I want to create a point in the chain where the ring is.

A thrown ring does not necessarily have to be floating above a chain or ring! It can lie above a join, between 2 chains, and can also face inwards.....
While this 8-ring appearance may not use the term thrown ring, the blue ring is made exactly according to any of the TR methods (in above case, with 2nd shuttle). 
Several other effects can be seen in the above model. Can you identify the thrown ring(s) in each?

NOTE: Although not shown in the pictorials, the pink ring need not be alone. We can have 2,3,or more rings below, with 1 or more TRs above!

All the rest of the methods are made with one shuttle and ball. Compare the colour of the TR and the chain curvature between each method. It is very important that chain stitches are snugged properly before attempting the TR.
2.A. Flipped-Up ring is simply a normal ring that is turned upwards before continuing with the chain.
2.B. Since I didn't like the way it sat, I tweaked it by stabilising and centering the TR with on overhand tie and keeping the ball in front of the work.
3. Loop Tatted Ring can be used to throw off a ring as well.
4. We all know that the Self-Closing Mock Ring is often used to deliberately create a pointed chain - whether it is a 1ds SCMR or a larger thrown ring.

Direct Tatting. In certain cases, it is easy direct tat a chain and throw off a ring, using single shuttle and ball. Tatting will move from right to left, but the shuttle will be in position to make a thrown ring.
Even if the shuttle is not in position, it can be brought to where we need it, by the following 2 methods -
5.A. Twist Work - I start by making an unflipped half-stitch but instead of snugging. I pull the shuttle upwards (or downwards, if required) such that the threads now switch position and I have the shuttle where I need it. I had explained it here to switch threads after a lock join - 
 https://drive.google.com/file/d/1nRj_48VHK2LjhcxdQnirXBVweKO6h2ow/view 
5.B. Shoe Lace Trick - we all know this, but I avoid it and prefer other repositioning methods, including twist work. Jon Yusoff has explained this method very nicely here (wish I could get my SLT to behave so well!) - https://tatsaway.blogspot.com/2010/05/sometimes-you-dont-need-two-shuttles.html  

6. Changing Course - When another row/round follows the one with thrown rings, one can choose to shift the rings to the next row/round and make them normal rings. Obviously the direction of the rings will change, and sometimes it may cause ruffling/cupping/distortion. However, it worked fine in the above version - those purple rings were supposed to be thrown rings from the previous round, but I wanted this colour here, hence.... https://tipsaroundthehome.blogspot.com/2019/06/valley-of-flowers.html 

I tatted this twice! My intention was merely to showcase the different effects when using each of the methods (lower scroll). But then somebody asked whether I had a tutorial actually showing how to do a thrown SCMR. So, I started over, taking stepwise pics for each method. 

And now I'm calling it a Ready Reckoner (RR), because as far as possible, I have included everything we'd want to know about Thrown or Floating Rings. I would love to get your feedback on this format and exercise. I already have another RR on the way that was started in July in response to a friend's request for help. 


Saturday, 17 April 2021

needling the heart

Pin It now!

 I am thrilled to share Pam Hemenway's needle tatted version of the Happy Hands Heart which was adapted from Frau Endrucks' edging pattern #1 from her 1920 book (all links & modernised patterns listed here). For shuttle pattern - https://tipsaroundthehome.blogspot.com/2021/02/happy-hands-heart.html

She willingly shared her NT notes and tips. Although I included most of it in the above post, I thought it more practical to have a dedicated post, especially now that she has sent in a pic of Two models, one with a bit of tweak.


Pam H's NEEDLE NOTES for Happy Hands Heart :
RingA) 1) Paper clip to hold the ring and pull tight 2) Work to first join and pull off needle to make join.
ChainB) 1) Picots I picked up with needle point to use working thread would twist stitches.
ChainD) 1) Roll tatting = ds 16 wraps around the needle ds Hint- hold tight it is a bugger to take out and re-do.

She was not very happy with the variegated, hence made another. Here's what she says -
"I did another and I did it a bit different on the dimple I tied it tight before joining the dimple and the roll I did not do the ds on the 2nd one you can see the lump of ds on the first so I left it off but hold on tight lol or you will have to restart. but it looks so much better. Here is the link to the photo if allowed https://www.facebook.com/photo.php?fbid=139705824826739&set=pb.100063619655954.-2207520000..&type=3"

TIP: Needle tatting Josephine Chains   
When roll tatting with a shuttle, there is a tendency for the thread to untwist, hence we need to suspend the shuttle to balance the twist again, as for spiral tatting. Pam pointed out that there was no need to suspend the needle and answers as follows -
"Yes Josephine chains unwind and yes to the untwist also but I found if my twist is going right, I use the 2nd half of ds and reverse for opposite twist. It works with the thread rather than against it. But we do have the needle to hold against until it is done."


Pam H has graciously offered to convert any of my patterns into needle as she enjoyed working the hearts (I leave the choice to her). She is currently teaching needle tatting in Georgia's Online Tatting Class. So if you wish to learn or hone tatting with a needle, hop over to her class. She has a Facebook page titled - Hilltop Tatter

Many many thanks, Pam. Hoping my needle tatting friends will take this opportunity ...
💗

Saturday, 13 February 2021

happy hands heart

Pin It now!
Happy Hands Heart
- free pattern by muskaan © Feb 2021

Almost down to the wire, but then hearts are in style throughout the year, especially if they bring happiness, happy hands and hearts with some chocolate thrown in!! And it's a fairly quick tat with not much thread required. So jump right in 💖

Based on the trials here, I worked another (top) last evening and then one more (below) which I am counting as the final pattern. Wish I could've tatted it more neatly, but it will still remain unforgettable since the earth literally shook while I was tatting! Earthquake tremors.

Design TIP: I used roll tatting instead of normal chains or lock chains for the lower segments because roll tatting is the narrowest 2-thread tatted line possible, right? 

There are numerous ways one can tat this tiny heart. I am sharing only one path and method. Feel free to adapt to your imagination (and skill level) but please share your version! Depending on individual tatting tension, you might have to tat one less or more half-stitch for the flushed chains.

Materials: 
Best worked in size 10. In Anchor size 20, this motif is 3cms tall and 3.5cms wide.
2 shuttles wound continuously (ctm). (In my yellow trials I had worked with a single shuttle and ball, using SLT to keep shuttle in hand).

Techniques used: fs/bs tatting, dimpled ring, mock ring, lock join, CWJ & DYJ optional, roll tatting. All tutorials can be found here- https://tipsaroundthehome.blogspot.com/p/tatting-resources.html

Abbreviations: Sh = shuttle; -/p = picot; + = join; RW = reverse work; LJ = lock join; dnrw = do not reverse work; SS = switch shuttle; CWJ = Catherine Wheel Join (for frontside); DYJv = Dora Young Join variation (for backside); w = wraps )for roll tatting) 


    Start with Sh1 in hand.
    RingA: 3 - 5 - 5 - 5 + 5 - 5 - 3. RW (this is the central heart-shaped dimpled ring)
    ChainB: p 3 LJ 5 LJ 10. RW
    RingC: 6 + 2 - 6. dnrw. SS
    ChainD: 20 CWJ, 16 wraps, LJ 
    ChainE: p 3 LJ 5 LJ 10. RW
    RingF: 6 + 2 + 6. dnrw SS
    ChainG: 20 DYJv, 16 wraps, LJ 

    ChainH: 3 - 3 LJ. 
    Tie and cut and hide ends. 

💗💗💗
UPDATE (April 2021): NEEDLE NOTES by Pam Hemenway 

RA) 1) Paper clip to hold the ring and pull tight 2) Work to first join and pull off needle to make join.
CB) 1) Picots I picked up with needle point to use working thread would twist stitches.
CD) 1) Roll tatting = ds 16 wraps around the needle ds Hint- hold tight it is a bugger to take out and re-do.
💗💗💗

Some Ideas and Possibilities -
  • Add beads and findings and use as jewellery - pendant, earrings, brooch. Inverted, with beads and a braid/chain, it can work as tikka jewellery for brides!
  • Of course, applique on fabric or glue to paper. Motifs can be used anywhere! By the way, that chocolate (Lindt Lindor Milk Chocolate) is seriously one of the Best I've tasted. 
  • Arrange/sew motifs stacked vertically for bookmark. When joined in a row (with additional picots) we could get an edging or trim, or even a choker! 
  • In the above arrangement, it appears we'll need 5 motifs to complete the polygon. Hmmm, I see a possible 4-leaf clover leaf there, too!
  • And this is such an appealing Arabesque arrangement! Love the curves.
  • UPDATE: I forgot to upload this at the time. The 2 yellow hearts can be worked continuously by tatting the tiny hearts at the bottom as a split rings to climb out of one heart and climb into the next.

So, what will you be making?! Enjoy 💕

UPDATE: Check out His Kid (Sue's) wonderful adaptation of the heart into a mermaid tail, with part of the body as well - http://hiskid66.blogspot.com/2021/03/inspired-by-muskaan.html
UPDATE: Diane Howe adapted this into a Shamrock leaf! - post and pattern - https://tipsaroundthehome.blogspot.com/2021/03/lucky-hands.html

UPDATE: Aug 2022
There are now so many adaptations of and from this heart - all are listed, with patterns, in the EP doc - https://docs.google.com/document/d/17LEVftXweztBIOWh4sL4BB7bX65ssoOsOn4oXIgCepY/view