Showing posts with label tatted snowflakes. Show all posts

Friday, 6 December 2024

and more

Pin It now!

 After reading my posts, Elisabeth Dobler took up the challenge and quickly sent me her version of the DAL Celtic Snowflake, designing a third round and also tweaking the first motif to incorporate Celtic knot picots! And she graciously shared the pattern, too, becoming our 21st participant. It took me some time to diagram it, though. But here it is ....

I realise only now while inking and uploading that we forgot to mention the beads in the center. It looks like she used two beads on each picot and made a swirl join at the end. 
There are Maltese rings at the tips and the thinner metallic thread picots fill the ring.

Elisabeth has a way with picots! If you are on Facebook or Instagram, you should look up her work and how she elegantly transforms the models. Her impeccable tatting is so inspiring, too. She frequently sends me pics of her work and I will soon share a few here.

Before I forget, you can find the pattern and all details in this Google Docs -https://docs.google.com/document/d/1pVqM6S5Ng49xk6erSsDyRm3y7SdV2tCIUOCgltze4lM/view

❅❄❅❄❅❄❅❄❅

And I also know of two other tatters who tatted the snowflakes -
and Padma M chose to tat Mariola Siwek's version which she shared in her FB account - 
UPDATE (Dec2024): The pattern (diagram for Padma's variation is also uploaded in the above document.
 
Many thanks to all for your participation! Being inspired and inspiring others is an unending cycle of creativity! 

Related Posts - 

Thursday, 21 November 2024

a collective gift 2

Pin It now!

Life has taken on this unhealthy habit of getting in my way! It took me way longer to publish this post than was required. I also apologise to all my blogger friends for not commenting, even though most times I read the posts. Without much ado, here's part 2, with patterns. Read part 1 here - https://tipsaroundthehome.blogspot.com/2024/11/a-collective-gift-1.html

12. Mariola Siwek - drew her visualization overnight and her tatted replication did full justice to the diagram! 

However, the stitch count numbers on the image were not sharp, so I had started diagramming it first. I am happy to say that at least this diagrammed pattern is now in the Google Docs. Link at the end.
 
13. Ninetta Caruso - designed Rounds 3 to 5 and tatted two models with options and also prepared a PDF!

This version has treble tatting in Round 3.

14. Paola Bevilacqua - designed Round 3 and converted her model into an ice drop!
Watch her short video showing work in progress -https://drive.google.com/file/d/1iXWwtyBrJp2o5Sb2GUMh8FO5MAKk-QFt/view

15. Silvana Buonvino - designed Round 3 with onion rings!
It has that fractal feel, doesn't it?

16. Stella Marina - designed Round 3 but with the models coming in, she decided to go for a bit more stylish decoration and overlapping chains!


17. Vani Kattoju - designed Round 3 and tatted two models and then went on to design a 4th round in her third model!


Nice dendrites in the fourth round!

18. Wanda Salmans - designed Rounds 3 & 4 and shared her journey, thoughts, and process in her blog post (https://www.wandasknottythoughts.com/2023/06/old-edging-and-a-dal-snowflake/) and also spoke about it in her inaugural YouTube video - https://www.youtube.com/watch?v=SsD-3AkFODQ&feature=youtu.be.
The snowflake looks good even after Round 3.

Such a difference in shades!

19. Dan Grady - started tatting his Round 3 design but the work is still not complete; obviously discarded a long time back.

20. Muskaan - designed Round 3 and shared pics and design journey in the following posts -https://tipsaroundthehome.blogspot.com/2023/05/problem.html 


And as promised, I am sharing the article (I removed the QR codes and added an Author's note) which has the pattern as well. 
Designing with Friends article and pattern PDF - https://drive.google.com/file/d/1peQYjewL79RsmXEpx_-XU1fxlPIYJNvt/view

*******************

AND now for all the patterns you are hopefully waiting for and have kept your shuttles/needles ready-- 

Feel free to join in the challenge by designing your own rounds or choose and tat any of the 25 patterns listed in the doc above. Do send me pics and feedback to be shared with the respective designer or to add you to the 20 designing friends!

 
Notice that you can interlace the first two motifs as you wish. Some designers chose one, some the other although to keep things simple I had shared only the model on the right in my invitation.

Many many many thanks to each and every participant for your wonderful and inspiring work(s) and for sharing it with the tatting community. It is indeed tremendous fun designing with friends!

Monday, 27 March 2023

antics

Pin It now!

 This is again a motif I tatted back in Feb for the #pickmeEndrucks game before my enforced break. After a fortnight at the compy I had picked up my shuttles to tat this center from Endrucks' doily #42.  

E42. It is tatted in one pass using split chains to climb out. I hate how badly the split chains came out - lack of practice I guess. However I enjoyed my little tatting break - it felt so good to have shuttles in hand again.
Worked in Lizbeth size 20.
E42+E39. And my antics never stop. Just wondering how it would look at the center of a different edging (#39)

E42 + original. But my main foray was into this snowflake made by adapting the 8-repeat center into a 6-repeat snowflake. The outer round is my own pattern. This prototype is both a trial and an experimentation. Each repeat is worked a bit differently till I finally arrived at a decision.
I named it Antiks Snowflake playing with 3 words - antique pattern from Endrucks; inclusion of ANKARS motif; and of course my own antics in designing and processing this. 

The pattern is a bit on the advanced side with split chains to climb out and working the layered ANKARS motif with a thrown ring. However the layering was deliberate - I wanted a combination of old (1920) with new (early 1990s). Although strictly speaking, I did not climb out using Endrucks' shadow chains, LOL.

Even without the outermost round, the center makes a beautiful hexagonal motif that can be tiled. 

I had started this in late Feb itself. But continued towards the finish a few days back. Even sent the pattern to Anita for testing. But with a still foggy head, I made a huge error. Instead of 6 repeats, I wrote 8 (from reference to the original E42). Anyways, more about this at another time, with pics. 

So do you like the design?

Monday, 19 December 2022

before and after 3

Pin It now!


 Like I said earlier, this month's game had a wide range of stars and snowflakes patterns and possibilities shared by Krystyna Mura. I would've liked to tat plenty more but doubt I'll have it finished by 22nd when the contest ends. This is the 3rd one I enter in the contest where some have reached close to 30! 
This 8-pointed Star from the Filligree collection is supposed to be worked continuously, starting with the outer round and climbing into the inner one.
This is my Poinsettia version, as the colours might attest.

E12 Filigree Eight-pointed Star by Krystyna Mura (2021) -https://drive.google.com/file/d/1o_qb8Z1CkHq_nOQ-90k_QWpnhrRb0V_d/view

Several factors contributed towards my tatting it differently - in 2 separate rounds, starting from the inner one. I started with a Floating Beads string which remains unattached except at the starting point.

One factor was the confusion over the mock rings. Hence I showed how I'd go about it. Ninetta went about it differently and later tried this method too.
All beads were pre-strung on shuttle #2.

After each SCMR, I make an unflipped half-stitch or hitch. It is invisible yet holds the mock ring in place without any possibility of distorting it's shape. It is something I've done for a very long time now.

It is only when I took pics that I noticed the flipped ring on the right side. 2 beads should've been on the outside.
Tatted in Anchor size 20 with a mix of beads and crystals.
It was easy to add the missing yellow bead while working the outer round. I was supposed to break the extra bead on the inside but didn't get around to it.
Now, here's something different I tried which could've been better (it distorted one of the chains/arms) - In order to complement the green on the tips, I wanted beads on the inner trough as well but these needed to be on the core thread! I really hadn't thought it through (which is not my strong point anyways!).
For one, the tension of the core thread should be extremely well-calibrated. 
2nd, the sequence goes as follows if we want the triangulation --- 
pull down the loop for joining in between the 2 yellow beads, 
move the green crystals along the core thread,
THEN close the join. This positions the 3 crystals as a triangle.
All this is a bit wiggly.
Yet the core thread can still slide freely, hence care must be taken while tensioning the next chain.

I'm happy with my idea and that it was something 'new' I attempted, though the execution leaves much to be desired. 
Again no ends to hide coz I used both to suspend the star with....trying to cut corners ;-D

Sunday, 11 December 2022

before and after 1

Pin It now! Our new game for the month of December is well underway, this time hosted by Ninetta, with patterns by Krystyna Mura and Ninetta Caruso. As admin we have certain privileges such as getting the pattern in advance and being able to tat them before anybody else ;-D. 

This time we converted a simple #tatmeEndrucks game into a contest for those willing to participate. Tat as many as you can and there is a 'cover prize'. Now as admin we are also at a disadvantage since it wouldn't be fair to count a model tatted beforehand in the contest. ;-P I got around it, just for kicks, with a Before and After look to the 2 patterns, working in some extras. Here's the first one ....

Tat Me Snowflake designed by Ninetta Caruso
I was privy to her design process and testing her Pretty Me Coaster version since our August game. https://tipsaroundthehome.blogspot.com/2022/09/aug-roundup-1.html .

At the time the 6-armed version wouldn't lie flat. We discussed a few options.
This is a variation of Endrucks' pattern #3 and the heart derived from it.

Ninetta came up with this clever adaptation by changing the stitch count of the chains around the heart. Notice how the lower one has broader repeats. The new version is kind of narrower.

So this is my BEFORE version. Worked in Red Heart size 20 with bicone crystals in 2 colours and sizes. All pre-strung on shuttle 2. The 2 sizes gives a better tapering effect to each arm.
I had deliberately left extremely tiny picots around the center intending to fill it up later with beads.

E3 Tat Me Snowflake by Ninetta Caruso (2022) -https://drive.google.com/file/d/1ZENvdgxihM0YI3Ar_UxP9lqRwprmFotP/view

And this is the AFTER version (sorry the colours don't show up here). Took me an hour and half to embellish. All sewn in with sewing thread. I like my idea of the bugle beads sticking out creating a kind of very pointed star within.
The large bicone red crystal in the center is surrounded by 6 orange and 12 smaller green bicones.

The same taken in the sun showing the bead colours a bit better.
I liked the personal challenge of adding beads in 'new' ways.

In my next post I will show the 2nd Before and After.

If you wish to join in, you can find the patterns in our Endrucks 1920 Project FB group. Direct links are on the top in the right panel of my blog.

Saturday, 6 November 2021

fooled by the tool

Pin It now!
It is always such a thrill to see my pattern crop up and even more so when it comes in such wonderful versions with impeccable tatting. So which tool did these talented artists use to tat?

I have chosen a very small selection of the many that are gladdening my heart and eyes; these are presented here in chronological order. They are all needle-tatted from my patterns that were presented for the shuttle.

needle-tatted by Gloria Nelson, June 2019

Gloria Nelson's modification of the Paisley Snowflake with graduated picots has brought more character to the flake, and the design and variegate fell in sync! But can you tell it is needle-tatted?

New tatters often ask which tool is better or easier - needle or shuttle. Valid question but no easy or straightforward answers. There are tatters who spent their life using one tool and muscular ailment forced them to change to the other because their love for the craft overpowered their discomfort. On the other hand a tatter may stick with the first tool s/he learned on, for their entire life without any curiousity to try another. Then there are those who deliberately learn tatting with the other tool (&/or hand as Eliz Davis did) in order to become more proficient at teaching and diversify their knowledge.

Ninetta Caruso said it best - hand is the tool

We could take this quite literally, too! Teri Dusenbury used finger tatting a lot. Hey, where's that tool now? And for the truly determined one hand will get the task done as Marilee Rockeley has demonstrated.

needle-tatted by Amarilys Cwb, Sept 2021 
Amarilys Cwb made some mistakes in this first attempt (not that I had noticed any) and worked it a 2nd time below with minor adjustment to picot size on chains.  
needle-tatted by Amarilys Cwb, Sept 2021

Second attempt of the Silver Linings Snowflake by this tatter from Brazil who can work with both needle and shuttle.

For some reason, probably starting with it being a late entrant, the needle has been looked down on as the stepsister in tatting. To date some purists consider only shuttle as the legitimate tool for tatting. 

Why? Look at the numerous patterns Nicola Gooday Bowersox has shared with us for free. I could never identify from only seeing her model that it was needle tatted! Could you tell? 

needle-tatted by Amarilys Cwb, Oct 2021
What about this gorgeous rendition of the Floating Beads earrings?! I had to ask Amarilys whether it was done with a needle or shuttle! Those cute beads really transform my simple pattern with 'boring' pearl beads, into something fun and enticing.

Elena Kozinenko is proficient with all tools be it shuttle, needle, or a cro-tatting hook. Even a netting needle! And unless she points out, one would never guess whether she used a needle or shuttle. I asked her which tool is her favourite and this is what she says - 
'I have absolutely no choice. It all depends on the idea that needs to be implemented and even on the mood!'
Oh, to have that kind of flexibility! She has such a range of patterns and frequently uploads videos that demonstrate a technique using each of the 3 tools - https://fairylace.kozinenko.com/three-types-of-tatting/

needle-tatted by Lella Loops, Nov 2021
Lella Loops is yet another needle-tatter who has such finesse with her needle! Besides this recent Frost Flower Snowflake, she has tatted a few more of my patterns earlier and wowed me every time!


Returning to Gloria Nelson, she needs no introduction! She frequently shares her expertise with her Facebook group for needle tatters. If we follow and apply her tips, the usual 'visual identifiers' of needle tatting will disappear! 
But here are a few of her must-read articles, shared in her Sparkling Light Creation Studio page https://m.facebook.com/story.php?story_fbid=1774052256037040&id=724059564369653
  • Needle and Shuttle – What’s the Difference?
  • Can a needle tatter follow shuttle videos and tutorials
  • Patterns - Can a Needle make shuttle patterns
So any tool in the right (or left!) hands, combined with the passion to lace, is ultimately what matters. And the journey's enjoyment for accompaniment...


As an aside .... I have wondered for years how needle tatters feel when shuttle tatters collectors display their collection of shuttles? There is such a Vast range to choose from, with new designs, materials, and decorations coming out frequently. Now a tatting needle can be so boring in that sense, except perhaps for the material used? 
 
At the very least, why can't the needles be colour-coded for size at the eye end? eg these tapestry and chenille needles from Pony - https://tipsaroundthehome.blogspot.com/2018/08/needle-tips.html 
Or can some kind of fortified coloured plastic needles for tatting? 
Can needle-tatters come up with ideas to share with suppliers and manufacturers to make the needles prettier and more of a collectors' item?

I'd like to thank each of the tatters mentioned in this post for all their dedicated and inspiring work. 
I want to stress that they constitute a very thin slice of the talented multitude,
all of who I cannot name or might not even know of. 


All patterns mentioned in the post are free and can be found here - https://tipsaroundthehome.blogspot.com/p/patterns-designs.html

Friday, 22 May 2020

peacock in the snow

Pin It now!

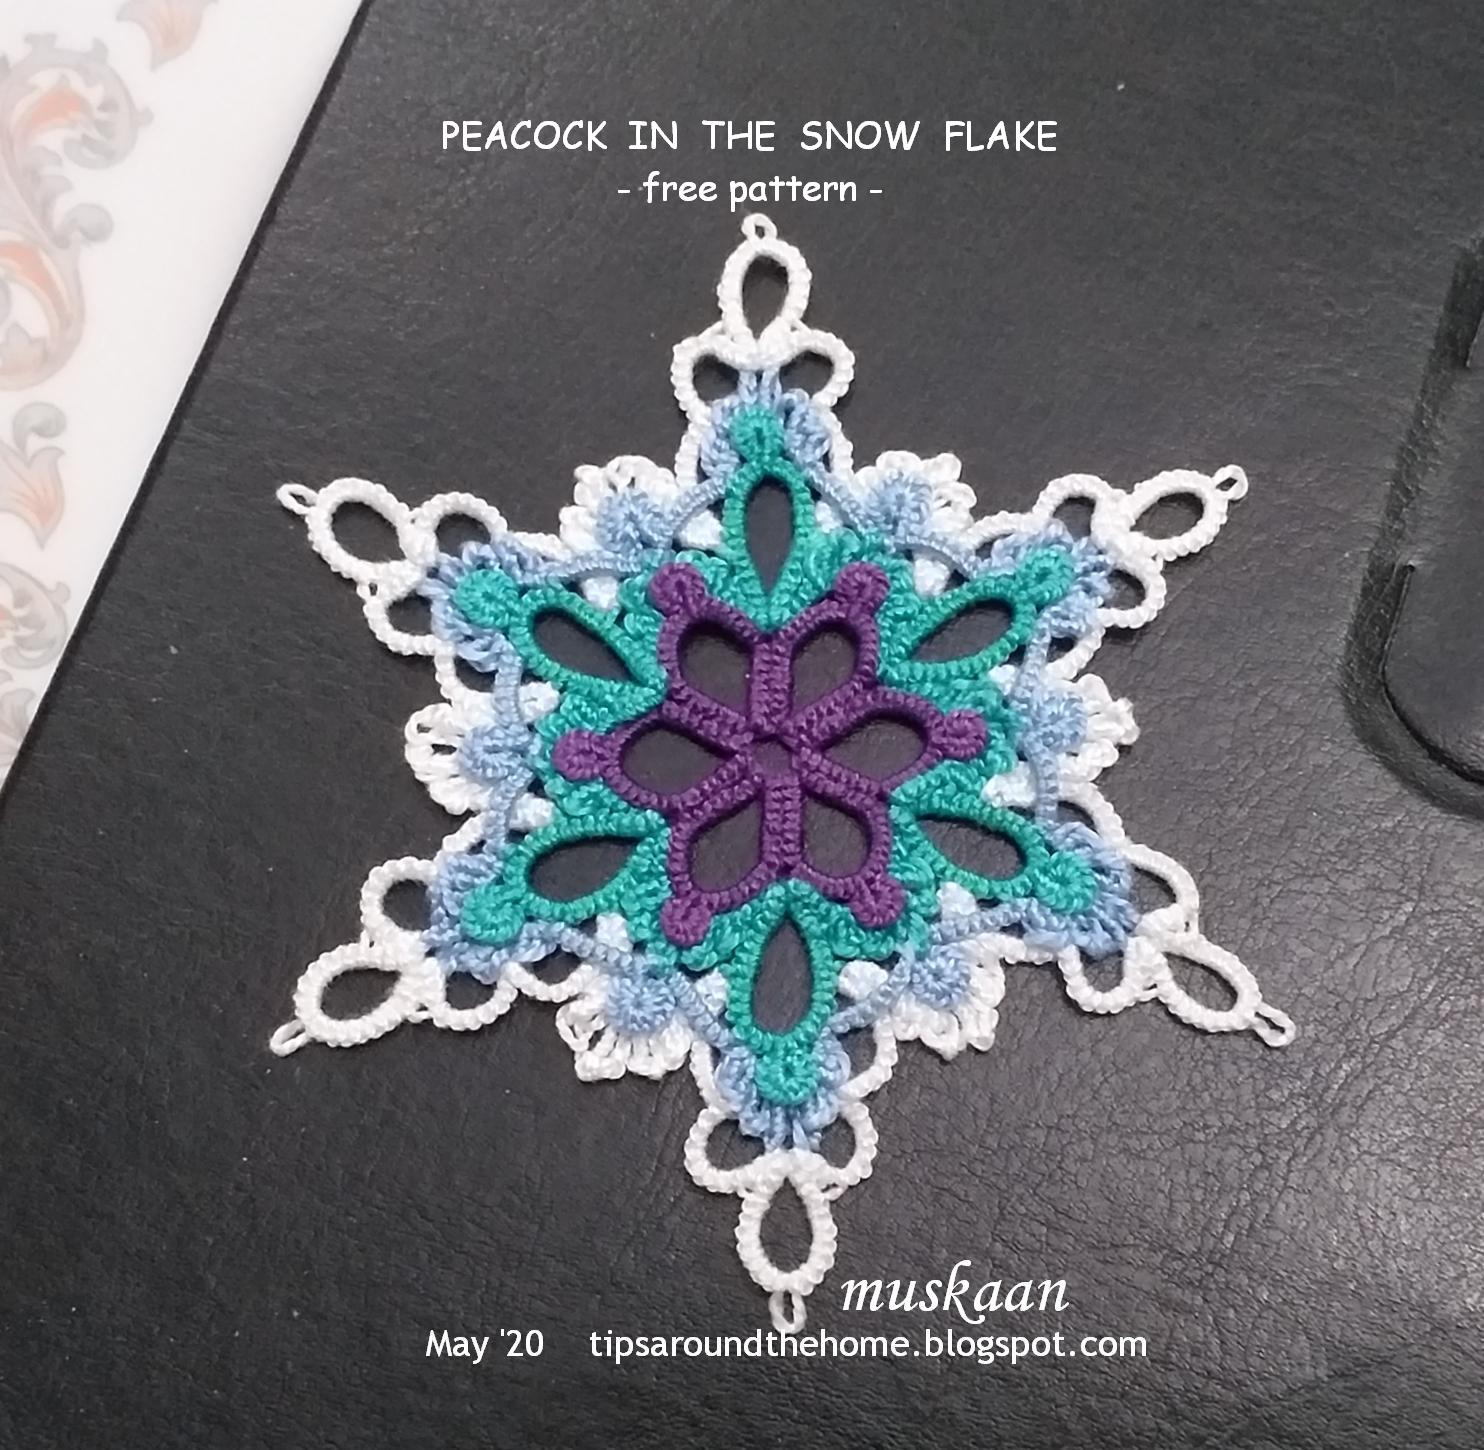
Whoever heard of a tropical bird prancing and showing off it’s plumage in snow? A bird that dances in the rain! It can only happen in lace where creativity knows no geographical bounds.
Yet, I stuck with cool colours for a seamless transition.

2 flakes stacked, creating a lovely effect and design!

Peacock in the Snow flake
Pattern is finally ready and converted to pdf which includes details, along with a close-up pic. Contact me in case of any problem. Hope you enjoy this layered flake. 

The story in pics ....
Round 1
Round 2
Round 3
2 together as motifs for a larger fabric.
Round 4
It measures 10 cms in Anchor Pearl cotton, size 8 (similar to Lizbeth size 20)
An extreme close-up to show details.

2 together as motifs for a larger fabric. Each side is 5 cms.

Hope you enjoy it as much as I did creating and playing with it!

Download pdf here