Showing posts with label bauble tatting. Show all posts

Saturday, 25 April 2026

3D solid tatting

Pin It now!

 Who knew these cute little birds would be the cause to anger some people who then went on to make them an extinct species in their ecosystem! This pertains to only one specific FB group from which many of us have been booted out while others have left voluntarily. We now have a new group started by Vicki Clarke, called 3-D Tatting. All birds wiped out from that one group are now flocking together in this group, LOL, and others as well.

Bluebird in solid tatting
Continuing from my last post about flat solid tatting, see how wonderfully it can be applied to tatted amigurumi models!!! All pics in this post belong to Carolyn Craig who is the experimenter, designer, and tatter. I will quote some of what she shared with me privately with permission to use whatever was needed.

What is Amigurumi - Amigurumi is the Japanese art of crocheting or knitting small, stuffed yarn creatures or objects. The word combines "ami" (meaning knitted or crocheted) and "nuigurumi" (meaning stuffed doll). Amigurumi are typically worked in spiral rounds using basic crochet stitches like single crochet and invisible decrease. They can now add tatting to the list for amigurumi. CRAIG

Solid Tatting by CAROLYN CRAIG - is the same as amigurumi. It is continuous rounds instead of joined rounds in a spiral, but it can also do flat solid tatting which is continuous. 
3-D Lips
After her 2D solid tatting in 2020, Carolyn tried these lips, working them in continuous rounds and stuffing them before sewing them closed
The Lips became the body of the birds. I am a retired art teacher. I have used basic shapes in clay, paper, and other materials to make different objects for class projects. I see how some can be made with the solid tatting, I just have not mastered all the ways it can be used. CRAIG
3-D Mouse Family
"The mouse family in solid tatting with jute... continuous spirally circle of tatting"

3-D Robin
This Robin is worked in yarn. 
You can see how she is experimenting with different threads/yarns as well as sizes to get the desired result.
The collage shows how the body is being worked as a single entity, a continuous round which includes the head in a different colour. Before the body is closed completely, it is stuffed. The tail, wings, beak, eyes are added later.

Below we see the assembly parts of a solid tatted Sparrow. 

3-D Sparrow
"This sparrow was done in 4 ply acrylic yarn with a Moonlit shuttle. The sparrow is continuous solid tatting in a spiral to form body and head. The spine and tail are solid flat tatting in one piece. The wings are regular tatting."

The second image is the parts of sparrow solid tatting in a continuous spiral - body and head, Flat solid tatting which is continuous - spine and tail, and regular tatting - wings with moonlit shuttle in background. 

If you look close at the flat spine and tail, one of the two stitches used to create SOLID TATTING can be seen in the top and bottom row……. CRAIG

TIP: Carolyn uses two types of lock join to achieve her compact 3D solid tatting. For the most part the lock join made through the wasitband of a double stitch which she calls LFW (LJ through front waistband). It is the horizontal bar of a DS when the DS is facing us; the LJ is made within the stitch, between two half-stitches. The 2nd is when the LJ is made through the back waistband - LBW. This is simply like joining between two DS. Since 3D model is tatted all from the front, the LFW is used much more. LBW is used for increases/decreases to shape the model. 

3-D Bluebird
"The blue bird is with size 3 tatting thread (but tail and wings are still in size 3 thread instead of size 10)"
 
A closer look at these beauties!

These are but 3 solid birds designs. Her aviary consists of 7 or 8 different birds and you can see them in her FB timeline or the 3-D Tatting group (besides a few other groups). There are many active preservationists who stepped in to prevent extinction! Carolyn will be sharing her process and experiments in detail in future.
🐦🐦🐦🐦🐦

3D in Tatting - There are numerous ways to tat 3D models with or without stuffing. Some are worked continuously (as in the listing below) while others can include joining motifs, bowl shapes, covering a balloon or ornament, etc.  These could include in no particular order ....

Please note that the above list is by no means exhaustive! Feel free to remind me of any I might've missed.
🐦🐦🐦🐦🐦

I wasn't going to, but this is adorably cheeky to not share! Here's what some veteran masters of tatting are doing in the above FB group .... Anita posted this yesterday and then left the group and told me I could share after several other tatters expressed their desire to copy/paste. 
Please note that this is the vintage edging (recreated by Anita) that inspired my threader holder motif here - https://tipsaroundthehome.blogspot.com/2026/04/literally-out-of-box.html

And now I am told Martha Ess has also posted something similar listing all our greats who inspired her 3D design using block tatting and it reads like a true historical timeline. 

Cheeky but civilised and disciplined and following all rules! 
🐦🐦🐦🐦🐦

Many thanks to Carolyn for allowing me to share her lovely work and details and to ALL others mentioned who allow us to use their ideas and techniques so that we do not have to reinvent the wheel.

Friday, 15 April 2022

tatted ball or bead - a puzzle

Pin It now!

free pattern pdf

 For a creative person, inspiration can strike any where, any time, any how! Keep one's eyes and brain open all the time....

This is what Anita Barry wrote to me on Oct 31st, 2018 -
" 23 years ago my mother, a quilter, gave my young boys a quilted fabric "Amish Puzzle Ball. I looked at yesterday and saw a series of joined rings. I tatted the Amish Puzzle Ball! It's 3-D "
The above pic shows both the sewn and tatted versions. 

This also happened to be her First 3-D pattern! She filled the empty space inside with cotton.
She quickly sent me the pattern - written as well as a hand drawing.
Tatted Amish Puzzle Ball pdfhttps://drive.google.com/file/d/1rOEnNcKfYqdly8QitJiJcUibt-SvYYcF/view
It is made with 2 shuttles, ctm. It consists entirely of equal-sized rings and split rings. 
Using the same concept, the size of the rings can be altered to change the size as desired.
They could well be tatted beads!

The Italian Chiacchierino FB group is holding an event 'Braccialetto Pandorino' or pandora's charms with tatted beads. One example is this pallina or small beaded ball by Ninetta Carusohttps://www.flickr.com/photos/ninettacaruso/8743041975/
There are several variations and beautiful versions are being uploaded enthusiastically, worked in metallic threads, beads, and imagination!
This triggered my memory of Anita's tatted ball or bead. 
I had been so excited, that before the end of the day I had tatted the ball using leftover Anchor size 20.  Before closing the final rings, I inserted a playing marble inside. This was a simple trial tat and I hope to do justice to it some time.
I haven't found my original; only the image from 4 years back. And it led to Anita's pattern and diagram which had slipped my memory.
I surprised her with an Inkscape diagram (I am currently in drawing mode!) and we put together the pdf for all to enjoy.

Click on the blue text to download the single page Tatted Amish Puzzle Ball pattern https://drive.google.com/file/d/1rOEnNcKfYqdly8QitJiJcUibt-SvYYcF/view

Many many thanks, Anita, for always sharing your creativity and fun patterns 

with me and the tatting community. 

Monday, 3 January 2022

feeble firsts

Pin It now!

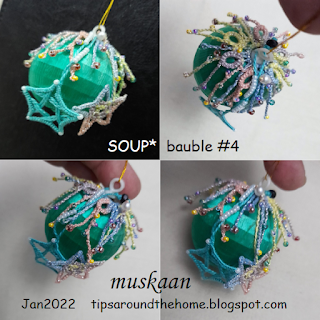
Believe me, I have never done bauble tatting! Oh, every year I think I will embellish at least one bauble, but all for nothing. In December 2021, the admin of the Italian FB group 'Chiacchierino: Filo Amore e Fantasia' held an online event with my MatheMagical Star pattern and several tatters used it to cover their bauble ornaments. All this really inspired me to do one..er 2, er 4.

Due to paucity of time and energy, I settled on using whatever motifs I had on hand - a SOUP (Sewing On/Using Pieces) moment. These 4cm ornaments will soon celebrate their 20th buy-day! At the time we didn't have a lot of options in this city and since the tree was decorated only the 1st 2 years, I am hesitant to buy. Next time I will certainly include more beads and crystals, more flamboyance. Perhaps I Should buy a few good quality and larger sized baubles. This little exercise has got me excited and more confident.

In chronological order - 

Bauble #1 - This edging is draped diagonally and temporarily taped down behind. (don't look behind!). But in Anchor size 20, it is too thick. A daintier edging/insertion would look better. And a tiny motif or 2 on the bare side spaces? 
Interlaced Cumulus pattern - https://tipsaroundthehome.blogspot.com/2020/05/puffy-clouds.html
Bauble #2 - There is no good angle to capture both flakes in a pic. These are in Lizbeth 20 and perhaps the reason I put them together. Spin Away above and ConcentriCity below.
I used a matching blue metallic thread to join the 2 flakes together. It really isn't difficult! Without cutting the thread from the reel, I sewed through the picots, and finally adjusted the tension and positions before snipping, tying, and hiding. Keeping the thread on the reel gave me a lot of leeway with no fear of running short.

Bauble #3 - This is the small version of the MatheMagical Star in size 40 - the only one that ... the others were too large for this bauble. And I kind of liked how the crystals sat like a crown on top.
On the underside is the Folded Fun Star. I hope you can see how I went a bit adventurous and joined the 2 stars.
Bauble #4 - Messy but looks better in real. I was going for an organic look by not tying down each twisted picot. But very difficult to photograph.

I simply sprinkled a few of my snowflakes instead of suspending them - yup lazy. Hubby even offered to put up a string of lights but I hope to be better prepared next time.

It happens Every year! I let the sunny days slip by and when I finally get around to decorating the tree, the sun gives me the slip! So the pic comes out insipid. Oh well, this should be a staunch reminder to start early this year!

I really want to thank all the wonderful versions shared by tatters around the globe - in the event (one tatter inserted it inside a transparent star ornament; and others who used beads in exciting arrangement) as well as ornaments in general - that got my juices running, finally. Feeble firsts, but determined to be better later this year!

All the star and snowflake patterns can be found here -https://docs.google.com/document/d/1r4OmXX_c5LjFebMN2UbSNiYqXYETLmoridK0X1YIQco/view

Sunday, 10 January 2021

wrapped in a star

Pin It now!

 Again, I was blown away at how an imaginative tatter can apply my pattern to something I had not imagined. And this motivates me even more to share all I can. 

Daniela Bogacka wrapped the large MatheMagical Star around a tree ornament/bauble. So simple, yet so effective! And she readily agreed to share it with my readers who are not on facebook or instagram..
 
This pattern was first shared here (along with pdf), in various sizes. And the simple equation/ratio is such that one can increase it to any size one wants! Thus a Huge advantage is that you simply choose the star size according to the size of the marble, bauble, etc. that you want to decorate.

UPDATE: Check out how Vera has inverted the star to cover the bauble here -
 https://veragondolatai.blogspot.com/2021/01/frivolitas-gombre.html! This gives me another idea - how about attaching teardrops at each tip to hold down the arms instead of weaving thread. It would also add some sparkle.

I am taking the liberty of sharing a couple of other renditions that I was tagged in recently. Like I said earlier, wish I could share all that I come across...But if you send me a pic of your model or a link to your blog, I would love to post it in my blog. 

This one is by Donatella Rizzo - the colourway reminds me of a romantic night sky! Add a few sparkly beads or glitter and what an astral sight we have!

Several weeks back Anna Tedesco worked the pattern in metallic threads. Beautiful, isn't it? 

You can find these talented tatters on Facebook and Instagram.

The MatheMagical 'franchise' of patterns continues to amaze me - the simple equation/ratio led to so many patterns - stars, tree, bells, and I'm hoping snowflake, ice drop, and 2D/3D angel in the future. I think the 3D bell needs more work before I start with the angel. And beads for decoration?!

Scroll down to 25 Snowflake Project 2019 for links to all patterns. or check out the Google Docs file. I intend to upload more of the remaining patterns through the year. Hopefully ;-D  

Many thanks to All the lovely tatters who have braved my patterns and return for more 😉 Please keep an eye out for a few more bravehearts in the coming weeks!