Showing posts with label Shuttle Brothers. Show all posts

Saturday, 25 April 2026

3D solid tatting

Pin It now!

 Who knew these cute little birds would be the cause to anger some people who then went on to make them an extinct species in their ecosystem! This pertains to only one specific FB group from which many of us have been booted out while others have left voluntarily. We now have a new group started by Vicki Clarke, called 3-D Tatting. All birds wiped out from that one group are now flocking together in this group, LOL, and others as well.

Bluebird in solid tatting
Continuing from my last post about flat solid tatting, see how wonderfully it can be applied to tatted amigurumi models!!! All pics in this post belong to Carolyn Craig who is the experimenter, designer, and tatter. I will quote some of what she shared with me privately with permission to use whatever was needed.

What is Amigurumi - Amigurumi is the Japanese art of crocheting or knitting small, stuffed yarn creatures or objects. The word combines "ami" (meaning knitted or crocheted) and "nuigurumi" (meaning stuffed doll). Amigurumi are typically worked in spiral rounds using basic crochet stitches like single crochet and invisible decrease. They can now add tatting to the list for amigurumi. CRAIG

Solid Tatting by CAROLYN CRAIG - is the same as amigurumi. It is continuous rounds instead of joined rounds in a spiral, but it can also do flat solid tatting which is continuous. 
3-D Lips
After her 2D solid tatting in 2020, Carolyn tried these lips, working them in continuous rounds and stuffing them before sewing them closed
The Lips became the body of the birds. I am a retired art teacher. I have used basic shapes in clay, paper, and other materials to make different objects for class projects. I see how some can be made with the solid tatting, I just have not mastered all the ways it can be used. CRAIG
3-D Mouse Family
"The mouse family in solid tatting with jute... continuous spirally circle of tatting"

3-D Robin
This Robin is worked in yarn. 
You can see how she is experimenting with different threads/yarns as well as sizes to get the desired result.
The collage shows how the body is being worked as a single entity, a continuous round which includes the head in a different colour. Before the body is closed completely, it is stuffed. The tail, wings, beak, eyes are added later.

Below we see the assembly parts of a solid tatted Sparrow. 

3-D Sparrow
"This sparrow was done in 4 ply acrylic yarn with a Moonlit shuttle. The sparrow is continuous solid tatting in a spiral to form body and head. The spine and tail are solid flat tatting in one piece. The wings are regular tatting."

The second image is the parts of sparrow solid tatting in a continuous spiral - body and head, Flat solid tatting which is continuous - spine and tail, and regular tatting - wings with moonlit shuttle in background. 

If you look close at the flat spine and tail, one of the two stitches used to create SOLID TATTING can be seen in the top and bottom row……. CRAIG

TIP: Carolyn uses two types of lock join to achieve her compact 3D solid tatting. For the most part the lock join made through the wasitband of a double stitch which she calls LFW (LJ through front waistband). It is the horizontal bar of a DS when the DS is facing us; the LJ is made within the stitch, between two half-stitches. The 2nd is when the LJ is made through the back waistband - LBW. This is simply like joining between two DS. Since 3D model is tatted all from the front, the LFW is used much more. LBW is used for increases/decreases to shape the model. 

3-D Bluebird
"The blue bird is with size 3 tatting thread (but tail and wings are still in size 3 thread instead of size 10)"
 
A closer look at these beauties!

These are but 3 solid birds designs. Her aviary consists of 7 or 8 different birds and you can see them in her FB timeline or the 3-D Tatting group (besides a few other groups). There are many active preservationists who stepped in to prevent extinction! Carolyn will be sharing her process and experiments in detail in future.
🐦🐦🐦🐦🐦

3D in Tatting - There are numerous ways to tat 3D models with or without stuffing. Some are worked continuously (as in the listing below) while others can include joining motifs, bowl shapes, covering a balloon or ornament, etc.  These could include in no particular order ....

Please note that the above list is by no means exhaustive! Feel free to remind me of any I might've missed.
🐦🐦🐦🐦🐦

I wasn't going to, but this is adorably cheeky to not share! Here's what some veteran masters of tatting are doing in the above FB group .... Anita posted this yesterday and then left the group and told me I could share after several other tatters expressed their desire to copy/paste. 
Please note that this is the vintage edging (recreated by Anita) that inspired my threader holder motif here - https://tipsaroundthehome.blogspot.com/2026/04/literally-out-of-box.html

And now I am told Martha Ess has also posted something similar listing all our greats who inspired her 3D design using block tatting and it reads like a true historical timeline. 

Cheeky but civilised and disciplined and following all rules! 
🐦🐦🐦🐦🐦

Many thanks to Carolyn for allowing me to share her lovely work and details and to ALL others mentioned who allow us to use their ideas and techniques so that we do not have to reinvent the wheel.

Sunday, 8 September 2024

pleasure and pondering

Pin It now!

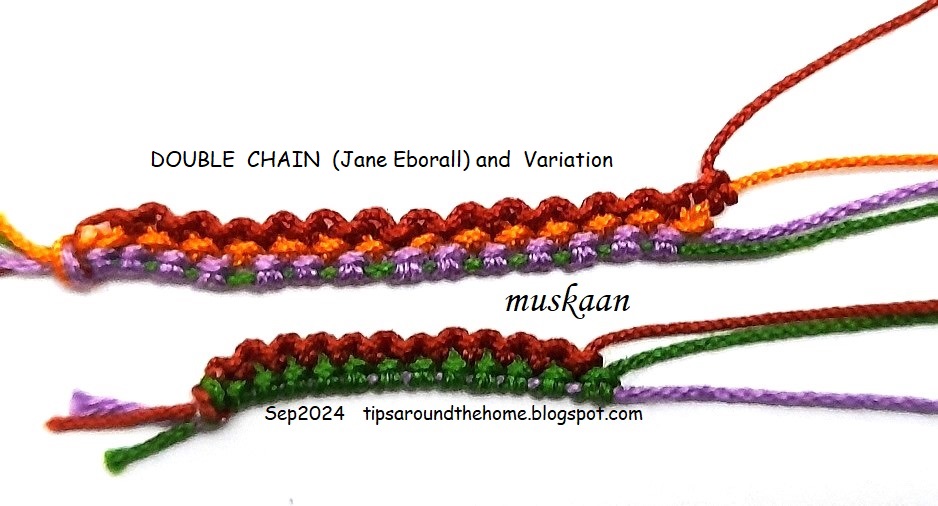
 Something old something new with loads of fun and possibilities. I found it listed in Karen Cabrera's Lesson #151 - Double Chain. At the end of the video is a model which was clearly a Jane Eborall pattern. However when I went to Jane's Techniques page, there is no listing for it. Finally I traced down the pattern where she used it - Butterfly with Fancy Edging (2001 rewritten 2011).

And I went a couple steps further, playing with some effects. This is merely a small window into possibilities which can be explored in future. In the above pic you see the three samplers and details follow ...
Abbreviations used: SH = shuttle ; SS = switch shuttles ; DS = double stitch ; RORS = reverse order reverse stitch (as in RODS) ; DC = double chain

Original Double Chain using 3 threads. All double stitches, but you switch shuttles and core threads. 

Step1: SH1 is the active shuttle (lavender) and SH2 thread forms stitches (green). Make 1DS and SS.
Step2: SH2 is the active shuttle (green) and SH3 thread forms stitches (brown). Make 1DS and SS.
Repeat steps 1 & 2 to desired length.
If using 3 colours, the first one remains hidden.

What if we added another thread? 'Double Chain' or should we say 'Triple Chain' using 4 threads. At least 3 shuttles are required while the 4th one can be a ball.
The process is exactly the same, except for the additional thread requiring an extra step.

Despite how they've been photographed, these are not straight chains. When I tried to straighten the DC variation, the SH1 core thread (green in this case) became visible between the stitches. Does make for a nice effect, though. The more threads you add, the wider this colour blip.
TIP: Yes, they can become straight if we use a thicker thread in SH1. 

NOTE The SH1 core thread remains free throughout but the other core threads become 'locked in'. Hence care should be taken to snug each stitch properly.

Since multiple shuttles are used, we can throw off rings and make chains! Imagine the free-styling one can do! And of course we can add beads in so many wonderful arrangements and colours!
In the above sample, I allowed the chain to curve.
TIP: This double chain can be used to make mock rings.


When I showed Ninetta a sneak peek, she sent me a link to Edda Guastalla's site where she has used and diagrammed the double chain technique.

Its not just fun and games. There are several lessons and some startling observations that emerged from this project! Let me share these with you and would love to read your insights and feedback.

Comparing Double Chain with other Techniques

1. Is it Pearl Tatting? 
To the extent that there are extra/auxiliary/additional threads, it can be considered pearl tatting. However there are differences - 
    the chain is not straight ;
    stitches face the same way, not opposite ; and
    the stitches are in two separate tiers, not on a common core thread.

2. Is it a Cord or cord tatting?
No, because the chains have a tendency to curve just like regular chains. The reason is obvious because the broader stitch caps are all lined up on one side. See TIP above.

3. Is it similar to Daisy picot?
Yes, it can be considered a chain version of the daisy picot technique. This is something I tried on the last few stitches and it worked.
    the stitches are two-tiered ;
    the double chain can be worked with only one shuttle (SH2 in the tatted sample) and 2 balls, making DS with one thread and RORS with the other thread. The reverse order reverse stitch (RORS) has to be coaxed gently to face outward (like the DS) and then repeat. 
    
4. Is it Helix Tatting?
Now here's the clincher! It is actually a precursor to helix tatting! It is the 2D version with exactly the same technique/process.
If we add more threads and join it back to the first thread, voila, we have a hollow tube as in helix tatting! 

5. Is it ATT?
Alternate Thread Tatting is a term coined by Shuttle Brothers where two threads (and often two shuttles) are used to make rings and chains incorporating an array of effects involving picots, thrown rings, colour switches, etc. 
    stitches all face outwards and they use the daisy picot a lot ;
    but the ATT chain is made with only two threads, not three (or more) ; 
    While rings (ATR) are made with two threads, the double chain (with 3 threads) can only be joined back as a mock ring. 
I think we can clearly rule out ATT.    

6. Is it TATHing?
Tatting with Alternate Thread is a term coined by Judith Connors where two shuttles are used alternately on the core thread as in pearl tatting, Maltese rings, daisy picot. 
    In this double chain, the stitches or picots (if any) face the same way, but it can be tatted using the daisy picot method. 
    However, the chain does need three threads to be made.
So where do we stand on this point? I'm not sure. Does TATHing include effects where the stitches face the same way? 

This is it for now. Hope to hear your thoughts and input.

UPDATE (10th Sep 2024): In Priscilla Tatting Book No.3, a 'double chain' is illustrated (Diag. 7) for the Tatted Centerpiece made with Needle and Shuttle pattern. Here some stems are worked as normal chains with a shuttle and then a second tier of stitches are inserted between the stitches below using a needle. Thank you, Mary A!

Many thanks to all mentioned. Its always a productive day when we learn something!

Sunday, 8 May 2016

trials and jubilation !

Pin It now!
Trials can cause tribulation; perseverance & practice can turn those trials into jubilation !

Ikuta’s Picots

When Georgia posted the May 2nd class material online, I immediately wanted to try out the 3rd Method of Ikuta’s Picots. These are from Mituko Ikuta’s book “Shuttle Lace - Tatting & Bead Tatting 3” published in the late 1990s. 

The 3rd method has a beautiful overlapping & interweaving of picots along the edge. But it took me over an hour of trials & tribulations to figure out how ! That called for some jubilation.

We have a review class this Monday, based on the pictorial I prepared. As usual, once I start, it is difficult to stop – from the main road, diverging on to alternate paths & by-lanes. Well, one needn’t make the entire journey; or one can make it at one’s convenience. The main pictorial is just about 3 pages, rest includes the by-lanes. 
Here is my pdf link for free download : Ikuta Picot Method 3 Pictorial .
Ninetta shared a couple of pics and a beautiful butterfly using these picots (also included in the pdf). She will be sharing the pattern soon – keep an eye out :-)


  1. The pictorial is based on this pattern here :  This is a 6-ring pattern without any joins.
Pattern for each ring : 3 – 3 – 3 – 3 – 3 – 3 – 3 – 3 – 3 – 3 – 3
(blue numbers indicate ring segments & SH1 picots; pink indicate chain segments & SH2 picots)
  1. Requires 2 shuttles.
  2. Effect is more visible when using 2 colours.
  3. The tatting is broken into alternating segments as seen in the 2 colours that show up :
ring segment worked with main shuttle as a normal ring , and
chain segment worked with 2 shuttles as a chain.
  1. The chain segment can be worked either as normal Double Stitches ( Sec I of pdf ) or by using Reverse Stitch (unflipped/wrapped stitches) but ensuring that the caps align with the previous segment ( Sec II p4).
  2. One can start (& end) by hiding the tails in different ways, as depicted in Sec III pages 5 & 6.
  3. The need for 2 shuttles arises because 2nd shuttle has to be posted through the ring in order to achieve interwoven picots. These picots can be interwoven either Under-Over or Over-Under based on their visible overlap. The former are covered in Sec I & II ; the latter are explained in Sec IV on p7.
  4. In the pattern, the 2nd shuttle thread can perform the function of joining adjacent rings (as seen between rings in lead pic) or become a decorative bridging ‘faux picot’ (Sec IV p7). This faux picot has been used to excellent advantage by Ninetta as antennae for the butterfly !
  5. An easier spin-off is the “Layered” picot (Sec V p8). By keeping 2nd shuttle to the left at all times, the picots formed do not intertwine, but do overlap in a layered effect. One does not need to post the shuttle in this formation.
  6. I haven’t tried it at the time of making the pdf,  but these picots can be tatted on a chain too. Scroll down for details & sampler. 

There has been a suggestion that the process of tatting Ikuta Picots on a ring is the same as the Shuttle Brothers’ Alternate Thread Ring (ATR or AT Ring) from their 2003 book - "Tatting Alternate Threads". 
I later came across Gina Butler’s video inspired by the ATR technique. The way she wraps the threads is same/similar to what I figured out. 
As for the picots themselves, from my internet search, Ikuta’s picots overlap differently from those of the ATR. I do not have any of the books, so cannot make a conclusive statement. Hopefully it will be discussed in class.
I tend to agree with Nina Libin that if one knows the AT tatting method, then making these picots is a simple variation of effect rather than technique. I have no idea of the process Ikuta herself followed.
Some stunning effects can be created by stringing along beads !!! Nina shared pics of her Beanile pieces using ATR technique and probably Ikuta’s picots. 

The same interwoven picots effect is possible on a chain. Here is my quick trial. It first reminded me of Jane Eborall's Double Chain ( sampler #27 here ) because 3 threads are needed. However, they are different. More about that in some future post.

Here's how to get the method 3 effect on a chain :
Use at least 1 shuttle which acts as the core thread (red in pic) throughout. 2 more auxiliary threads are required (yellow & green in pic) which make the alternating double stitch segments. Leave sufficient length of picot space before starting each segment. Both types of overlap (under-over & over-under) are possible by bringing the necessary auxiliary thread forward. It is very quick to tat up & can make pretty braids, outlines, decorative elements, etc. 

UPDATE : For beginners,  it may be a good idea to start with the picots on a chain ; then try the 'layered' effect, before moving on to the actual Method 3 with interwoven picots.

ΩΩΩΩΩΩΩΩΩΩΩΩ
This is also very interesting, especially if one adds beads to the long picots, or one interweaves them. It is something I had tried a couple of years back, inspired by an image, not knowing the name of the picot then. . These are simple long picots that are joined to the adjacent ring. We know them as Double Picots when they are joined back to the same ring. 
My practice piece of 2014 varies from the original image in the use of 2 colours to highlight the overlap between picots. Hmmm, I now notice that these have an over-under overlap ! 

The lesson shared goes a few steps further : There are 4 long picots in each ring, 2 of which are joined to the adjacent ring, creating a lot of overlap. I had to abort it, though, because the stated picot length of 1" (or 2" when open) turned out to be too short for the effect to show, as can be seen in the collage. 

Secondly, the instructions said to join picots 1 & 3 of each ring to 1st & 3rd positions in next ring. However the tatted model shows that picot 1 of ring 1 is joined to 2nd picot position of ring 2; and 3rd of ring 1 to 4th of ring 2. 
I chose to follow the image, but added an interweave. But another trial with at least a 1.5 to 2" long picots will show the effects.
Can't celebrate yet; just happy to be on the right track ....


ΩΩΩΩΩΩΩΩΩΩΩΩ

And before I leave the topic of picots, here's a reminder of my Double Daisy Flowers - love the picot effect here !

ΩΩΩΩΩΩΩΩΩΩΩΩ


I’m sure you remember my tribulation during Ninetta’s small Curled Rings trials here. I needed to redeem myself as well as gain confidence that indeed I have understood it. Hence here is another sampler I tatted that includes 3 versions of her Bracelet Capriccio. Her videos were a great help ! All her videos can be accessed on Georgia Seitz's Online Advanced Class Videos 
Still not there, but I do think I can celebrate a bit ... the tatting went very quickly this time, with minor mistakes.


ΩΩΩΩΩΩΩΩΩΩΩΩ

And the latest from this amazing designer : Mediterranean Tatting Diet ! A tat-along bookmark !! I had time to tat only one strawberry in size 40 thread. The calyx is in shaded silk thread, doubled up.


ΩΩΩΩΩΩΩΩΩΩΩΩ

Many thanks to all the wonderful tatters named in this post !
happy tatting :-)

Related Posts :  Daisy Picot flowers