Showing posts with label daisy picot. Show all posts

Sunday, 8 September 2024

pleasure and pondering

Pin It now!

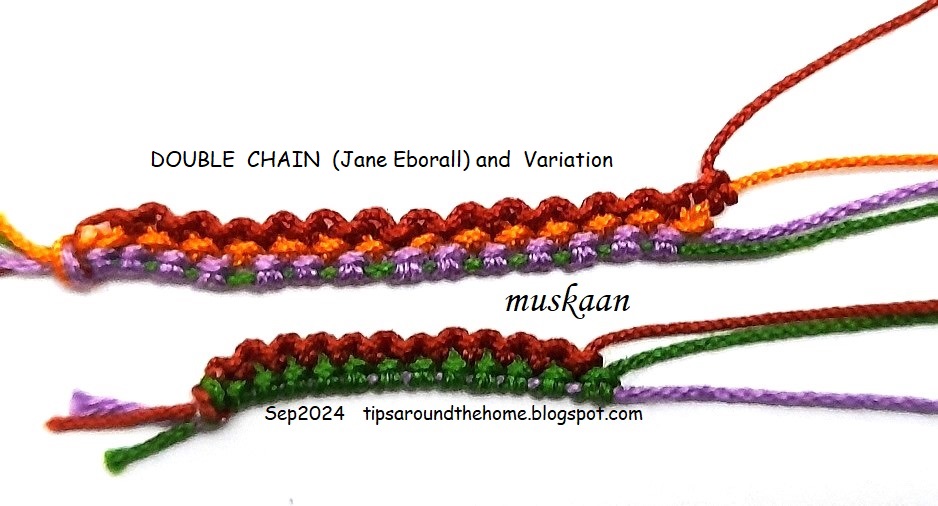
 Something old something new with loads of fun and possibilities. I found it listed in Karen Cabrera's Lesson #151 - Double Chain. At the end of the video is a model which was clearly a Jane Eborall pattern. However when I went to Jane's Techniques page, there is no listing for it. Finally I traced down the pattern where she used it - Butterfly with Fancy Edging (2001 rewritten 2011).

And I went a couple steps further, playing with some effects. This is merely a small window into possibilities which can be explored in future. In the above pic you see the three samplers and details follow ...
Abbreviations used: SH = shuttle ; SS = switch shuttles ; DS = double stitch ; RORS = reverse order reverse stitch (as in RODS) ; DC = double chain

Original Double Chain using 3 threads. All double stitches, but you switch shuttles and core threads. 

Step1: SH1 is the active shuttle (lavender) and SH2 thread forms stitches (green). Make 1DS and SS.
Step2: SH2 is the active shuttle (green) and SH3 thread forms stitches (brown). Make 1DS and SS.
Repeat steps 1 & 2 to desired length.
If using 3 colours, the first one remains hidden.

What if we added another thread? 'Double Chain' or should we say 'Triple Chain' using 4 threads. At least 3 shuttles are required while the 4th one can be a ball.
The process is exactly the same, except for the additional thread requiring an extra step.

Despite how they've been photographed, these are not straight chains. When I tried to straighten the DC variation, the SH1 core thread (green in this case) became visible between the stitches. Does make for a nice effect, though. The more threads you add, the wider this colour blip.
TIP: Yes, they can become straight if we use a thicker thread in SH1. 

NOTE The SH1 core thread remains free throughout but the other core threads become 'locked in'. Hence care should be taken to snug each stitch properly.

Since multiple shuttles are used, we can throw off rings and make chains! Imagine the free-styling one can do! And of course we can add beads in so many wonderful arrangements and colours!
In the above sample, I allowed the chain to curve.
TIP: This double chain can be used to make mock rings.


When I showed Ninetta a sneak peek, she sent me a link to Edda Guastalla's site where she has used and diagrammed the double chain technique.

Its not just fun and games. There are several lessons and some startling observations that emerged from this project! Let me share these with you and would love to read your insights and feedback.

Comparing Double Chain with other Techniques

1. Is it Pearl Tatting? 
To the extent that there are extra/auxiliary/additional threads, it can be considered pearl tatting. However there are differences - 
    the chain is not straight ;
    stitches face the same way, not opposite ; and
    the stitches are in two separate tiers, not on a common core thread.

2. Is it a Cord or cord tatting?
No, because the chains have a tendency to curve just like regular chains. The reason is obvious because the broader stitch caps are all lined up on one side. See TIP above.

3. Is it similar to Daisy picot?
Yes, it can be considered a chain version of the daisy picot technique. This is something I tried on the last few stitches and it worked.
    the stitches are two-tiered ;
    the double chain can be worked with only one shuttle (SH2 in the tatted sample) and 2 balls, making DS with one thread and RORS with the other thread. The reverse order reverse stitch (RORS) has to be coaxed gently to face outward (like the DS) and then repeat. 
    
4. Is it Helix Tatting?
Now here's the clincher! It is actually a precursor to helix tatting! It is the 2D version with exactly the same technique/process.
If we add more threads and join it back to the first thread, voila, we have a hollow tube as in helix tatting! 

5. Is it ATT?
Alternate Thread Tatting is a term coined by Shuttle Brothers where two threads (and often two shuttles) are used to make rings and chains incorporating an array of effects involving picots, thrown rings, colour switches, etc. 
    stitches all face outwards and they use the daisy picot a lot ;
    but the ATT chain is made with only two threads, not three (or more) ; 
    While rings (ATR) are made with two threads, the double chain (with 3 threads) can only be joined back as a mock ring. 
I think we can clearly rule out ATT.    

6. Is it TATHing?
Tatting with Alternate Thread is a term coined by Judith Connors where two shuttles are used alternately on the core thread as in pearl tatting, Maltese rings, daisy picot. 
    In this double chain, the stitches or picots (if any) face the same way, but it can be tatted using the daisy picot method. 
    However, the chain does need three threads to be made.
So where do we stand on this point? I'm not sure. Does TATHing include effects where the stitches face the same way? 

This is it for now. Hope to hear your thoughts and input.

UPDATE (10th Sep 2024): In Priscilla Tatting Book No.3, a 'double chain' is illustrated (Diag. 7) for the Tatted Centerpiece made with Needle and Shuttle pattern. Here some stems are worked as normal chains with a shuttle and then a second tier of stitches are inserted between the stitches below using a needle. Thank you, Mary A!

Many thanks to all mentioned. Its always a productive day when we learn something!

Saturday, 9 March 2024

exciting firsts

Pin It now!

 Editing the book, 'The Six T's of Shuttle Tatting' is creating opportunities to try out exciting techniques and effects, long in my to-try list. And learning a Lot in the process. The author, Net Best, had created one glossary for her book, and another more comprehensive glossary for her group and possibly for later digitization. We decided to combine both to make the glossary as updated as possible, which was her main goal. This also means we have to add missing sampler images. I have reached out to several of my tatting friends to contribute some specific pics (with due credit), and so far everybody has graciously given permission. 

While I won't be sharing all pics, here are a few - I love the way these turned out!  

1. BROOMSTICK PICOT - 

I followed Karen Cabrera's Lesson #104 - https://youtu.be/yp5W6ZrDF9I

And since the long adjoining picots need to be joined to create the effect, I allowed my shuttles to create this little motif - like a flame within a flame. 
Is it interesting enough for the pattern to be shared?
Although I'm sure there are tons of tatters who will simply count the stitches and tat it up, and we all know who will get the credit ... yes, Pinterest, LOL. 
I used really thick thread (probably a size 3) so that the effect shows up in thumbnail pics.


2. DANCING PICOTS -
I followed Karen Cabrera's Lesson #107 - https://www.youtube.com/watch?v=DX7Ig978Xg4
This is a variation of the Daisy Picot and requires 2 shuttles.
I encapsulated the 2nd shuttle thread within the first half-stitch at the start and the last half-stitch at the end. (Judith Connors' tip).
While I tatted over the shuttle 1 tail at the start, I didn't do it for the Sh2 thread, although it can be done.
NOTE: All picots here (bare threads) can be both decorative and functional (for joining).


3. INTERWOVEN  SPLIT  RING  BRAID / CORD -
This 2-shuttle variation is attributed to Wally Sosa, and I referred to Jane McLellan's Choker patternhttps://janemactats.blogspot.com/2012/04/choker-pattern.html  [In the right panel on her blog page, you can find the pdf links for the lovely beaded versions of choker as well as a necklace].
All split rings are 8/8. This time I used Anchor size 20.
It comprises a red foundation cord tatted to desired length. Then the teal cord is worked, weaving the red cord alternately over and under through the open ring before it is closed. 
It is such a lovely piece! However, I have no idea how to use it. It is a bit short for a friendship bracelet coz I ran out of thread and don't wish to add more. 
Any ideas how I could use it?


I hope you enjoyed seeing and reading this, and will try to use these techniques in future tatting. And adding beads for even more variations. I certainly hope to incorporate my new learnings some day. For the present, I am busy tatting more samplers and working on the book, to the exclusion of all else. If I don't concentrate on it it will never get done. Our target is to finish it before year end.

And there are more to share ....

Tuesday, 20 June 2017

tell the world it's not easy!

Pin It now!
daisy picot star and tatting notes

From now on we tell the world it's not easy. This delightful article was recently shared on Craftree.
It Is true – we generally spend longer than we care on our projects. I usually do share my mistakes and all, but don’t like to make it a sob-story.
This time, though, I stand by the title (no kidding, no fibbing, no embellishing) – this star did not come easy and I spent way too much time.

Daisy Picot Star
Jon Yusoff

I was inspired by Jane's star project to pick this up, and the fear that I'd forgotten how to make a daisy picot. And like her, I joined leaves which should've remained floating ! Too far into it to un-tat. Cut off and started afresh.
I’ve done the daisy picot before. It’s pretty easy once we know how to hold and how to wrap stitches. But rarely used, hence easy to forget. This time I referred to Jon’s own pictorial – excellent directions !

A stroke of luck from Utah made me realise that I the daisy picot stitches are wrapped in what we termed Twist Work in Reverse Stitch (TwW rs) !!!

Clearly I like to make my tatting life difficult! I've gotten addicted to directional (fs/bs) tatting. This star tested me to the limits. Not only did I have to refresh my daisy picot skill, but now I needed to tat them backside as well!
AND join to adjoining trefoil daisy picot backside ! Managed somehow, with lots of retro-tatting. But what's a project without some challenge, right?! And I was adamant. Fortunately I was working with size 20 threads.

My Notes :
  • In the discarded attempt, I started with the inner daisy picot trefoils frontside. The work progressed in counterclockwise direction, and joining to adjacent daisy picot was easy.
  • In 2nd attempt, with inner trefoils being worked backside, and work progressing in clockwise direction, joining became difficult – it seemed like I was using “picot join to the right” methods. But it could just be some messing around with up and down picots.  
  • To eliminate the space between chains at base of daisy picot, I had to pull real tight, not always successfully. Should’ve had an anchoring vsp !
  • I slipped the yellow thread through the last half stitch of ring before closing in the hopes of keeping the 2 threads as close as possible. I think size of base ring (& thread size?) also has a role to play.
  • For the leaves, I did not use SLT. Easy to make the ‘8’ leaves without any SLT if the side chains face in opposite directions.
  • The arms need careful attention for some unfathomable reason. Perhaps some design-induced mind games coz I faced similar problems with Marilee’s snowflake!


Back to the aforementioned article – delightful read and I agree as a crafter. But she misses one point – not every crafter can fib and market oneself. That in itself is a skill that needs to be acquired :-D

Many thanks to Jon for sharing her pattern and tutorial

easy or difficult, it’s happy tatting time always !

Wednesday, 3 August 2016

hits and misses

Pin It now!

Early last year I had bought variegated thread online, and though the colours were gorgeous & thread good to tat with, it turned out to be thicker than even size 10 – probably a size 7 or 3? Nevertheless, I was impatient to tat with it, having used only one of the 5 variegation thus far. Both coasters were tatted in 2015 & some parts of the post may appear dated due to my subsequent learning. I have given away all my circular coasters (tatted up until July 2016), so I don’t have exact measurements or photos after blocking.


Marilee Rockley 
Started : 15 Feb 2015
Challenges come in many forms, when/where least expected !

I was so happy when Marilee posted & shared her latest Melt Into Spring Snowflake pattern here. Daisy Picot was on my to-learn list. So the snowflake came at just the right time. Also, since it is a 6-point pattern, it could work well with the Chicken Wing Coaster I had recently made. So off I went & printed it out.

Materials : Bliss (India) variegated thread (no colourway, dye details or size mentioned). Probably a size 7 or 3.
South Maid Mercer Cotton (USA). Art. D-54, White. Size 10.
2 shuttles
Techniques : directional tatting, daisy picot, thrown rings (Josephine knots/rings)
Now, one would expect all the challenge & difficulty to lie in the daisy picot round. But that went off quite nicely ! What with her instructions & pics, as well Riet Surtel’s technique posted by Jane Eborall here, it was a very smooth & enjoyable round. No mistakes, no unpicking & retatting. Perhaps working with a large thread helps when doing a new technique.
The 2nd round is simply rings & chains ….beginner level. Yet, I kept making mistakes in stitchcount, joins, horrible thread sensation, you name it ! Finally, very frustrated with all the unknotting & retatting, I snipped it off. Glad Jane had gifted us these scissors ;-)


Started the 2nd round afresh the next morning & it was a breeze. But I learned something else about my own tatting….
The pattern indicates that the 2nd round is worked counterclockwise. Hence the chains are tatted on the front/right side, but the rings after RW, on the reverse/back side.
I found that my shuttle movement is such that the already tatted trefoils interfered with the shuttle, coming in it’s way. That’s when I realized that perhaps I tatted more easily, more smoothly if it is clockwise ?
So, when I started again, I went round clockwise, with FS/BS tatting & it Did work ! Must keep this in mind for future.
I anchored the JRs, by adding picots on either side & decreasing the stitchcount to compensate.  
Marilee kindly permitted me to make any changes I wanted, but I am deeply unsatisfied & ashamed with what I did in Round 3. That was the reason I hesitated to post it for so long….
I loved the curves of the outer chains, but wanted the trefoils at the tips to be smaller or different. All I came up with was to make daisy picots like a corona/outline around the central ring.
Someday I will tat this again, in smaller thread. 


Anne Bruvold
tatted on 20th July 2015
Spot the Odd One out !!!

My notes reveal that I had taken a hiatus from tatting last year as well, for a week. I think I was sewing during that time. Anyways, this simple but lovely doily was my ticket to get back into tatting mode. It was quite a rage on Craftree at the time, where I first came across the pattern.

Materials : BlissIndia.  Variegated thread (no colourway, dye details or size mentioned). Probably a size 7 or 3.
South Maid Mercer CottonUSA . Art. D-54, Color 430, Cream. Size 10.
2 shuttles.
Techniques : directional tatting, thrown rings (trefoils)
 
Started with this colour placement, but switched to the other because of thread size mismatch & also it seemed like the central flower effect was being lost.
This is one of those easy, almost generic, triangle motifs that can be used to create large fabric when joined in different ways. 
Very quick tat, joining individual motifs as one goes.
One realization about working with variegated threads in directional (fs/bs) tatting dawned. I had started the 1st motif with normally tatted inner rings, & RODS for the chains & trefoils. Since this latter was a larger chunk of working, in next motif I switched to RODS for the inner rings & normal sequence for outer ecru part. This reversed the colourway (from clockwise to counterclockwise)!!!
Can you spot the odd one out ?

Again, many thanks to both designers, and my apologies to Marilee. 
Hope I can do a better job next time.

happy tatting :-)

Friday, 3 June 2016

Part 3 snaking it's way through

Pin It now!
...... continued from Part 2
Starting the last leg of our picot tat-along, with a treat.


Method 3 picots of Mituko Ikuta (from her book "Shuttle Lace - Tatting & Bead Tatting 3", is the effect that, to me, distinguishes it from all others. I haven’t come across this intertwined overlap so far. The picots are not just layered and overlapping, but also snake in & out through each other. This effect is more visible when the picots are spaced apart. (Please read discussion at end)

We have made them on a chain in Part 1 - Sections III & IV
We will now try that effect on rings.

We start and work exactly like the layered picots in Part 2. However, there is one extra step involved : POSTING THE SHUTTLE THROUGH THE RING. Hence TWO shuttles become necessary here. That’s all there is to it.


OVERLAPPING PICOTS ON RINGS
(inspired by Mituko Ikuta)
PART 3 of tat-along exercise


To refresh memory, the pic below shows how to wrap & position the threads. (it is fine to drop the ring loop while working on the chain, & pick the loop again) .
In my first pictorial pdf I have used the terms ring segment for the blue stitches since these are made on the ring loop; and chain segment for the yellow stitches since these are made on the chain thread.

And this combo pic below shows the parts that the text will refer to …


VI. Over-Under Overlapping Picots on a Ring

Each overlapping picot on the ring interweaves with adjoining picot. It lies over the previous picot but under the next picot.
Load 2 shuttles and Start ring for each section with blue thread (SH1) and make 3DS.

Make 3DS on the ring loop with the blue SH1. 

Post SH2 back to frontPass yellow SH2 through the ring loop from back to front , but …
... keep yellow thread Between ring loop and blue SH1 thread.
Thus we have SH1 thread in front, followed behind by SH2 thread, and the ring loop right at the back.

Leave picot space and tat yellow chain of 3DS (with SH1 as core thread). (notice that the ring loop is not active in this step & remains at the back)

Let yellow SH2 remain to the left.  Leave picot space and tat 3DS (blue) on ring loop. 

Post yellow SH2 back to front again, as in Pic 29 ; leave picot space & tat 3DS yellow chain.
Continue to make alternating segments for required pattern, posting shuttle back to front before each chain segment, and close ring.
Yes, that's all there is to it !

The Treat !
Are you confident ? Then here's a treat. Try out Ninetta’s Butterfly pattern which uses over-under overlap.

I tatted this in embroidery thread - 3 strands 0325 and size 40 Anchor 0185. 
It measures less than 1 inch
Please refer to Decorative Alternatives in this pictorial for hiding tails when starting and ending (Sec III) ; continuing with the next ring (pics 21-22 on p4) ; and for the faux picot (Sec IV). These are on pages 5-7.  


Now that we know that the chain shuttle (SH2) needs to be posted, I encourage you to try the alternate effect of under-over picots without reading Section VII. Only remember to do the opposite : post the shuttle from front to back, in order to get under-over overlapping picots. 


VII. Under-Over Overlapping Picots on a Ring

Each overlapping picot on the ring interweaves with adjoining picot. It lies under the previous picot but over the next picot. 
(This was covered in Sec I of pictorial pdf )

Start ring with blue SH1 and make 3DS (blue). Then leave picot space & make 3DS yellow chain with SH2 using SH1 as core thread . At present both shuttle threads are in front of the ring loop.


Post SH2 from front to back through the ring loop.
Notice the position of threads – blue SH1 thread is in front, the ring loop is in the middle & SH2 thread is behind.
Compare with pic 30.
Leave picot space & tat 3DS (blue) on ring loop.
Leave picot space & tat 3DS (yellow) on SH1 core.
Remember what to do next ?
Post SH2 from front to back as in pic 36/37. In above pic, the shuttle has been posted & threads re-positioned. SH1 is all set to tat 3DS in ring loop...

Continue to make alternating coloured segments for required patterns, posting shuttle front to back before each chain segment, and close ring.


This completes the tutorial. But so much fun can be had by trying out 
variations of the picots  ...
different picot sizes ;
spaced by a single double stitch or more ;
in single or different colours ;
with addition of beads ;
interspersed with normal picots - within or between ; etc.
These picots, besides being decorative, also provide two (or more) joining points if required in next round, with slight Celtic effect !


DISCUSSION
sources of confusion

the name


The name Ikuta’s Picots has confused many, and also been challenged.
Method 1 is what we commonly know as Double Picots ;
Method 2 is a variation of the Double Picot where the very long Double Picots are joined to adjacent rings, creating a criss-crossing Celtic effect ;
Method 3 is a variation of the pearl tatting picots described by Mlle Riego’s, where instead of simple layered overlapping (as in Riego’s Raised Tatting Book, and covered in Part 2 of tat-along), there is also an interweaving between adjacent picots.
The reason why Georgia Seitz chose this name, in her own words
“I used the name Ikuta out of respect from Mrs. Mituko Ikuta from whose book I learned the method and it was to honor her memory that I taught the class in Spokane . Ok so no disrespect to anyone, this was just my way of indicating the type of picot.”

She has now decided to discontinue the name, and hence in this post I have used only Overlapping Picots. The term gives some idea of the effect created. I will be updating previous posts, too. But changing the notations on the pics will require a major overhaul, so I will have to let that be.


the Daisy Picot
Another source of confusion was the Daisy Picot . Now that you have successfully completed the exercise, what do you think ? Is it similar to or the same as the Daisy Picot ? 
Section II of the Pictorial pdf also shows how to use direct tatting for the chain segments in ring.

Here's a collage showing the main steps of making a Daisy Picot, and a couple of variations.
For easy comparison, the thread/shuttles remain the same – SH1 is blue thread, SH2 has yellow thread.

and to add some more confusion .....
the Dizzy Picot
Now consider Mark Myers’ Dizzy Picot. And Sherry Pence’s variation of the Dizzy Picot.
How similar or different is it from the overlapping picots discussed in this Part 3 ? The effect, the construction ?
This is your homework :-)


I have a few more interesting picot effects to share (some already shared on Craftree), but that will have to wait. I’m kind of tired with all these picots snaking in & out of my blog, aren’t you ?
So it’s tata to the current tat-along 


Happy tatting with a :-)

Related Posts : Tat-along Part 1, and Part 2 


Sunday, 3 January 2016

Tatting Effects & patterns

Pin It now!

Mixed Effects

I usually like to post when there is something substantial or complete to offer.  This time I'm making an exception coz I don't know how soon I'll be able to prepare proper posts ...
These are a few effects I came up with over the last few months. Haven’t had much time or patience to develop or refine them . I also wanted to share something ‘new’ (I hope) at the start of the new year.
So, here's a sneak peek at some of the effects I have in the works (some my own, some borrowed) ... these are still in experimental stage & some kinks to be worked out … but they are pretty simple .

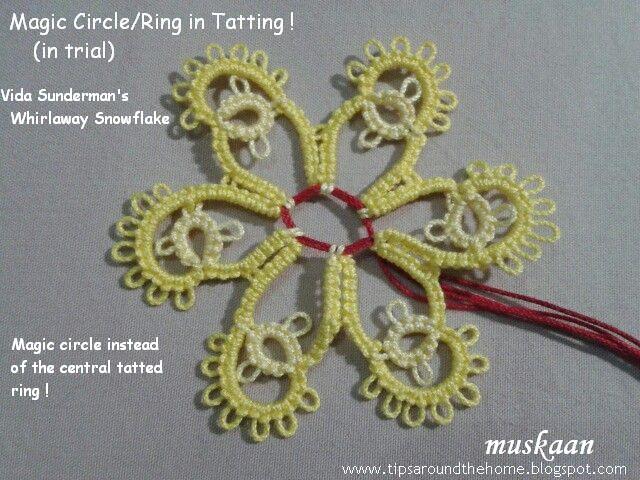
1. MAGIC  CIRCLE /RING
Crochet & knitting have a magic circle/ring, ...so why not tatting ? Should we be left behind ? Nnnnnoooooooo!
All one needs is a loop with a slip knot OR a simple length of scrap thread (if one wants decorative, use different colour, or a ribbon, etc.) . Skip the central ring in the pattern. Begin tatting the pattern & when it says to join in center or to a central ring, join instead to this loop – a normal picot join. That’s it ! Take care not to pull the loop thread through when tensioning the join. In end, tighten the slip knot & hide tails.
This was back in October but it took a while to think of wider application & usefulness. I believe it has potential for designers to estimate round size, or how many repeats can fit in a certain diameter, ... as well as for tatters faced with certain situations – such as not having the right sized finding/doodad/button ; to cover tree ornaments (baubles) easily (slip on/over & tighten !); estimate girth of suncatcher, etc….. Join many individual motifs to the magic string to make a bunting or a necklace!
The magic circle can't even be seen if pulled tight. But if one wants it to show, That's possible too.
**************

2. RINGS  ENRAPT / WRAPPED RINGS
A wrapped-around effect for rings, worked with only 2 shuttles normally.
The wrapping itself is Very easy & can be applied to any single shuttle ring (Not split rings, though) with or without picots.
Start ring. Make 1st half stitch But before tensioning it, pass SH2 through, along the core ((just as we do when hiding tail within)). The continue tatting normally. Before closing ring, pass SH2 through the ring, wrapping around it. Close ring normally & continue.
The wraps can be made on picoted rings too (topmost ring in above pic). If one wants the wrap Within a picot, one will need to position SH2 before starting the picot.
This effect can be a bit fiddly at times since the wrap does not slide easily over the double stitch & may have to be nudged into position.
Secondly, if one chooses to place colours in a certain way, there is a tendency for the wrapped thread to be pulled tight accidentally (unless one uses a shoelace trick). So this is a ‘flaw’ I need to fix with a few experiments. I have a few advanced effects in mind for this … let’s see.
Also tried the blanket stitch for fun :-) I like the look in the 2nd pic, where the picots make a nice angle & also anchor the wraps. It is fine to decorate a single ring but I wouldn’t recommend it for multiple rings – it is very difficult to obtain tension, being a topstitch.

UPDATE : This basic wrap was applied to bare thread / mignonette in order to use 2 colours in same round and add some bulk : http://tipsaroundthehome.blogspot.com/2016/02/identity-crisis.html

************** 

3. OVERLAPPING SPLIT RINGS
aka
FAUX CELTIC TATTING
Simple split rings (SR) ! 3 in a series, joined back at base of 1st SR.
Gives a ‘free swinging’ middle (top) ring. This has potential for 3D tatting, where one or more rings can be joined to picots on topmost ring, thus providing an enclosed cylindrical or barrel shape (something like the layered rings here but where the lower rings/petals are vertical too !). Tatted Bugle beads ?!!!  Or 3D flowers of course. 
If the stitches on the 2nd half of each split ring are increased, one gets this overlap in center. Imagine if one were to use 2 thread sizes – 20 for 1st half of SRs that form a peripheral outline ; & size 40 for 2nd half of SRs that give a clear overlap. Experiment with more number of rings to see what kind of overlap one gets. Look Ma, no Celtic shuttles ! 
**************

with a ‘double twist’
(This is not my original idea, hence post titled “Mixed” effects).
There are 3 tatted pin links here (excuse my shabbiness – first attempts) :
2. Using 2 colours,  and chain reduced to 18ds
3. Doubled up chain . One can add a vsp to chain & join before starting 2nd ring.

4. Further Ideas : use 2 thread sizes - thicker rings & thinner chains. Make a separate ring or use a metal ring. Wrap the cotter pin chain all around the ring/large chain, covering it completely.  Something like enraptured ring – this is something I really want to try out – it would look so nice as the center of a flower or around a cabochon, pearl, etc. !
**************

Ending with a quick & easy pattern using daisy picots to welcome the new year ….
DOUBLE  DAISY  FLOWERS

Very quick to tat & use up scraps of thread. Daisy Picot technique.
2 shuttles.
Pattern :
(Form ring loop with SH1)
Sh1 : 1ds, p, 1ds
Sh2 : long picot, 1ds
Repeat from
for 6 'petals'.
Close ring. T & C !
These flowers are going to be sewn to an embroidered neckline, hence I left the tail ends long, to be sewn through the fabric later.
Notice the difference between front (top & bottom pics) and back (above pic) of flower ? 
Which do you prefer ? 
**************
That’s it for this post. Still left with a lot of experimentation & trials & ideas to work on … hope some of the above inspire or generate even more & much better ideas


happy tatting :-)

Motifs #16-20 / III for 25 Motif Challenge