...... continued from Part 2

 In my first pictorial pdf I
have used the terms ring segment for the blue stitches since these are made on
the ring loop; and chain segment for the yellow stitches since these are made
on the chain thread.
In my first pictorial pdf I
have used the terms ring segment for the blue stitches since these are made on
the ring loop; and chain segment for the yellow stitches since these are made
on the chain thread.

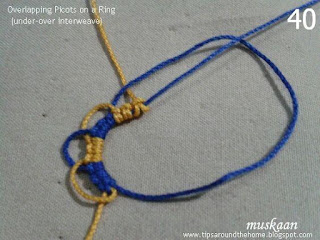
Each overlapping picot on the ring interweaves with adjoining picot. It lies over the previous picot but under the next picot.


 Post SH2 back to front : Pass yellow
SH2 through the ring loop from back to front , but …
Post SH2 back to front : Pass yellow
SH2 through the ring loop from back to front , but …


 Continue to
make alternating segments for required pattern, posting shuttle back to
front before each chain segment, and close ring.
Continue to
make alternating segments for required pattern, posting shuttle back to
front before each chain segment, and close ring.


 Post SH2 from front to back through the ring loop.



This completes the tutorial. But so much fun can be had by trying out

and to add some more confusion .....
Starting
the last leg of our picot tat-along, with a treat.

Method 3 picots of Mituko Ikuta (from her book "Shuttle Lace - Tatting &
Bead Tatting 3", is the effect that, to me, distinguishes it from all
others. I haven’t come across this intertwined overlap so far. The picots are
not just layered and overlapping, but also snake in & out through each
other. This effect is more visible when the picots are spaced apart. (Please
read discussion at end)
We have
made them on a chain in Part
1 - Sections III & IV.
We will now
try that effect on rings.
We start
and work exactly like the layered
picots in Part 2. However, there is one extra step involved : POSTING THE SHUTTLE THROUGH THE RING. Hence TWO shuttles become necessary here. That’s
all there is to it.
OVERLAPPING PICOTS ON RINGS
(inspired by Mituko Ikuta)
PART 3 of tat-along exercise
To refresh
memory, the pic below shows how to wrap & position the threads. (it is fine
to drop the ring loop while working on the chain, & pick the loop again) .

And this combo
pic below shows the parts that the text will refer to …

VI. Over-Under Overlapping Picots on a Ring
Each overlapping picot on the ring interweaves with adjoining picot. It lies over the previous picot but under the next picot.

Load 2 shuttles and Start ring
for each section with blue thread (SH1) and make 3DS.

Make 3DS on
the ring loop with the blue SH1.


... keep
yellow thread Between ring loop and blue SH1 thread.
Thus we
have SH1 thread in front, followed behind by SH2 thread, and the ring loop
right at the back.

Leave picot
space and tat yellow chain of 3DS (with SH1 as core thread). (notice that the ring
loop is not active in this step & remains at the back)

Let yellow
SH2 remain to the left. Leave picot space and tat 3DS (blue) on ring
loop.

Post yellow
SH2 back to front again, as in Pic 29 ; leave picot space & tat 3DS yellow
chain.

Yes, that's
all there is to it !
The Treat !
Are you
confident ? Then here's a treat. Try out Ninetta’s
Butterfly pattern which uses over-under overlap.

I tatted this in embroidery thread - 3 strands 0325 and size 40 Anchor 0185.
It measures less than 1 inch
Please refer to Decorative Alternatives in this pictorial for hiding tails when starting and ending (Sec III) ; continuing with the next ring (pics 21-22 on p4) ; and for the faux picot (Sec IV). These are on pages 5-7.
Now that we
know that the chain shuttle (SH2) needs to be posted, I encourage you to try
the alternate effect of under-over picots without reading Section VII. Only
remember to do the opposite : post the shuttle from front to back, in
order to get under-over overlapping picots.
VII. Under-Over Overlapping Picots on a Ring
Each
overlapping picot on the ring interweaves with adjoining picot. It lies under the
previous picot but over the next picot.
(This was
covered in Sec
I of pictorial pdf )

Start ring
with blue SH1 and make 3DS (blue). Then leave picot space & make 3DS yellow
chain with SH2 using SH1 as core thread . At present both shuttle threads are
in front of the ring loop.


Notice the
position of threads – blue SH1 thread is in front, the ring loop is in the
middle & SH2 thread is behind.
Compare
with pic 30.

Leave picot
space & tat 3DS (blue) on ring loop.

Leave picot
space & tat 3DS (yellow) on SH1 core.
Remember
what to do next ?

Post SH2
from front to back as in pic 36/37. In above pic, the shuttle has been posted
& threads re-positioned. SH1 is all set to tat 3DS in ring loop...

Continue to
make alternating coloured segments for required patterns, posting shuttle front
to back before each chain segment, and close ring.
This completes the tutorial. But so much fun can be had by trying out
variations
of the picots ...
different
picot sizes ;
spaced by a
single double stitch or more ;
in single
or different colours ;
with
addition of beads ;
interspersed
with normal picots - within or between ; etc.
These
picots, besides being decorative, also provide two (or more) joining points if
required in next round, with slight Celtic effect !
DISCUSSION
sources of confusion
the name
The name
Ikuta’s Picots has confused many, and also been challenged.
Method 1 is what we
commonly know as Double Picots ;
Method 2 is a variation of the Double Picot
where the very long Double Picots are joined to adjacent rings, creating a
criss-crossing Celtic effect ;
Method 3 is a variation of the pearl tatting picots
described by Mlle Riego’s, where instead of simple layered overlapping (as in
Riego’s Raised Tatting Book, and covered in Part 2 of tat-along), there is also an interweaving between adjacent picots.
The reason
why Georgia Seitz chose this name, in her own words :
“I used the
name Ikuta out of respect from Mrs. Mituko Ikuta from whose book I learned the
method and it was to honor her memory that I taught the class in Spokane
She has now
decided to discontinue the name, and hence in this post I have used only
Overlapping Picots. The term gives some idea of the effect created. I will be
updating previous posts, too. But changing the notations on the pics will
require a major overhaul, so I will have to let that be.
the Daisy Picot
Another
source of confusion was the Daisy Picot . Now that you have successfully
completed the exercise, what do you think ? Is it similar to or the same as the Daisy Picot ?
Section II of the Pictorial pdf also shows how to use direct tatting for the chain
segments in ring.
Here's a
collage showing the main steps of making a Daisy Picot, and a couple of
variations.
For easy comparison, the thread/shuttles remain the same – SH1 is blue thread, SH2 has yellow thread.
For easy comparison, the thread/shuttles remain the same – SH1 is blue thread, SH2 has yellow thread.

and to add some more confusion .....
the
Dizzy Picot
Now
consider Mark Myers’ Dizzy Picot. And Sherry Pence’s variation of the Dizzy Picot.
How similar
or different is it from the overlapping picots discussed in this Part 3 ? The effect, the construction ?
This is
your homework :-)
I have a
few more interesting picot effects to share (some already shared on Craftree),
but that will have to wait. I’m kind of tired with all these picots snaking in
& out of my blog, aren’t you ?
So it’s
tata to the current tat-along
Happy tatting with a :-)


